
OneDrive is one of the best cloud storage platforms from Microsoft that allows you to store data. It lets you free up your device storage and also keep a backup.
But what is the fun of using OneDrive if you don’t know how to utilize it correctly and wisely?
To help you out on the same& we are presenting you with a resolute dossier on how to upload photos to OneDrive. This will provide you with trusted and tested techniques to upload photos using minimum steps.
Table of Contents
Part 1: How to Upload Photos to OneDrive on the Computer?
With increasing storage space on computers& more and more people are heading towards cloud storage platforms. This helps them with emptying storage space on computers. As a result& they can easily add more data.
Onedrive is one of those platforms that provide the ability to do so. You can easily upload photos& videos& movies& music& doc sheets& etc. Now how to automatically upload photos to OneDrive is a tricky process for many& simplified here.
1.1 Traditional Way
When it comes to uploading photos to OneDrive from a PC& you can easily do so in a traditional way. Microsoft provides you with an OneDrive app that you can use to upload photos automatically. Let us see how.
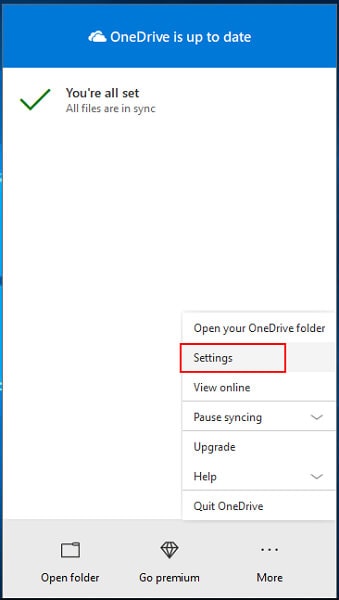
Step 1: Open Microsoft OneDrive from your PC and click on the taskbar icon. Then click on “More”. You will easily find it in the form of three vertical dots. Once clicked& a popup window will appear. Go with “Settings”.
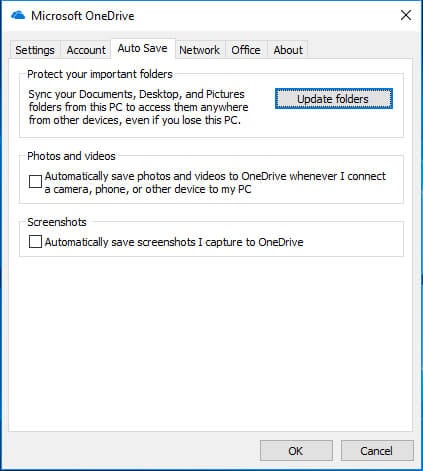
Step 2: Select the “AutoSave” tab from the given options followed by a click on the “Update folder” option as shown in the image.
Now here you will be provided with two options.
- “Automatically save photos and videos to OneDrive whenever I connect a camera& a phone& or other devices to my PC”: This will let you Auto-sync photos in external devices.
- “Automatically save screenshots I capture to OneDrive”: This will let you auto back up your screenshots.
You can select any of the given options as per your demand at the time.
Step 3: Once you are done selecting& click on “Pictures” as shown in the image below.
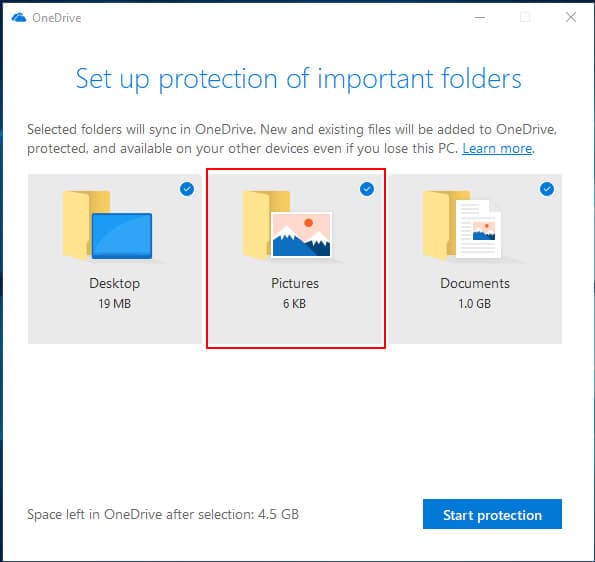
At last& click on “Start protection”. This will automatically upload photos to OneDrive from your PC.
1.2 Easy Way
Although the traditional way is a good way to go with it& it doesn’t provide that freedom you are looking for.
So what is the solution?
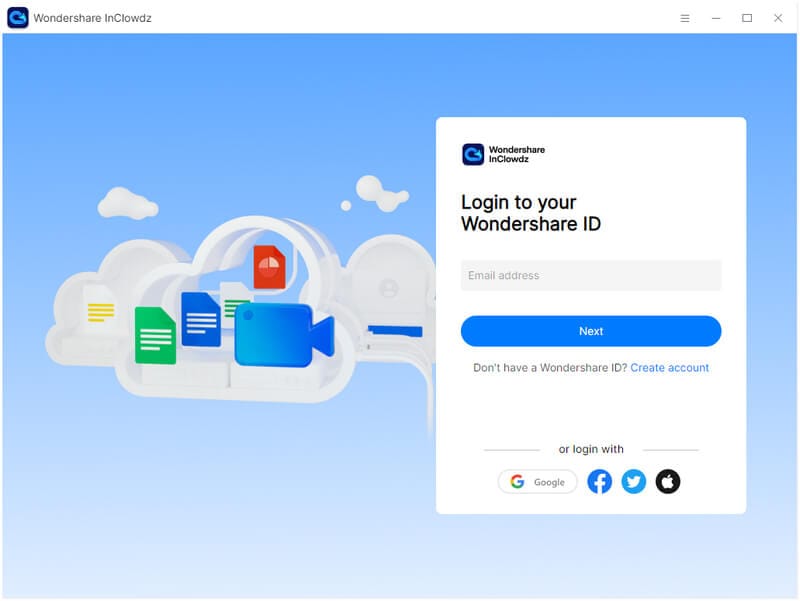
You can do this in a more free and easy way through Wondershare InClowdz. Wondershare InClowdz is a dedicated cloud migration and management solution that lets you migrate data from one cloud to another. It lets you sync data between different clouds. Most of all& it lets you manage all clouds in one place. This means you can easily upload photos to OneDrive. Let us see how?
Migrate, Sync, Manage Clouds Files in One Place
- • Migrate cloud files such as photos, music, documents from one drive to another, like Dropbox to Google Drive.
- • Backup your music, photos, videos in one could drive to another to keep files safe.
- • Manage all cloud drives such as Google Drive, Dropbox, OneDrive, box, and Amazon S3 in one place.
- • Sync clouds files such as music, photos, videos, etc., from one cloud drive to another.
Step 1: Open InClowdz on your computer and log in using your ID and password. If you are a new user& you have to create an account.
Step 2: Once you are signed in& you have to add a cloud account. For this& click on “Management” from the right menu and click to add clouds. You can add several cloud storage accounts. You will be asked for authorization. Click on “Authorize Now” to proceed further.
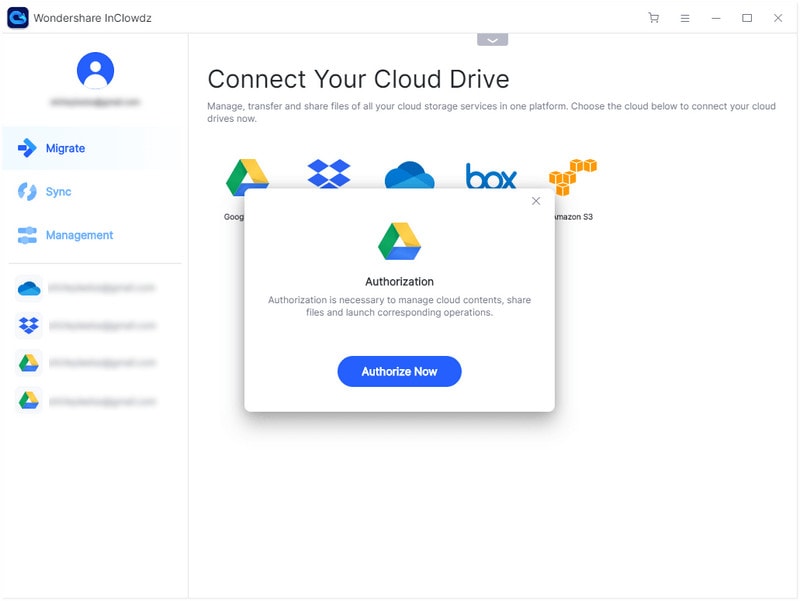
Once the cloud storage account is added& you will see the list along with the information.
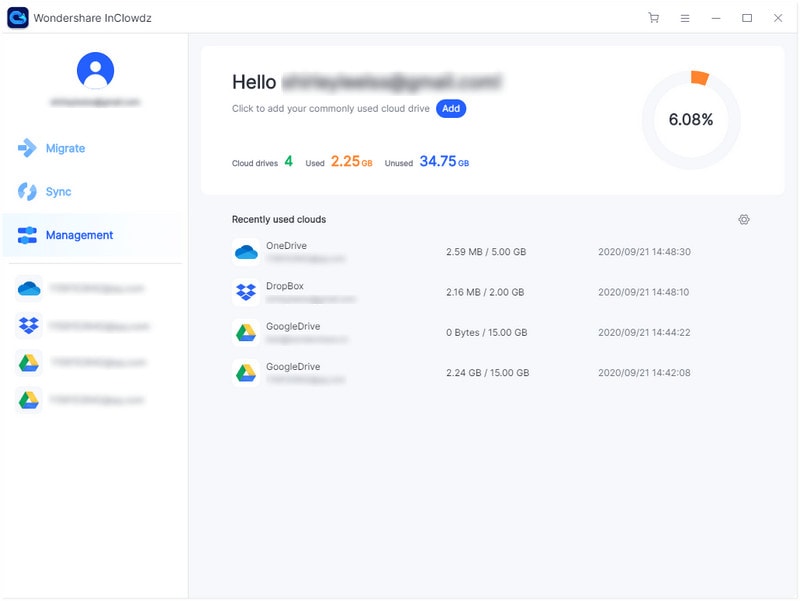
Step 3: Now select OneDrive& and you will be provided with the available files. You can right-click to download& migrate& delete& rename. You can also refresh& download& upload& or even create a new folder from the upper right menu. Here you have to click on upload and proceed further. This will save photos to OneDrive. This also makes your task of uploading photos much easier.
Note: The speed of uploading Photos will solely depend upon the photos' size and your internet speed. The lesser the size and the more the internet speed means faster the uploading.
Part 2: How to Upload Photos to OneDrive on iPhone?
You can easily install the OneDrive app on your iPhone. It will let you automatically back up all of your photos and videos. You can also control what to upload and what not. You can use your mobile data or Wi-Fi for the same.
Let us see how?
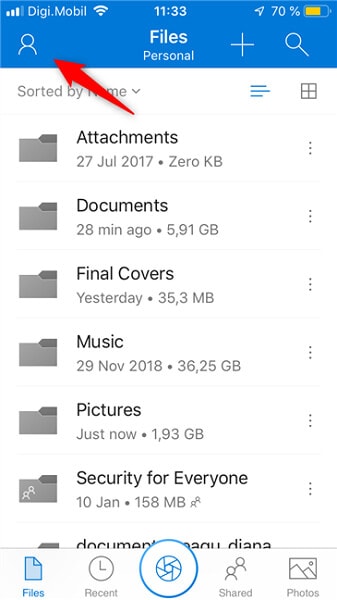
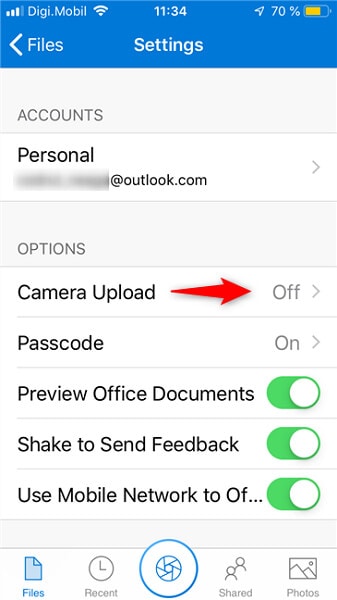
Step 1: Open the OneDrive app on your iPhone. Once opened& tap on the “Me” icon. It is there on the top-left corner.
Step 2: Now click on the “Settings”
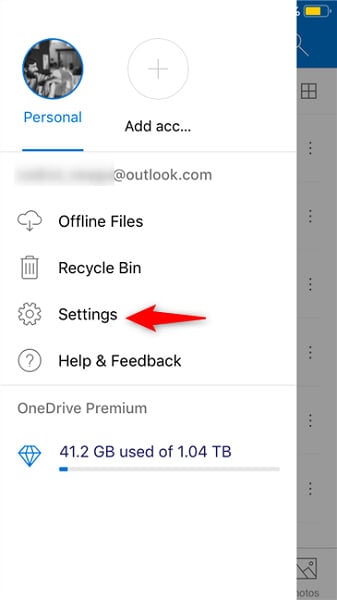
Now in the settings& you will find Camera Upload settings& which will be off by default& as shown.
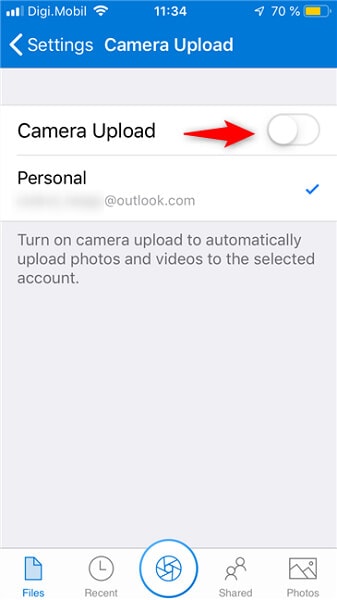
Step 3: On switching “Camera Upload” ON the OneDrive app will open a new screen named “Camera Upload”. Now you have to turn ON the switch. Enabling this switch means you are authorizing the automatic upload of your photos.
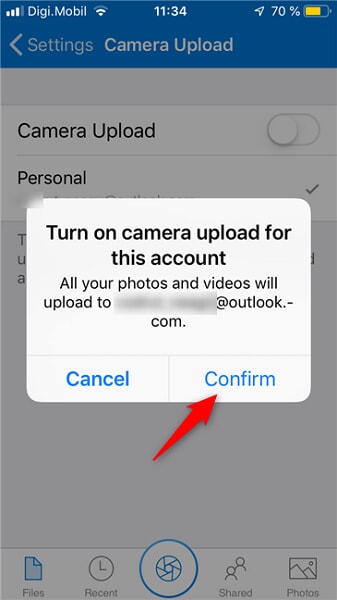
On turning this switch ON& you will be asked for confirmation. This will be “Turn on camera upload for this account”. You have to tap on “Confirm”.
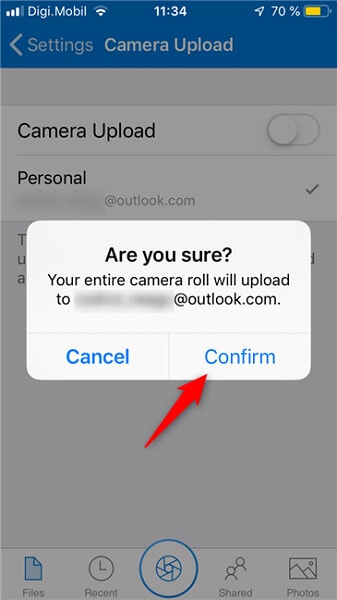
This is not the end. You will be asked to confirm once more. You will get the message “Are you sure” This is for security purposes. You can proceed further by tapping on “Confirm”.
Once you are done with this& your photos will start backing up on OneDrive.
Note: The first time you do this will take time. This is so because all the photos make up a large uploading size. Moreover& the time taken will also depend upon the speed of the internet. So it is good to use a high-speed connection for uploading.
You have to face this situation once the next time you take a photo& and it will be automatically uploaded to OneDrive.
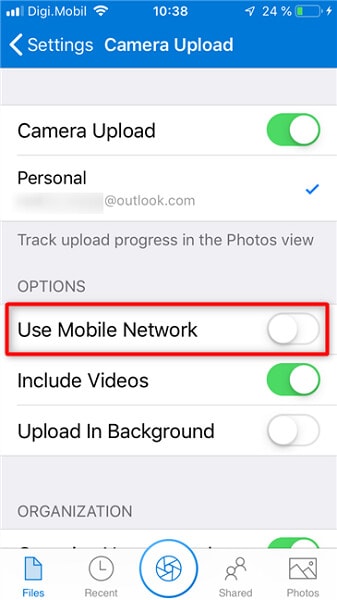
For this& you can go with various options like “Use Mobile Network” This is so because& by default& the uploading is set to Wi-Fi. You can easily do so by going to “settings” and then “Camera Upload” as shown. All you need to do is to turn “Use Mobile Network” ON& and you are done.
Part 3: How to Upload Photos to OneDrive on Android?
One Drive app is not only available for iOS. It is available for Android too. This means you can use your Android phone to upload photos on OneDrive. Here is a simple technique to upload photos to Onedrive from Android.
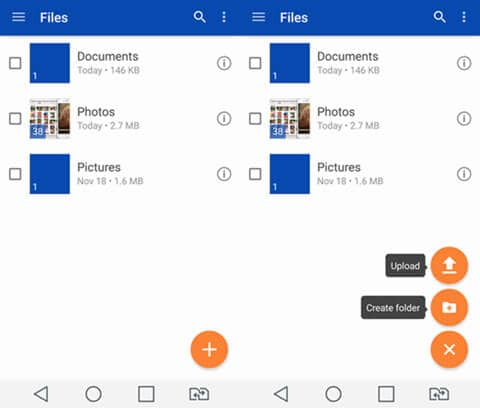
Step 1: Install the OneDrive app and sign in to your account. Once signed in successfully& go to the homepage and tap on the plus icon. It will be present in the lower-right corner. Now choose “Upload” from the given options. If you want to store your photos in a new folder& you can also click on “Create Folder”.
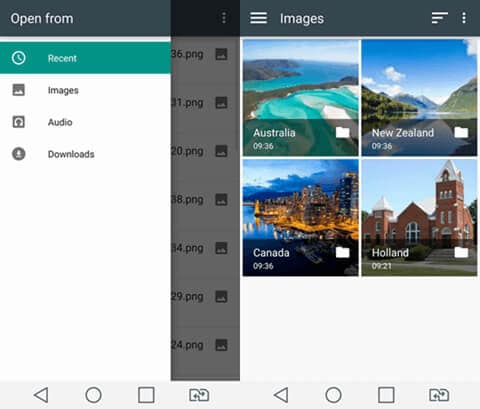
Step 2: On clicking “Upload” you will be provided with the option of uploading files. You can select the folder that you want to upload. Here you need to click on “Images”. Then you have to choose the folder in images where your files or photos are stored.
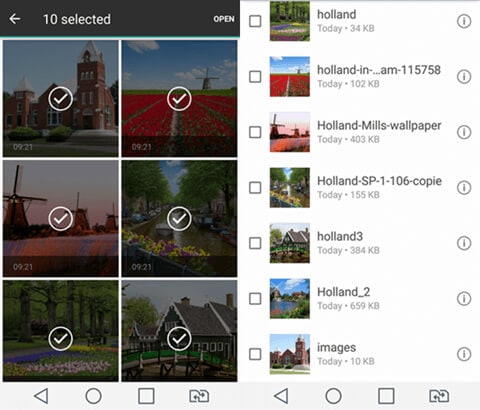
Step 3: Now select the images you want to upload. You can also go with the folder or folders as a whole. Once the images are selected& a tick will appear on the selected image& followed by a darkening of that particular image. Once done with selecting& click on “Open”. It is present in the upper right corner. Once tapped& the uploading process will begin and will take some time for the process to complete.
Conclusion:
When it comes to uploading photos on OneDrive& there are many available techniques online. But what matters the most is the effectiveness and simplicity of the technique. To make this process easy for you& some effective and tested techniques are presented to you on how to upload photos to OneDrive from PC& upload photos from iPhone to OneDrive and upload photos from Android to OneDrive. This guide will help you step by step to complete the process of uploading photos on OneDrive.
Share


 100% Secure