4 Ways to Transfer Photos & Videos from Galaxy S9 to Computer

Jan 11, 2024 • Filed to: Manage Device Data • Proven solutions
You’ve recently purchased the incredible new Samsung Galaxy S9/S20 smartphone, easily one of the most powerful and fully-featured smartphones to hit the markets this year.
However, when it comes to transferring your high-definition media, most notably your photos and videos, from your new phone to your computer, it’s easy to fall into the trap of fiddling around the transferring data to memory cards or using dated Bluetooth methods.
It’s time to make life simpler with these four easy methods to teach you how to transfer pictures from galaxy S9/S20 to computer effortlessly for a solid backup.
Method 1. Transfer Photos From S9/S20 To PC/Mac Using Dr.Fone - Phone Manager (Android)
The first and easiest way to transfer your digital media from your S9/S20 to your computer is using third-party software known as Dr.Fone - Phone Manager (Android). In addition to being able to transfer the existing content on your device, you’ll also be able to send across all your SMS messages, contacts, music files and more, ensuring you have comprehensively backed up all the data you could ever need to save. The software is also compatible with both Mac and Windows computers.
Dr.Fone - Phone Manager (Android)
Transfer Photos and Videos from S9/S20 to PC/Mac Easily
- Transfer files between Android and computer, including contacts, photos, music, SMS, and more.
- Manage, export/import your music, photos, videos, contacts, SMS, Apps etc.
- Transfer iTunes to Android (vice versa).
- Manage your Android device on computer.
- Fully compatible with Android 8.0.


Here’s how to use Dr.Fone to transfer photos/videos from S9/S20 to computer?
Step 1. Make your way over to the Dr.Fone - Phone Manager (Android) website and download the right edition for your computer. Install the software and open it.

Step 2. Connect your S9/S20 device using the appropriate USB cable. Once Dr.Fone has recognised your device, click the "Phone Manager" option.
Step 3. Next, choose the ‘Transfer Device Photos to PC’ option. If you want to change the type of file that you’re transferring, use the options at the top of the window (Music, Photos, Videos, Information etc.).
Step 4. The software will now scan your device to see what files are available to be transferred. They will appear in the window with a preview and a folder network on the left, allowing you to find the photos you’re looking to transfer easily.
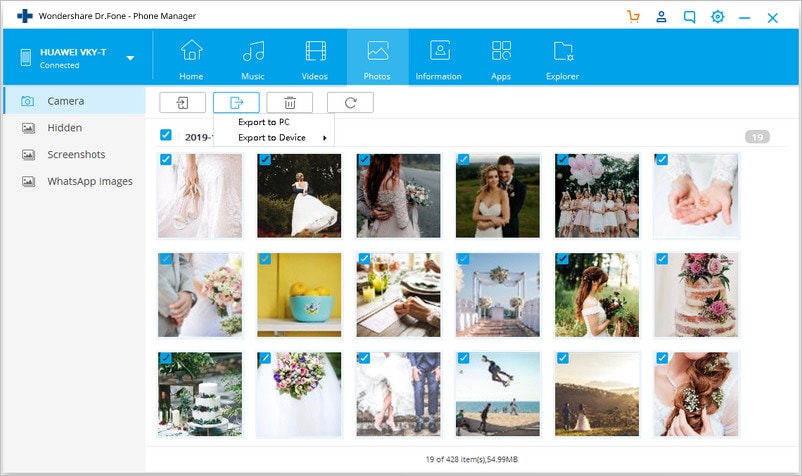
Step 5. Use the checkboxes to choose the files you want to transfer. Then, click the Export button and choose a location on your computer for your photos to be saved.
Step 6. Click ‘OK’ and your files will be transferred and saved on your computer.
Method 2. Copy photos from S9/S20 to PC through File Explorer
Another way to transfer photos from S9/S20 to computer is using the built-in File Explorer software on your Windows computer. This is an effective technique if you know your way around the folder network of your device.
Step 1. Connect your S9/S20 to your computer using your USB cable.
Step 2. Open File Explorer on your computer and navigate This PC > Your device name and then choose either the SD Card or Phone Storage, depending on where your files are saved.
Step 3. Locate the DCIM folder and open it.
Step 4. Here you’ll find all the images and videos on your device. Select the files you want, either by clicking CTRL + clicking, or CTRL + A to select them all.
Step 5. Right-click a selected file and select Copy.
Step 6. Now navigate your computer to find the folder you want to store your photos and videos (i.e. your Pictures folder). Right-click a blank space and click Paste.

Method 3. Transfer Photos from S9/S20 To Mac Using Android File Transfer
If you’re looking for the transfer photos from S9/S20 to computer which happens to be a Mac, you could be looking for the Android File Transfer app. This is a quick and easy piece of software to use and can help you back up your media to your computer safely and securely.
Step 1. Head over to the Android File Transfer website and download the app in the .dmg format.
Step 2. Locate the downloaded androidfiletransfer.dmg file on your Mac and drag it into your Applications folder.
Step 3. Connect your Samsung S9/S20 to your Mac using your compatible USB cable.
Step 4. Open the Android File Transfer software.
Step 5. Once the software has identified your device, you’ll be able to browse your device for photos and videos (up to 4GB in size) and copy them across to your computer.

Method 4. Download Photos from S9/S20 To Computer Using Dropbox
Finally, you have the ability to transfer photos from S9/S20 to computer using a cloud storage platform known as Dropbox.
This is an ideal solution if you already have Dropbox account, but you’ll need to pay for extra storage space if required. This method also means you can back up your data wirelessly, but data charges may apply.
Step 1. On your Samsung S9/S20, download and install the Dropbox application.
Step 2. Open Dropbox and sign into your account (or create one if you don’t have one already).
Step 3. Navigate to your Gallery app and start selecting the files you wish to transfer.
Step 4. Click the Share option and tap Dropbox to upload your files to your Dropbox account.
Step 5. On your computer, head over to the Dropbox website and download and install the Dropbox software.
Step 6. Open Dropbox on your computer and sign into your account.
Step 7. Here, you will see all the photos you uploaded from your device. Select the ones you wish to store on your computer and click Download. You’ll then be able to choose which folder on your computer you wish to save your files before successfully downloading and backing them up.

As you can see, there are many methods you can take when it comes to learning how to transfer pictures from galaxy S9/S20 to computer, whether you’re trying to keep them safe or back them up.
Dr.Fone - Phone Manager (Android) can help you do this effortlessly thanks to its ease of use, quick installation and trial period so you can make sure that this is the right software for you.


Samsung Tips
- Best Samsung Phones
- 1. Samsung Galaxy Note 20
- 2. Samsung Galaxy S22
- 3. Top 10 Samsung S22 Tips
- 4. Samsung S9 Tips
- 6. Tips for New Samsung S22
- Samsung Alternatives
- 1. Royole vs. Samsung Galaxy Z Fold
- 2. Samsung Galaxy S21 vs. Xiaomi Mi 11
- 3. Huawei P50 Vs Samsung Galaxy S22
- 4. iPhone 13 VS Samsung S22
- 5. Samsung Galaxy S10 vs. Huawei P20
- 6. Samsung vs. iPhone
- Samsung Useful Tips
- 1. Transfer Photos from Galaxy S9
- 2. Transfer Photos from Samsung
- 3. Samsung Kies 2 Free Download
- 4. Use Samsung Kies for Samsung Note
- 5. Samsung Kies Download for Windows
- 6. Samsung Kies Not Working
- 7. Use Samsung Kies for Samsung
- 8. Transfer Contacts from Samsung
- 9. Sync iTunes to Android
- 10. Turn on Phone without Power Button
- 11. Move Old Phone Data to Samsung
- 12. Fix Samsung Phone Got Bricked
- 13. Play Flash on Samsung
- 14. PC Suites for Samsung
- 15. Track and Lock Samsung Lost Phone
- 16. Top 10 Samsung Music Players
- 17. Take Screenshots on Samsung
- 18. Video Calling Apps for Samsung
- 19. Remove Google Account Bypass
- 20. Bypass Samsung Lock Screen
Daisy Raines
staff Editor