4 Tricks to Transfer Photos from Mac to iPhone Including iPhone 14 with/without iTunes

Mar 08, 2024 • Filed to: Manage Device Data • Proven solutions
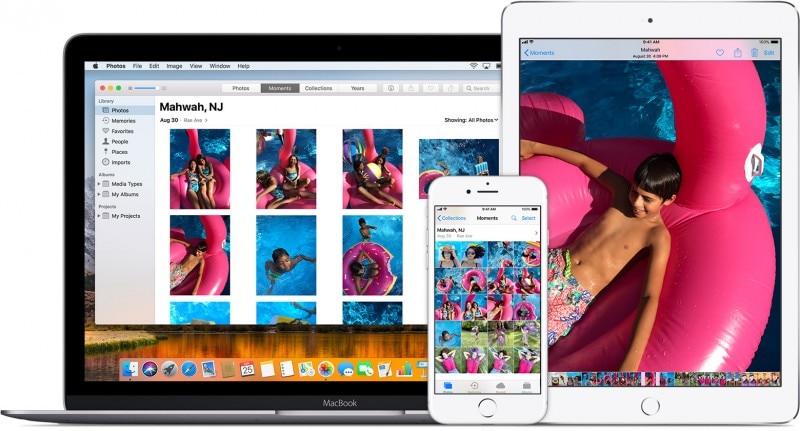
When you talk about sharing those beautiful moments captured and saved in your Mac to an iPhone, then obviously you would look around to choose a method that can transfer them safely. You would all know that photos and videos can be transferred from Mac to iPhone using various methods. And you may want to transfer files from Mac to iPhone or in the opposite that to transfer files from iPhone to Mac. However, the process might get a bit complex for the ones who are not familiar with the tech world.
One such method that comes to the mind of most is using iTunes, but besides that, there are other alternatives too that can perform their part quite well. Thus, here in this article, we are covering the top 4 ways to transfer photos from Mac to iPhone with or without using iTunes. All the steps have been mentioned in simple terms for everyone to benefit from this article. It's completely compatible with the new released iPhone 14.
Let us move ahead with the detailed step guide for each solution one by one.
- Part 1: Transfer photos from Mac to iPhone with iTunes including iPhone 14
- Part 2: Transfer photos from Mac to iPhone including iPhone 14 without iTunes using Dr.Fone - Phone Manager (iOS)
- Part 3: Import photos from Mac to iPhone using iCloud Photos Sharing [iPhone 14 included]
- Part 4: Import photos from Mac to iPhone using iCloud Photo Library [iPhone 14 included]
Part 1: Transfer photos from Mac to iPhone with iTunes including iPhone 14
When it comes to transferring media from Mac to iPhone, iTunes is considered to be the most common method. This method might get difficult for new users. So in this part, we are going to discuss how to put photos from Mac to iPhone. Please follow all the steps correctly to get the best result.
To transfer photos from Mac to iPhone smoothly, please keep the latest version of iTunes installed on your Mac computer.
- Step 1. Simply launch iTunes on your computer. After the successful launch, connect your iOS device to your computer using the included USB cable. Now, click on the Device icon that will be available on iTunes.

- Step 2. Then, click on Photos which will be available in the left sidebar of the main screen. Remember to check the "Sync Photos" option that will be available on the main screen.
- After this, you will have to specify the folder for the syncing process. You have the option to sync from all albums or some particular images.
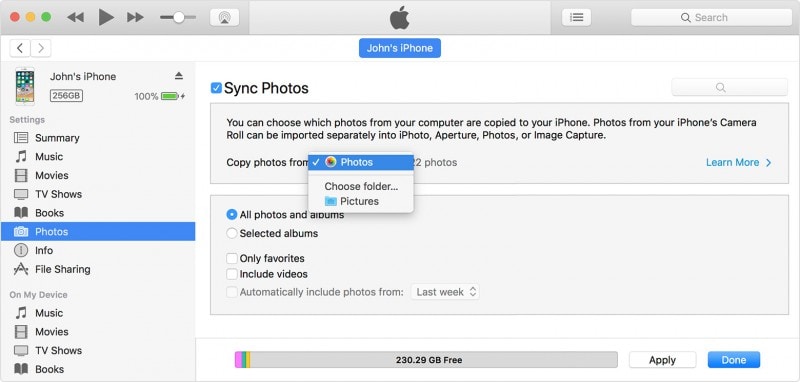
- You will have to click on "Apply" to confirm the process. Live photos need to be synced from the iCloud library to keep their live effect.
Every time you sync your iOS device with your iTunes, it will add new images to your iPhone to match your iTunes library. This was the answer to the question of how to put photos from Mac to iPhone via iTunes.
Part 2: Transfer photos from Mac to iPhone including iPhone 14 without iTunes using Dr.Fone - Phone Manager (iOS)
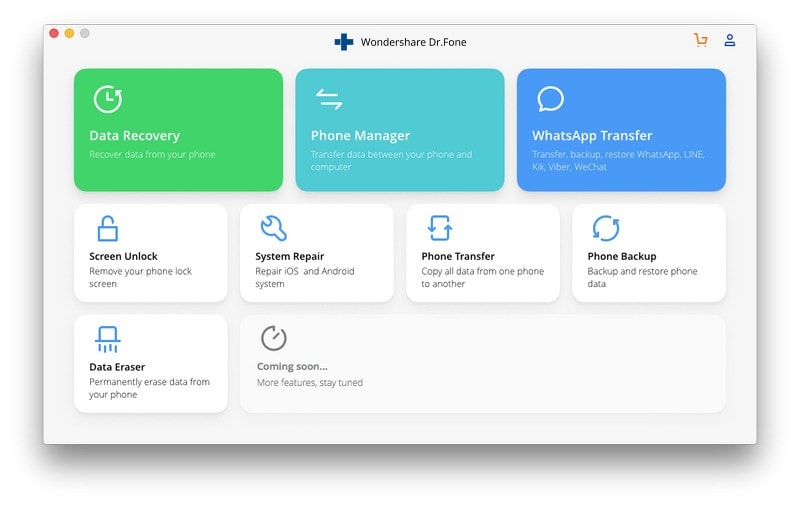
As, we already know that using iTunes to transfer photos from Mac to iPhone creates some difficulties, especially for the one not from the tech world. There are lots of third-party apps available on the web that promises to simplify this job for you. But, the real question is how many of these apps do what they promise. The Dr.Fone - Phone Manager (iOS) is the most popular toolkit available on the web. This is one of those few apps that stand up to their promises. This app is very easy to use and it has one of the simplest interfaces. Follow the steps given below to know how to import photos from Mac to iPhone.
Dr.Fone - Phone Manager (iOS)
Transfer Photos from Mac to iPhone/iPad without Hassle
- Transfer, manage, export/import your music, photos, videos, contacts, SMS, Apps, etc.
- Back up your music, photos, videos, contacts, SMS, Apps, etc. to the computer and restore them easily.
- Transfer music, photos, videos, contacts, messages, etc from one smartphone to another.
- Transfer media files between iOS devices and iTunes.
- Fully compatible with iOS 10, iOS 11, iOS 12, iOS 13, iOS 14, iOS 15, iOS 16 and iPod.


Step 1. First of all, download Dr.Fone on your Mac computer. Launch Dr.Fone and select "Phone Manager". Then you are required to connect your iPhone to your computer using the supplied USB cable. you might get an alert saying "trust this computer", you have to choose trust to continue.
Step 2. Once your device has been successfully connected, you should go to the Photos tab that will be located at the top of the Dr.Fone toolkit window.
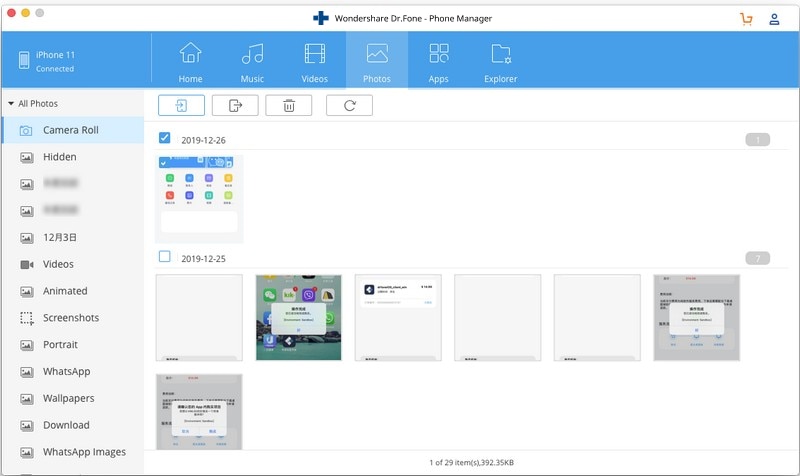
Step 3. Simply select the add photos option that will be available at the top of the screen. You can either import the photos from Mac one by one or import the photo folder in 1 click.
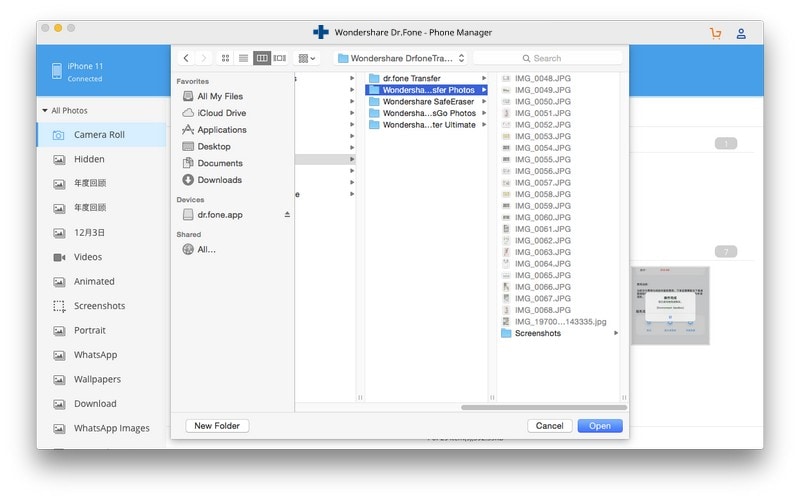
Step 4. After your selection has been made, click Open option as a confirmation to transfer the photos to the iPhone. You desired images will be transferred from you Mac to your iPhone is a few minutes. This way you get the appropriate answer to the question of how to get photos from Mac to iPhone.
Note: if you have doubts regarding how to export other data from Mac to iPhone, then also you can use this toolkit for that purpose, as it is a multipurpose option for all iOS and Android devices.
Part 3: Import photos from Mac to iPhone using iCloud Photos Sharing [iPhone 14 included]
If you are using an older version of Mac then you will not have Photos for Mac. You still have the option to share images with the older version of Mac photo sharing. Follow the steps given below to know how to transfer photos from Mac to iPhone using iCloud Photos Sharing option.
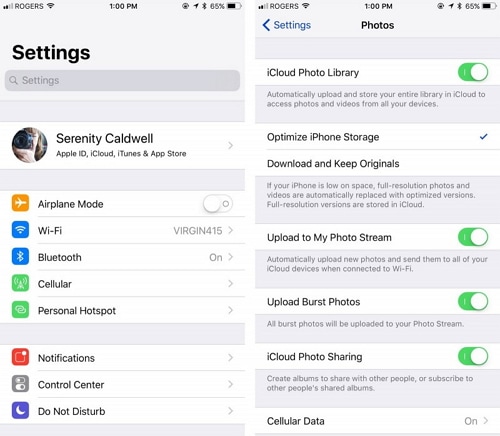
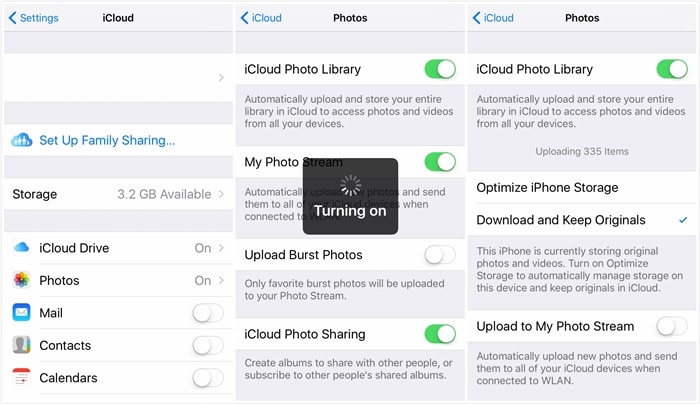
Step 1. launch Settings on your iPhone and choose the Photos option.
Step 2. You need to ensure that both iCloud Photo Library and iCloud Photo Sharing settings are turned on.
Step 3. Now, on your Mac, launch iPhoto and choose the images that you want to transfer.

- After that, choose Add To iCloud to create a brand new shared photostream. You can name these stream as you wish. Within minutes, you will find these images in the shared tab of your photos app on your iPhone.

Part 4: Import photos from Mac to iPhone using iCloud Photo Library [iPhone 14 included]
In the case of the iCloud photo library, you can handpick every photo that you want to share from your Mac to your iPhone. Follow the steps given below to know how to import photos from Mac to iPhone:
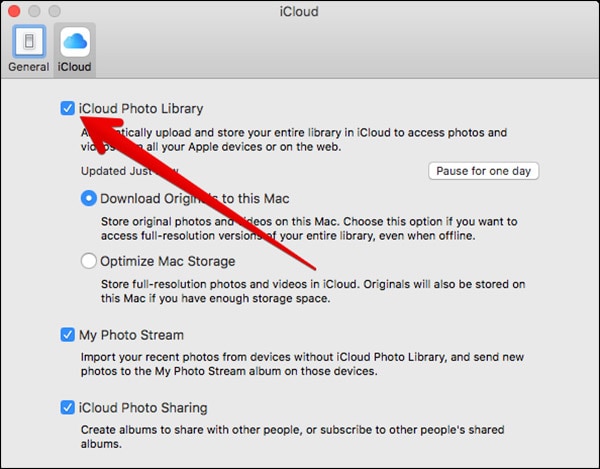
Step 1. Launch the Photos app on Mac and open the Preference option.
Step 2. Move on to turn on the “iCloud Photo Library” option that you will find here.
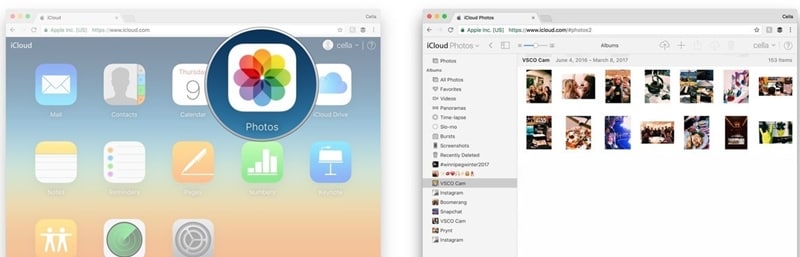
Step 3. You also have the option to visit the official website of iCloud and manage your entire photo library from there.
Step 4. Finally, go to your phone's Settings > iCloud > and enable the feature “iCloud Photo Library” that you will find there.
Now, you will find all your photos in one unified library that is available on all your Apple devices with the same iCloud ID logged in. This part can also be used to answer how to export photos from Mac to iPhone.


iPhone Photos
- Convert HEIC to JPG
- 1. Convert HEIC to JPG on Linux
- 2. Convert HEIC to JPG Windows
- 3. Best HEIC Converter Online
- 4. Convert HEIC to JPG High Quality
- Export iPhone Photos
- 1. Upload iPhone Photos to Google Drive
- 2. Transfer Photo from iPhone to PC
- 3. Transfer Photo from iPhone to iPhone
- 4. Transfer from iPhone to iPhone
- 5. Transfer from iPhone to iPad
- 6. Move iPhone Photo to External Drive
- 7. Transfer from iPhone to Flash Drive
- 8. Extract Photos from iPhone
- 9. Download Photo from iPhone
- Import Photos to iPhone
- 1. Transfer from Laptop to iPhone
- 2. Transfer Photo from Camera to iPhone
- 3. Transfer Photo from Mac to iPhone
- 4. Transfer Photos from PC to iPhone
- 5. Transfer from iPhone to PC
- 6. Transfer from Android to iPhone
- 7. Transfer from Samsung to iPhone
- Manage iPhone Photos
- 1. Back up iPhone Photos
- 2. Get Photos off iPhone
- 3. Send Large Size Photos from iPhone
- 4. Photo/Video Compressor Apps
- 5. Delete Photos from iPhone/iPad
- 6. iPhone Photos Disappeared Suddenly
- 7. iPhone Photoshop Alternatives
- Recover iPhone Photos
- 1. Restore Deleted Photos from iPhone
- 2. Recover Photos from iPod Touch
- 3. Recover Deleted Picture from iPhone
- Transfer iPhone Photos to Mac
- Transfer iPhone Photos to PC
- 1. Transfer Data from iPhone to PC
- 2. Transfer Photo to Computer
- 3. Transfer Photo to PC without iTunes
- 4. Transfer Library to Computer
- 5. Send Photo from iPhone to Computer
- 6. Import Photo from iPhone to Windows
- 7. Transfer Photo to Windows
- Transfer Photos from Google Drive
- 1. Download from Google Drive to iPhone
- 2. Transfer from Google Photo to iPhone
- 3. Download from iCloud to iPhone
- Transfer Photos to Google Drive
- Image Convert Tips
- ● Manage/transfer/recover data
- ● Unlock screen/activate/FRP lock
- ● Fix most iOS and Android issues
- Learn More Learn More
Bhavya Kaushik
contributor Editor