100% Security Verified | No Subscription Required | No Malware

 :
: 
 ChatGPT
 Perplexity
 Gemini
 Claude
 Grok
Grok
Are you constantly struggling with device storage limits and wondering how to transfer photos from Android to PC effortlessly? You are certainly not alone. While Android operating systems offer a high degree of flexibility, many users still find it tedious and complicated to securely move their precious memories to a Windows computer. Whether it is due to driver errors, slow transfer speeds, or a lack of time, users often procrastinate and leave their media unbacked, increasing the risk of data loss.
Fortunately, learning to transfer photos from Android to PC does not have to be a frustrating experience. In 2026, there are numerous streamlined methods designed to make this process seamless, regardless of your technical expertise. Whether you are looking for a straightforward wired connection or wondering how to transfer photos from Android to PC using WiFi, we have you covered. In this comprehensive guide, we will walk you through 8 foolproof, step-by-step solutions, including built-in Windows features, cloud platforms, and advanced third-party software, ensuring your photos are safely backed up in no time.
In this article
- Part 1. How to Transfer Photos from Android to PC with Dr.Fone?
- Part 2. How to Transfer Photos from Android to PC Using AutoPlay?
- Part 3. How to Transfer Photos from Android to PC Using Photos App on Windows?
- Part 4. How to Transfer Photos from Android to PC Using File Explorer?
- Part 5. How to Transfer Photos from Android to PC Using Google Drive?
- Part 6. Top 3 Apps to Transfer Photos from Android to PC
Part 1. How to Transfer Photos from Android to PC with Dr.Fone?
If you are looking for the most efficient and comprehensive Android device management solution, you should definitely try Dr.Fone - Phone Manager (Android). With this remarkable desktop software, you can bridge the gap between your mobile device and your computer effortlessly. It does not just stop at helping you transfer photos from Android to PC; it also allows you to manage videos, contacts, text messages, music, and various other essential files seamlessly.
 Effortlessly manage data through preview, delete, export, etc.
- Transfer all data between devices.
- Robust backup solutions for reliable data protection.
- Mirror screens to PC for meetings, teaching, and control.

As an integral component of the Dr.Fone toolkit, it provides an intuitive, one-click solution designed specifically for smooth cross-platform file sharing. Because of its user-friendly interface, you will not encounter any steep learning curves while moving your data. It is fully compatible with almost every major Android brand and version on the market. To learn how to transfer photos from Android to PC using USB with this tool, just follow these detailed steps:
-
Step 1 Enable USB Debugging on Your Device
First of all, you need to activate the USB debugging feature on your Android phone. To do this, navigate to its Settings > About Device > Software info > Build number and tap it 7 consecutive times to unlock Developer Options. After that, return to the main Settings, access Developer Options, and toggle on USB Debugging. Note that the exact menu layout might vary slightly depending on your Android version and manufacturer interface.

-
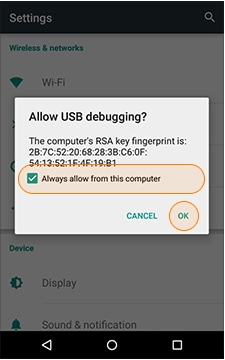
Step 2 Allow System Permissions
Great! Now you can connect the Android device to your desktop system using an authentic USB cable. A prompt will appear on your phone screen; ensure you allow USB debugging and grant the computer the necessary access permissions to interact with your device.
-
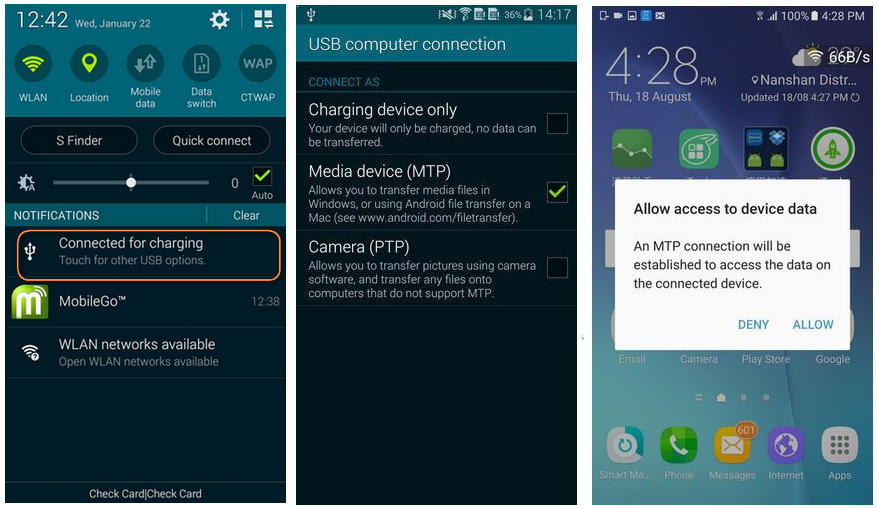
Step 3 Choose the Media Device (MTP) Connection
Furthermore, immediately after connecting, your phone's operating system will ask how you wish to handle the USB connection. Ideally, you should select the Media Transfer Protocol (MTP) or File Transfer option. This specifically allows the computer to read and access your Android device’s internal file storage system.
-
Step 4 Launch Dr.Fone Software
Now that you are all set and the physical connection is securely established, simply launch Dr.Fone - Phone Manager (Android) on your PC. Your connected phone will automatically be recognized by the software, and a clean visual snapshot of your device will be displayed directly on the dashboard interface.
-
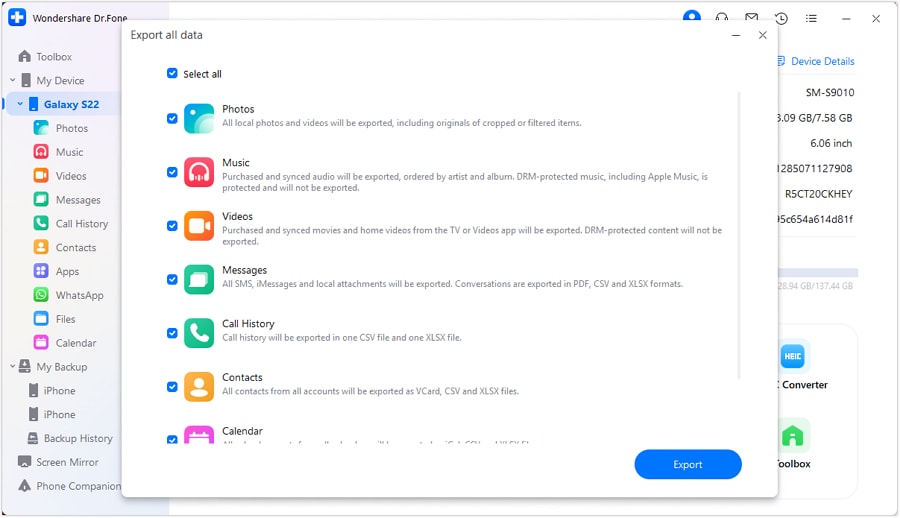
Step 5 Initiate the Bulk Transfer Process
If you wish to transfer all photos to your computer at once without sorting them manually, click on the "Transfer Device Photos to PC" shortcut option right from the home screen. This will instantly open a pop-up confirmation window and automatically start the mass transfer process, backing up your entire gallery.

-
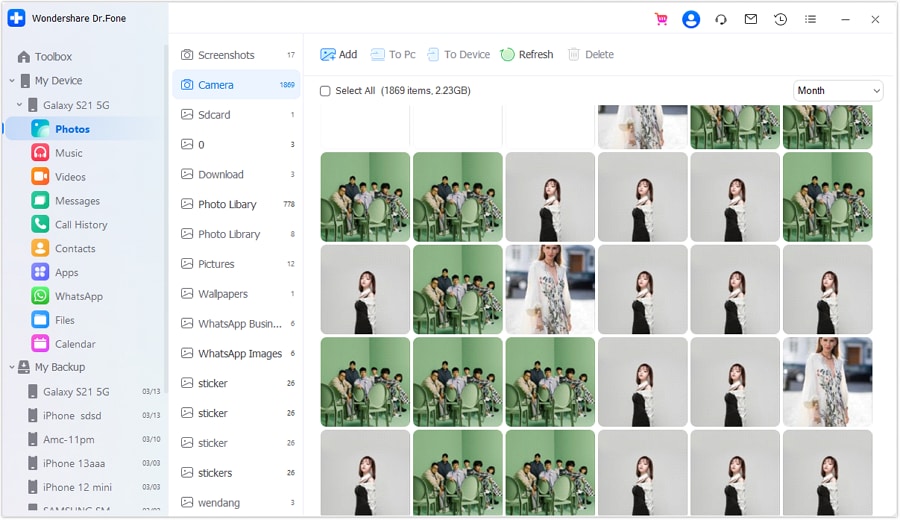
Step 6 Select Specific Photos for Export
To have more granular control and manually select the specific photos that you wish to transfer, navigate to the "Photos" tab on the top navigation bar. Here, you will find all the visual media stored on your phone systematically categorized under different folders (like Camera, Downloads, Screenshots). You can freely switch between these albums from the left panel and utilize the software's built-in image viewer to preview the photos beforehand.
-
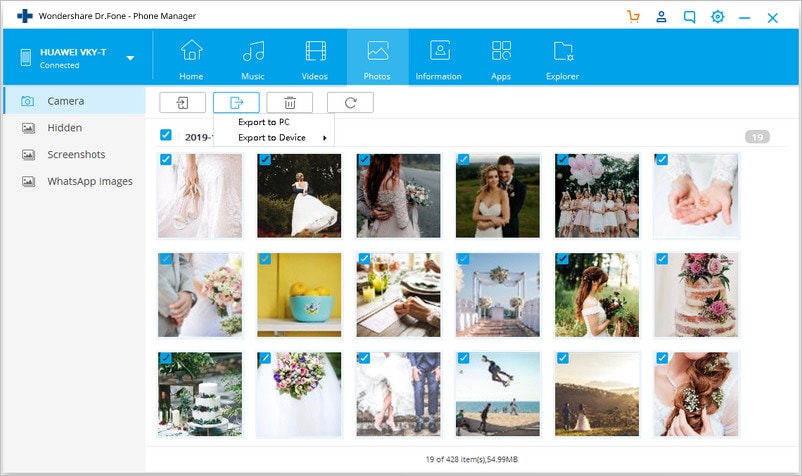
Step 7 Click the Export Icon
Select the individual photos or entire batches that you wish to transfer by checking their respective boxes, and then click on the 'Export' icon located conveniently on the top toolbar. From the dropdown menu, choose the 'Export to PC' option to initiate the routing process.
-
Step 8 Define the Target Save Location
Finally, a standard browser window will be opened on your screen so that you can specify the exact desktop directory or folder where you wish to save the exported files. Once you have pinpointed a location, confirm your choice, and the high-speed transfer process will commence immediately.
That is absolutely it! By following these straightforward instructions, you can successfully transfer photos from Android to PC in virtually no time at all. Since the application’s interface provides a crystal-clear preview of your data, you can carefully select only the photos you truly wish to transfer, avoiding unnecessary storage consumption. Similarly, you can apply this exact methodology to manage and transfer videos, music files, contact lists, SMS messages, and much more.
Additionally, Dr.Fone - Phone Manager (Android) boasts unparalleled compatibility with every leading hardware brand. Therefore, whether you want to learn how to transfer photos from Samsung Android to PC, or you are operating devices from LG, Sony, Huawei, Motorola, Lenovo, Google Pixel, and more, this software remains your ultimate companion.
Part 2. How to Transfer Photos from Android to PC Using AutoPlay?
Apart from utilizing dedicated third-party managers like Dr.Fone, there are some native Windows functionalities designed to help you transfer your photos to a PC as well. For instance, you can easily take advantage of the built-in Windows AutoPlay feature to accomplish this task. While you will not be able to precisely preview or selectively manage your photos via a dedicated interface like Dr.Fone, it will certainly fulfill your basic mass-transfer needs. This versatile feature is engineered to work for almost all connected external hardware, including various Android phones, Apple iPhones, digital DSLR cameras, and USB flash drives.
-
Step 1 Configure Windows AutoPlay Settings
Firstly, you need to ensure that your Windows computer is configured to automatically trigger the AutoPlay feature as soon as an external device is plugged in. To verify and enable this, go to your system's Start menu, navigate to Settings > Devices > AutoPlay, and toggle the master switch to turn on the AutoPlay feature for all media and devices.

-
Step 2 Connect the Android Device
Now, to truly grasp how to transfer photos from Android to PC using USB with this native method, simply use a compatible USB cable to connect your smartphone directly to your computer's USB port.
-
Step 3 Wait for the AutoPlay Prompt
In almost no time, your mobile phone should be officially detected by the computer’s operating system, and the AutoPlay background service will be executed automatically. A distinct pop-up notification window, similar to the one shown below, will be prominently displayed on your screen.

-
Step 4 Execute the Import Command
From the list of available actions presented in the dialogue box, simply click on the “Import pictures and videos” option to proceed. This will automatically scan the device and start the broad transfer process, efficiently moving all supported photos and videos from your phone directly into the PC's default Pictures folder.
Part 3. How to Transfer Photos from Android to PC Using Photos App on Windows?
Modern iterations like Windows 10 and Windows 11 come fully equipped with a highly capable native application called "Photos," which can significantly simplify how you transfer photos from Android to PC. Much like AutoPlay, it is universally compatible and works brilliantly for an array of smart devices, including iPads or high-end digital cameras. Moreover, this application features a surprisingly robust in-app photo editor that can help you digitally organize, crop, and further customize your imported pictures.
For all those tech-savvy users who wish to learn how to transfer photos from Android to PC using WiFi, the Photos app ecosystem can occasionally serve as an indirect solution if synced with OneDrive, though local transfers typically rely on direct connections. If you intend to transfer photos over a local WiFi network using companion apps, both the PC and the Android device must remain securely connected to the same router network. However, for maximum stability, establishing a direct USB cable connection between both devices is always the most recommended approach for the Windows Photos app.
-
Step 1 Open the Native Photos Application
To start the procedure, launch the default Photos app on your Windows desktop. You can quickly locate it under your installed Apps list, or simply by typing "Photos" into the Start menu search bar.

-
Step 2 Access the Import Menu
Once opened, the interface will automatically index and load all the existing visual media currently saved on your system's hard drive. Besides intelligently managing your current collection of photos, you can seamlessly import new ones as well. To do this, locate and click on the 'Import' icon, which is prominently positioned at the top right corner of the application screen.

-
Step 3 Establish the Device Connection
Ensure that your Android hardware is actively connected to the desktop computer. You can link it using a high-speed USB data cable or, depending on your Windows ecosystem settings, via a synchronized WiFi connection.
-
Step 4 Choose Your Android Hardware
An intuitive pop-up menu will display a comprehensive list of all the external storage devices that are currently connected to your system and primed for data transfer. Simply click and select your connected Android device from this generated list.

-
Step 5 Review and Execute the Transfer
The subsequent window will systematically scan the phone and further provide a clear preview of all the photos legally available for extraction. Simply check the boxes of the specific photos that you wish to transfer and confidently click on the “Continue” or "Import Selected" button.

Afterward, patiently wait for a few moments as the selected high-resolution photos are securely transferred to your local system storage. You can instantly access them through the Photos app gallery interface or by manually navigating to the respective destination folder on the PC. By default, Windows will logically organize and transfer these files directly into the native “Pictures” folder (or any custom location you previously specified) on the computer's primary drive.
Part 4. How to Transfer Photos from Android to PC Using File Explorer?
If you prefer an old-school, hands-on approach, then you must be extremely familiar with this traditional technique. Before the widespread availability of specialized management applications, users would manually copy and paste their raw media files from their device storage directories directly to the PC hard drive. Because the underlying architecture of an Android phone allows it to be mounted as a standard mass media storage drive, it makes it fundamentally easier for us to manually transfer photos from Android to PC.
However, while this legacy technique is undeniably straightforward and requires no additional software installations, it comes with a significant catch. It inherently makes your device and desktop highly vulnerable to cross-platform malicious attacks. For instance, if your phone's storage is already silently corrupted by a hidden virus, performing a raw manual transfer can easily copy the malware directly into your Windows system, or vice versa. Therefore, cybersecurity experts recommend you only consider this raw transfer method as your absolute last resort. If you still wish to proceed, you can learn how to transfer photos from Android to PC using USB by following these basic navigational steps:
-
Step 1 Connect and Authorize the Device
Start the procedure by securely connecting your Android device to the PC using a USB cable. When you receive a standard system notification drop-down on your Android screen, deliberately choose to use the USB connection for 'File Transfer' or 'Media Transfer Protocol (MTP)'.
-
Step 2 Open File Explorer
If your PC generates an AutoPlay prompt upon connection, choose the option to "Open device to view files." Alternatively, if no prompt appears, you can always manually launch the Windows File Explorer (Win + E) and navigate to "This PC" to locate the newly connected device drive.

-
Step 3 Locate the Media Directories
Simply double-click to browse the internal device storage hierarchy and visit the exact directory location from where you wish to extract the images. Ideally, Android camera photos are automatically stored in the primary 'DCIM' folder or specific 'Pictures' folders located either in the device’s native internal storage or on an inserted Micro SD card.

-
Step 4 Copy and Paste Files
In the end, you can visually scan the directories, hold 'Ctrl' to select multiple specific photos that you wish to transfer, and right-click to copy them. Next, navigate to the local hard drive location where you wish to permanently store the photos, right-click on empty space, and “paste” them there. For a more fluid experience, you can even drag and drop the highlighted photo batch directly into any open destination folder window on your system.

Part 5. How to Transfer Photos from Android to PC Using Google Drive?
For those users who specifically wish to learn how to transfer photos from Android to PC using WiFi without dealing with tangled cords, leveraging cloud-based platforms like Google Drive is a phenomenal alternative. By default, every registered Google account is graciously provided with 15 GB of free cloud storage space shared across Google services. Therefore, if you do not have an exceptionally large volume of high-resolution photos to transfer, you can effectively utilize this wireless technique.
Because this method dictates that it will upload and download your data wirelessly over the internet, it is important to note that it will consume a considerable chunk of your WiFi bandwidth or cellular data plan, depending on file sizes. Furthermore, while many people highly prefer this method because it automatically creates a secure online backup of their data, privacy-conscious individuals should be aware. By storing data on remote servers, your files could theoretically be accessed if your core Google account credentials ever get compromised in a hacking attempt. Proceed with strong passwords and Two-Factor Authentication.
-
Step 1 Prepare the Upload via Mobile
Firstly, you logically need to upload your local photos onto the Google Drive servers. To accomplish this, launch the official Google Drive application on your Android smartphone, ensure you are logged into the correct account, and tap on the floating “+” (Plus) icon situated prominently at the bottom right of the screen.
-
Step 2 Execute the File Upload
The application interface will subsequently ask you what specific type of digital asset you wish to add to the cloud. Simply select the upwards-pointing “Upload” button.

-
Step 3 Complete Cloud Synchronization
Use the built-in Android file picker to navigate to the local storage location where your photos are kept, select the desired images, and confirm to upload them to your Google Drive account. Depending on your network speed, this might take a few moments. Once completed, your selected photos will be safely mirrored on Google Drive’s remote servers.
-
Step 4 Download to the Desktop Environment
To finally access and retrieve them on your computer, launch a web browser, go to the official portal of Google Drive (drive.google.com), and securely log in utilizing the exact same Google account credentials you used on your phone. Navigate into the specific directory where you just saved your photos and meticulously make the desired selections. Finally, right-click on the highlighted files and choose to “Download” these compressed photo archives directly onto your local system drive.

Part 6. Top 3 Apps to Transfer Photos from Android to PC
In our modern mobile-first era, it feels like there is a specialized app engineered for absolutely everything. Apart from implementing the system-level and hardware-based solutions stated above, you can also rely on dedicated networking applications specifically built to seamlessly transfer photos from Android to PC. While the Google Play Store is flooded with several apps claiming they can help you do the exact same thing, our technical team has meticulously evaluated the landscape and handpicked the 3 absolute best and most reliable ones right here.
6-1. Recovery & Transfer Wirelessly & Backup
Developed with precision by the experts at Wondershare, this highly regarded and freely available utility app will allow you to confidently transfer vast amounts of data between your Android phone and desktop computer without experiencing any technical hassle. The overarching philosophy is simplicity: all you literally need to do is install and launch the lightweight app on your smartphone, and carefully select the media files you urgently wish to transfer. Concurrently, on your desktop system, you can open any standard browser, navigate to the dedicated web portal at web.drfone.me, verify the connection with your phone, and instantly start receiving the files over the air. Yes—it genuinely is as astonishingly simple as that.
- The application provides an incredibly seamless, high-speed way to flawlessly transfer photos from Android to PC wirelessly, eliminating cable dependency.
- You can also effortlessly reverse the process and send heavy files from your PC directly to the mobile phone in a strictly similar manner.
- The end-to-end transfer protocol is highly secure, ensuring none of the sensitive personal user data is ever unethically accessed or stored by the application's servers.
- Besides merely transferring your media data, you are also empowered to choose to take full incremental backups or actively recover accidentally lost files straight from your system interface.
- It fundamentally supports high-resolution photos, 4K videos, and critical business documents spanning a multitude of different digital formats.
- The software is completely 100% free to use and designed with a super easy-to-navigate graphical user interface.
Compatibility: Android 2.3 and later versions
Get it here: https://app.adjust.com/1fg6niuy_IN

6-2. Mylio Photo Organizer
If you are dealing with a massive, disorganized media library, Mylio is a highly sophisticated digital photo organizer that can proactively help you sync and structure your scattered photos from dozens of different hardware sources into one unified place. If your digital storage space feels hopelessly cluttered and your memories are spread all over the place, then this robust organizational tool would objectively be the perfect application for you.
- Mylio operates as a freely available cross-platform app that intelligently works to automatically sync your entire photo repository across multiple registered devices.
- It technically supports direct peer-to-peer sharing as well as standard local wireless network transfers. Furthermore, optional proprietary cloud storage capabilities are also readily available for premium users.
- A unique selling point is its ability to help you securely keep your high-resolution photos safe and accessible even when you are completely offline without an internet connection.
- It leverages advanced AI to assist you in meticulously managing your massive photo catalogs, allowing you to categorize them effortlessly using automated facial detection algorithms.
- There is also a highly capable in-app photo editor packed with color-correction tools that you can aggressively utilize before transferring.
Compatibility: Android 4.4 and later versions
Get it here: https://play.google.com/store/apps/details?id=com.myliollc.mylio

6-3. Cloud Storage Manager
If you are deeply integrated into the cloud ecosystem and already possess active accounts on far too many disparate cloud storage services, then you can greatly benefit from using this reliable aggregation app. It acts as a central hub, designed specifically to help you integrate numerous separate cloud storage providers into a single unified interface, ensuring that you can strategically make the absolute most out of all your available, fragmented digital space.
- The overarching application can successfully integrate and manage various mainstream cloud storage services simultaneously, including industry giants like Dropbox, Google Drive, Microsoft OneDrive, Box, and so on.
- You can simply mandate the app to upload selected photos straight from your Android device and then remotely access them on your desktop computer via the centralized cloud storage network.
- It can also actively help you schedule and maintain a reliable ongoing backup of your newest photos to prevent catastrophic data loss.
- Besides focusing strictly on photography, you can also effortlessly utilize the platform to transfer heavy music albums, long-form videos, and critically important document files.
Compatibility: Depends entirely on the specific Android device hardware.
Get it here: https://play.google.com/store/apps/details?id=hr.telekomcloud.storage

Conclusion
Now that you are fully informed and intimately knowledgeable about these 8 distinct, highly effective ways to transfer photos from Android to PC, you possess the technical capability to always keep your precious digital data safe and meticulously organized. Out of all the diverse hardware and software options provided in this guide, leveraging Dr.Fone - Phone Manager (Android) is undoubtedly the absolute most recommended choice for both beginners and power users alike. After all, it acts as a complete, multifaceted Android device manager ecosystem and will reliably assist you in far more ways than you can initially imagine—from seamless data recovery to comprehensive cross-platform backups. Now that you conclusively understand how to securely transfer photos from Android to PC, go ahead and generously share this detailed guide with your friends, family, and colleagues to teach them these invaluable digital preservation skills as well!
FAQ
-
1. What is the absolute fastest way to transfer photos from Android to PC?
While wireless transfers offer unmatched convenience, establishing a direct physical connection using a high-quality USB cable paired with specialized management software like Dr.Fone typically provides the fastest data transfer speeds. USB connections bypass potential Wi-Fi bandwidth limitations and network interferences, making them perfect for moving hundreds of gigabytes of high-resolution image files in a fraction of the time. -
2. Why is my Windows PC failing to recognize my Android phone when connected via USB?
If your computer fails to detect your Android device, it usually stems from a few common culprits. Firstly, ensure that your phone is unlocked and explicitly set to "Media Transfer Protocol" (MTP) rather than "Charge Only." If that does not work, the issue may lie with a faulty USB cable, a damaged USB port on your PC, or outdated Android USB drivers. Try using an alternative cable or updating your system drivers via the Windows Device Manager. -
3. Can I securely learn how to transfer photos from Android to PC using WiFi without downloading any third-party apps?
Yes, it is entirely possible. The most common built-in method involves utilizing cloud services natively integrated into your Google account, such as Google Drive or Google Photos. By allowing your Android device to automatically sync photos to the cloud over WiFi, you can subsequently access drive.google.com or photos.google.com via any web browser on your PC to download those images locally without needing additional desktop applications. -
4. Is it possible to extract and transfer photos from an Android phone with a completely broken screen to my PC?
Transferring data from a device with a broken or unresponsive screen can be exceptionally challenging because you typically cannot physically tap the screen to authorize the USB connection. However, if USB Debugging was previously enabled on the device before the damage occurred, data recovery tools like Dr.Fone can often bypass the broken interface and extract your photos directly to your PC. Alternatively, if your phone supports OTG (On-The-Go), you can temporarily connect a USB mouse to navigate the interface and authorize the transfer.
 Add Wondershare Dr.Fone as a preferred source on Google