Transfer Music From Mac to Your iPhone Without iTunes in Few Clicks

Jul 12, 2024 • Filed to: Manage Device Data • Proven solutions
Are you tired of struggling to transfer music from Mac to iPhone without iTunes? Or without the software? Well, you're not alone. Many people have been searching for a guide about "how to transfer music from Mac to iPhone without syncing."
If that sounds like you, you're reading the right comprehensive guide. This article will walk you through three ways to transfer music between your Mac and iPhone. From third-party apps to syncing, it got you covered. So, let's explore your alternatives together.
Part 1. How To Transfer Music From Mac to an iPhone Without Syncing
Want to learn how to transfer music from Mac to iPhone without syncing? Wondershare gets it. Syncing doesn't pose major risks, but who wants to risk losing valuable data? Besides, you don't want to remove your existing music and media files to sync with your Mac. So, what's the solution? It's Wondershare Dr. Fone's iTunes Library feature.
Wondershare Dr.Fone iTunes Library
Tired of the restrictions of iTunes? Dr.Fone is a third-party app that comes to your rescue when you want to transfer music files from Mac to iPhone without syncing. It lets Mac users like you copy your iTunes media data and transfer them to your iPhone. But that's not all!
Key Benefits of Dr.Fone iTunes Library
Here are some benefits of using Dr. Fone's iTunes Library feature for Mac users.
- iTunes-Free Data Transfer
Dr.Fone iTunes Library helps to transfer data between your iOS device and computer without relying on iTunes.
- Rebuild Your iTunes Library, No Deletion Required
You don't have to delete your existing music or media files on your iPhone. Dr.Fone lets you keep your favorite tracks intact. It amplifies what you can do and gives you complete control.
- Cross-Platform Compatibility
Dr.Fone works like a charm on various platforms. Just ensure your iOS is 9.0 or later, macOS is X 10.8 & higher, or if you're a Windows user, Windows 7 or newer.
- Try Before You Buy
Curious to try out Dr.Fone before committing? You can try the free trial and explore some of its features. If you love it (and sure you will), you can choose a subscription plan starting at $39.95 per year for the Dr.Fone Basic plan.
Step-by-Step Guide to Using Wondershare Dr.Fone iTunes Library
Now let's walk you through the steps to transfer music files from Mac to iPhone without syncing:
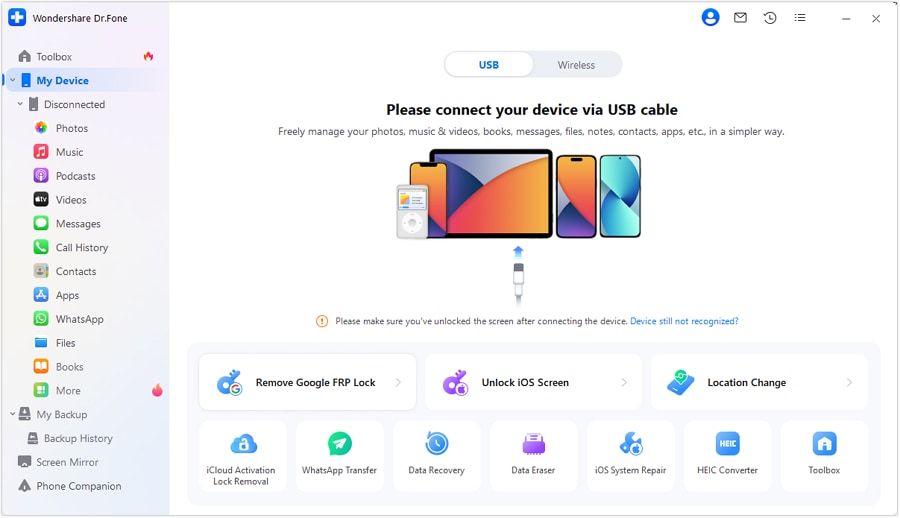
- Step 1: Download and install Wondershare Dr.Fone on your Mac.
- Step 2: Launch the app, connect your iPhone to your Mac using a USB cable, and follow the in-app instructions.
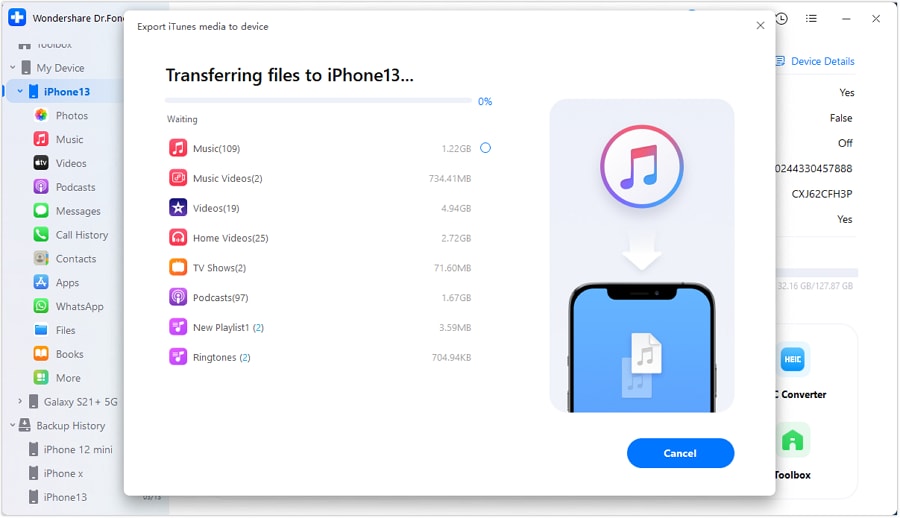
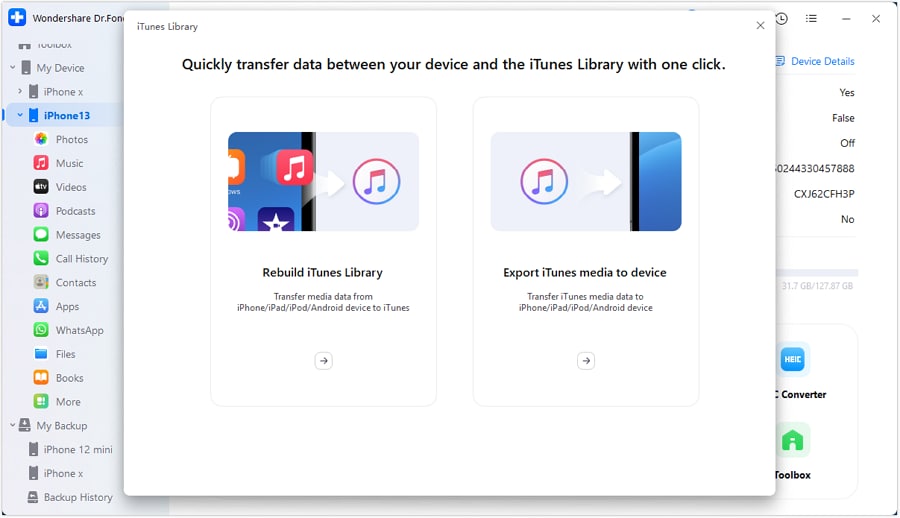
- Step 3: Click iTunes Library from the lower navigation pane.

- Step 4: Select Export iTunes media to the device from the iTunes Library dialogue box.
- Step 5: Select the Music checkbox and other media file types you want, then click Transfer.
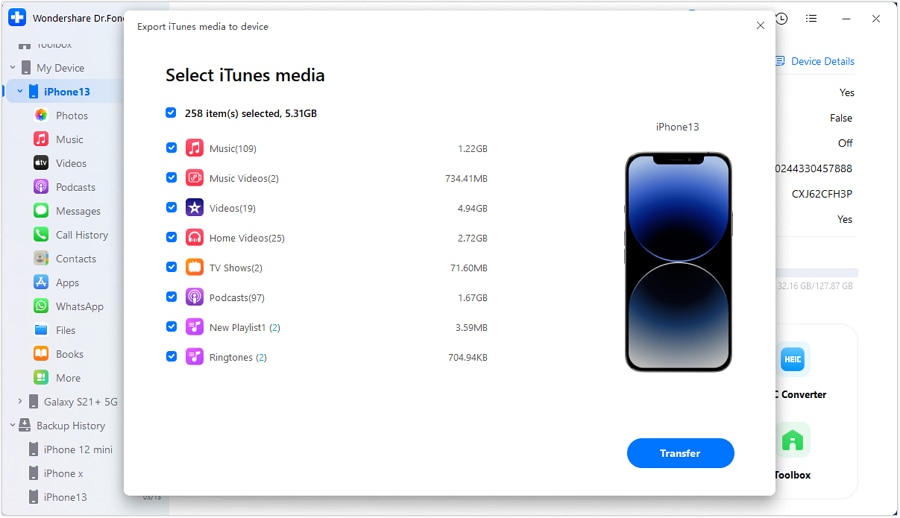
- Step 6: Wait for the transfer process to complete, and voila! You now know how to transfer music from Mac to iPhone without iTunes or syncing.

Part 2. How To Transfer Music From iPhone to Mac Without a Software
You might not want to bother with additional software when transferring music files from your iPhone to your Mac. Well, guess what? There's another way! It's called syncing. What is syncing, you ask? Think of it as getting two things to work together seamlessly. Okay, how can music be transferred from iPhone to a Mac without software? Let's break it down for you.
Define Syncing and Sync Library - Apple Music
It's like ensuring everyone is on the same page, or in this case, the same song. Still not getting it? Imagine your music files updating themselves on all your devices; no manual copying is required.

Sync Library is your music oasis if you're an Apple Music subscriber. It lets you access your music library and playlists on any device with the Apple Music app using the same Apple ID. It's like having your file available wherever you go across all your Apple devices. Just a note—Apple Music isn't for backup, so consider using Dr.Fone for that extra peace of mind.
Importance of Syncing Between Mac and iOS Devices
Why should you bother syncing your media files between your Mac and other iOS devices? Simple—it's all about having control and convenience. No more juggling between apps or copying files repeatedly. Syncing empowers you to enjoy your media seamlessly across all your Apple devices.
Step-by-Step Guide to Syncing Music Between Mac and iPhone
Follow these simple steps to learn how to transfer music from iPhone to Mac without software:
Step 1: Open the Settings app and tap Music on your iPhone.
- Step 2: Enable the Sync Library option.

- Step 3: On your Mac, open the Apple Music app.
- Step 4: Select Account in the menu bar and check your Apple ID if it's similar to what you use in your Apple Music subscription.
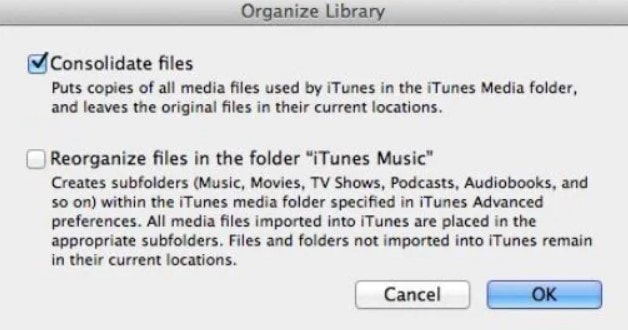
- Step 5: Go to File > Library > Organize Library, select the Consolidate files checkbox, and click OK.
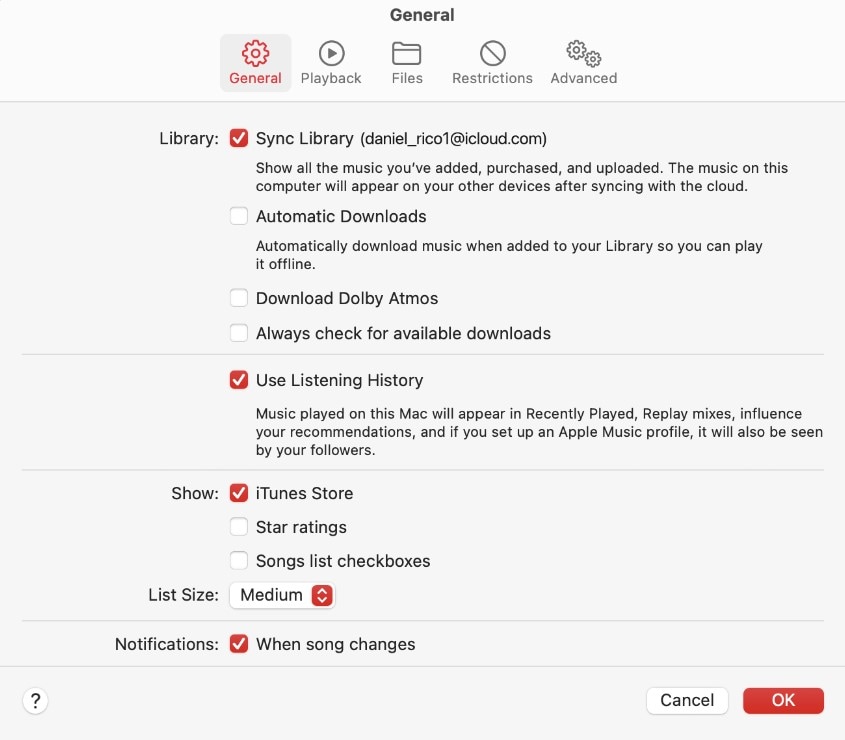
- Step 6: Go to Music > Settings or Music > Preferences.
- Step 7: Select the Sync Library checkbox and click OK in the General tab.
- Step 8: Wait for the syncing process to complete.
Part 3. How To Add Music From iTunes to an iPhone
You might have been looking for a guide about how to add music from iTunes to your iPhone. Sometimes, syncing your files on the cloud isn't what you want, and that's understandable. In such cases, you can use iTunes to sync content to your iPhone. This option is helpful for macOS Mojave or earlier and Windows PC users.
With iTunes, you can sync not only media files. But also your contacts and calendars. It's pretty versatile, isn't it? Just a quick note: if you're an Apple Music or iTunes Match subscriber, this method won't work for you. But no worries, Dr.Fone can handle those scenarios too - as iTunes features may vary by country or region.
When syncing music from iTunes to your iPhone, you have two options: automatic and manual. Let's explore both:
- Automatic Syncing:This is the quickest and easiest option. It allows you to select which items, such as playlists, artists, albums, or genres, you want to sync to your iPhone automatically.
- Manual Syncing:If you prefer more control over what gets synced to your iPhone, manual syncing is the way to go. It lets you handpick the songs, albums, or playlists you want to transfer.
Step-by-Step Guide on How To Add Music From iTunes to iPhone
Alright, now it's time to get hands-on with the process. Follow these steps to learn how to add music from iTunes to your iPhone.
- Step 1: Connect your iPhone to your MacBook using a USB cable.
- Step 2: Click the device icon in the upper left side pane of the iTunes window.

- Step 3: From the Settings section, click Music in the left-side navigation pane.
- Step 4: Select the Sync Music checkbox, then select Entire music library or Selected playlists artists, albums, and genres radio buttons.
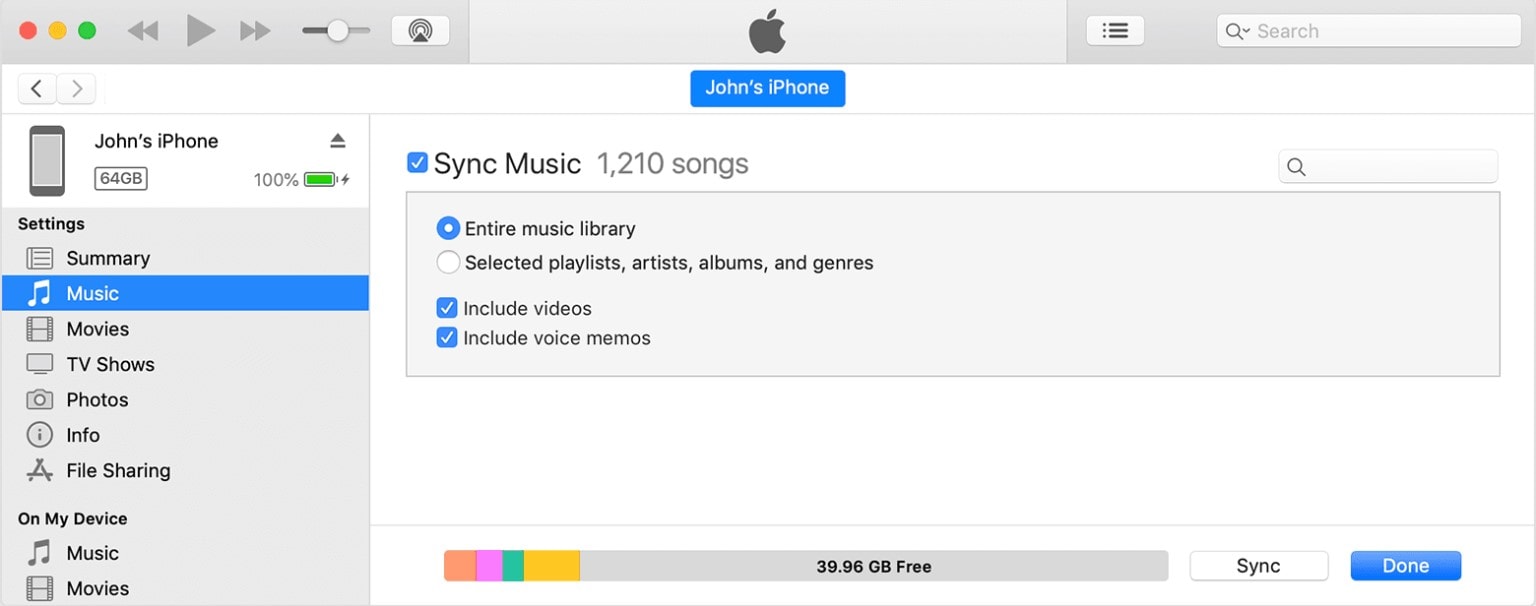
- Step 5: Click Done or Sync to start automatic syncing.
That's it! You've successfully added music files from iTunes to your iPhone. Wasn't that easy? Now you can enjoy your favorite tunes on the go.
You May Also Like:
How to Get Music Off iPhone With Ease?
6 Proven Solutions to Transfer Photos from iPhone to Mac
Top 8 Free Apps to Download Songs on iPhone/iPad/iPod
Conclusion
So there you have it, a guide on how to transfer music from Mac to iPhone without iTunes, and more. Whether you use a third-party app like Dr.Fone, sync your devices, or use iTunes, each method has advantages.
Now it's up to you to decide which method suits your needs best. However, give Wondershare Dr.Fone a try. A user-friendly interface and robust features make it suitable for managing your devices and solving file transfer problems. Remember, as technology evolves, so do your devices. Stay empowered and in control of your music collection.
FAQs
Before wrapping up this article, let's address a few questions when searching for solutions like "How to transfer music from Mac to iPhone without iTunes." Read the FAQs and find the answers you need.
If you're having trouble dragging those MP3 files into iTunes, don't fret. First, ensure you haven't added the media file to your iTunes library. Check the "Recently Added" section, just in case. Another possibility is that the MP3 file is corrupt or in an unsupported format. It's worth checking.
And if you have any security software installed, give it a break temporarily. Disable it, restart your computer, and try importing those MP3 files again. And, are you using the latest version of iTunes, or have you updated your computer?


iTunes
- iTunes Backup
- Restore iTunes Backup
- iTunes Data Recovery
- Restore from iTunes Backup
- Recover Data from iTunes
- Recover Photos from iTunes Backup
- Restore from iTunes Backup
- Free iTunes Backup Extractor
- View iTunes Backup
- iTunes Backup Tips
Daisy Raines
staff Editor