A Complete Guide on How to Transfer Photos from iPhone to Mac
Oct 24, 2025 • Filed to: Device Data Management • Proven solutions
Dr.Fone Basic:
Better Control for Your Phone
Manage, transfer, back up, restore, and mirror your device

Running out of storage on your iPhone? Or just looking for a way to keep your sweet memories safe? Be it switching devices, organizing your photo library, or simply freeing up space, transferring photos to your Mac is the solution.
If you are wondering how to transfer photos from an iPhone to a Mac seamlessly, this guide has got you covered. We have compiled all popular methods to transfer photos from iPhone to Mac. We will start by using the easiest and most proven method, Dr. Fone - Phone Manager for iOS data transfer, and will also review and learn other methods.
So, ready to keep your memories safe and your iPhone storage free? Dive into the best and easiest ways to send photos from iPhone to Mac. But before that, let’s briefly overview why transferring pictures is a good idea!
Part 1. Why Transfer Photos from iPhone to Mac?
Your iPhone can store a great number of important photos. These pictures are the memories you don't want to lose. But soon, with an increasing photo collection, your iPhone will run out of space. In such a case, transferring photos to a Mac is a very good idea.
Here are some notable benefits:
- This clears up space on the iPhone and saves your memories. If your phone gets lost or damaged, the photos will be safe on your Mac.
- Mac also makes it easier to sort out and edit photos. The big screen helps sort, enhance, and organize your snaps in less time.
- If you are upgrading to a new iPhone, the photos transferred to a Mac make it pretty easy to manage and transfer them to the new gadget.
Whether you want to free up space, keep photos safe, or organize them better, transferring onto Mac is your answer. Now, let's look into some easy ways to achieve it.
Part 2. Ways to Export iPhone Photos to Mac
Exporting photos from iPhones and Macs is such a daily routine thing; It doesn't have to be complicated. It is better when it's easier.

Some methods are fast and simple, while others might take a little more time. In this section, we’ll start with one of the easiest and most effective solutions:
Way 1. Top Pick: Wondershare Dr.Fone (Fast and Easy)
Wondershare Dr.Fone is an excellent phone management program that covers data transfer and backup needs for all your desires.Dr.Fone is designed to handle standard data management seamlessly and is pretty flexible and trustworthy to manage all your files. It provides intuitive onscreen instructions to ensure smooth, error-free operations.

Wondershare Dr.Fone
Export iPhone Photos to Mac without iTunes
- Transfer, manage, export/import your music, photos, videos, contacts, SMS, Apps, etc.
- Back up your music, photos, videos, contacts, SMS, Apps, etc., to the computer and restore them easily.
- Transfer music, photos, videos, contacts, messages, etc., from one smartphone to another.
- Transfer media files between iOS devices and iTunes.
- Fully compatible with the newest iOS system.
Steps to Export iPhone photos to Mac using Dr.Fone:
Step 1. Visit Dr. Fone’s official website and download it on your computer. Install it using installation instructions.
Step 2. You must first connect your device to the computer using a USB connection. Launch Dr. Fone and connect your phone to the computer.
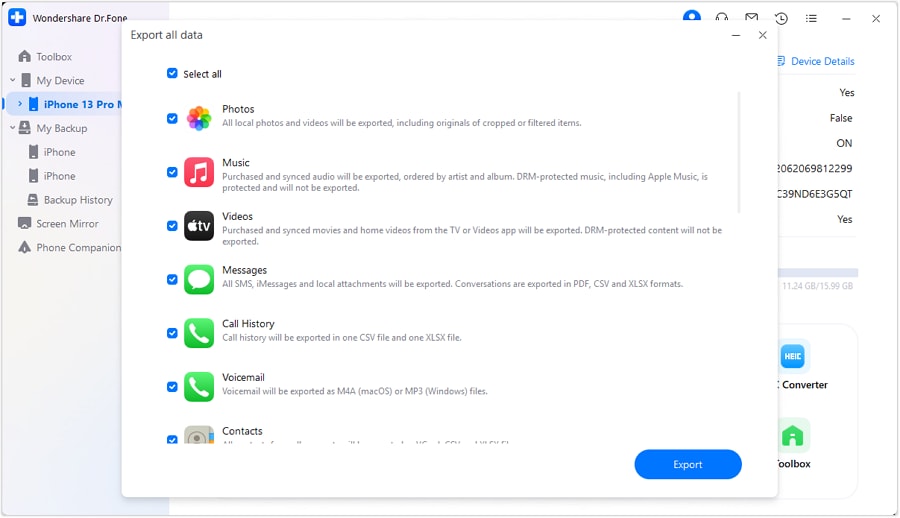
Step 3. Once the device is connected, click on your device name tab. You will see the details of your device and a quick start section. Click the Export all data button.

Step 4. Now, you can select all the data or file types you want. To copy pics from iPhone to Mac, choose Photos. Now click Export.

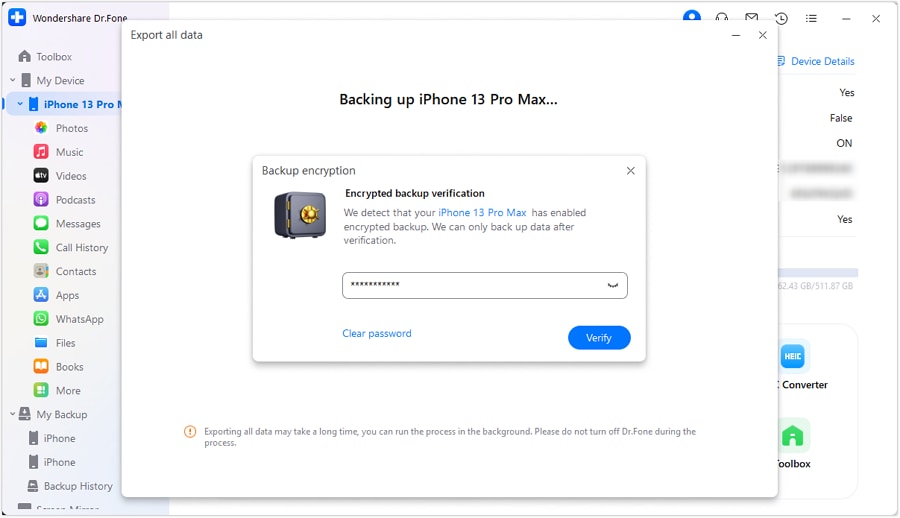
Step 5. After this, Dr. Fone will ask for the encryption password for the data backup. Enter the password for verification and click Done.

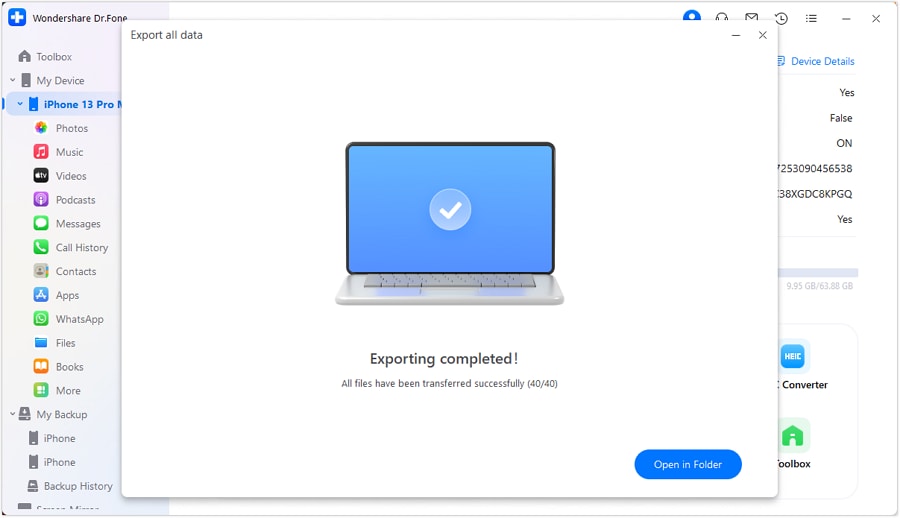
Step 6. Dr. Fone will now start the process to export iPhone pictures to Mac. You can check the progress on your screen.

Step 7. Wait for a while, and it will show the Exporting completed message.

That’s how simple and effortless it is to use Dr. Fone and send iPhone photos to Mac computer. With Dr. Fone's iOS phone transfer, you can also:
- Send data directly from iCloud to your iPhone or computer without any delay.
- Transfer photos and other files between your iPhone, iPad, or iPod touch and iTunes.
- Send photos, videos, and other files between your iPhone and computer – no need to use iTunes or iCloud.
- Back up and mirror your device on the computer for quick access and management.
Now, let’s review another wired method to import photos from iPhone to Mac.
Way 2. Using Photos App
Photos app is the default app to browse, manage, and organize photos and media on iOS devices. You can use this app to directly transfer photos through a USB connection.

Let's learn the method to send photos through the Photos App via USB connection.
Step 1. Connect your mobile with a Macbook using a USB lightning cable.

Step 2. Your phone will show a prompt to ask you if you trust the computer device that is being connected. Tap Trust Device and enter your passcode to continue.

Step 3. Open the Photos App on your Macbook. Under the Devices label, open your iPhone. It will import and show all the device photos.

This method is reliable, and it works online. The only hassle is that you need to manually select and import photos from iPhone to Macbook and manage them accordingly. Whereas Dr. Fone offers a proper iPhone management solution.
We will now learn how to import photos from iPhone to Mac using wireless means.
Way 3. Using AirDrop
Apple provides the built-in AirDrop method for wireless data transfer between two iOS devices. This method requires Bluetooth and a Wi-Fi hotspot for file transfer, but it can work without an internet connection.
Let's learn the step-by-step method to transfer iPhone photos to Mac computer wirelessly using AirDrop.
Step 1. Open AirDrop on the Mac and set the visibility for Everyone.

Step 2. Open your mobile phone and check from the control pane if Bluetooth and Wi-Fi are turned ON. If not, turn them ON.
Step 3. Select the photos that you want to transfer. Click the three dots button and tap Share.
Step 4. Tap AirDrop option and send the photos to your Mac.

Step 5. It will start the transfer process, and you can see the transferred files in Downloads.

Note. Change the AirDrop visibility to Contacts only after file transfer; otherwise, people can send you random files.
This method is fast and secure but it can drain the battery very fast. Moreover, this method can fail if your Bluetooth or Wi-Fi is not working properly. You can use this Apple AirDrop if you need to send fewer files. You should prefer a wired connection if you have a large collection of photos to transfer.
If you want to sync your photos effortlessly using cloud solutions, move on to the next part.
Way 4. Using iCloud Photos
Cloud solutions are preferable mostly because they sync photos automatically without much effort. Apple's default cloud is iCloud. It syncs data between Apple devices using your Apple ID.
Follow the steps below to learn how to sync iPhone photos to Mac using iCloud.
Step 1. Open Settings on iPhone.

Step 2. Scroll down in settings and tap Photos.

Step 3. Toggle ON the switch for iCloud Photos. Your phone will start syncing your photos across different iCloud devices.

Step 4. Launch the Photos app on your Mac. Go to Photos Preferences from the menu and click on iCloud. Click the checkbox with the iCloud Photos. This will start syncing the iCloud photos in the Photos app. You can now access your photos at any time.

Apple gives 5GB of free iCloud storage. If you have more photos, buy more storage or use another cloud option. Dropbox is another popular choice. Let’s move on to using Dropbox.
Way 5. Using Dropbox
Dropbox is a cloud service that is not just limited to iOS and Mac devices; you can access your data on multiple brands and Android devices, too.
It is ideal for personal and professional use and it also lets you share your data using a link.
If you want to use Dropbox, Install the Dropbox App from the Apple store. You can upload your photos to Dropbox using multiple ways:
- Tap and hold on to the Dropbox app, and you will find the Upload Photos option. Tap this and upload your photos to Dropbox.
- Alternatively, open Dropbox, tap the “+” button in the center, and upload photos.
- You can also access Dropbox using the Files app on your iPhone. Open the Files app, and in the location section of the app, you can see Dropbox.

To access your files on Mac, open the Dropbox website or app and download photos.
If you don’t want to use all these methods, you can try using iTunes. iTunes was replaced by Finder in Mac OS Catalina and later.
Part 3. Troubleshooting Common Issues with Photo Transfer
We have listed some common issues with iOS photo transfer and their possible solutions.
3-1. AirDrop Not Working
Check if both Bluetooth and Wi-Fi are turned ON.
Restart both devices and try again.
3-2. iCloud Problem Syncing
Check if iCloud is enabled properly on both devices.
Restart devices to remove any random glitches.
3-3. Device Not Recognized
Update macOS and iOS to the latest version.
Use the original genuine Apple USB lightning cable.
Change the USB port; there may be some issues.
3-4. Slow Transfer Speed
Close background apps.
Transfer in smaller batches.
If you want to avoid all these issues, move photos from iPhone to Macbook using Dr. Fone. It provides an all-in-one iPhone management solution. You can back up and restore your data, save and cherish your memories, and organize your data all in one place.
Conclusion
We have discussed transferring photos from iPhone to Mac using different methods. Methods are explained step-by-step so that you can choose the best according to your preferences. After reviewing them all in detail, we can say that Dr. Fone provides a complete iPhone management solution with safe and easy data transfers.
So, move photos from iPhone to Mac effortlessly using Dr. Fone and say goodbye to iPhone storage limits.
Dr.Fone Basic:
Better Control for Your Phone
Manage, transfer, back up, restore, and mirror your device
iPhone Photos
- Convert HEIC to JPG
- 1. Convert HEIC to JPG on Linux
- 2. Convert HEIC to JPG Windows
- 3. Best HEIC Converter Online
- 4. Convert HEIC to JPG High Quality
- Export iPhone Photos
- 1. Upload iPhone Photos to Google Drive
- 2. Transfer Photo from iPhone to PC
- 3. Transfer Photo from iPhone to iPhone
- 4. Transfer from iPhone to iPhone
- 5. Transfer from iPhone to iPad
- 6. Move iPhone Photo to External Drive
- 7. Transfer from iPhone to Flash Drive
- 8. Extract Photos from iPhone
- 9. Download Photo from iPhone
- Import Photos to iPhone
- 1. Transfer from Laptop to iPhone
- 2. Transfer Photo from Camera to iPhone
- 3. Transfer Photo from Mac to iPhone
- 4. Transfer Photos from PC to iPhone
- 5. Transfer from iPhone to PC
- 6. Transfer from Android to iPhone
- 7. Transfer from Samsung to iPhone
- Manage iPhone Photos
- 1. Back up iPhone Photos
- 2. Get Photos off iPhone
- 3. Send Large Size Photos from iPhone
- 4. Photo/Video Compressor Apps
- 5. Delete Photos from iPhone/iPad
- 6. iPhone Photos Disappeared Suddenly
- 7. iPhone Photoshop Alternatives
- Recover iPhone Photos
- 1. Restore Deleted Photos from iPhone
- 2. Recover Photos from iPod Touch
- 3. Recover Deleted Picture from iPhone
- Transfer iPhone Photos to Mac
- Transfer iPhone Photos to PC
- 1. Transfer Data from iPhone to PC
- 2. Transfer Photo to Computer
- 3. Transfer Photo to PC without iTunes
- 4. Transfer Library to Computer
- 5. Send Photo from iPhone to Computer
- 6. Import Photo from iPhone to Windows
- 7. Transfer Photo to Windows
- Transfer Photos from Google Drive
- 1. Download from Google Drive to iPhone
- 2. Transfer from Google Photo to iPhone
- 3. Download from iCloud to iPhone
- Transfer Photos to Google Drive
- Image Convert Tips
- ● Manage/transfer/recover data
- ● Unlock screen/activate/FRP lock
- ● Fix most iOS and Android issues
- Learn More Learn More


Alice MJ
staff Editor