Share Screen on Mac: Everything You Need To Know

Jul 12, 2024 • Filed to: Mirror Phone Solutions • Proven solutions
Screen Sharing Mac is a great way to show your computer screen activities to other parties. Suppose you're looking to show a business presentation to your colleagues via a zoom call, share a movie from your computer screen to a TV, or more. Screen sharing will help you achieve your goal seamlessly.
If you don't know how to screen share Mac, don't panic. This guide will introduce you to different methods that you can use to perform the operation quickly and easily. You don't necessarily need to be tech-savvy!

Part 1. Is it Possible to Share My Screen on a Mac?
Yes, of course. You can screen share Mac, and the good thing is there are various methods to get the job done. You can either use the macOS built-in screen-sharing feature, AirPlay Feature, or a Mac screen-sharing third-party app. The method you choose depends on your needs.
Regardless of what method you wish to use in screen sharing Mac, we've explained the simple steps to go about it without necessarily requiring technical knowledge. Read on to find out more.
Part 2. How to Use Screen Sharing on Your Mac Computer?
As mentioned earlier, Mac supports a built-in screen-sharing feature that facilitates sharing of a Mac computer's entire screen or a specific window with another Mac user over a stable internet connection. To use this feature, you must ensure the screen-sharing feature is enabled on both Mac computers you intend to use for the screen-sharing operation.
The following steps explain how you can use Mac screen sharing to share screens on Mac:
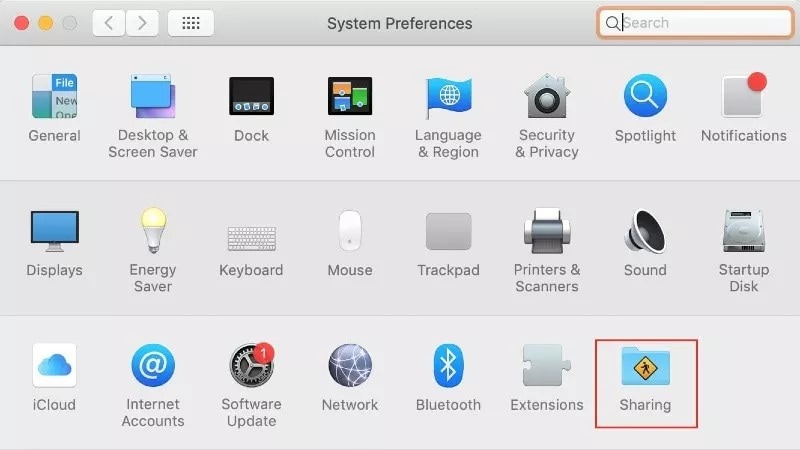
Step 1: Enable Mac Screen Sharing
- Click the Apple Logo at the top-left corner of your screen and select System Preferences from the drop-down menu. Then, select Sharing on the new page.
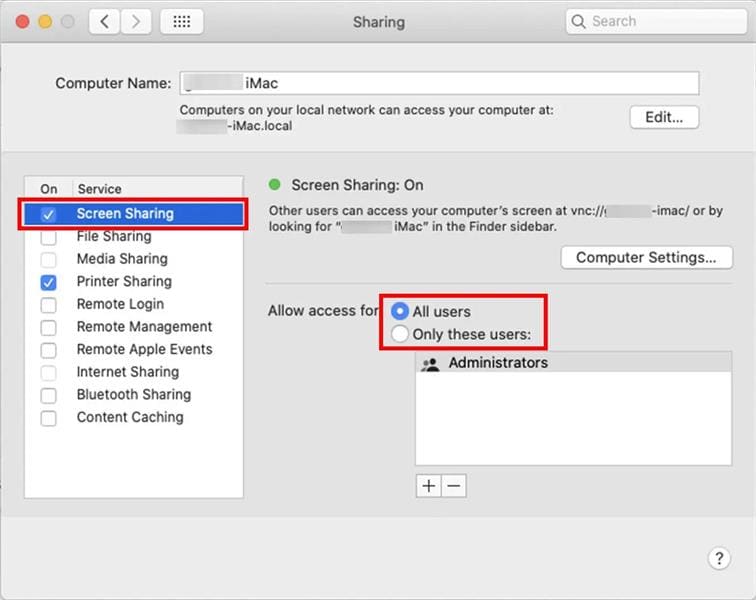
- Tick the check box next to Screen Sharing from the left side of your screen.
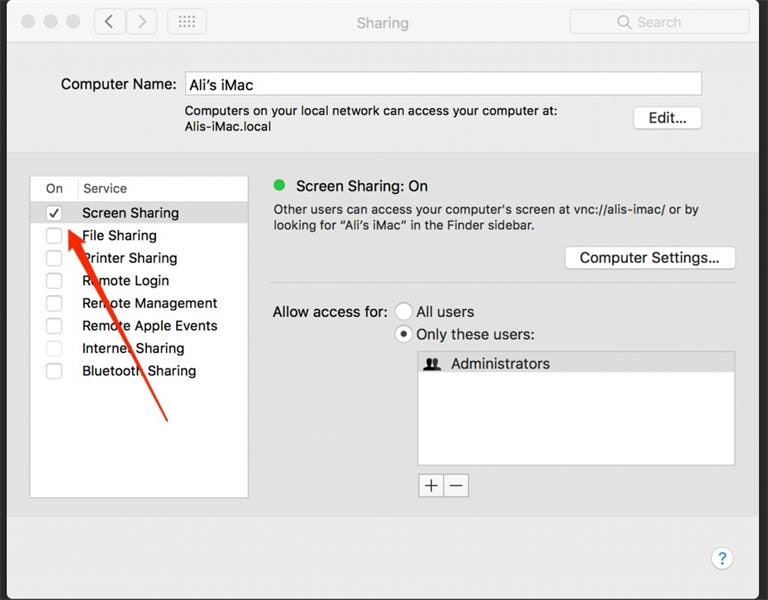
Step 2: Setup Screen Sharing Permissions
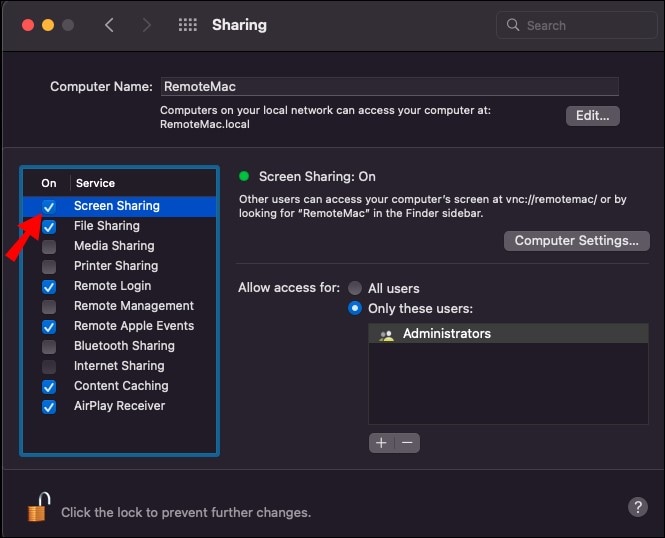
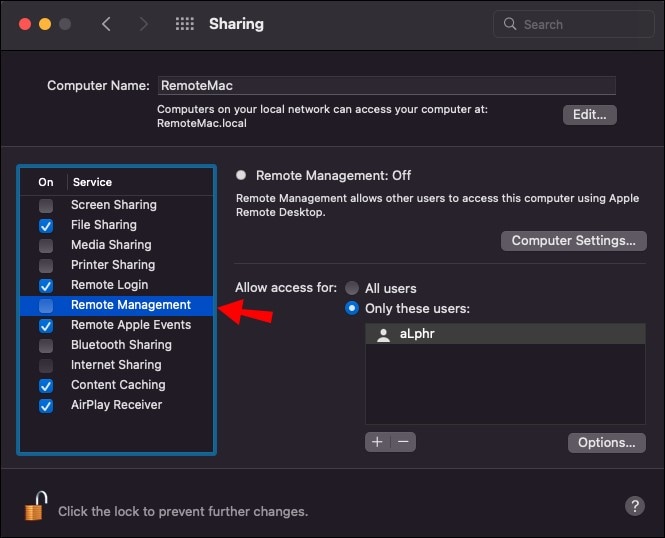
- Once you've turned on the screen-sharing feature, scroll down to Remote Management and ensure it's turned off. Then, navigate to the tagged as "Allow Access for" and click the radio button next to All Users or Only These Users. If you select only these users, click the plus icon at the bottom of the screen and add the users with whom you wish to share your screen.
- Also, you can click Computer Settings and select a preferred method of how you want users to request permission to control your computer screen.
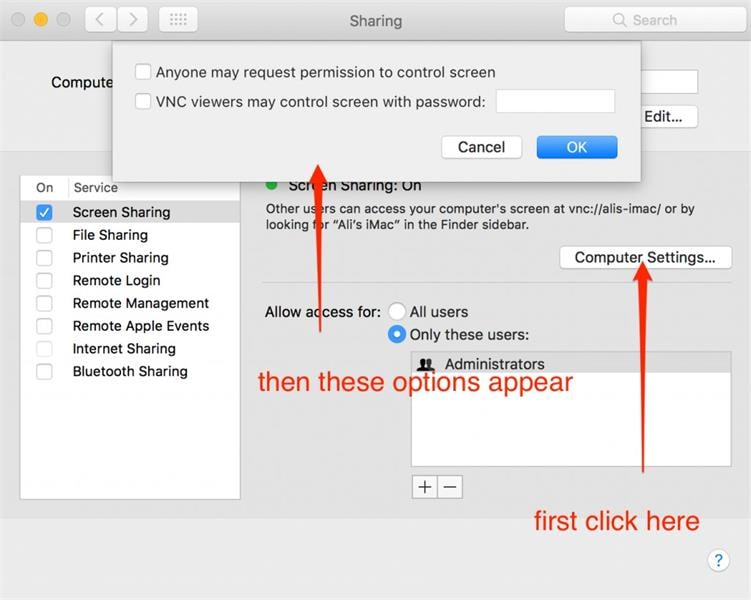
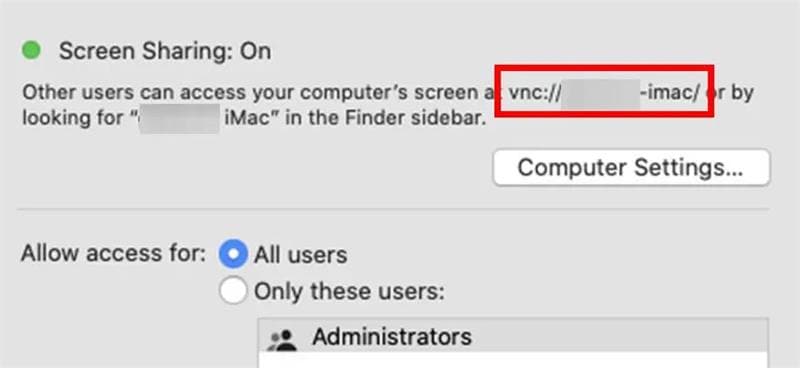
After that, note the VNC address that shows under 'Screen Sharing: On' on the right-hand side. The address looks like vnc://[IPAddress] or vnc://[Name.Domain].
Note: Turn off Remote Management if it's turned on.
Step 3: Access Your Mac's Screen over a Local Network
There are two ways to connect the other Mac computer to yours. You can either connect them via the address or by using the name. We've explained how to use each method below:
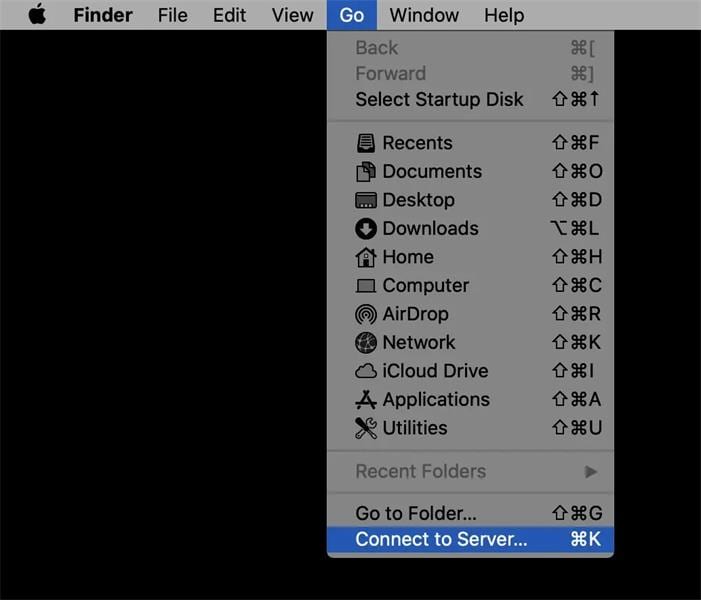
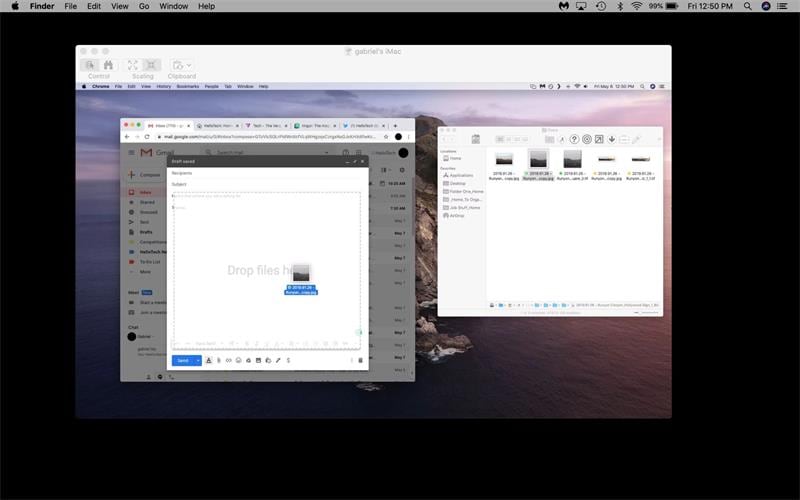
- Connect via Address: Open the Finder app on the Mac where you intend to view your screen. Select Go from the top bar and click Connect Server.
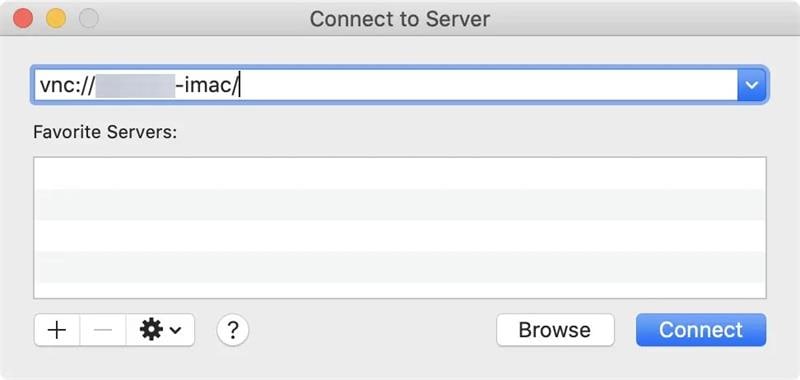
- Then, enter the VNC address of the Mac whose screen you intend to share and click Connect.
- Connect Via Name: Open Finder and click Network from the Locations section of the sidebar. Then, double-click the Mac whose screen you want to share and click Share Screen. If you can't find any option in the Location section, click the arrow icon ">".
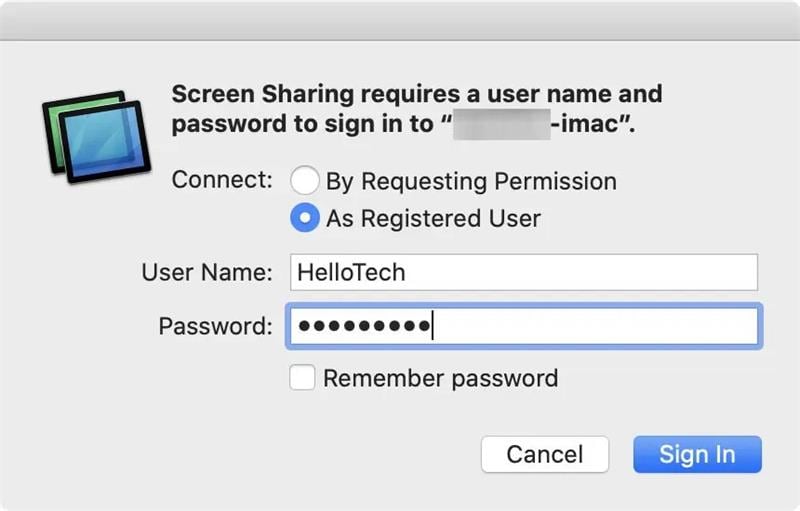
- The screen-sharing operation should begin instantly If you're logged in to both computers using the same Apple ID. But if not, enter the username and password of the Mac whose screen you intend to share. Then, click Sign In to begin the screen-sharing operation.
Step 4: Connect Remotely to Your Office Mac Using Screen Sharing
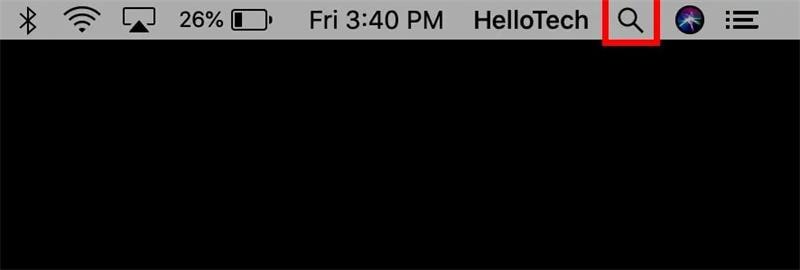
- Click the Magnifying glass icon at the top-right side of your computer screen to open Spotlight. Or just click Command + Space Bar on your keyboard to get the job one.
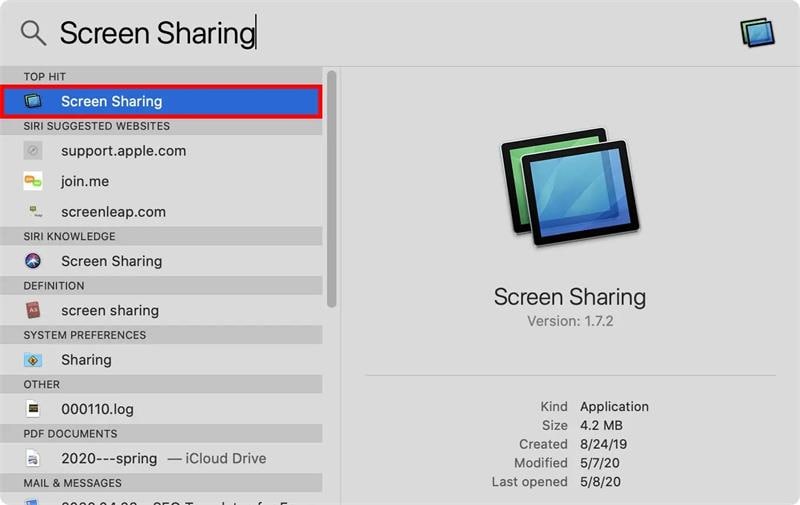
- Type Screen Sharing in the search bar and click Enter. Then, select the top search result.
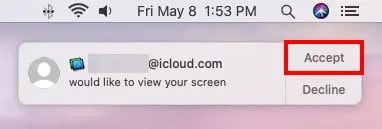
- Type the Apple ID of the office Mac computer you're looking to access remotely in the text box next to "Connect To." Then, click Connect to proceed.

- Click Accept from the notification message that appears on the office computer.
- Once the request to allow screen sharing on the office computer has been accepted, a new window should appear asking you to choose whether to allow the user to control the computer screen (Control My Screen) or just view the screen without controlling it (Observe My Screen).
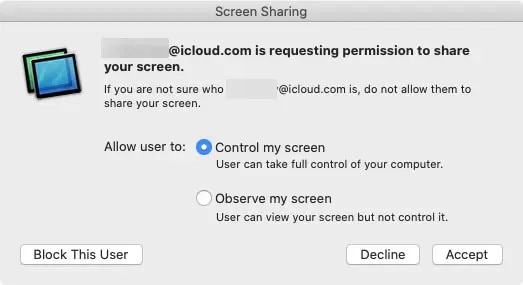
- After you've selected the preferred option, the office Mac computer screen should start showing on your Mac computer.
Note: Your screen-sharing app must be opened on both computers at all times during the screen-sharing process.
Pros and Cons of Mac Screen Sharing App
Pros
- You don't need to install a third-party app.
- It offers a wide variety of functions.
- High-quality screen sharing.
- It's free.
- Facilitate remote control of Mac computer.
Cons
- Newbies might find the steps confusing.
- Some users report frequent crashes while using the tool.
Part 3. Other Ways to Share Screen on Macbook
Besides using Mac's built-in screen-sharing tool, other workarounds can be used to screen share on MacBook.
Here, we've explored four additional methods that anyone can use to execute the operation quickly and easily. Read on to find the method that suits your requirements.
Method 1. Access a Mac via iMessage
As surprising as this might sound, the iMessage app can be used to Screen Share Mac, and it does the job perfectly.
The iMessage app supports a built-in screen share feature that allows you to share your screen with another iMessage user within a few clicks. You just need to ensure you have set up iMessage on your Mac and have the other person's email or phone number in your iMessage contact.
See how to share screen Mac using iMessage:
Step 1: Open iMessage and select a preferred conversation thread.
Step 2: Click the Info (i) icon at the top right corner and select Share.
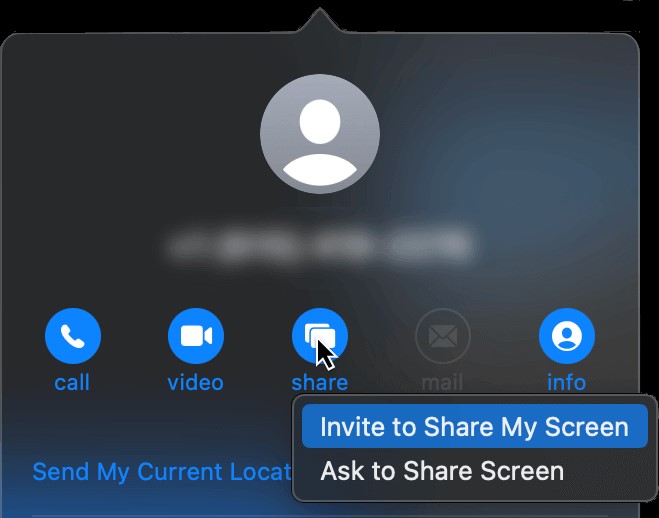
Step 3: Select Invite to Share My Screen or Ask to Share My Screen.
Step 4: Once the other person accepts the request, an audio call will be initiated instantly. Then you can start sharing your screen while chatting.
Step 5: Click End Screen Sharing to end the operation once you're done.
Method 2. Enable Screen Sharing on Mac via AirPlay
AirPlay can also be used to share screens on Mac. As we all know, AirPlay allows wireless audio and video streaming from Mac to Apple TV or other compatible devices. So, it's a great choice if you intend to share a Mac screen.
However, you must ensure that both your Mac computer and the other device you minted to share your screen with are connected to the same WiFi network.
The steps to use AirPlay in sharing Mac are as follows:
Step 1: Open the Control Center on your Mac computer and select Screen Mirroring.
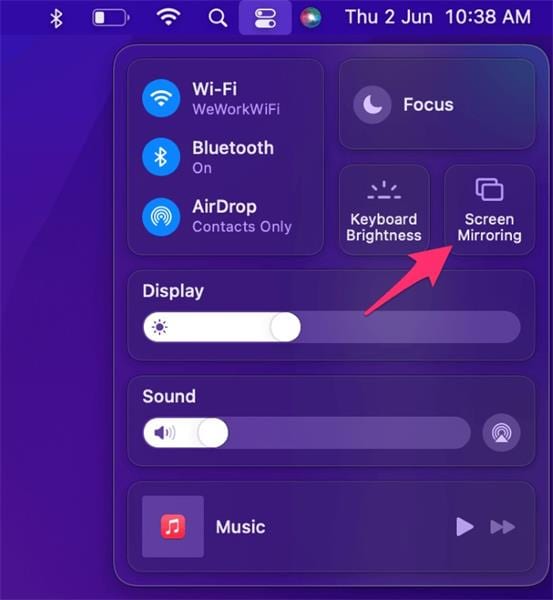
Step 2: You should see a list of devices displayed on your screen. Click your TV.
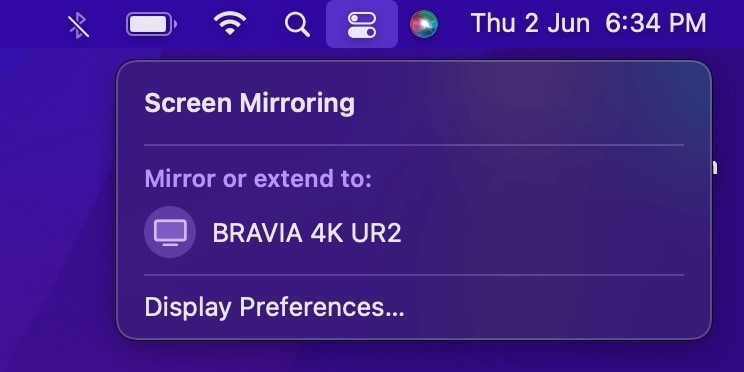
The Mac computer should start screen sharing instantly.
Method 3. Remote access a Mac Using Chrome Remote Desktop
You can also rely on the Chrome Remote Desktop tool to share the Mac screen. It's a tool developed by Google to enable users to remotely access and control another computer via the internet. And it's available on any device running a chrome browser.
To use the Chrome Remote Desktop tool, you must ensure the extension is installed on your Mac and the other computer you wish to share your screen with.
See the steps to help you operate smoothly below:
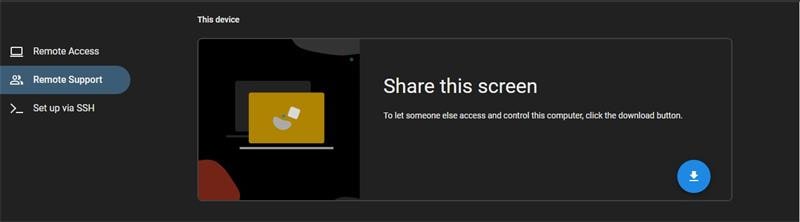
Step 1: Open remotedesktop.google.com/support in the chrome browser on your Mac computer.
Step 2: Click Remote Support from the left side of the screen and click the Download icon next to Share this Screen.
Step 3: Follow the on-screen instruction to set up the downloaded app.
Step 4: Select Generate Code under Get Support.
Step 5: Copy the code and open remotedesktop.google.com/support in the Chrome browser of the Mac computer you wish to access remotely. Then, paste the code under Connect to Another Computer in the Access Code area.
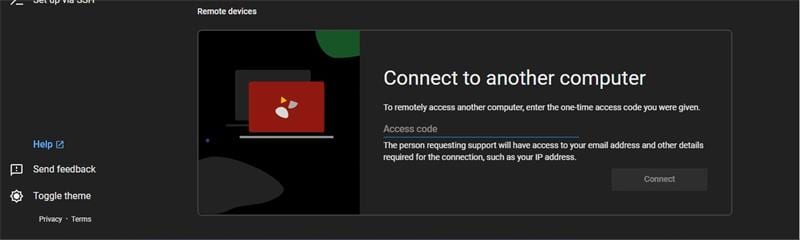
Step 6: Once you enter the code, you should see a dialog with an e-mail address on your computer screen. Select Share to start accessing the Mac computer remotely.
Step 7: Once you're done with the screen-sharing operation, click Stop Sharing to finish.
Method 4. Alternative Third-Party Apps
There are also third-party apps that facilitate Mac screen sharing. Read on to find out the best ones that you can employ for the task.
1. FaceTime
The first app on our list is the FaceTime app. The FaceTime app supports a built-in screen share feature known as SharePlay. SharePlay allows users to share various experiences on their device's screen during a FaceTime video call. However, it only works with macOS 12.1, iOS 15.1, iPadOS 15, or later.
Step 1: Open FaceTime on your macOS.
Step 2: Select New FaceTime or choose a contact you FaceTime recently and make the call.
Step 3: Click the Share Play icon once the call connects.

Step 4: Click on Window to share a specific window or Screen to share your PC's entire screen.
- The other person should be able to see the shared screen or Window during the FaceTime call.
2. Zoho Meeting
Zoho Meeting is a tool that enables seamless screen sharing on Mac, and you don't necessarily have to install any app. It facilitates secured Mac screen share, thus enabling you to share your presentations or other on-screen activities with your colleague or other parties without any worry. You don't even need technical knowledge to operate it.
The following steps explain how to use Zoho Meeting to share screens on Mac;
Step 1: Open Zoho Meeting and sign up for an account for free.

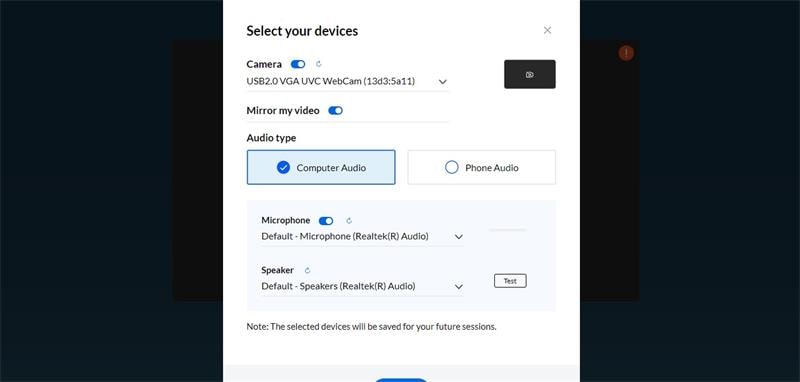
Step 2: Click Meet Now and select Video Conferencing.

Step 3: Copy the invitation link from the pop-up and send it to the person with whom you want to share your computer screen. Then, adjust the settings according to your requirements.
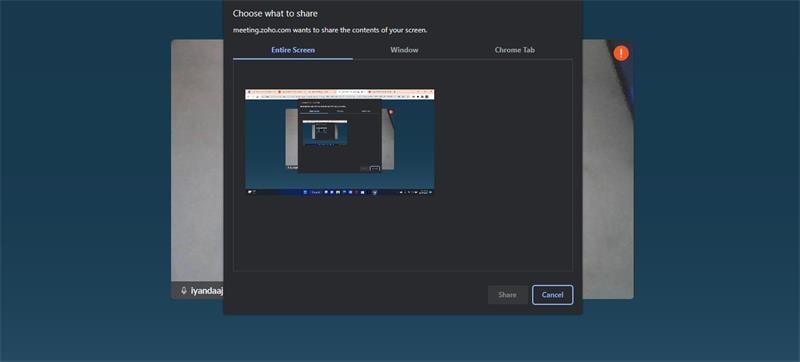
Step 4: Click the Share icon at the bottom of your computer screen and select Share Screen.

Step 5: Choose whether to share your computer's Entire Screen, Window, or Chrome Tab.
Step 6: The tool should start sharing your Mac computer screen instantly. Once you're done, click Stop Sharing to end the screen recording.

3. TeamViewer
TeamViewer is an easy-to-use remote control software that can also be used to share Mac screens remotely. It allows you to share a Mac screen over the internet, and thanks to its simple interface, you only need a few clicks to employ it in sharing your screen with other parties. To use this tool, you must ensure both devices have the TeamViewer app installed.
Step 1: Download and install the Team Viewer software on your Mac.
Step 2: Launch the installed app and click Meeting from the left side.
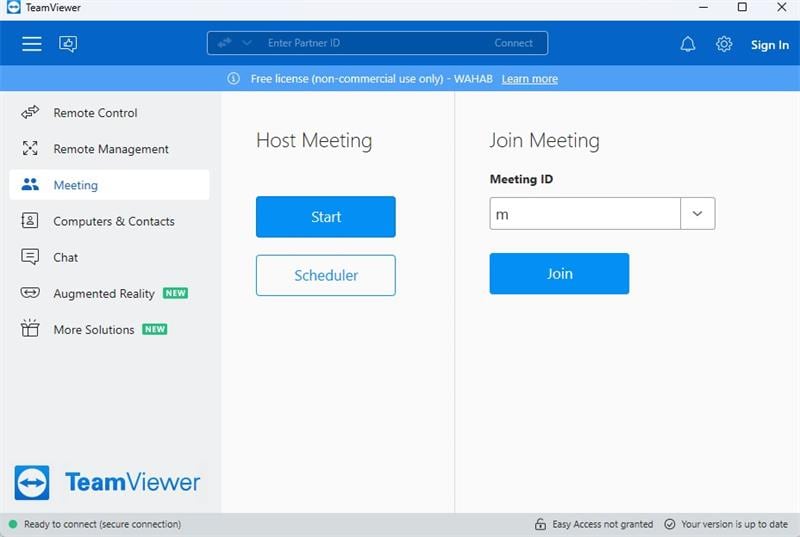
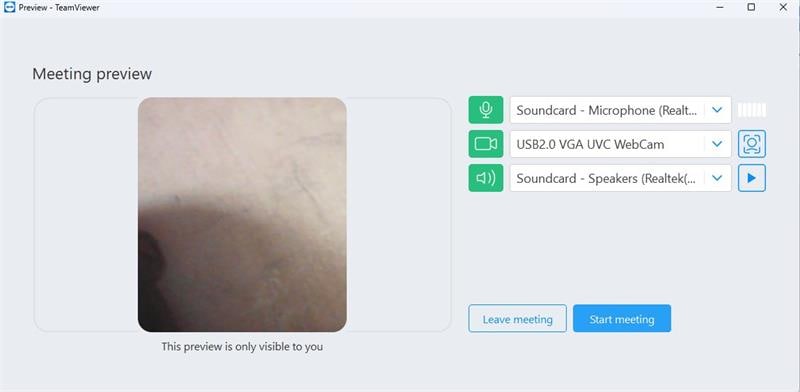
Step 3: Click Start and select Start Meeting.
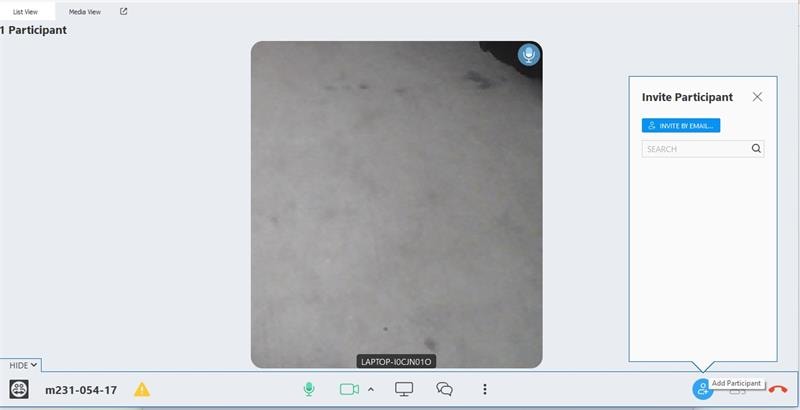
Step 4: Click the icon at the bottom left corner and invite a participant via email. Alternatively, you can search for the participant's email or username.
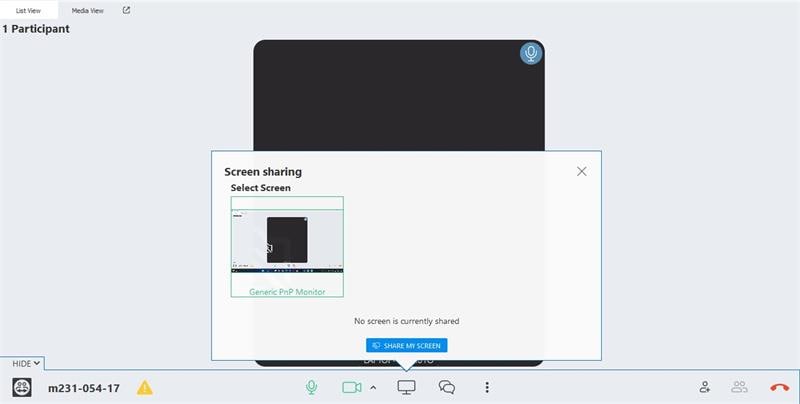
Step 5: Click the Share Screen icon at the bottom of the screen and select Share My Screen from the pop-up.
Step 6: Once you're done with the screen sharing, click the End Sharing icon at the top of the screen to finish sharing the Mac screen.
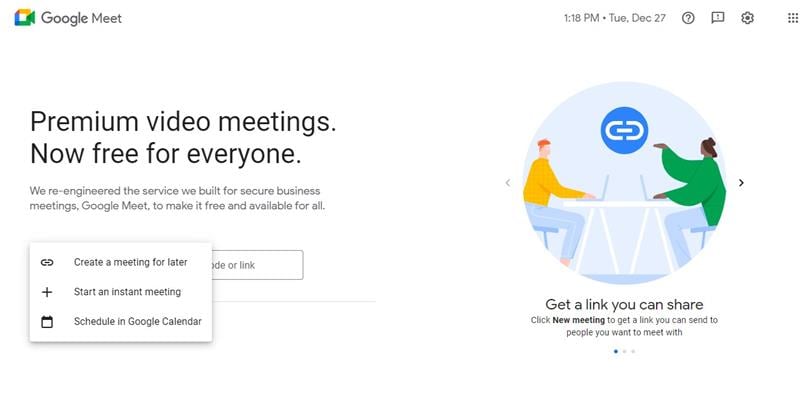
4. Google Meet
You might have heard of Google Meet. But do you know it also allows remote sharing of a computer screen? It can be used to share Mac full screen or a specific window without any complication. You don't even need to install any app.
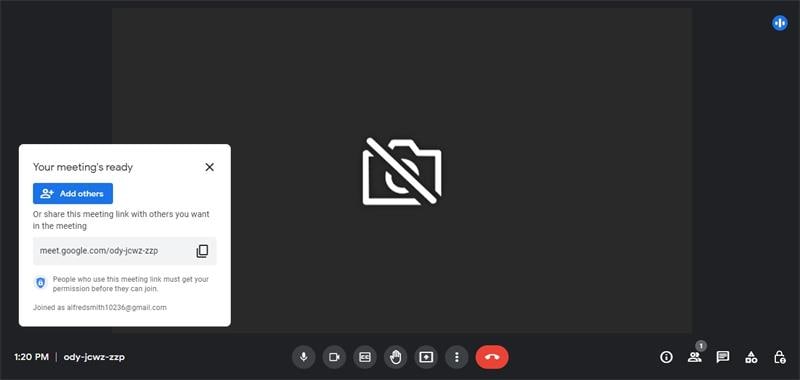
Step 1: Open Google Meet in your device's Chrome browser and click Start Meeting > Start an Instant Meeting.
Step 2: Click Add Others to add other participants to the meeting, or just copy the meeting ID and share it with the person with whom you want to share your Mac screen.
Step 3: Click the Share icon at the bottom of the screen and select a preferred option from the pop-up list.
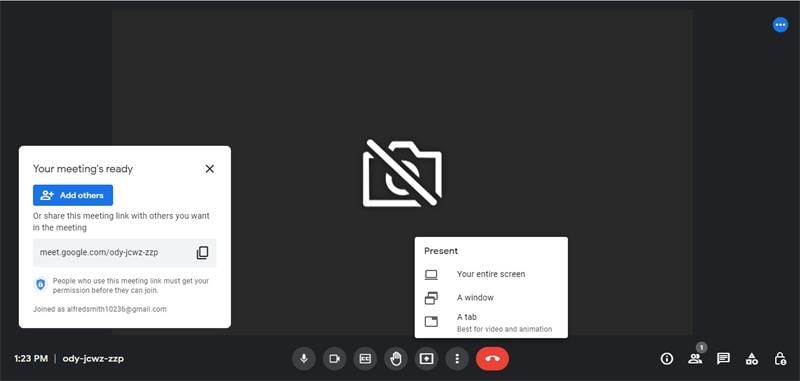
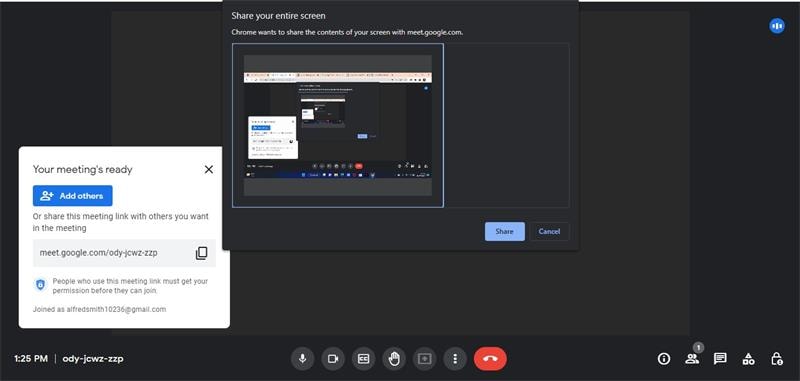
Step 4: Select the area of your Mac screen to share and click Share to begin the operation.
Step 5: Once you're done, click Stop Sharing to end the operation.

Part 4. How to Reduce Risk When Sharing Your Screen on Mac?
The best way to reduce risk when sharing your Mac screen is to enable firewall and stealth mode on your computer. Doing this will prevent your Mac computer from responding to ping requests or connection attempts from closed TCP or UDP networks, thus making it difficult for malware or hackers to invade your computer.
The following steps explain how to enable firewall and stealth mode on Mac:
Step 1: Click the Apple icon from the top-left corner and select System Preference.
Step 2: Locate and click on Security & Privacy option. Then, select the Firewall tab.
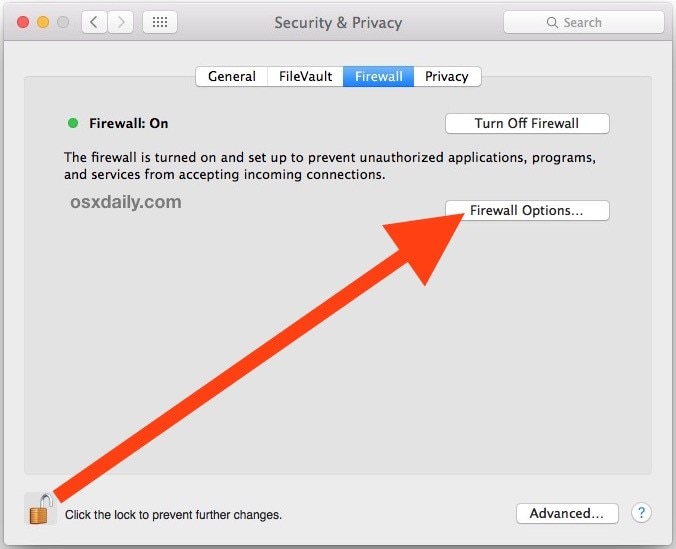
Step 3: Click the unlock button and authorize it with an administrator password. Then, click 'Enable firewall'.
Step 4: After that, click the 'Firewall options' button. Tick the check box next to "Enable Stealth Mode" and click OK to finish.
Part 5. FAQs About Screen Sharing on a Mac
1.Does Mac Screen Sharing Work Over the Internet?
Yes, of course. You can share your Mac screen remotely via the internet. You don't necessarily need to be on the same local network as the receiving computer to share your screen.
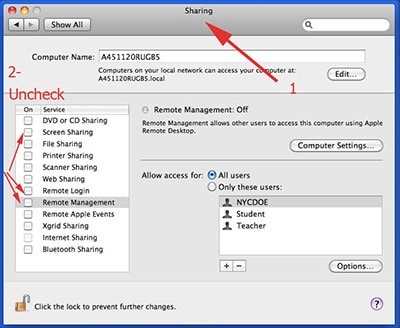
2.How to Turn off Screen Sharing on Your Mac?
You can turn off screen sharing on a Mac computer by doing the following;
- Click the Apple icon at the top-left corner and select System Preferences. Then, locate and click on Sharing.

- Untick the checkbox next to Screen Sharing, Remote Management, and Remote login.
3.How To Fix Screen Share Not Working on a Mac?
There are various ways you can fix screen share not working on Mac.
- Firstly, you need to check whether the screen-sharing feature is turned on on your Mac. To do that, just go to System Preference and select Sharing. Then, locate Screen Sharing and tick the checkbox next to it to turn it on.
If screen share does not still work, then you need to check whether the app you want to share your screen through has permission to record your screen. To do this, just go to System Preference and do the following;
- Select Security & Privacy.
- Click the Privacy tab and select Screen Recording.
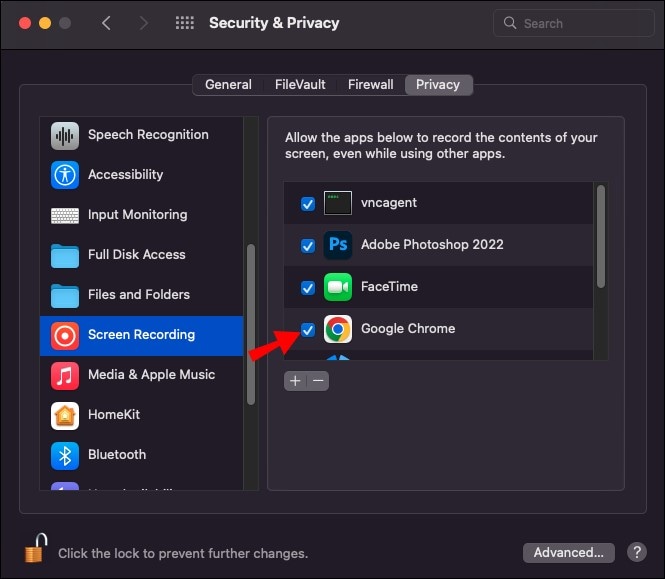
- Tick the checkbox next to Google Chrome and restart the browser.
- Another thing you must do for screen sharing to work is to turn off Remote Management. To do this, go to System Preference and select Sharing. Then, locate the Remote Management option from the left-hand side and untick the checkbox next to it.
4. How to Mirror iPhone to Mac/MacBook?
The most efficient way to mirror iPhone to Mac is by using an advanced screen mirroring tool like Dr.Fone Air. Yes, Dr.Fone Air is a dedicated online screen mirroring tool that facilitates a seamless iPhone screen mirroring to Mac wirelessly.
And unlike many of its competitors, it does not support ads, which makes it very easy to use. Besides, Dr.Fone Air is 100% free. So, you don't have to pay a dime to mirror your iPhone screen to Mac.
Key Features
- Simple user interface.
- Connect your devices wirelessly without using Bluetooth or NFC.
- It's compatible with any device, including Mac, Windows, Android, and iPhone.
- It's ads-free.
See how to use Dr.Fone Air to mirror iPhone to Mac or MacBook below:
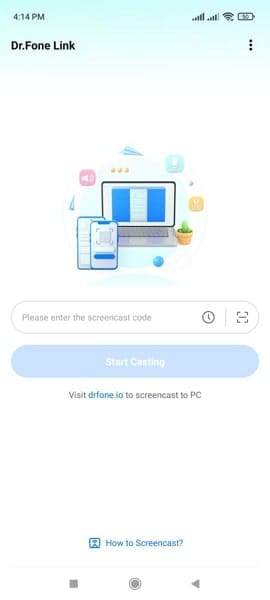
Step 1: Open Dr.Fone Air on your Mac computer and download the Dr.Fone Air app on your iOS device.
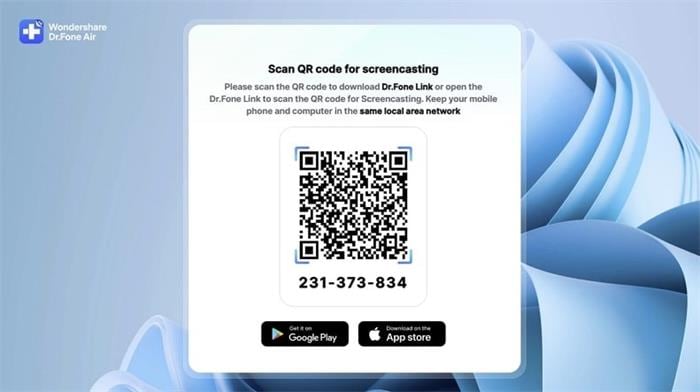
Step 2: Set up the Dr.Fone Air app on your phone and follow the on-screen instruction to set it up. Then Scan the QR code on your Mac computer screen or enter the cast code in the relevant area on your phone to establish a connection between both devices.
Step 3: Your iPhone should be mirrored to the Mac computer instantly.

Conclusion
There you have it. The article above has covered the comprehensive methods to share screen MacBook. You don't necessarily need to be tech-savvy to employ any of the Mac screen share methods recommended above. However, if the need to mirror your mobile device screen to a PC arises, then a tool like Dr.Fone Air can come in handy for the operation.


Other Popular Articles From Wondershare
Screen Mirror Tips & Tricks
- iPhone Mirror Tips
- Mirror iPhone to iPhone
- iPhone XR Screen Mirroring
- iPhone X Screen Mirroring
- Screen Mirror on iPhone 8
- Screen Mirror on iPhone 7
- Screen Mirror on iPhone 6
- Cast iPhone to Chromecast
- Mirror iPhone to iPad
- Screen Mirror on iPhone 6
- Apowermirror Alternative
- Android Mirror Tips
- Screen Mirroring Huawei
- Screen Mirroring Xiaomi Redmi
- Screen Mirroring App for Android
- Mirror Android to Roku
- PC/Mac Mirror Tips
James Davis
staff Editor