 Permanently erase all iOS & Android data—completely unrecoverable.

 100% Security Verified | No Subscription Required | No Malware

 :
: 
 ChatGPT
 Perplexity
 Gemini
 Claude
 Grok
Grok
Attempting to permanently erase data from your iPhone or iPad is a critical step for protecting your privacy, especially when selling or recycling a device. However, encountering a "failed to erase data" error can be both frustrating and concerning. This issue can arise from a variety of factors, including software conflicts, incorrect device settings, or connection problems.
Fortunately, most data erasure failures can be resolved with a systematic troubleshooting approach. In this guide, we will walk you through the essential checks and advanced solutions to fix the problem and ensure your personal information is securely and completely wiped from your device.
In this article
Part 1. Essential Preliminary Checks to Fix Erasure Failures
Before diving into more complex settings, let's start with the most common and easily fixable issues that can cause the data erasure process to fail. These initial steps often resolve the problem without needing further action.
1-1. Update the Data Eraser Software
Software developers frequently release updates to fix bugs, improve compatibility with new iOS versions, and enhance performance. Using an outdated version of the data eraser tool is a primary cause of failure. Check your software version in the Menu > About section. If it's not the latest, update it through Menu > Check for Update or by downloading the newest version directly.

1-2. Unlock Your iOS Device
During the entire erasure process, your iOS device must remain unlocked. If the screen locks or the device goes to sleep, the connection between the software and your iPhone or iPad can be interrupted, leading to a failure. Keep the device awake and responsive before starting the erase and monitor it throughout the process.
1-3. Close All Background Applications
Applications running in the background, especially those that are updating or syncing data, can interfere with system-level operations like data wiping. Before you begin, double-tap the Home button (or swipe up from the bottom on newer iPhones) and swipe up on all open app previews to close them completely. This ensures the data eraser has the full resources of the device.
Part 2. Configuring Key Settings on Your Device and iTunes
If the preliminary checks didn't solve the issue, the problem likely lies within your device or iTunes settings. These configurations are designed to protect your data, but they can sometimes block legitimate erasure tools.
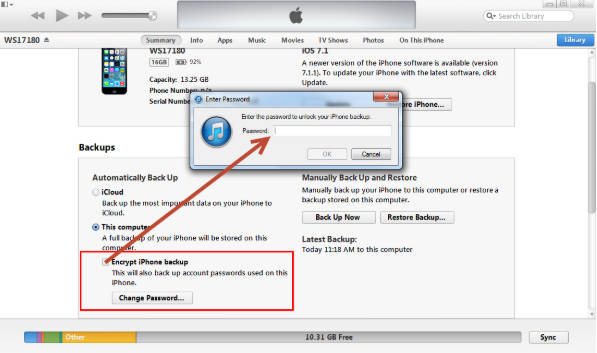
2-1. Disable iTunes Backup Encryption
If you've previously created an encrypted backup in iTunes, this setting can prevent third-party tools from accessing the device properly. You must disable it before proceeding.
-
Step 1 Connect your device to your computer and open iTunes.
-
Step 2 Select your device icon and navigate to the Summary page.
-
Step 3 Under the Backups section, uncheck the box for Encrypt local backup. You may need to enter your backup password to confirm.
2-2. Ensure Sufficient Free Storage Space
The data erasure process often requires temporary working space on your device to overwrite existing data effectively. If your device's storage is almost full, the process may fail. Go to Settings > General > [Device] Storage to check your available space. As a rule of thumb, the free space should be at least equal to the size of your largest data category, such as Photos.
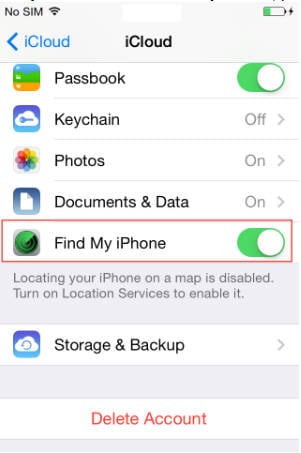
2-3. Temporarily Disable Find My iPhone
Find My iPhone is linked to Apple's Activation Lock, a powerful anti-theft feature that prevents unauthorized erasure of your device. This feature must be turned off before you can perform a complete data wipe. To disable it, navigate to Settings > [Your Name] > Find My > Find My iPhone and toggle it off. You will need to enter your Apple ID password.
 Permanently erase all data on iOS & Android — completely unrecoverable.
- Military-grade wiping to fully protect your privacy.
- Generate verified erasure reports to boost device resale value.
- Selectively erase private data and remove junk & large files.
Part 3. Advanced Solution: The iTunes Backup and Restore Method
If you have tried all the steps above and the erasure still fails, there may be a minor software corruption or glitch within the iOS itself. Performing a backup and restore via iTunes can often fix these underlying issues, creating a clean slate for the data eraser to work properly. Ensure you follow these steps precisely.
-
Step 1 Connect your device to your computer and launch iTunes.
Select your device's icon in the top-left corner to access its summary page.
-
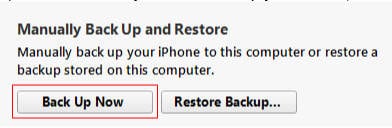
Step 2 Create a fresh backup.
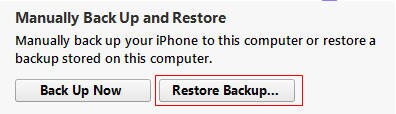
In the Summary tab, click on Back Up Now. This ensures all your current data is saved before you proceed with the restore. Wait for the backup process to complete fully.
-
Step 3 Restore your device from the backup.
Once the backup is complete, click the Restore Backup... button. Select the backup you just created from the list and proceed. iTunes will wipe the device and then reinstall your data and settings from the backup file.
-
Step 4 Attempt to erase the data again.
After the iTunes restore process is successful, your device's software should be in a stable state. Now, run the Data Eraser software again to perform the final, permanent wipe.
Conclusion
When you fail to erase data, the solution is typically found by working through a checklist of potential issues. Start with the basics: update your software, unlock your device, and free up system resources. Then, move on to critical settings like disabling backup encryption and Find My iPhone. For persistent problems, the iTunes backup and restore method is a powerful technique to resolve underlying software conflicts. By following these steps, you can overcome erasure errors and confidently secure your personal information.
FAQ
-
1. Why does my data eraser tool keep failing?
The most common reasons for failure include using an outdated version of the software, the device screen being locked, active background apps interfering, security settings like 'Find My iPhone' being enabled, or insufficient storage space on the device. -
2. Is it safe to disable 'Find My iPhone' to erase data?
Yes, it is safe and necessary to disable 'Find My iPhone' to allow a third-party tool to perform a full system wipe. This feature is designed to prevent such actions for security. Just remember to re-enable it if you plan to keep using the device, or leave it off if you are selling or giving it away. -
3. Will using the 'Restore Backup' option in iTunes delete my data permanently?
The 'Restore Backup' function itself does not lead to permanent data loss. It first wipes the device and then reinstalls all the data and settings from the backup file you selected. The purpose of this step in our guide is to fix iOS glitches. The permanent deletion happens afterward when you successfully use the Data Eraser tool. -
4. What should I do if the erasure still fails after trying all these steps?
If you have diligently followed all the troubleshooting steps, including the iTunes backup and restore method, and the erasure still fails, there might be a more complex software issue or a problem with the tool's compatibility with a specific iOS beta version. At this point, it is best to contact the software's customer support for specialized assistance.
 Add Wondershare Dr.Fone as a preferred source on Google




