What Are the Problems of iOS 17 Beta and How to Downgrade?

Dec 16, 2025 • Filed to: Phone Repair Solutions • Proven solutions
The release of a new iOS version is always met with excitement and anticipation. With each update, Apple introduces innovative features, enhanced security, and improved performance. It makes iOS devices even more capable and enjoyable to use. However, the beta versions, such as iOS 17 Beta, provide early access to upcoming features.
iOS 17 Beta may entice adventurous users to experience the latest advancements. However, it is important to remember that beta software has many bugs that are yet to be resolved. In this article, we will explore the common problems experienced with the iOS 17 Beta. It will provide a walkthrough detailing the process of the iOS 17 beta downgrade.
Part 1: Problems Users Facing After Installing the iOS 17 Beta
Apple's iOS 17 Beta promises an exciting glimpse into the future of its operating system. However, it is not the final release, and as such, it may be plagued with several issues. The early adopters get to explore upcoming features and offer their feedback.
They also risk encountering a range of problems that can lead to a downgrade from the iOS 17 beta. Some of the developer or public beta version problems are described below:
1. App Compatibility Issues
The iOS 17 Beta often causes compatibility issues with third-party apps. It results in crashes and unexpected behavior. Developers need time to update their apps to match the new iOS version. That's why users can face crashes, freezes, or unexpected behavior from such apps.
2. Performance Hiccups
Beta software is notorious for not being as optimized as the final release. Users may encounter performance hiccups, like lag, slow app launches, and overall sluggishness. These issues can be frustrating for day-to-day use.
3. Battery Drain
The iOS 17 Beta may not be as power-efficient as a stable iOS version. Users often report higher battery consumption. It leads to shorter battery life on their devices. This can be particularly inconvenient for users who rely heavily on their iPhones.
4. Connectivity Problems
Wi-Fi and Bluetooth connectivity issues are not uncommon in beta software. Users might encounter difficulties connecting to networks. The problems can also span pairing devices or facing sudden drops in connectivity. These challenges can hinder their ability to stay seamlessly connected to services.
5. UI/UX Glitches
Glitches in the graphical user interface can ruin the OS's appearance and functionality. Common issues are misaligned elements, overlapping text, and visual artifacts. These problems undermine the expected smooth and polished experience of using your device.
Part 2: Should You Downgrade From iOS 17 Beta or Not?
Are you thinking about downgrading from iOS 17 Beta to a stable version? It involves careful consideration. While beta software gives early access to exciting features, it can have potential issues. This affects device performance and user experience. If you don't mind occasional bugs and performance problems, staying on iOS 17 Beta might be worth it.
However, if you rely on your device for important tasks or work, the issues might be too disruptive. It makes downgrade necessary. Check if third-party apps work well on the beta; if not, it's best to revert to a stable iOS version. Moreover, beta versions may drain the battery faster and be less responsive. If your device frequently crashes or freezes, downgrading can restore smoother operation.
If you have important data, downgrading may provide a safer environment for it. Developers and tech enthusiasts may prefer the beta. However, they should set up proper testing and backups. Keep in mind that beta versions get limited support from Apple. Ultimately, your decision to revert from iOS 17 beta depends on your priorities and risk tolerance.
Part 3: A Streamlined Guide To Downgrade From iOS 17 Beta to iOS 16
The road to downgrading from iOS 17 Beta to a stable iOS version needs to be taken with care. To help you out, we have created a streamlined guide. Follow this guide to ensure a smooth transition to downgrade iPadOS 17 to 16. Without further ado, let's move to the first step in the journey to downgrade iOS 17 Beta:
- Step 1: Create a Backup of Your iPhone's Data
Before you begin downgrading your iPhone, make sure to safeguard your data. Creating a full backup of everything important is crucial. This way, nothing will be lost when you switch the operating system. Follow these steps to create a backup using iTunes or Finder:
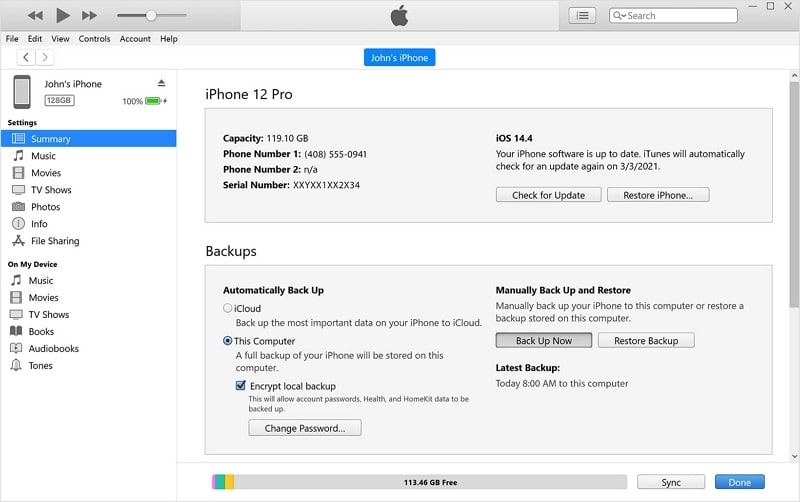
- Step 1: Start by connecting your iPhone to a computer using a Lightning cable. Open iTunes (for macOS Mojave or earlier) or Finder (for macOS Catalina or later) on your computer.
- Step 2: In iTunes or Finder, select your iPhone when it appears on the screen. Click on the "Back Up Now" option in iTunes under “Backups” in the “Summary” tab. This will initiate the backup process of your iPhone.
- Step 2: Tools Required To Execute the iOS 17 Downgrade Process
To successfully perform the iOS 17 beta downgrade, you'll require the following tools:
1. Windows PC or MacBook
You will need a Mac or Windows computer with the latest version of iTunes installed (for macOS Mojave or earlier) or Finder (for macOS Catalina or later). Moreover, ensure your PC/Mac has a stable internet connection.
2. Lightning Cable
You'll require a lightning cable to connect your iPhone to the computer. Make sure it's in good working condition to establish a reliable connection.
3. IPSW File for iOS 16
To downgrade from iOS 17 Beta to iOS 16, you will need the iOS 16 IPSW file specific to your iPhone model. The IPSW file contains the firmware for the desired iOS version. You can download the IPSW file from reliable sources, such as the IPSW.me website, matching your device model and the iOS 16 version you wish to install.
4. Patience and Caution
The downgrade process involves erasing your device and installing an older iOS version. It's essential to be patient and cautious throughout the process to avoid data loss or potential issues. Make sure you have backed up your data before proceeding.
Tool 1: iTunes/Finder
iTunes (for macOS Mojave or earlier) or Finder (for macOS Catalina or later) is a crucial tool required to downgrade from iOS 17 beta. Both iTunes and Finder act as the interface between your computer and your iPhone, allowing you to manage your device, perform backups, and initiate the restore process.
For macOS Mojave or earlier users, iTunes is the default application used to interact with iOS devices. For macOS Catalina or later users, Apple has integrated iPhone management into Finder. Here are the steps for downgrading iOS 17 beta via iTunes/Finder:
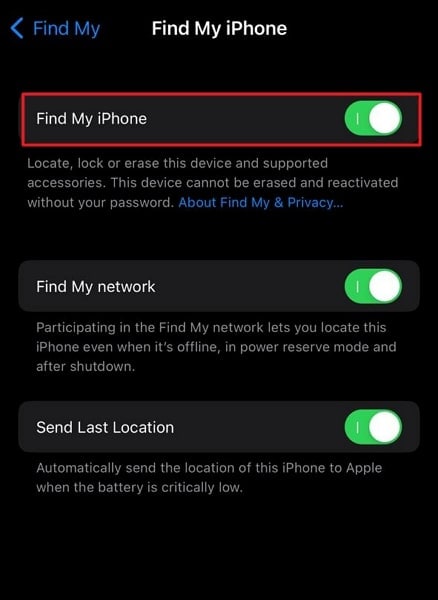
- Step 1: After creating a backup, the next thing to do is turn off “Find My” on your device. To do that, you first need to open Settings, then tap Apple ID and follow it by choosing “Find My.” On the next screen, toggle off “Find My iPhone.”
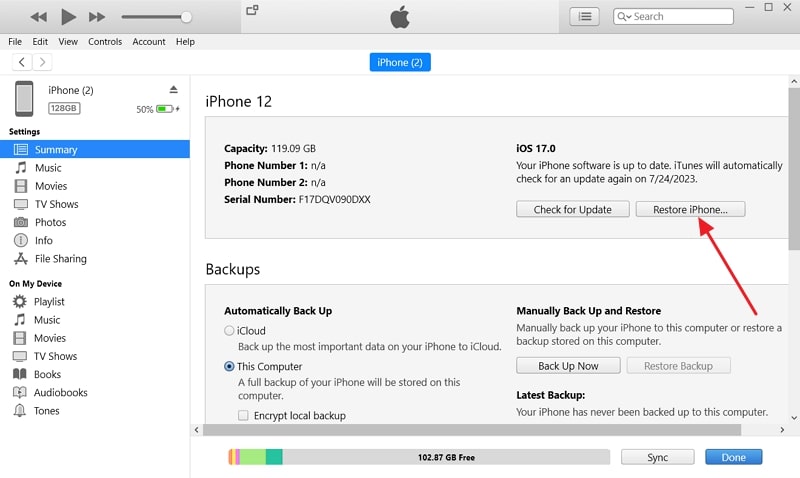
- Step 2: Now connect your iPhone to the computer with the latest iTunes/Finder installed. In iTunes, click the device tab and access the Summary tab. Here click “Restore iPhone” while pressing the “Shift” key or “Option” key for Mac.
- Step 3: Here, browse and select the IPSW file you downloaded and click "Restore/Open." It will start the process of downgrading the iOS 17 beta, which will take some time.

Tool 2: Wondershare Dr.Fone
Looking for a straightforward and quick process to revert from iOS 17 beta? You need to look no further than Wondershare Dr.Fone. It is a comprehensive tool that allows you to upgrade or downgrade your device's iOS version to your desired version. The best thing about using Wondershare Dr.Fone is that it is compatible will all iOS versions. Moreover, it doesn't require jailbreaking for upgrading or downgrading iOS.
Apart from offering iOS downgrading capabilities, it also lets you upgrade your device to the latest beta versions. Here are the detailed steps to downgrade your iPhone’s iOS 17 beta to iOS 16.
- Step 1: Install Dr.Fone and Choose iOS Upgrade/Downgrade
Download and install Wondershare Dr.Fone on your computer. After the installation is complete, launch the software and find and click on the "Toolbox" section. From the toolbox options, select "System Repair" and ensure you specify "iPhone" as your device type, as this enables the software to perform iOS Upgrade/Downgrade operations.

- Step 2: Prepare for iOS Downgrade
Within the System Repair section, you will find the "iOS Upgrade/Downgrade" option. Click on it to access the downgrade features. Select "Downgrade iOS" and confirm your choice by clicking "Continue." Before connecting your iOS device to the computer, ensure you have an original or MFi-Certified cable at hand to maintain a stable connection. Once connected, Wondershare Dr.Fone will automatically detect your device.

- Step 3: Download the Suitable Firmware
Review the list of available firmware versions and choose the one that best suits your needs. Click the "Download" button next to your selected firmware to start the download process, which may take some time, depending on your internet speed and firmware size.

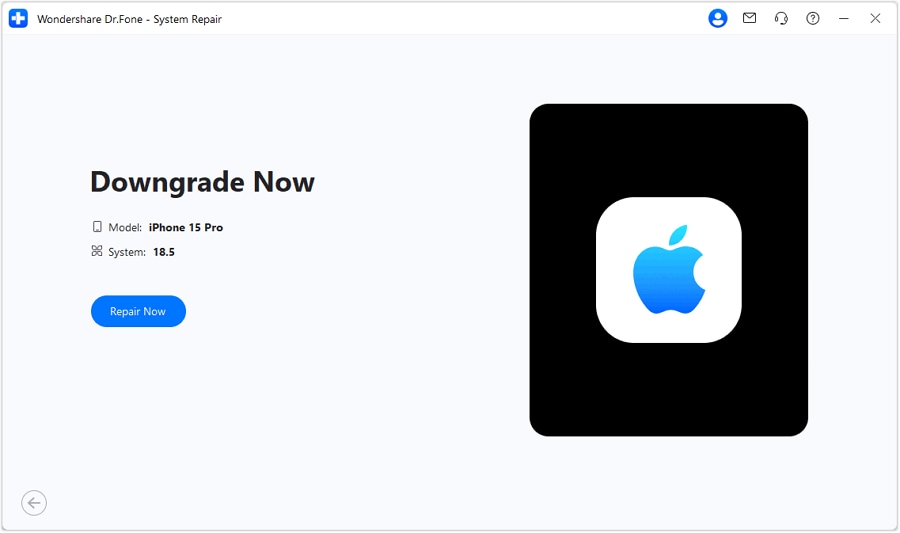
- Step 4: Install Firmware and Verify Downgrade
After the firmware download is complete, you'll be prompted to start the installation process. Click on "Repair Now" to initiate the installation of the downloaded firmware onto your iOS device. Throughout the installation, ensure not to disconnect your device from the computer to avoid any potential issues. The installation process may take some time, so be patient and let Wondershare Dr.Fone do its work.
- Step 3: Recover the iOS 17 Data to iOS 16 iPhone
After successfully downgrading from iOS 17 Beta to iOS 16, the next step is to recover your iOS 17 data. For this, you will need to use the iTunes/Finder backup you created in the first step. However, there is one problem here.
The problem is you can't restore iOS 17 backup on an iOS 16 device. It doesn't mean that you cannot restore your old data. Follow these steps to recover your iOS 17 data:
- Step 1: Find the backup you created on your computer using the iTunes Manage Backups feature. Look for the "info.plist" document within the folder. Use the shortcut keys "CTRL + F" on Windows or "Command + F" on Mac to search for the keyword "Product Version."
- Step 2: Once you locate it, change the string value from "17.0" to "16.0" just below that line of code. Save the document after making the change. Now disconnect your iPhone and reconnect it. Then, from the “Summary” tab, tap “Restore iPhone” and select the old iOS 17 backup to restore the data.

Bonus Tip: The Powerful and Efficient iOS 17 Beta Supported System Repair Toolkit
Did you encounter any issues during the process of downgrading iPadOS 17 to 16? Is your iPhone experiencing persistent problems after the downgrade? If yes, use Wondershare Dr.Fone to overcome such issues. This powerful toolkit is designed to address various iOS system issues. It is compatible with the latest iOS versions, including iOS 17 Beta.
Wondershare Dr.Fone provides offers two repair modes to fix different iOS system problems. It can fix over 150 iOS system issues without data loss. These issues include black/white screens, boot loops, freezing, and more. If your iPhone is stuck in recovery mode or experiencing other problems, Dr.Fone can be a reliable solution. Here is how you can fix your iOS 17 Beta device system issues with Wondershare Dr.Fone:
- Step 1: Download Wondershare Dr.Fone to Start the Process
Access Wondershare Dr.Fone on your computer. It is to start repairing your iPhone's iOS if you already have it. Otherwise, you can download the software from its official website. Further accessing the tool, go to the "Toolbox" section to access "System Repair" to initiate the process.

- Step 2: Select the Repair Method
Then you will be continued to the next screen to choose the device type. Choose "iPhone" and further select the "iOS Repair" option. Once selected, go to "Standard Repair" to retain your device's data after system repair.

- Step 3: Enter the Device in Recovery Mode
If you're familiar with the procedure, continue to put your device in Recovery Mode. However, you can also follow the instructions displayed on the screen. Moreover, if you still face problems enabling iPhone's Recovery Mode, click the "Guide" button for a comprehensive guide.

- Step 4: Install the Firmware to Finalize the Process
After entering the Recovery Mode, the tool will suggest a few iOS firmware. You can choose the required firmware and download it. Furthermore, after completion, the software will verify the firmware for your device. Then, click on the “Repair Now” button once the iOS firmware verification is completed.

Conclusion
In conclusion, exploring the iOS 17 Beta can be an exciting venture. It is especially for those eager to get a glimpse of Apple's latest innovations. However, it is essential to be aware of the potential problems that come with beta software. The iOS 17 beta downgrade process to a stable iOS version is a viable solution for those facing issues.
Among the available solutions, Wondershare Dr.Fone stands out as a powerful and efficient toolkit. It is compatible with all iOS versions, including beta releases. Dr.Fone provides a reliable and effective way to repair and restore your iPhone to a stable iOS version.


James Davis
staff Editor
Generally rated4.5(105participated)