How to Undo an Update on iPhone/iPad?
Jan 04, 2026 • Filed to: Phone Repair Solutions • Proven solutions
“How to undo an update on iPhone? I have updated my iPhone X to iOS 26 Beta release, and now it seems to malfunction. Can I undo iOS update to a previous stable version?”
This is a query from a concerned iPhone user posted on one of the forums about an unstable iOS update. Recently, a lot of users have updated their devices to the new iOS 26 Beta/iOS 18 only to regret it afterward. Since the Beta version is not stable, it has caused tons of issues with iOS devices. In order to fix this, you can simply undo the software update on the iPhone and downgrade it to a stable version instead. In this post, we will let you know how to undo an iOS update using iTunes as well as a third-party tool.

Part 1: Things you should know before undoing an iOS Update
Before we provide a stepwise solution to undo iOS updates, it is important to note certain things. Consider the following things before you take any drastic steps.
- Since downgrading is a complex procedure, it might lead to unwanted data loss on your iPhone. Therefore, it is recommended to always take a backup of your data before you undo the iPhone/iPad update.
- You would need a dedicated desktop application like iTunes or Dr.Fone - System Repair to undo software updates on iPhone. If you find a mobile app claiming to do the same, then avoid using it (as it can be a malware).
- The process would automatically make some changes on your phone and might overwrite existing settings.
- Make sure that you have enough free space on your phone so that you can install the new update easily.
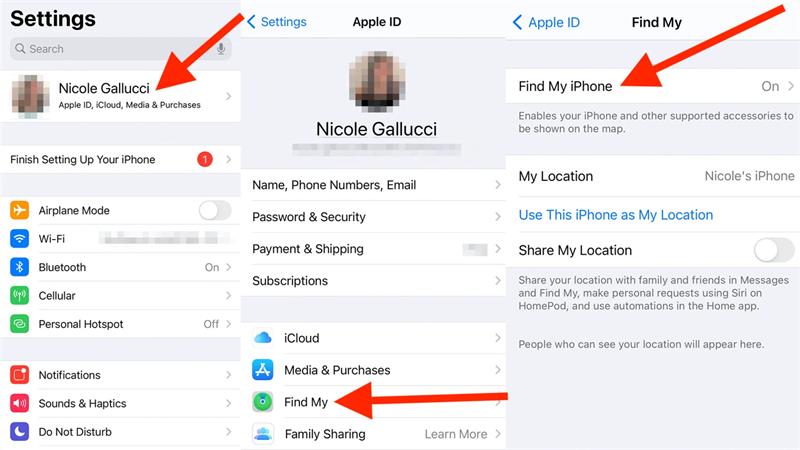
- It is recommended to turn off the Find my iPhone service before undoing an iOS update. Go to your device’s Settings > Tap "Your Name" > Find My and turn the feature off by confirming your iCloud credentials.

Part 2: How to Undo an Update on iPhone without Losing Data?
If you’re thinking about downgrading your iPhone’s iOS version but are worried about losing your data, there’s a better way! Native tools like iTunes often wipe your device during the downgrade process, which can be frustrating. That’s why you should try Dr.Fone - System Repair (iOS).
This powerful and easy-to-use tool lets you fix a variety of iOS issues right from the comfort of your home. Whether your iPhone is frozen, acting up, or you want to undo an iOS update, Dr.Fone ensures your existing data stays safe. It’s the reliable, hassle-free solution you’ve been looking for!
Dr.Fone - System Repair (iOS)
Fix your iPhone problems without data loss!
- Fix iOS issues in a few clicks without any data loss
- Troubleshoot and repair a variety of iPhone errors
- Enjoy a safe, reliable, and seamless experience
- Work for all models of iPhone, iPad, and iPod touch
The application is a part of the Dr.Fone toolkit and runs on every leading Windows and Mac version. It supports all kinds of iOS devices, including those running on iOS 18/17 as well (like iPhone 14, iPhone 13, iPhone XS, XS Max, XR, and so on). If you wish to learn how to undo an update on iPhone using Dr.Fone - System Repair, then follow these instructions:
Step 1: Connect your iPhone
Firstly, connect your iPhone to the system using a working cable and launch the Dr.Fone toolkit on it. From the available options on its home, select “System Repair” to start things.

Step 2: Pick a repairing mode
Visit the "iPhone" > "iOS Repair" section from the left section and select a mode to repair your device. Since you only wish to undo iOS update without any data loss, select the Standard Mode from here.

Step 3: Verify device details and download an iOS update
As you would proceed, the application will automatically detect your device’s model and system. Here, you need to change the current system version to an existing stable one. For instance, if your iPhone runs on iOS 17, then select 16 and click on the “Download” button.

This will make the application download the stable version of the firmware available for your phone. Just hold on for a while as the downloading process might take a few minutes. When the firmware download is completed, the application will perform a quick verification to make sure it is compatible with your device.
Step 4: Complete the installation
As soon as everything gets ready, you will be notified by the following screen. Just click on the “Repair Now” button to undo software updates on iPhone.

Sit back and wait for a few more minutes as the application would install the relevant iOS update on your phone and restarts it in normal mode.
Part 3: How to Undo an Update on iPhone using iTunes?
If you don’t want to use a third-party application like Dr.Fone to undo iOS updates, then you can also give iTunes a try. To do this, we will first boot our device in Recovery Mode and later restore it. Before you proceed, make sure that you have an updated version of iTunes installed on your system. If not, you can update iTunes before learning how to undo an iOS update. Furthermore, you should also be familiar with the following limitations of this solution.
- It will wipe the existing data on your iOS device by resetting it. Therefore, if you have not taken a prior backup, you would end up losing your stored data on the iPhone.
- Even if you have taken a backup on iTunes, you can’t restore it due to compatibility issues. For instance, if you have taken a backup of iOS 17 and have downgraded it to iOS 16 instead, then the backup can’t be restored.
- The process is a bit complicated and will take more time than a recommended solution like Dr.Fone - System Repair.
If you are fine with the above-mentioned risks to undo the software update on the iPhone, then consider following these steps:
Step 1: Launch iTunes
To start with, launch an updated version of iTunes on your Mac or Windows system and make sure it stays running in the background. Now, use a working cable and connect your iPhone to the system. Turn your iOS device off if it isn’t already.
Step 2: Boot your device in Recovery Mode
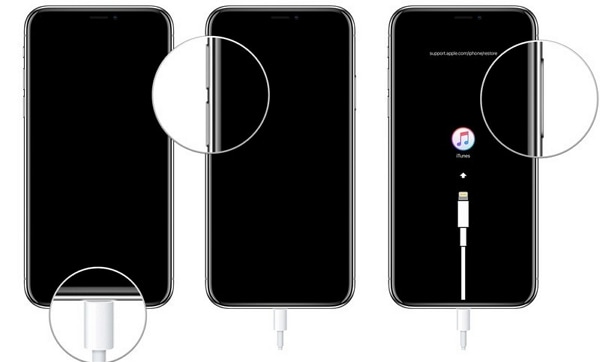
Using the correct key combinations, you need to boot your phone in recovery mode. Kindly note that the exact combination might change between different iPhone models.
- For iPhone 8 and later versions: Quick press and release the Volume Up button and then the Volume Down button. Now, press the Side button and keep holding it for a while until your phone boots in recovery mode.

- For iPhone 7 and 7 Plus: Connect your phone and press the Power and the Volume Down buttons at the same time. Keep holding them for the next few seconds until the connect-to-iTunes logo would appear.
- For iPhone 6s and previous models: Hold the Power and the Home buttons at the same time and keep pressing them for a while. Let them go once the connect-to-iTunes symbol will come on the screen.
Step 3: Restore your iOS device
Once your phone enters Recovery Mode, iTunes will automatically detect it and display a relevant prompt. Just click on the “Restore” button here and again on the “Restore and Update” button to confirm your choice. Agree to the warning message and wait for a while, as iTunes would undo the iOS update on your phone by installing a previous stable update on it.
In the end, you would be asked to enter your Apple ID and password to authenticate the action and boot the phone in normal mode.
Part 4: How to Delete an iOS 17 beta Profile on iPhone/iPad?
When we install an iOS 17 beta version on our device, it creates a dedicated profile during the process. Needless to say, once you have completed the downgrade, you should get rid of the iOS 17 beta profile. Not only will it make more free space on your phone, but it will also avoid any software-related issues or conflicts on it. Here’s how you can delete the iOS 17 beta profile on your phone in a jiffy.
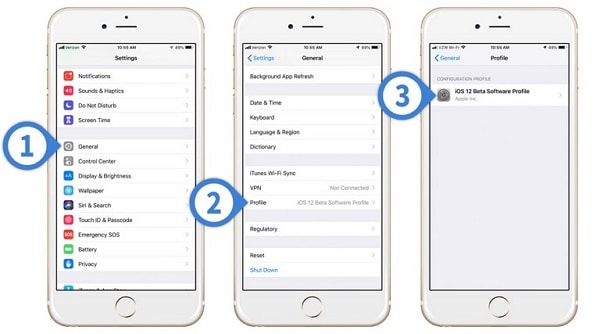
- Unlock your iOS device and go to its Settings > General > Profile or Device Management.
- Here, you can see the iOS 17 beta profile of an existing installer. Just tap on it to access the profile settings.
- At the bottom of the screen, you can see an option for “Remove Profile”. Tap on it and select the “Remove” option again from the pop-up warning.
- In the end, authenticate your action by entering the passcode of your device to delete the beta profile permanently.

Conclusion
By following this simple tutorial, anyone can learn how to undo an update on iPhone or iPad. Now that you know how to undo an iOS 17 update, can you easily resolve the recurring issues on your device? Ideally, it is recommended only to update an iOS device to a stable official release. In case you have upgraded your iPhone or iPad to a beta version, then undo iOS 17 updates using Dr.Fone - System Repair. Unlike iTunes, it is an extremely user-friendly solution and will not cause unwanted data loss on your device.
Upgrade & Downgrade
- iOS Beta Install
- 1. Download iOS Beta Profile
- 2. Download the iOS 13 Beta
- 3. iOS 16 Beta Download
- 4. Uninstall iOS Beta
- 5. Install iPhone Beta Profile
- 6. Install Mac Beta Profile
- 7. Install iOS 15 Beta Profile
- 8. Upgrade iPad to iOS 14
- iOS News
- 1. Update iPhone 4s to iOS 9
- 2. Cheaper iPhone
- 3. Customize iPhone Home Screen
- 4. Know About iOS 15 Lock Screen
- 5. Add Lyrics to Song on Apple Music
- 6. Current iOS Version
- 7. Current iOS for iPad
- 8. iOS 19 and the iOS 26 Rumor
- iPhone Downgrade Tips
- 1. Downgrade iOS Like a Pro
- 2. Roll Back to an Older iOS Version
- 3. Downgrade to iOS 15
- 4. Install Developer Profile
- 5. Downgrade iOS without iTunes
- 6. Downgrade to iOS 14
- 7. Download and Install the iOS 16
- iPhone Update Tips
- 1. iPhone & iPad Security Updates
- 2. Undo an Update on iPhone
- 3. Update iPhone with/without iTunes
- 4. Fix iPhone Checking for Update Stuck
- 5. Fix iPad Software Update Failed
- 6. Fix iPhone Stuck On Update
- 7. Fix iPhone Won't Update
- 8. Fix Update Server Not Be Contacted
- 9. Fix iPhone Stuck on Update Requested
- 10. Resolve iPhone Cellular
- 11. Resolve iPhone Error 1110
- 12. Fix iPhone Frozen
- iOS 11/12 Problems
- 1. Fix iPhone Stuck on Waiting
- 2. Fix iPhone Can't Make Calls
- 3. Fix iPhone Stuck on Logo
- 4. Fix Photos Disappeared from iPhone
- 5. Fix iPhone Keeps Freezing
- iOS 13/14 Problems
- 1. Fix CarPlay Not Connecting
- 2. Fix Resolve Apps Won't Open
- 3. Fix Song/Playlist Missing
- 4. Fix iPhone Asking for Passcode
- 5. Fix Map Voice Navigation Won't Work
- 6. Fix iMessage Not Working
- 7. Recover Deleted Data on iOS 14
- 8. Recover Disappeared Notes on iOS 14
- iOS 15 Problems
- iOS 16 Problems
- 1. Fix iPhone Wi-Fi Not Working
- 2. Fix iOS 16 Battery Drain Issues
- 3. Fix Screen Mirroring Not Working
- 4. Fix Apple CarPlay is Not Supported
- 5. Fix iPhone Screen Not Responding
- 6. Fix iPhone Apps Keep Crashing
- 7. Fix Call Failed iPhone Issue
- 8. Fix iPhone Stuck On Apple Logo
- 9. Counter iPhone Heating Problems
- 10. Fix iPhone Stuck in Boot Loop
- 11. Fix iPhone Bluetooth Not Working
- iOS 17 Problems
- 1. iPhone Freezing After Update
- 2. iOS 17 Wallpapers Blurry at Top
- 3. Fix iPhone Charging Slow
- 4. Enable Live Activities iOS 17
- 5. Fix iOS 17 Apps Crashing
- 6. Fix iPhone Stuck on Verifying Update
- 7. Overheating after 17 Update
- 8. Fix iOS 17 Keyboard Bug
- 9. Fix iOS 17 Green Screen Issue
- 10. iOS 17 Bugs & Fixes
- 11. No iOS 17 Update on Your iPhone
- 12. iOS 17 Unable to Download
- 13. Missing contacts with iOS 17 update
- iOS 18 Problems
- 1. iOS 18 Black Screen
- 2. iPadOS 18 Math Notes Issues
- 3. iPhone Email Not Working
- 4. iPhone Contacts Disappeared
- 5. iPhone Stuck in Restore Mode
- 6. iPhone Stuck on Preparing Update
- 7. iPhone Flashlight Not Working
- 8. iPhone Bluetooth Issues
- 9. Stuck on Terms and Conditions
- 10. Frozen iPhone iOS 18
- 11. iOS 18 Beta Boot Loop Issue
- 12. iOS 18 Beta Overheating
- 13. iOS 18 Beta Volume Bug
- iOS 26 Topics


Alice MJ
staff Editor
Generally rated4.5(105participated)