100% Security Verified | No Subscription Required | No Malware

 :
: 
 ChatGPT
 Perplexity
 Gemini
 Claude
 Grok
Grok
Have you recently updated to a new iOS 26 beta or official release and are now experiencing bugs, poor battery life, or compatibility issues? This is a common scenario, and many users immediately search for a way to downgrade iOS without a computer, hoping for a simple, on-device solution.
However, the process of reverting to an older iOS version is more complex than updating. While it's tempting to look for an app or a setting to roll back the software, Apple's ecosystem is built with security measures that make this impossible. In this guide, we'll explain the reality of iOS downgrades and walk you through the only safe and reliable method that requires a computer, ensuring your data remains intact.
In this article
Part 1. The Reality: Can You Downgrade iOS 26 Without a Computer?
Let's address the main question directly: is it possible to downgrade iOS without a computer? The definitive answer is no. Apple does not provide any official on-device method to revert to a previous iOS version. The entire update and restore process is designed to be managed through a computer for security and stability reasons.
Downgrading involves completely reinstalling the operating system using a specific firmware file (an .ipsw file). This process requires a trusted desktop application like iTunes (on older macOS/Windows) or Finder (on newer macOS) to communicate with your iPhone in a special recovery or DFU mode. Third-party tools like Dr.Fone - System Repair (iOS) also rely on a computer connection to perform this task safely.
You should be extremely cautious of any website, profile, or app that claims to allow you to downgrade iOS without a computer. These are almost always scams designed to install malware, steal your personal information, or damage your device. The only legitimate way to downgrade is with a computer.

Part 2. Essential Preparations Before You Downgrade iOS 26
Since using a computer is mandatory, it's crucial to prepare your device properly to ensure a smooth and safe downgrade process. Skipping these steps can lead to permanent data loss or other complications. Here’s a checklist of everything you must do before you begin.
- Create a Complete Backup of Your iPhone: This is the most critical step. Downgrading can sometimes fail, and using methods like iTunes will erase your device completely. To protect your photos, messages, and other important data, create a full backup. You can use iCloud, iTunes, or a more flexible tool like Wondershare Dr.Fone for this.
- Ensure Your Device is Sufficiently Charged: The downgrade process can take a significant amount of time. To prevent your iPhone from shutting down midway, which could brick the device, make sure it is charged to at least 70% or, even better, keep it connected to a power source throughout the process.
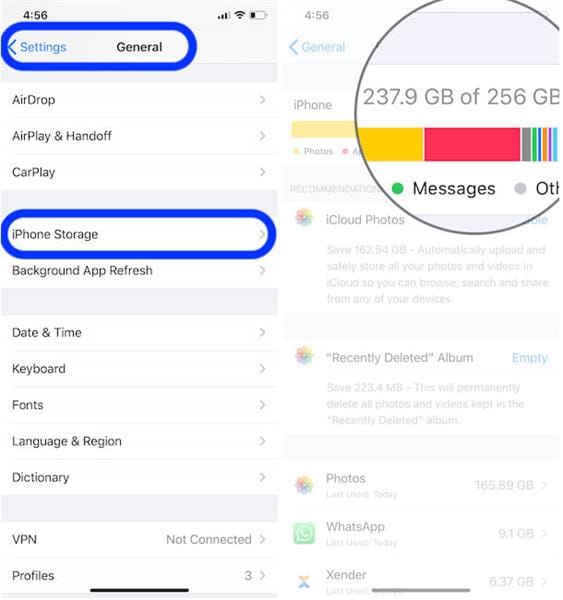
- Free Up Storage Space: The iOS firmware file requires a considerable amount of space to download and install. If your iPhone storage is nearly full, the process may fail. Check your available space in Settings > General > iPhone Storage and delete unnecessary files or apps to free up several gigabytes.
- Disable the 'Find My iPhone' Feature: 'Find My iPhone' is linked to Apple's Activation Lock, a security feature that can interfere with restoring or downgrading the operating system. To avoid any conflicts, go to Settings > [Your Name] > Find My, and toggle 'Find My iPhone' off. You will need to enter your Apple ID password to confirm this action.
- Choose a Reliable Downgrade Solution: While iTunes is Apple's official tool, it is known for being cumbersome and, most importantly, it will wipe all data from your device during the downgrade. For a safer and more user-friendly experience that preserves your data, it is highly recommended to use a trusted, specialized tool.
Part 3. The Ultimate Data-Safe Method to Downgrade iOS 26
While iTunes can downgrade your iPhone, it comes at a high cost: all your data will be erased. This makes the process stressful and inconvenient. For users who want to downgrade from iOS 26 without losing data, a specialized solution is the best choice.
Dr.Fone - System Repair (iOS) is engineered to handle complex iOS issues, including downgrades, while keeping your personal files safe. Unlike iTunes, its Standard Repair mode can revert your device from a buggy beta like iOS 26 to a stable public version without deleting anything. It also fixes over 150 other system problems, such as being stuck on the Apple logo, a black screen, or a recovery mode loop.
 Fix iOS issues, no data loss.
- One-click repair for all iOS problems.
- Solve recovery mode, Apple logo, black screen, etc.
- Upgrade or downgrade iOS without iTunes

Follow these steps to safely downgrade your iOS version:
-
Step 1 Launch Dr.Fone and Connect Your iPhone
Download and install Wondershare Dr.Fone on your computer. Open the program, select "System Repair" from the main toolbox, and connect your iPhone using a USB cable.

-
Step 2 Choose iOS Repair and Standard Mode
Navigate to the "iPhone" > "iOS Repair" section. To downgrade without data loss, select "Standard Repair." This mode is designed to fix most system issues while preserving all user data.

-
Step 3 Select the iOS Version for Downgrade
The software will automatically detect your iPhone model. On the next screen, you will see a list of available iOS firmware versions. Choose the older, stable version you want to downgrade to and click "Download."

-
Step 4 Initiate the Downgrade Process
Once the firmware download is complete and verified, click the "Repair Now" button. Dr.Fone will begin the process of installing the selected stable iOS version on your device, effectively overwriting the problematic beta version.

-
Step 5 Complete the Downgrade
Keep your iPhone connected until the process is finished. Your device will restart automatically with the older, stable iOS version installed. All your data will be just as you left it.


Conclusion
While the idea of downgrading iOS without a computer is appealing, it remains impossible due to Apple's strict security measures. The only safe and effective way to revert from a problematic iOS 26 beta is by using a computer. After carefully backing up your data and preparing your device, you need to choose the right tool. For a process that is not only simple but also protects your valuable data, Dr.Fone - System Repair stands out as the expert-recommended solution, ensuring a smooth transition back to a stable iOS environment.
FAQ
-
1. Why can't I downgrade iOS directly on my iPhone?
Apple's security design requires iOS firmware to be installed through a trusted computer connection in a specific mode (like Recovery or DFU). This prevents unauthorized software installation and protects the device's integrity, making an on-device downgrade impossible. -
2. Will downgrading iOS delete my data?
It depends on the method. If you use the official iTunes/Finder restore function to downgrade, all your data and settings will be completely erased. However, if you use a tool like Dr.Fone - System Repair (Standard Mode), you can downgrade your iOS without any data loss. -
3. What is the biggest risk of downgrading iOS?
The primary risk is data loss, which is why a backup is essential. Another risk is the process failing, potentially leaving your device in an unusable state (bricked) if the connection is interrupted or an incorrect firmware file is used. Using a reliable tool minimizes these risks. -
4. Can I downgrade to any iOS version I want?
No, you can only downgrade to an iOS version that Apple is currently "signing." Apple stops signing older firmware versions shortly after a new update is released to ensure users are on the most secure software. You can typically only downgrade to a recent, stable version.
 Add Wondershare Dr.Fone as a preferred source on Google