How to Retrieve and Restore Contacts from iCloud
Jul 12, 2024 • Filed to: Data Recovery Solutions • Proven solutions
Let's say you've just changed your device or your data is suddenly lost. All of your contacts all gone. Reaching your clients, colleagues, or even friends becomes difficult.
Actually, iCloud offers a practical solution to mitigate this kind of problem using contact syncing and restoration across Apple devices. When enabling iCloud backup, any changes made on one device are instantly reflected on others linked to the same iCloud account.
Cool, right? Under any circumstances, you can restore your contacts using iCloud during device setup or through selective data recovery from backups. iCloud's contact syncing and restoration functionality offers both convenience and data protection for users' peace of mind.
Now, hop on and learn the details of how to retrieve contacts from iCloud!
Part 1: How to Retrieve Contacts from iCloud Synced File
iPhone users can use the Dr.Fone Data Recovery tool to retrieve their contacts from an iCloud-synced file. It works by extracting the contacts' data from the iCloud backup and presenting users with an option to restore them to their iPhone.
How to restore contacts on iphone from iCloud using Dr.Fone data recovery tool:
- Step 1: Launching the Data Recovery Tool
To initiate a successful recovery from iCloud, begin by downloading and installing the most recent version of Wondershare Dr.Fone. Open the software by navigating to Toolbox > Data Recovery.

- Step 2: Recover data from iCloud.
When prompted to choose the device type, proceed by selecting iOS and then click "Next." From the available choices, opt for "Recover data from iCloud" to launch the data recovery tool for iCloud data.
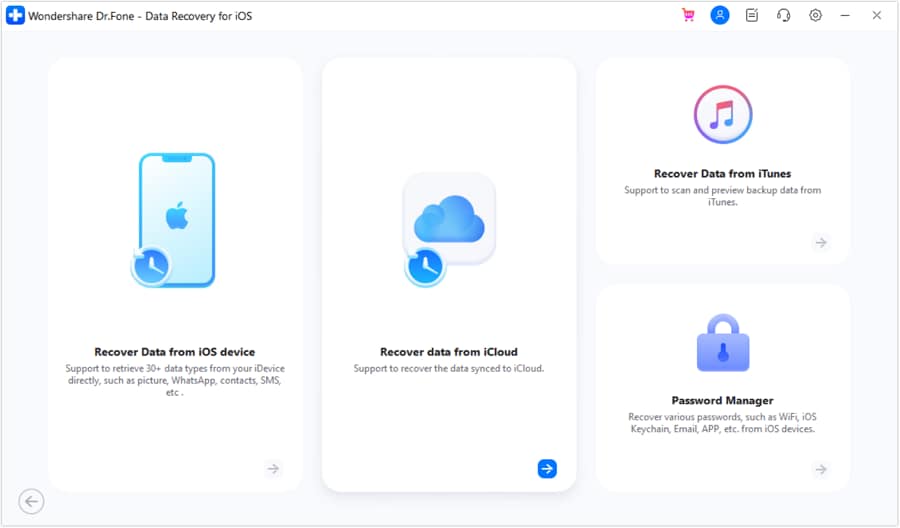
- Step 4: Signing Into Your iCloud Account
Next, you will be required to log in to your respective iCloud account from which you intend to recover the data. Provide the necessary authentication details to successfully log into your iCloud account for data recovery purposes.
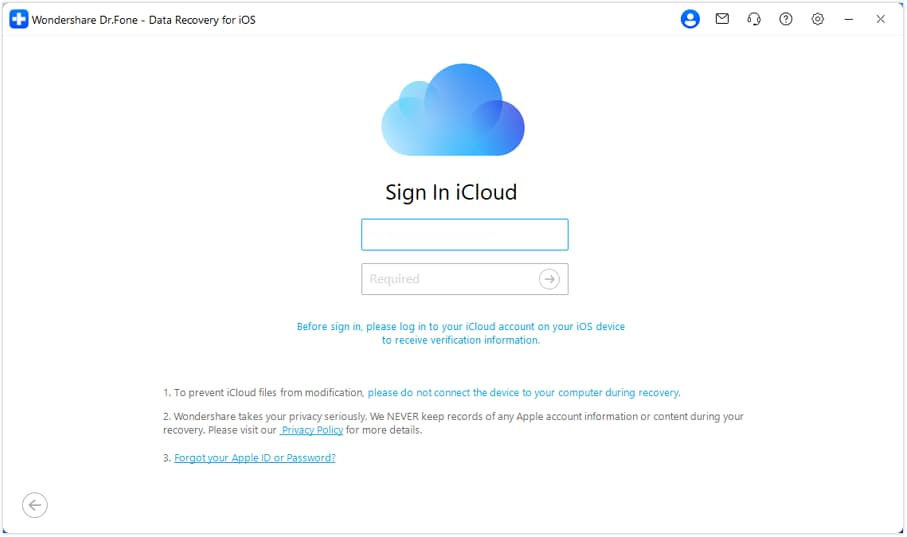
- Step 5: Choosing File Types
In this part, you'll need to select the file types you want to recover using Dr.Fone. Since we want to recover your contact data, you can select the Contacts only. Then, proceed by clicking "Next" at the bottom-right corner of the screen.
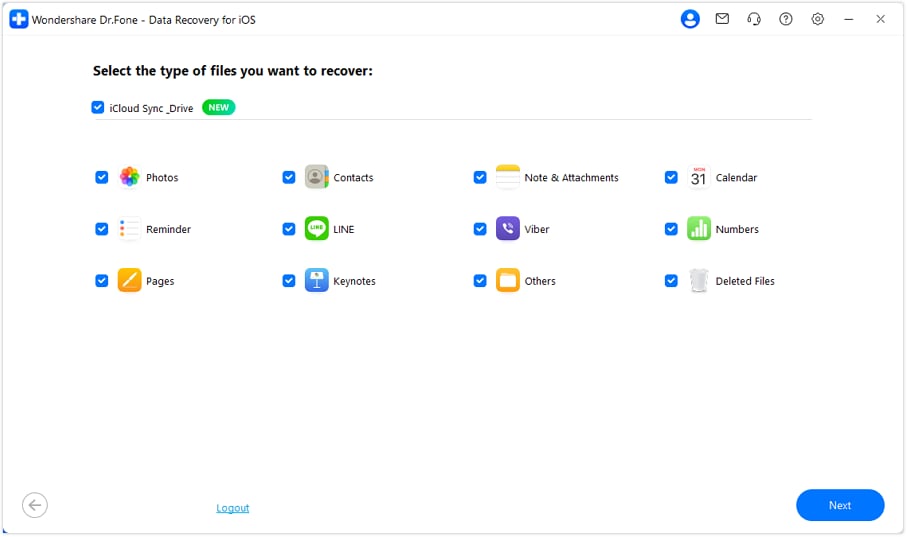
Once you proceed, the download process will start, as seen in the progress bar. If you need to halt the process, click the "Stop" button at any point.
- Step 6: Selecting and Restoring iCloud Data
Once the download is complete, the next window will display all downloaded data in a categorized format. You can modify the display filter and choose only the appropriate selection. Checkmark all the data you wish to recover and click "Restore to Device."
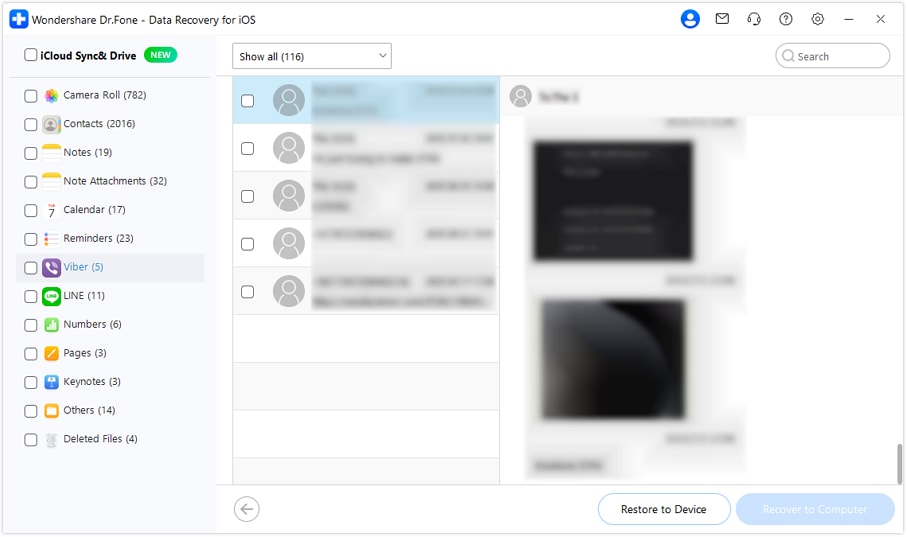
Restore your contacts to your iPhone:
A window will show up asking you to pick the device where you want to restore the iCloud data. Select your iPhone device and click "Continue" to start the setup.
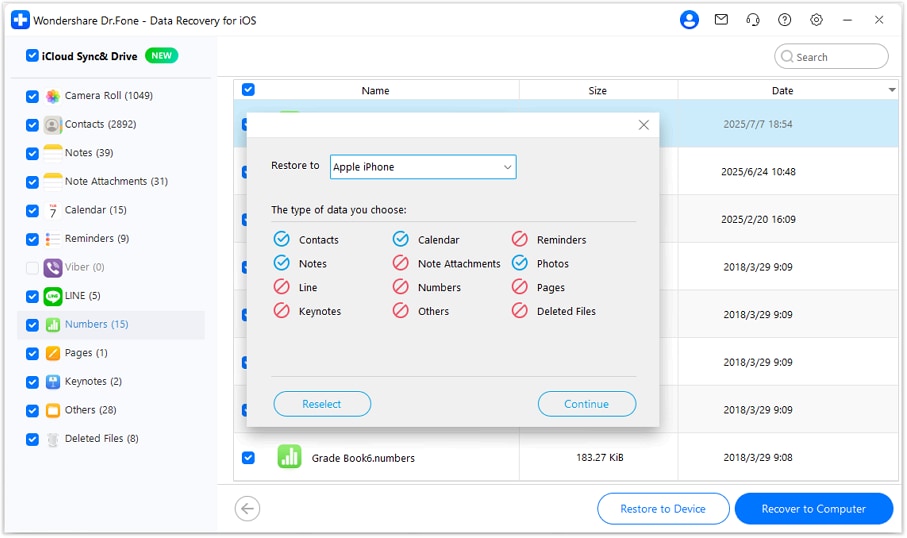
Now, it's time to transfer it to your iPhone by connecting it to your computer. If done, the following screen will present the connection status with your device.
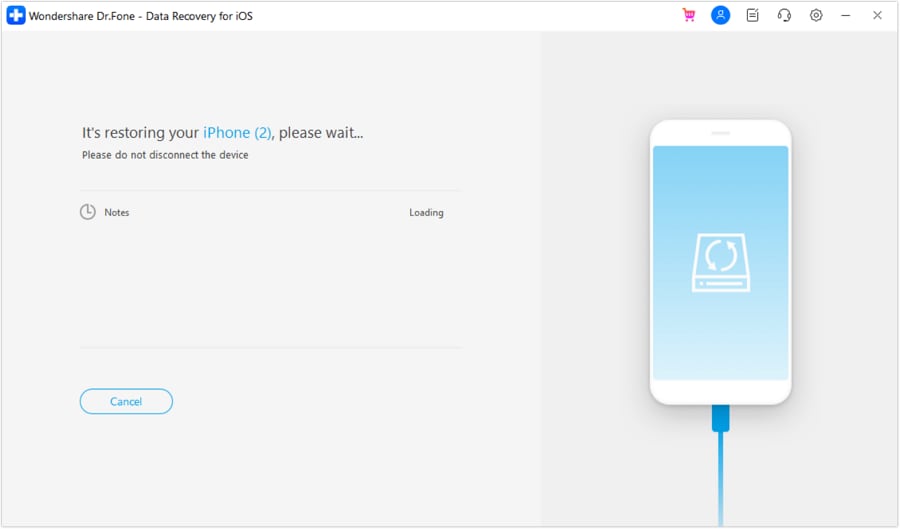
There's also an option to recover data from iCloud to your computer using the "Recover to Computer" feature. When selected, a prompt window will open, allowing you to specify the recovery location. Proceed by choosing the "Recover" option to successfully execute the process.
Part 2: How to Back Up Contact on iCloud to Prevent Data Loss
You might have noticed it, but to retrieve your contacts from iCloud, you need to back them up first or store them in your iCloud. This process of creating backups might seem like an extra task, but it's actually easier than you thought.
Besides, having a backup also holds immense importance, especially regarding your iPhone and the valuable data it contains. No one wants to lose their precious photos, messages, or contacts in an instant, regardless of the reasons!
Now that you've understood the importance of iPhone backups, it’s time to walk through the steps to back up your data to iCloud:
- Step 1: Open the iPhone's Settings.
- Step 2: Tap on your account, select "iCloud."
- Step 3: Toggle on the "Contacts."
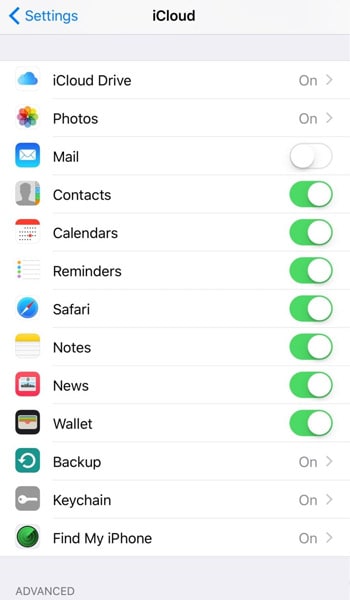
Done! You’ve turned on the auto-backup for your contacts on iCloud. It will ensure that all the details saved in your Contacts are uploaded and synchronized with your iCloud account.
Part 3: Export Contacts to vCard on iCloud
Do you know vCard? iPhone users can either import or export a virtual card known as a vCard. These vCards hold wide contact details for one or multiple contacts so that you can manage and share contact information conveniently.
First, how to import the vCard:
- Step 1: Access iCloud.com to restore contacts and sign in with your account if prompted.
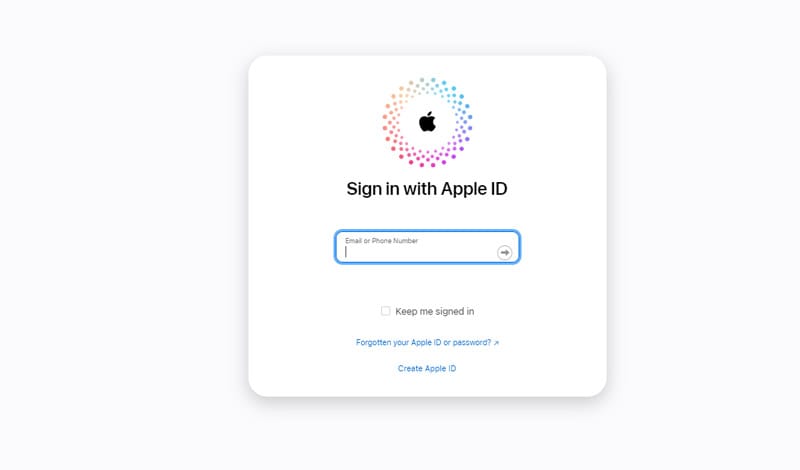
- Step 2: Once logged in, click the "Contacts" icon to access your contact list. On the left sidebar of the Contacts interface, locate and click the "Show Actions Menu" pop-up button. This button might look like three dots or a gear icon.
- Step 3: From the menu, select "Import vCard." This action will prompt a file selection dialogue to appear. Then, navigate to the location on your computer where the vCard file is saved.
- Step 4: Click on the vCard file to select it, then click "Open" or "Choose" to initiate the import process. Once done, the import process will begin. The contacts contained within the vCard will be imported and added to the "All Contacts" group by default.
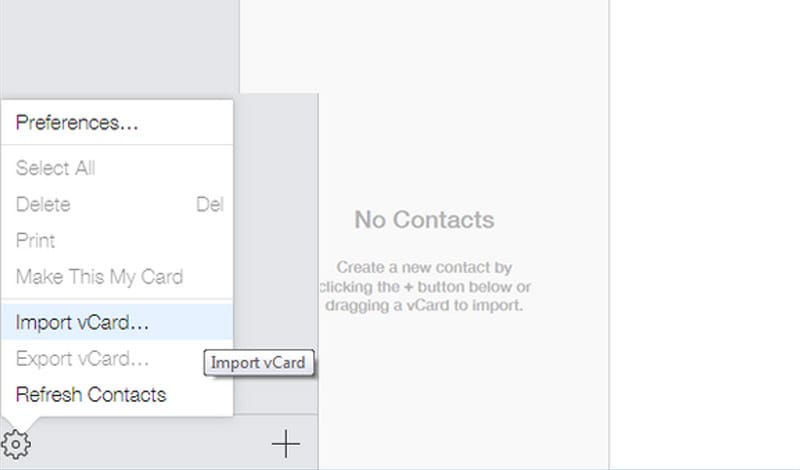
If you want to organize the imported contacts into specific groups, you can do so by dragging and dropping the contacts into the desired groups within the left sidebar.
Next, let’s export the vCard:
- Step 1: Access Contacts on iCloud.com again and navigate to the Contacts interface.
- Step 2: In the contacts list, click on the contact that you want to export. If you wish to export multiple contacts, hold down the "Command" key (Mac) or "Control" key (Windows) while clicking on each desired contact.
- Step 3: Click "Show Actions Menu" on the left sidebar, and choose "Export vCard." If you have selected multiple contacts, they will be exported as a single vCard file.
- Step 4: A file download prompt will appear. Next, select a location on your computer to store the vCard file and click "Save."
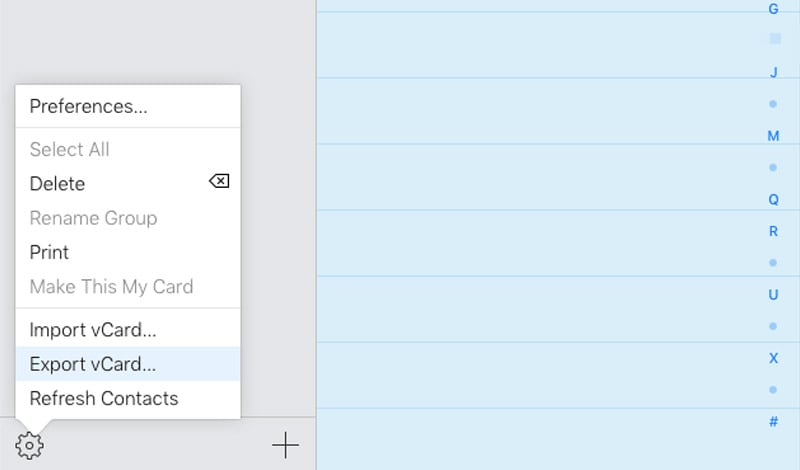
The chosen contact(s) will be exported into a vCard file. This file can be shared, stored, or used for other purposes!
Part 3: Tips for Troubleshooting Contact Retrieval Issues
Contacts are a fundamental part of your iPhone's functionality, and issues with retrieving them can be frustrating. Fortunately, many common problems have straightforward solutions. Here are some tips for troubleshooting contact retrieval issues:
1. Contact Syncing Errors
Problem:
Your contacts from iCloud are not appearing on your iPhone or changes you make to contacts on one device are not syncing on others.
What you can do:
- Make sure that you're using the correct Apple ID on your devices.
- Turn off Contacts in iCloud settings and then turn it back on to force a sync.
- Check your internet connection, as proper syncing requires a stable Wi-Fi or cellular connection.
- Restart your device and try again.
- Verify that you haven't accidentally disabled iCloud syncing for contacts on any device.
2. Duplicate Contacts
Problem:
You have duplicate entries in your contacts, so it’s hard to find the right one.
What you can do:
- Use the "Contacts" app on your iPhone to merge duplicate entries:
Tap on a contact, then tap "Edit," scroll down, and tap "Link Contacts" to merge duplicates.
- On iCloud.com, you can merge duplicates by selecting "All Contacts," then clicking on the gear icon and choosing "Merge Contacts."
- Avoid syncing contacts with multiple accounts (e.g., iCloud, Google, Exchange) to prevent duplication.
- Manually review your contacts and delete duplicate entries.
3. Missing Contacts:
Problem:
Some of your contacts have mysteriously disappeared from your iPhone.
What you can do:
- Make sure that you haven't accidentally filtered your contacts.
- Check the "Recently Deleted" folder in the "Contacts" app to recover accidentally deleted contacts.
- If you're using multiple accounts for contacts (e.g., iCloud, Google), ensure that you're looking in the correct account's contact list.
4. iCloud Storage Full:
Problem:
You're unable to sync contacts because your iCloud storage is full.
What you can do:
- Clear up space by deleting old backups, photos, and other unnecessary data from iCloud.
- Consider upgrading your iCloud storage plan to accommodate your needs.
5. Unresponsive Contacts App:
Problem:
The Contacts app is not opening or is freezing when you try to access it.
What you can do:
- Restart your iPhone.
- Update your iOS since it often includes bug fixes.
- Reach out to Apple Support for persistent issues.
Conclusion
Now, you don't have to worry if you suddenly lose your contacts and want to get them back. With the advent of advanced data backup and synchronization features, retrieving lost contacts on your iPhone has become simple and reliable.
Thanks to services like Dr. Fone data recovery tool and iCloud, you can restore contact information in case of mishaps.
iCloud Manage
- iCloud Delete
- iCloud How-Tos
- 1. Save Documents in iCloud
- 2. Access iCloud Photos
- 3. Access Your Notes on iCloud
- 4. Cancel iCloud Storage Plans
- 5. Sharing iTunes Store Purchases
- 6. Reset iCloud Email on iPhone / PC
- 7. Set Up iCloud Account on Android
- 8. iCloud Two-Factor Authentication
- iCloud Issues
- 1. iCloud Backup Failed Issue
- 2. Not Enough iCloud Storage
- 3. iCloud Contacts Not Syncing
- 4. iCloud Photos Not Syncing
- 5. iPhone Couldn't Be Activated
- 6. iPhone Backup with iTunes/iCloud
- 7. Stuck on Updating iCloud Settings
- 8. iPhone Won't Backup to iCloud
- 9. Notes App Not Syncing with iCloud
- iCloud Tricks
- 1. iCloud Tips and Tricks
- 2. Recover iCloud Password
- 3. Disconnect iPhone from iCloud
- 4. Retrieve Contacts from iCloud
- 5. iCloud Alternative For iPhone/iPad
- 6. Bypass iCloud Activation with IMEI
- 7. Bypass Activation Lock on iPhone
- 8. Change iCloud Account on iPhone
- 9. Get Rid of the Repeated iCloud Sign
- 10. Download Videos from iCloud
- ● Manage/transfer/recover data
- ● Unlock screen/activate/FRP lock
- ● Fix most iOS and Android issues
- Manage Now Manage Now Manage Now


James Davis
staff Editor