How to Restore WhatsApp from iCloud [2026] - Fix & Recover Chats [iPhone 17 Supported]
Dec 31, 2025 • Filed to: Data Recovery Solutions • Proven solutions
Dr.Fone Basic:
Better Control for Your Phone
Manage, transfer, back up, restore, and mirror your device
WhatsApp plays an essential role in our daily communication, helping us stay connected with family, friends, and colleagues. With so many important chats, media files, and documents shared through the app, securing your data is crucial. Thankfully, iOS devices make it easy to protect your conversations with iCloud backup WhatsApp restore, giving you peace of mind that your data is always safe. For users upgrading to the iPhone 17, taking advantage of iCloud backup becomes even more important.
This article will guide you through the step-by-step process of restoring WhatsApp from iCloud. It will ensure that your messages and media are safely restored to your device. It doesn't matter how you lost your WhatsApp data. This detailed guide will assist you in getting it back.
Part 1: Prerequisite for the WhatsApp Restoration Process
Before embarking on the journey to restore WhatsApp backup from iCloud, it is crucial to ensure that you have met a few prerequisites. Doing this will ensure a smooth and successful restoration process without data loss. Here is what you need to have in place before proceeding:
iCloud Backup Enabled
WhatsApp utilizes iCloud, Apple's cloud storage service, to back up your data. To proceed with the restoration process, you must have an iCloud backup of WhatsApp. To verify this, go to your device's Settings and tap on your Apple ID at the top. Now select "iCloud," and ensure that the "WhatsApp" toggle is turned on.
Sufficient Device Storage Space
Confirm that your device has enough storage space to accommodate your WhatsApp backup. WhatsApp backups can consume a significant amount of storage. In general, you need double the storage space of the size of a backup when restoring it. Thus, ensuring your device has enough free storage space is mandatory.
Stable Internet Connection
A stable and reliable internet connection is crucial for downloading the iCloud backup. It will also help in completing the restoration process without a hitch. Connect to a Wi-Fi network to ensure a smooth and uninterrupted experience.
Part 2: How to Restore WhatsApp Backup From iCloud?
Once you’ve met all the necessary requirements, the next step is restoring WhatsApp chat from iCloud to ensure you never lose important messages, photos, or files. This process is especially useful if you’ve reset your phone, switched to a new device, or recently upgraded to the iPhone 17. With iCloud, transferring your WhatsApp data is simple, secure, and efficient:
Step 1: Remove WhatsApp from your iPhone and reinstall it using the App Store. Afterward, open WhatsApp and verify your number.
Step 2: On the "Chat Backup" screen, you'll be prompted to restore your chat history from iCloud. Following this, choose the "Restore Chat History" option to proceed with the process.
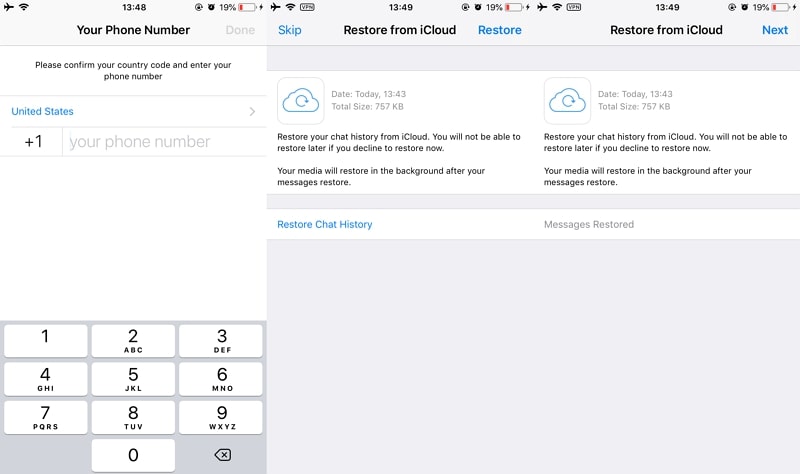
Step 3: Wait for WhatsApp to retrieve and restore your backup from iCloud. This process may take a few minutes. Afterward, follow the on-screen prompts to complete the setup process of WhatsApp.
Part 3: What to Do If WhatsApp Restore From iCloud Fails?
Even after carefully following the steps for restoring WhatsApp chat from iCloud, you might sometimes face unexpected issues that stop the process from completing successfully. These errors can range from insufficient iCloud storage to weak internet connectivity, or even compatibility issues when setting up a new devic. If you’ve just upgraded to the iPhone 17 and encounter obstacles during restoring WhatsApp chat from iCloud, don’t worry—there are reliable fixes available:
Insufficient Storage Space
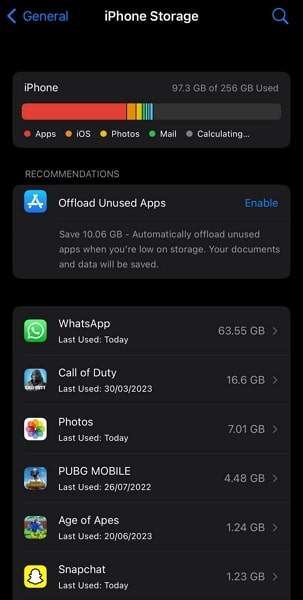
As mentioned before, you need almost double the space of the size of the backup. If you are facing insufficient storage space issues, you will need to free up the space. Use the following guides to resolve this issue:
Instruction: Launch “Settings” on your device and tap "General." Here, find and tap "iPhone Storage," and on the following screen, free up some space. You can do this by deleting the app you have not been using for a long time or offloading some apps.
Slow and Interrupted Internet Connection
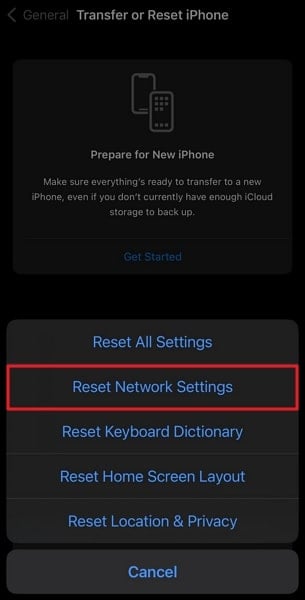
An unstable or slow Wi-Fi connection can cause interruptions. It leads to failure during the restoration process. Ensure that you are connected to a high-speed Wi-Fi network. If your Wi-Fi is disconnecting repeatedly, try resetting your network settings. To do that, follow this guide:
Step 1: Access iPhone Settings and tap the "General" option. Here scroll down to tap "Transfer or Reset iPhone." On the following screen, press "Reset" and select "Reset Network Settings."
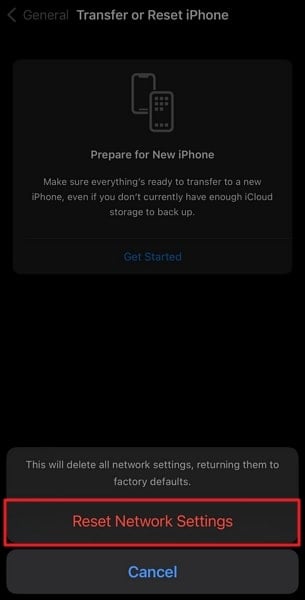
Step 2: Confirm your action by providing the phone passcode. Finally, tap "Reset Network Settings" to restore the network settings to their default.
Incomplete or Failed Restoration Process
The restoration process can be interrupted or failed due to many reasons. It could be due to temporary glitches, which can be resolved by restarting your device. Another reason behind the failure is the corrupt WhatsApp backup. In the same way, an outdated WhatsApp can also cause this issue. If there is no clear cause, you will need to contact WhatsApp Support.
Part 4: How to Restore WhatsApp Without an iCloud Backup? Alternatives!
Restoring WhatsApp from an iCloud backup is the recommended method. However, there are instances where you may not have an iCloud backup available. In such situations, there is no need to panic because we will provide alternate methods to recover your WhatsApp data. This section will explore two alternatives to restore your chat history from iCloud:
Restoring from Local Backup Using iTunes
Have you previously backed up your iPhone using iTunes or Finder? If yes, there's a possibility that your WhatsApp data is included in the local backup. iTunes or Finder is the official iOS management software that provides many functions. Creating local backups is a specialty of iTunes. Follow these steps to restore the local backup from iTunes:
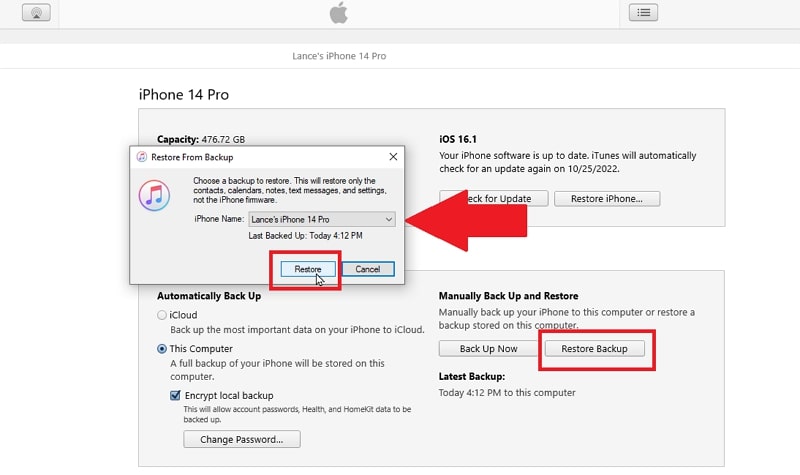
Step 1: Connect your iPhone to the computer that holds the backup and open iTunes or Finder. Once iTunes detects it, click the device icon to access the "Summary" tab.
Step 2: Within the "Summary" tab, navigate to the "Restore Backup" option and click it. Now, select the most recent backup that includes your WhatsApp data.
Using a Specialized Data Recovery Tool Wondershare Dr.Fone
IIf you have lost important WhatsApp messages and realize there’s no available iCloud backup, don’t panic—there are still effective ways to recover your data. While restoring WhatsApp chat from iCloud is the most common solution, not every user creates regular backups. In such cases, specialized recovery tools can help retrieve your valuable information.
One highly reliable option is Dr.Fone - Data Recovery (iOS). This tool enables you to recover a wide range of WhatsApp data—including messages, videos, photos, voice notes, and attachments—even if you don’t have a prior backup. It supports data recovery directly from your iOS device, iTunes, or iCloud.
Dr.Fone - Data Recovery (iOS)
World's 1st iPhone Data Recovery Software
- Selectively recovers iPhone data from internal memory, iCloud, and iTunes.
- Works perfectly with all iPhone, iPad, and iPod touch.
- Original phone data will never be overwritten during recovery.
- Step-by-step instructions provided during the recovery.
Here is how you can recover WhatsApp data with Wondershare Dr.Fone:
Step 1: Select Data Recovery in Wondershare Dr.Fone
Initiate the WhatsApp data recovery process by launching Wondershare Dr.Fone. From the left side panel, choose "Toolbox" and follow it by clicking "Data Recovery." Afterward, connect your iPhone to the system and select "iOS."
Step 2: Choose to Recover Data from iOS Device to Commence the Process
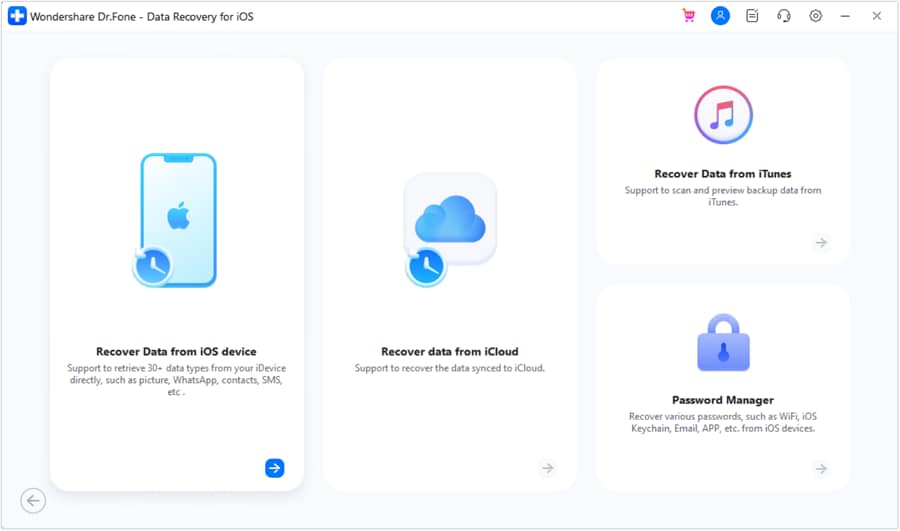
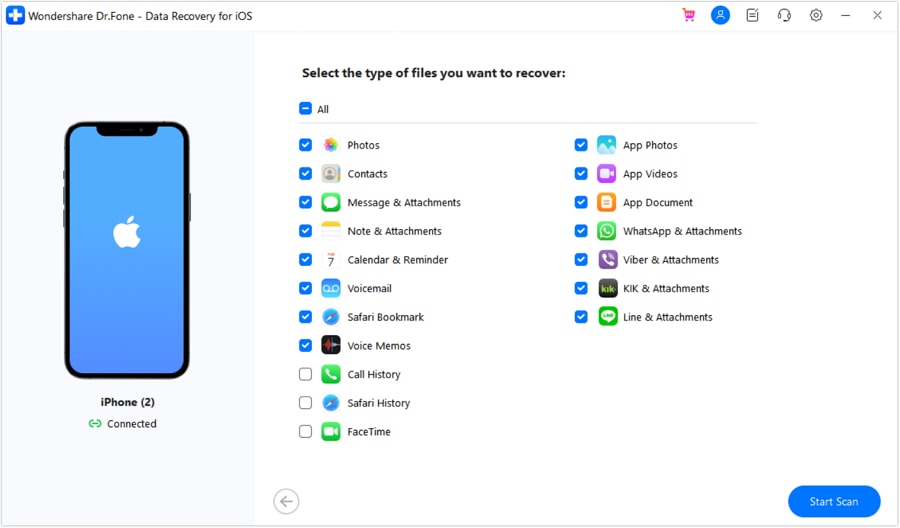
From the available four options, choose “Recover Data from iOS device," and on the next screen, choose data types. Since you are looking to recover WhatsApp data, check the “WhatsApp & Attachment” and click “Start Scan.”
Step 3: Recover and Restore Your WhatsApp Data
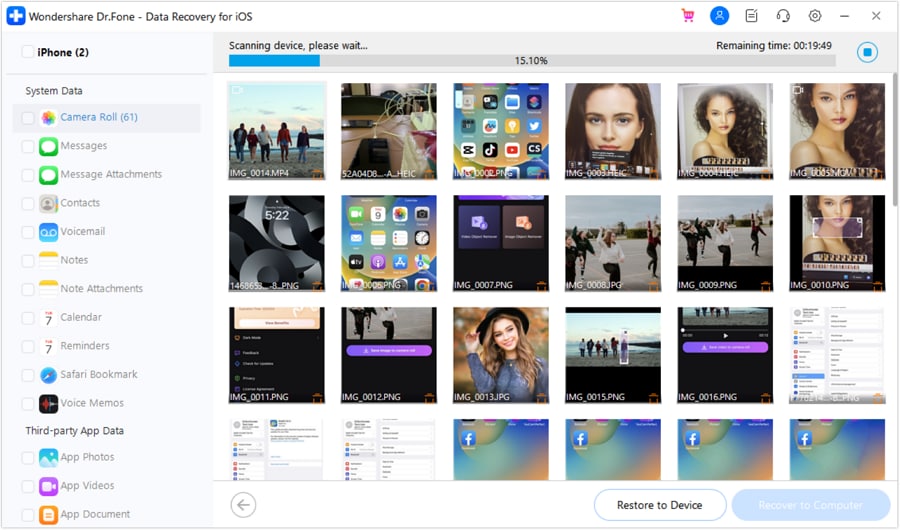
As the scan begins, the recovered data will start appearing on the screen for you to preview. After the scan is finished, find your WhatsApp data and preview it. Once you are satisfied, use either “Restore to Device” or “Recover to PC” to get your WhatsApp data back.
Part 5: How to Restore iPhone WhatsApp Backup to Android?
With the advanced features of Dr.Fone - WhatsApp Transfer, moving your data across different mobile platforms is now easier than ever. If you’ve recently upgraded to the iPhone 17 but still want to keep using an Android device alongside it, you don’t have to worry about losing your important WhatsApp history. The tool allows you to effortlessly Restore iPhone WhatsApp Backup to Android, ensuring all your messages, media files, voice notes, and attachments move with you.
Dr.Fone - WhatsApp Transfer (iOS/Android)
Handle Your WhatsApp Chat, Easily & Flexibly
- Transfer iOS WhatsApp to iPhone/iPad/iPod touch/Android devices.
- Backup or export iOS WhatsApp messages to computers.
- Restore iOS WhatsApp backup to iPhone, iPad, iPod touch, and Android devices.
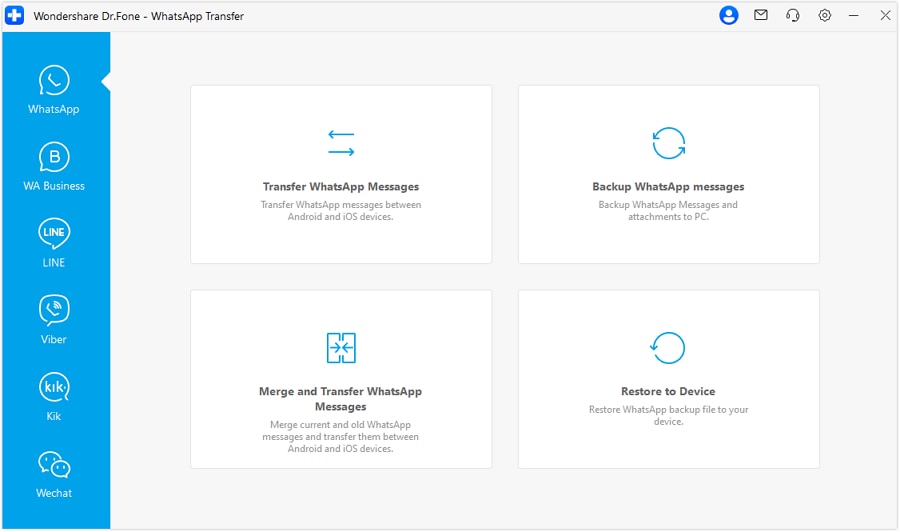
Once you launch the Dr.Fone toolkit, you need to go for "WhatsApp Transfer", then choose “Whatsapp”. Out of the list you need to choose “Restore to device”.
Step 1: Connection of Devices
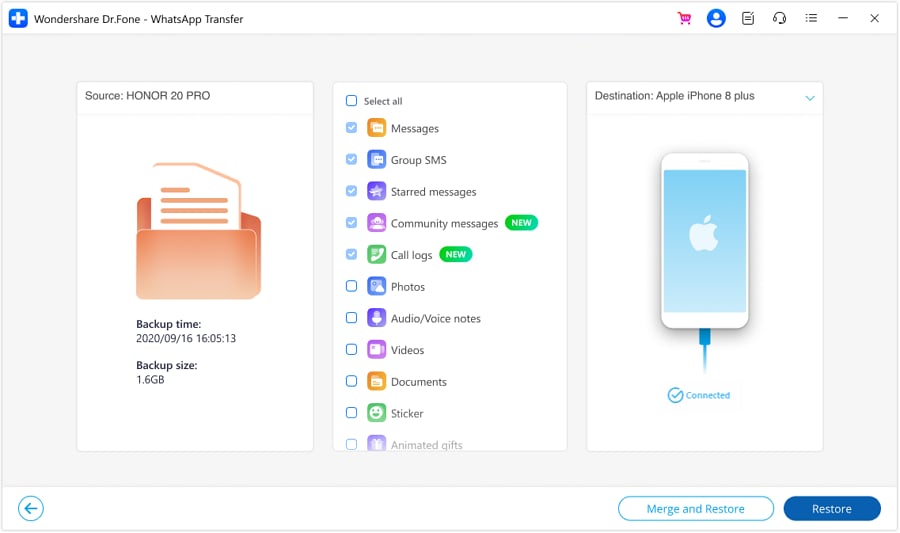
Now, the first step will be to connect your Android device to the computer system. A program window will appear as given in the image:
Step 2: Restoring Whatsapp messages
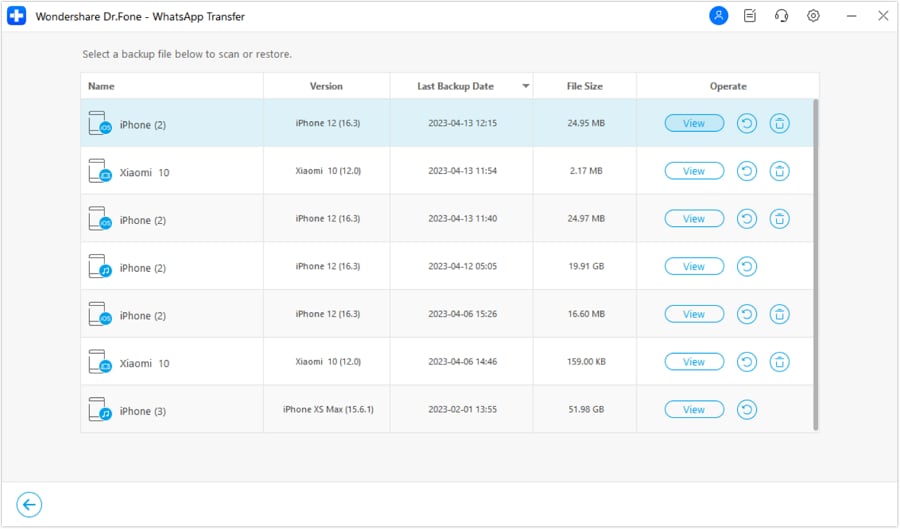
From the given window, select the backup file which you want to restore and click "View". Then out of the given list of messages, select the desired messages or attachments and click "Export to PC" to export the files to PC. You can also click "Restore to Device" to restore all WhatsApp messages and attachments to the connected Android.
Conclusion
In summary, the process of restoring from iCloud backup WhatsApp is crucial. It is especially needed when it comes to recovering your valuable conversations, photos, and videos. This article has provided you with a comprehensive guide on how to restore WhatsApp from iCloud. In addition to iCloud, there are reliable data recovery tools available to assist you in restoring WhatsApp data.
Among the various options, we recommend Wondershare Dr.Fone as the best data recovery tool. Wondershare Dr.Fone offers a user-friendly interface and advanced recovery capabilities. It also boasts a high success rate in recovering WhatsApp data from iCloud backups. It provides a comprehensive solution for retrieving your WhatsApp data with ease.
Dr.Fone Basic:
Better Control for Your Phone
Manage, transfer, back up, restore, and mirror your device
iCloud Backup
- Backup to iCloud
- 1. View Text Messages on iCloud
- 2. Backup/Extrac WhatsApp from iCloud
- 3. iCloud Drive, iCloud Sync & iCloud Backup
- Extract iCloud Backup
- 1. Access iCloud Backup Files
- 2. Retrieve Data From iCloud
- 3. Access and Download iCloud Backup
- 4. Top 6 Free iCloud Backup Extractor
- Restore from iCloud
- 1. Restore from iCloud Backup
- 2. Recover Photos from iCloud
- 3. Restore WhatsApp from iCloud
- 4. Restore iCloud Backup to iPhone
- 5. Restore Text Messages from iCloud
- 6. Restore Notes from iCloud
- 7. Restore WhatsApp from iCloud
- 8. Can't Restore an iCloud Backup
- 9. Retrieve Photos from iCloud Backup
- iCloud Backup Issues
- ● Manage/transfer/recover data
- ● Unlock screen/activate/FRP lock
- ● Fix most iOS and Android issues
- Start Backup Start Backup Start Backup


James Davis
staff Editor