
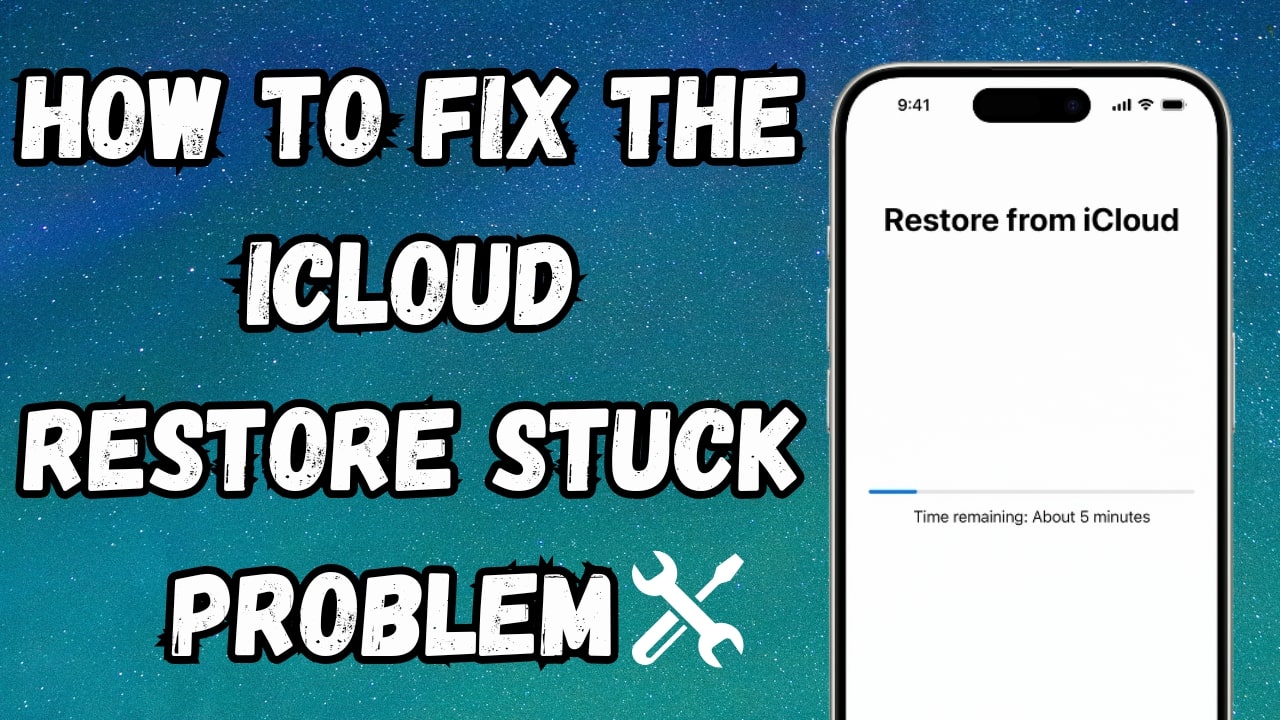
iCloud Restore Stuck? Here’s How to Fix It [iPhone 17 Supported]

Jun 30, 2026 • Filed to: Data Recovery Solutions • Proven solutions
 TL;DR:
To fix a stuck iCloud restore on your iPhone (up to the iPhone 17), ensure adequate device storage, disable Wi-Fi Assist to force network stability, or use Dr.Fone software to bypass system freezes and standard restoration limits.
● The native Apple recovery method strictly requires wiping your device entirely via the "Erase All Content and Settings" option before you can initiate the backup transfer from the "Hello" screen.
● Dr.Fone - Data Recovery bypasses the mandatory factory reset requirement, enabling you to selectively extract specific files from an iCloud backup directly to your device or computer without overwriting existing data.
● For devices stuck in boot loops, frozen during restore, or experiencing specific iTunes codes (errors 14, 50, 53, and 27), Dr.Fone - System Repair utilizes a Standard Mode to resolve underlying iOS firmware bugs without data loss.
Ask AI for a summary
 ChatGPT
 Perplexity
 Gemini
 Claude
 Grok
Grok
Dr.Fone Basic:
Better Control for Your Phone
Manage, transfer, back up, restore, and mirror your device
Restoring your phone backup is a process that should be effortless, but it is not always the case. Many iOS users have reported issues when trying to restore from iCloud backup, putting their vital content at risk. Several factors can cause this, including network instability, insufficient storage, or software glitches. Luckily, multiple solutions exist to resolve this problem efficiently.
This guide provides the most effective troubleshooting steps for fixing problems when restoring from iCloud backup on your iPhone. Whether the restore process freezes, runs unusually slow, or gets stuck, there’s no need to panic. With these solutions, you can quickly complete the iCloud restore and regain access to your data—whether on the latest iPhone 17 or an earlier model—ensuring a smooth recovery process.
Part 1. Why is iCloud Restore Stuck on My iPhone?
A thorough understanding of this problem's causes will enable more efficient troubleshooting and a successful resolution. Several things can go wrong during restoration, causing the process to freeze and interrupt the transfer of your data. Here are a few major reasons why you are having issues with the iCloud backup recovery:
1. Unstable Internet Connection
A weak or inconsistent Wi-Fi can interrupt the restore process, causing it to freeze or slow down significantly. Since iCloud backups need a stable and high-speed internet connection, such disruptions can lead to failures.
2. Insufficient iPhone Storage
When your phone doesn’t have enough space to accommodate the backup data, the process may get stuck. Checking available storage before restoring is crucial to avoid this issue.
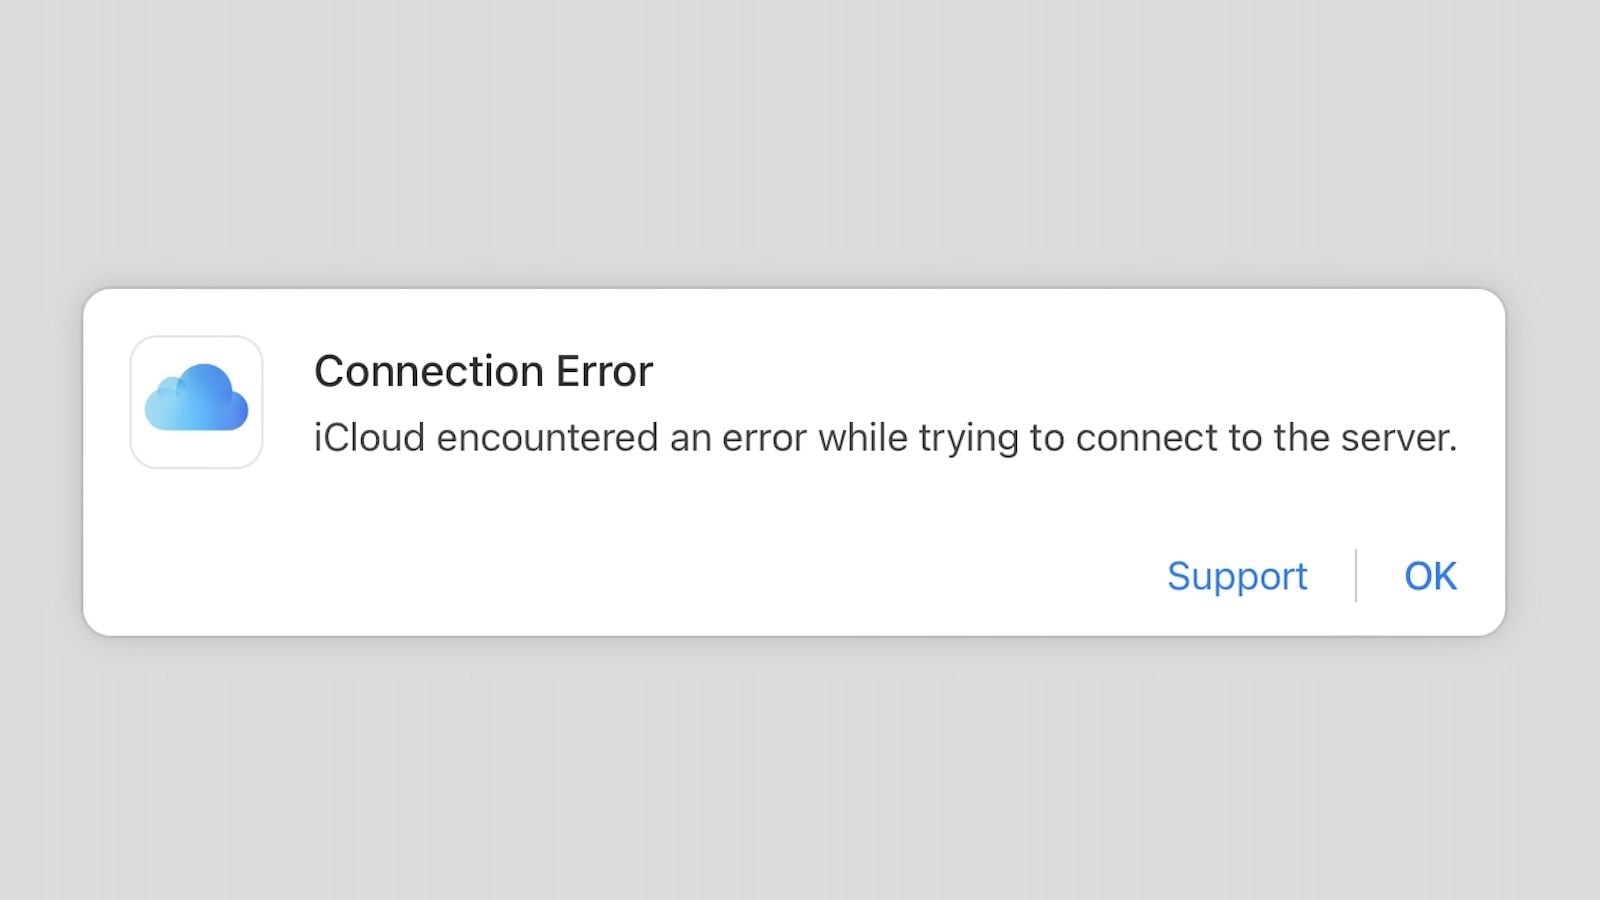
3. Apple Server Issues
Sometimes, iCloud restore problems occur due to Apple’s server downtime or high traffic. The restore may take longer or fail if the servers are experiencing issues.
4. Corrupted or Incomplete Backup
The restore process might freeze if the backup file is corrupted or incomplete. That can happen due to interrupted backups, software bugs, or failed uploads.
5. Software Glitches or iOS Bugs
A bug within firmware or a system glitch may interfere with the restore process. Outdated software, conflicting settings, or system errors can cause the iCloud restore to get stuck.
Part 2. How to Fix iCloud Restore Stuck on Your iPhone?
Several effective solutions can help resolve the issue and get your restore process back on track. Each of these methods is designed to let you regain access to your data without unnecessary delays. By applying the right fix, you can ensure a smooth recovery and get rid of the problem. Discover the top 6 solutions to deal with iCloud recovery issues below:
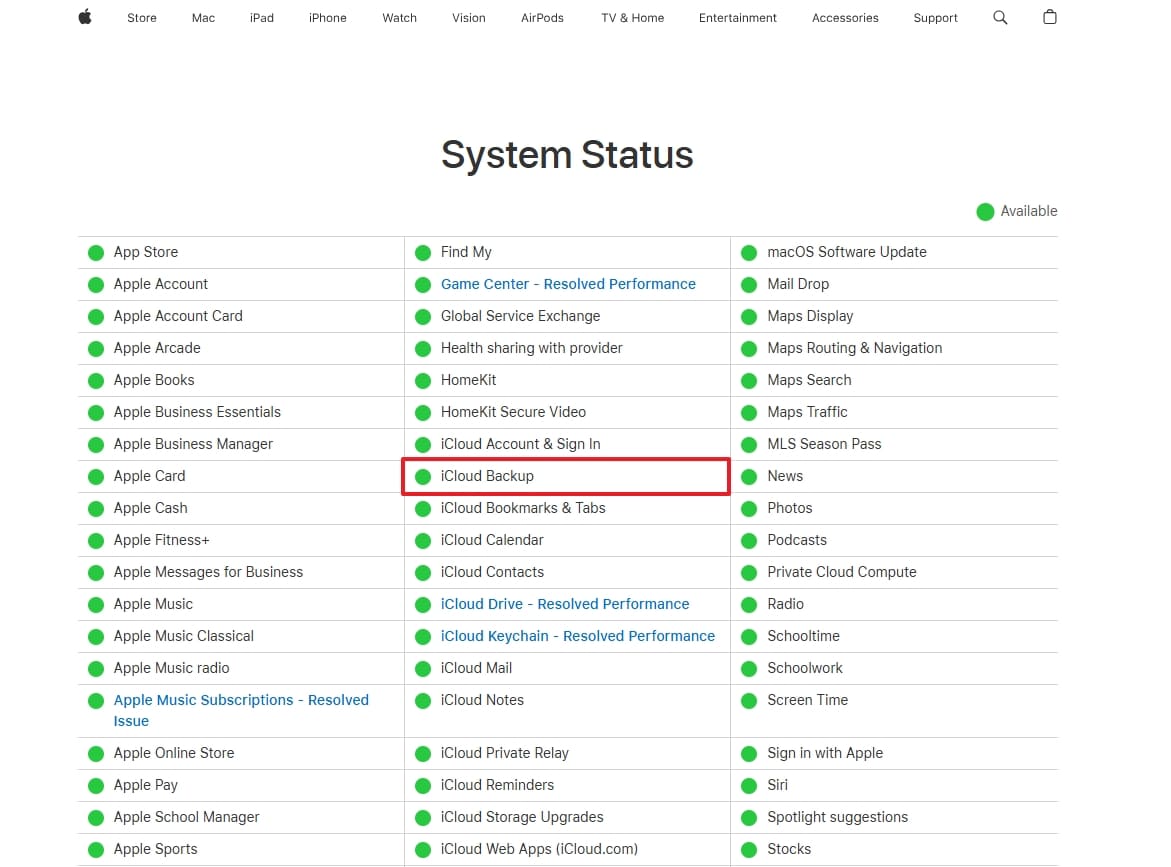
Fix 1. Check the iCloud System Status
Sometimes, the issue might be on Apple’s end rather than your device. The servers occasionally experience downtime or high traffic, which can slow down or interrupt the process. Before trying other fixes, it’s essential to check Apple’s system status to confirm if iCloud services are running smoothly. You can follow these instructions to check servers and restore the iPhone from the backup without any issues:
Instructions. Proceed to access a web browser on a device and visit Apple’s official System Status page. Here, look for “iCloud Backup” to check its indicator. Yellow or red indicates issues with the service, while green indicates there is no problem with it.
Fix 2. Use a High-Speed Internet Connection
A slow or unstable network can cause iCloud restore to freeze, take longer than expected, or fail entirely. In general, restoring from iCloud requires downloading large amounts of data. That means a high-speed and stable Wi-Fi connection is essential for a smooth process. Hence, you should switch to a better connection can help resolve the issue without having to go through complex steps.
You could try switching between Wi-Fi and mobile data to see if that solves your dilemma. To refresh your connection, restart your router or toggle Airplane mode on your mobile. A faster and more stable internet can significantly improve the restoration process.
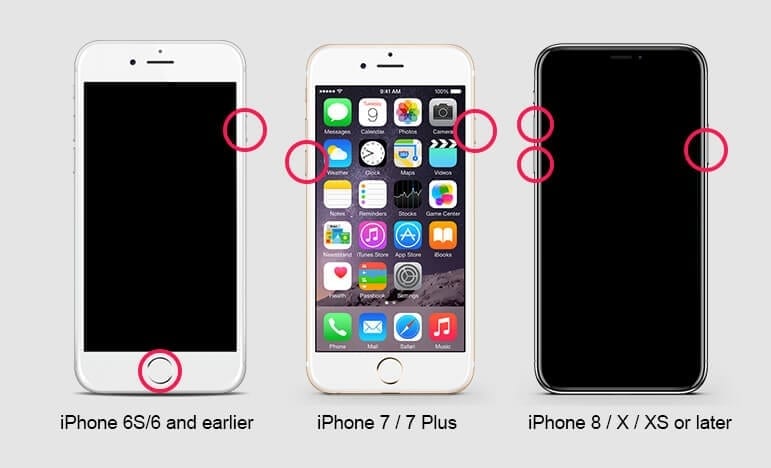
Fix 3. Force Restart Your iPhone
Temporary glitches or bugs on your mobile can become a nuisance when performing important actions. In such cases, a force restart can resolve minor system issues that may be causing the iCloud restore to get stuck.
Doing so clears temporary system errors without erasing your data. It is especially helpful when your phone is frozen or stuck in the restore process. Follow these guides to learn how to restore an iPhone from a backup:
- iPhone 8 or Later: Proceed to run a tap and release operation on the “Volume Up” key and repeat it on the “Volume Down” button. Following that solidly put a hold on the “Side” button and let it go when the Apple logo makes its appearance on the screen.
- iPhone 7/7 Plus: After firmly pressing down the “Volume Down” and “Sleep/Wake” buttons at the same, release them when you see the Apple emblem.
- iPhone 6S or Earlier: You’ll have to hold down the “Home” and “Sleep/Wake” keys simultaneously until you can verify the Apple logo on the screen.
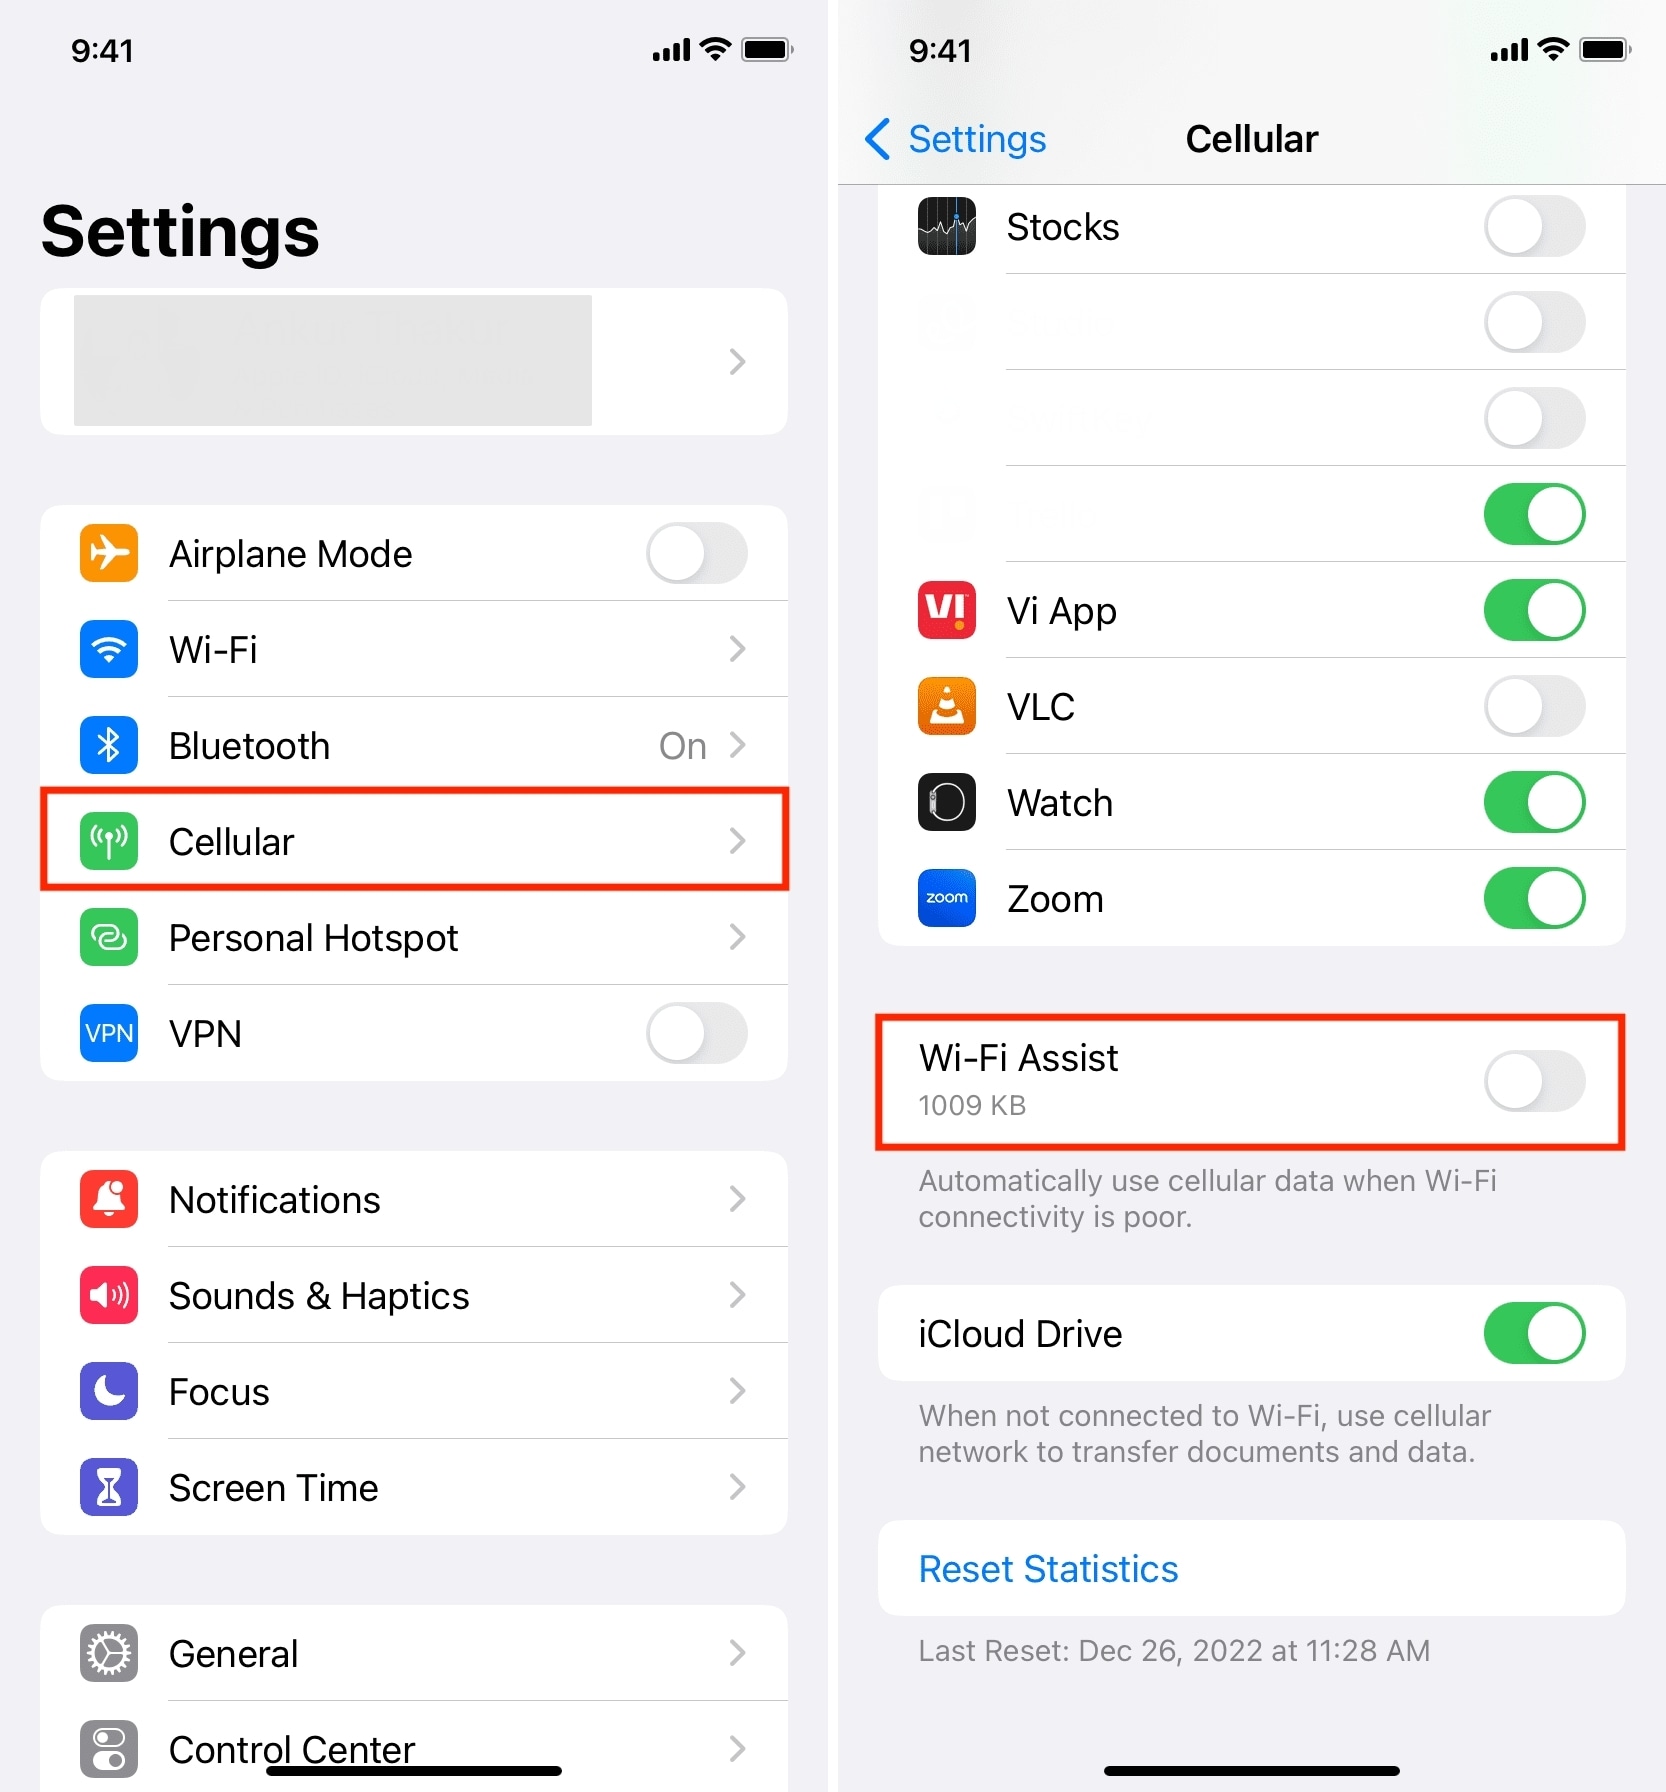
Fix 4. Turn Off Wi-Fi Assist Feature
This function on your iOS device lets you switch to cellular data when a Wi-Fi connection becomes weak. While this feature improves browsing and streaming, it can interfere with an iCloud restore. By continually switching between networks, it can potentially cause interruptions or delays.
Disabling Wi-Fi Assist ensures that your phone remains connected to a stable network throughout the process. The following guide can help you learn how to restore iCloud backup:
Instructions. Move to the phone settings and access the “Cellular” or “Mobile Data” tab. On the subsequent screen, find the “Wi-Fi Assist” option at the bottom and toggle it off.
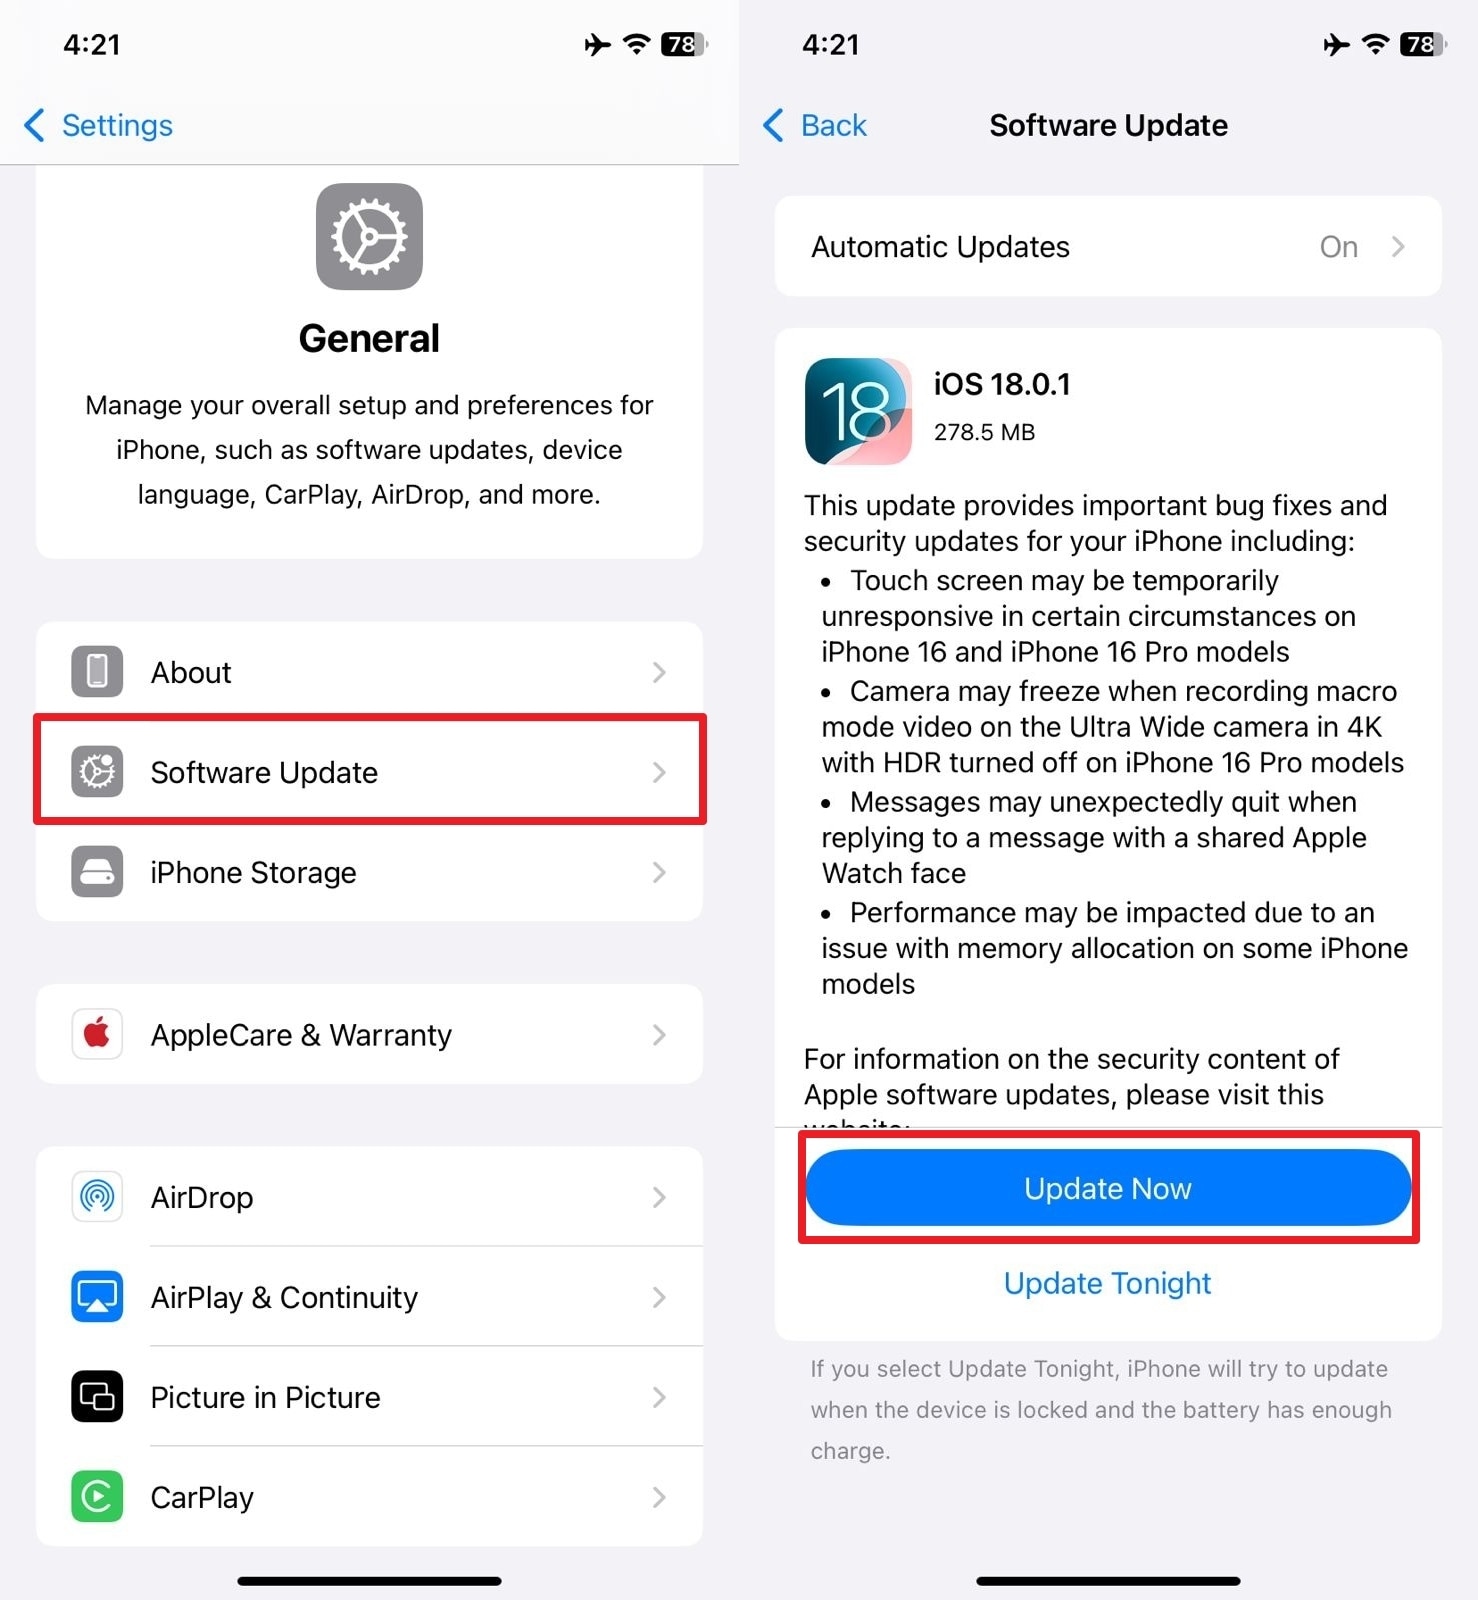
Fix 5. Update Your iOS Firmware
When you run your phone on an outdated system version, it becomes prone to various issues. One of these problems is the iCloud backup restoration due to bugs and compatibility errors. That’s why Apple regularly releases new updates to fix glitches and improve system stability.
Upgrading the firmware can increase performance and flush out phone issues. Adhere to these instructions for restoring from iCloud backup without any problems:
Instructions. Go to the “General” tab in the phone settings and tap “Software Update” to look for the latest available iOS update. Then, opt for “Download Now” to commence the operation if a system upgrade is available.
Fix 6. Fix All System-Level Issues of Your iPhone in a Single-Click
You can go for a professional iOS repair tool if the basic troubleshooting does not solve the problem. In such cases, severe software glitches or deep system errors can be the likely cause. Dr.Fone – System Repair (iOS) offers a reliable way to fix various iOS issues, including a stuck iCloud restore. This tool helps repair system errors without data loss to ensure your phone works normally without affecting your files.
Dr.Fone - System Repair
One-click to fix various iPhone problems without data loss.
- Easy, fast and reliable.
- Fix with various iOS system issues like stuck in recovery mode, white Apple logo, black screen, looping on start, etc.
- Fixes other problems with your valuable hardware, along with iTunes errors, such as error 14, error 50, error 53, error 27 and more.
- Works for all models of iPhone, iPad, and iPod touch.
- Fully compatible with the latest iOS 11.


It can solve problems like phones stuck in a boot loop, frozen during restore, or facing update failures. You will get a Standard Mode, which fixes most system issues without data loss. For severe-level problems, the program offers an Advanced Mode to ensure your device works without a hitch. The following detailed guide can help you repair all system issues to ensure a smooth iCloud restore process:
Step 1. After launching Dr.Fone on your computer, proceed to the “Toolbox” and select the “System Repair” feature. Next, choose “iOS” as your device type when prompted and establish a connection between your phone and the computer.

Step 2. Once connected, head over to the system repair section and click on “iOS Repair” to move forward. Then, select “Standard Repair” to fix your device without causing any data loss.
Step 3. From there, carefully follow the on-screen guidelines and press “Enter Recovery Mode” to proceed. Now, browse the available firmware versions and select the one you wish to install.

Step 4. After that, press the “Download” button and allow the software to fetch and verify the firmware. When done, click “Repair Now” to begin resolving all system-related issues.

Part 3. How to Restore iCloud Data on iPhone Without Any Technical Issues?
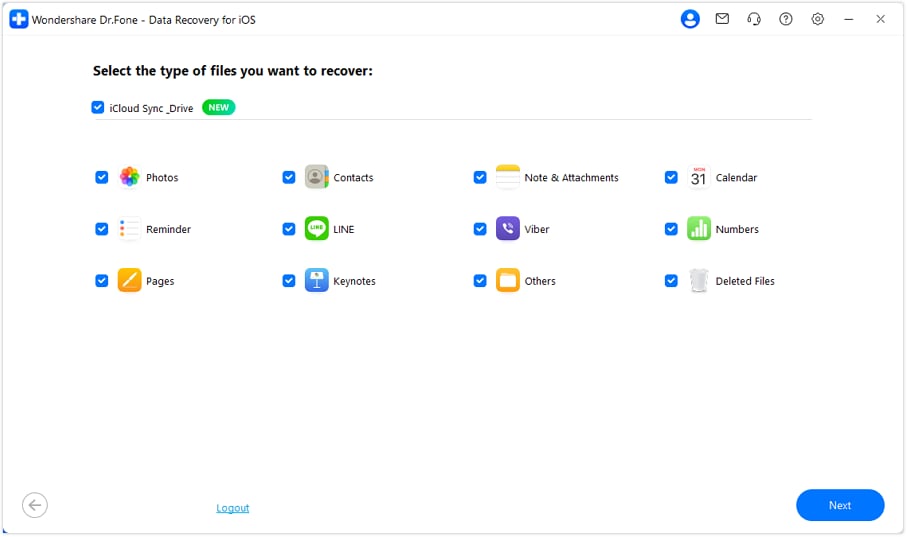
An alternative way to get your vital content from iCloud becomes necessary when the normal process doesn’t work. Instead of restarting the process multiple times and risking further delays, a dedicated tool can be a more reliable choice. Dr.Fone – Data Recovery (iOS) offers a smooth way to access and restore your iCloud backup without the standard restore process. Unlike Apple’s method, it doesn’t require erasing your device before restoring data.
The iCloud backup recovery with this program becomes selective as you can restore what data you need. This flexibility ensures that you do not have to lose existing content, saving time and preventing unnecessary data overwrites. After logging into your iCloud account within the software, you can preview and extract files directly to your computer. Moreover, it lets you recover content when you accidentally factory reset your iPhone.
Main Benefits of Employing Dr.Fone – Data Recovery (iOS)
- Easily view and select specific photos, messages, contacts, and other files before restoring them.
- Recover contacts, photos, videos, notes, reminders, and more content from your mobile backup.
- Retrieves phone data from iTunes backups for direct restoration onto your iDevice.
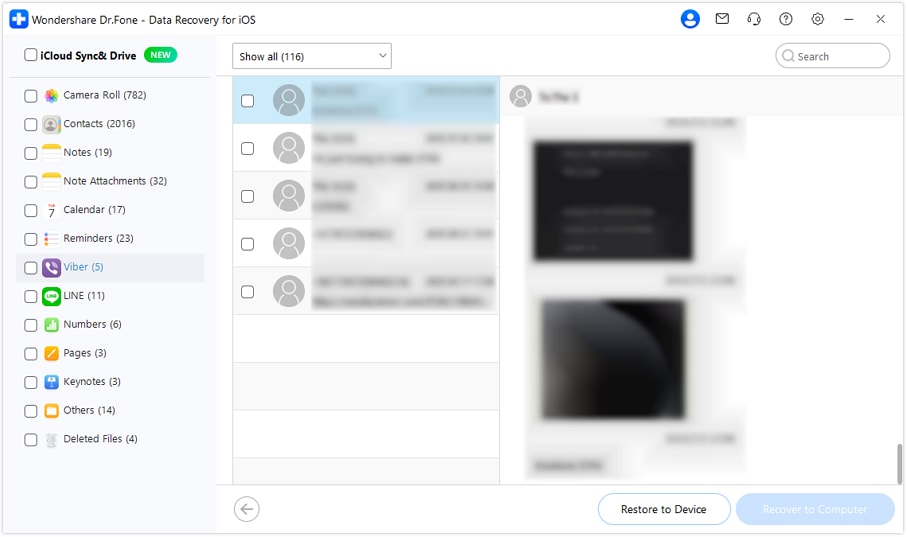
Detailed Guide on How to Restore iCloud Data on iPhone via Dr.Fone – Data Recovery (iOS)
This program ensures data privacy and prevents overwriting of existing files during the process. Utilize the following elaborate instructions to learn how to restore the iPhone from the backup:
Step 1. Sing Into Your iCloud Account After Accessing Related Option
As you move to launch Dr.Fone on your system, approach “Toolbox” from the left panel and click “Data Recovery.” Then, hit “iOS” for the platform type and opt for “Recover Data from iCloud" on the next screen. Following that, proceed to log into your iCloud account and confirm your identity via 2FA.

Step 2. Get the Content You Want from iCloud
At this point, you will be asked to choose the data categories you wish to extract from the backup. After making the choice, hit “Next” and wait for the content downloading to complete. Now, use an Apple-certified cable to attach your iOS device to the computer to proceed.
Step 3. Select the Desired Content and Restore it to iDevice
Moving forward, choose the files you wish to restore on your phone and click “Restore to Device.” On the upcoming screen, select your mobile and tap “Continue” to commence the operation. Apart from the phone, you can also “Recover to Computer” to store the content on your computer.
Pro Tip. How to Restore iCloud Backup on iPhone [Simplified Steps]
You’ll need to follow the correct instructions if you want to perform backup restoration without a hitch. Doing so ensures that all your data, settings, and apps are accurately transferred to your device. Employ the following steps to restore the iPhone from backup using the native way:
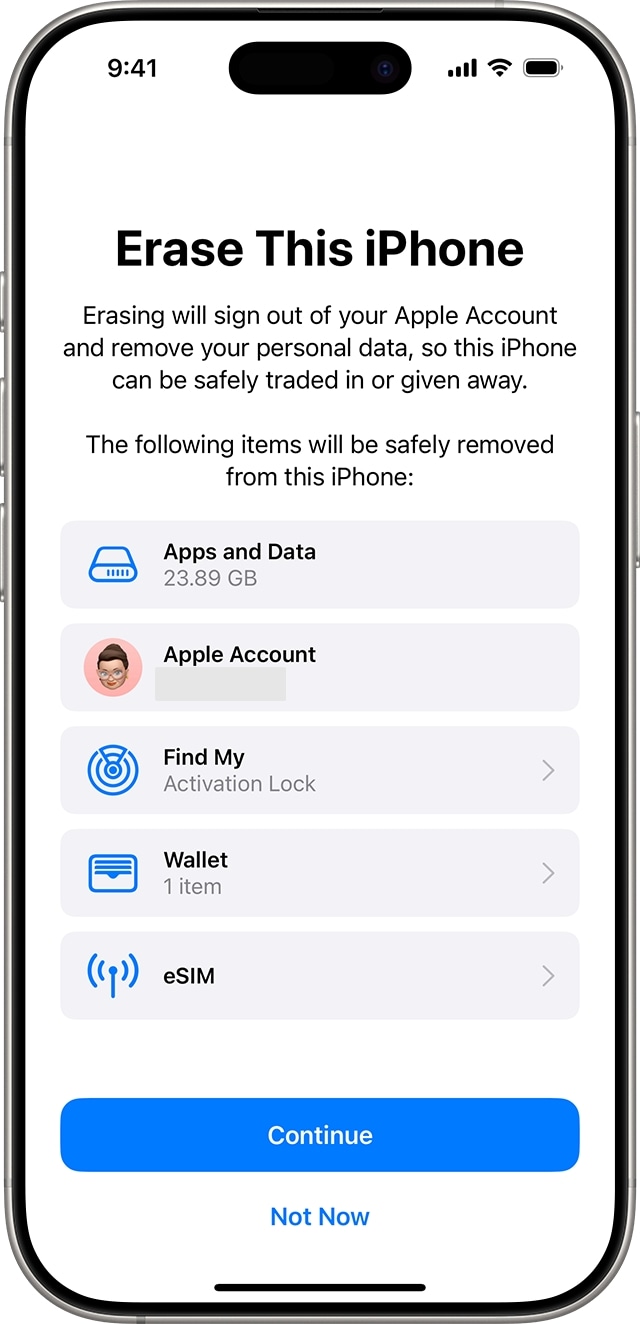
Step 1. Begin by erasing your phone if it hasn’t already been done via the “Erase All Content and Settings” option from the “Transfer or Reset iPhone” tab in General settings. Following that, reboot the device to access the “Hello” screen and start setting it up.
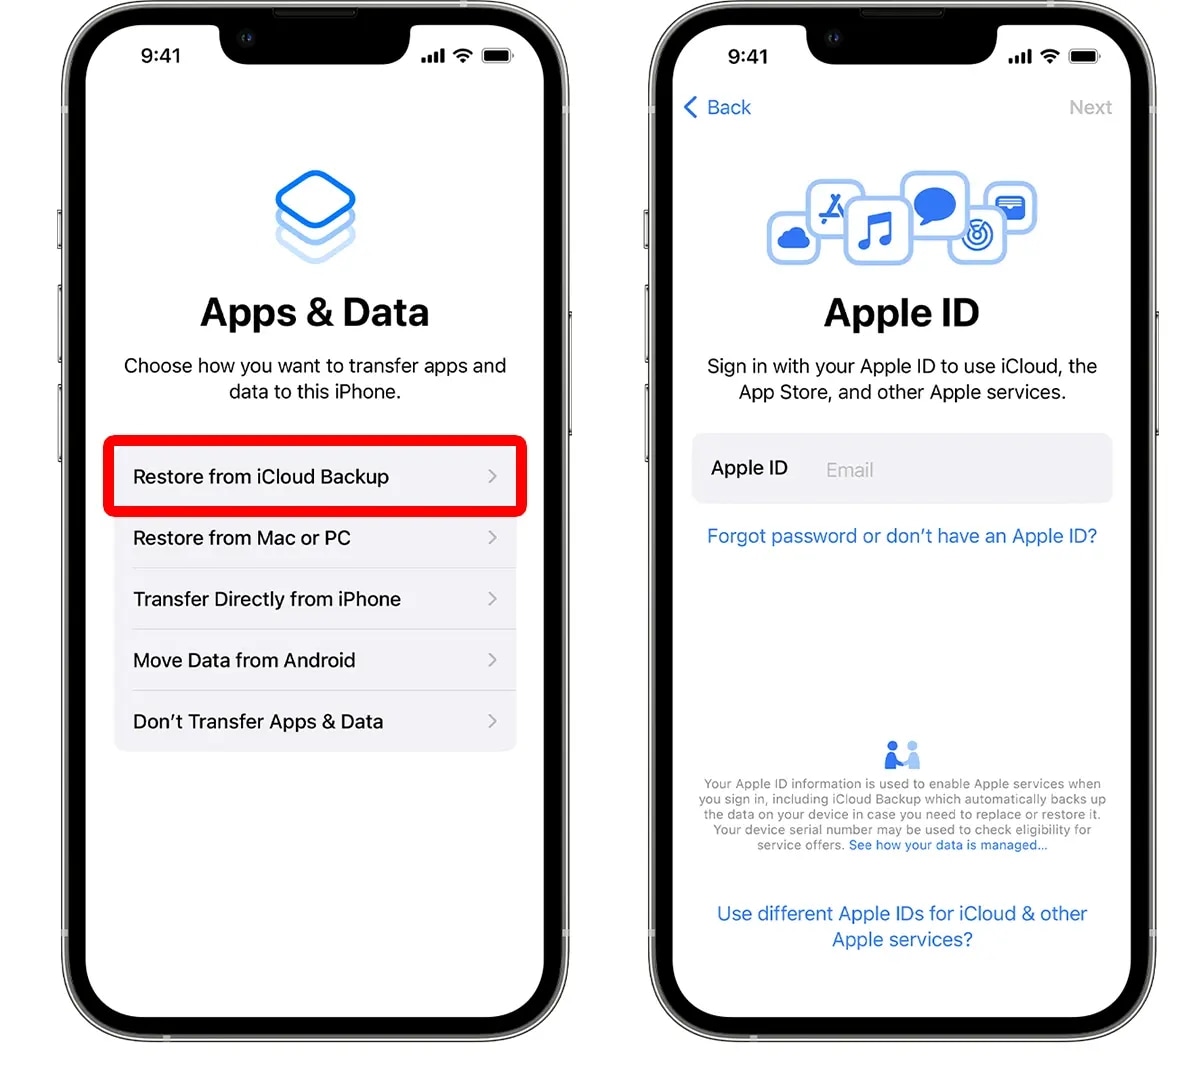
Step 2. Once you reach the “Apps & Data” screen, select the “Restore from iCloud Backup” option from available choices. Now, log into your Apple account and choose the desired backup to kickstart this operation.
Conclusion
In summary, iCloud backup recovery can become a headache if you do not know the proper methods. Process delays or failures can stem from device malfunctions, necessitating corrective action. You can use a tool like Dr.Fone – System Repair (iOS) to fix system issues and Dr.Fone – Data Recovery (iOS) for selective restoration without erasing data.
Dr.Fone Basic:
Better Control for Your Phone
Manage, transfer, back up, restore, and mirror your device


iCloud Backup
- Backup to iCloud
- 1. View Text Messages on iCloud
- 2. Backup/Extrac WhatsApp from iCloud
- 3. iCloud Drive, iCloud Sync & iCloud Backup
- Extract iCloud Backup
- 1. Access iCloud Backup Files
- 2. Retrieve Data From iCloud
- 3. Access and Download iCloud Backup
- 4. Top 6 Free iCloud Backup Extractor
- Restore from iCloud
- 1. Restore from iCloud Backup
- 2. Recover Photos from iCloud
- 3. Restore WhatsApp from iCloud
- 4. Restore iCloud Backup to iPhone
- 5. Restore Text Messages from iCloud
- 6. Restore Notes from iCloud
- 7. Restore WhatsApp from iCloud
- 8. Can't Restore an iCloud Backup
- 9. Retrieve Photos from iCloud Backup
- iCloud Backup Issues
- ● Manage/transfer/recover data
- ● Unlock screen/activate/FRP lock
- ● Fix most iOS and Android issues
- Free Download Free Download Free Download


James Davis
staff Editor