How to Set Up iCloud Account on Android

May 19, 2026 • Filed to: Device Data Management • Proven solutions
 TL;DR:
You can configure an iCloud email account on an Android device by selecting manual setup in the default email app and choosing the IMAP protocol.
● Set the incoming IMAP server to imap.mail.me.com with SSL security on port 993 using your full iCloud email address and password.
● Set the outgoing SMTP server to smtp.mail.me.com with TLS security on port 587 and confirm that SMTP authentication is required.
● POP and EAS protocols are completely unsupported for iCloud, and it is recommended to handle important email management and prioritization directly through the iCloud website.
Ask AI for a summary
 ChatGPT
 Perplexity
 Gemini
 Claude
 Grok
Grok
Dr.Fone Basic:
Better Control for Your Phone
Manage, transfer, back up, restore, and mirror your device
Are you switching to Android? What do you do if your emails account is still with Apple? If you have an iCloud account and are worried about switching over to Android, it’s easy now. Migrating from iCloud to Android is easier than ever. It is also simple to set up iCloud account on Android.
Admittedly, the two systems do not gel well together. However, Android allows you to add your iCloud email account with ease. It can be added to your phone’s in-built email app like any other third-party email account. Adding an email account is possible today even if you are switching to Android. Don’t worry if it seems tricky - you will just have to enter a right server and port information. Here are a few steps that will help you easily add and set up an iCloud account on your Android device.
Steps to set up iCloud account on Android
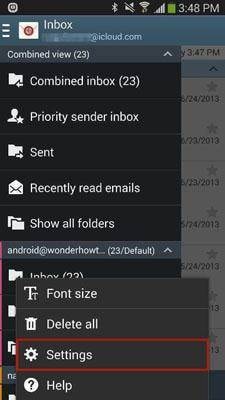
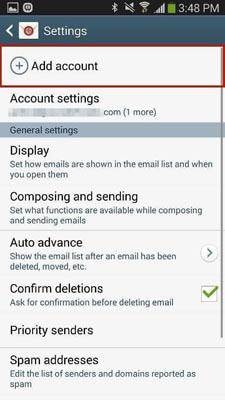
First Step – Open the App
Stock email app allows you to add the third-party email accounts. Go to your apps and open email app on your Android device. Tapp on the Menu button and visit Settings. Next, you have to click Add account.
Second Step
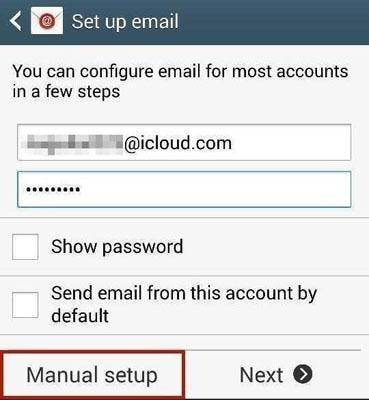
From the second step, you will begin to start setting up your iCloud account. On the next screen, you must enter the username (which looks like username@icloud.com) and also enter your iCloud account password. After entering the information, you need to tap on Manual setup. In some cases, your iCloud email account may look like xyz@icloud.com, where xyz is the username.
Step Three
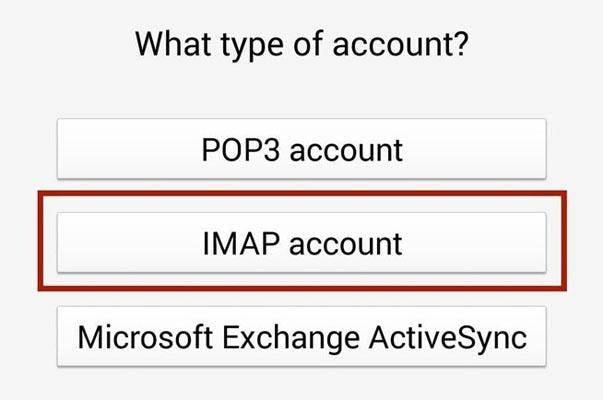
On the next screen, you will have to choose the type of your account. You will have the choice between POP3, IMAP and Microsoft Exchange ActiveSync accounts. POP3 (Post Office Protocol) is the most common type in which your email is deleted from the server once you check the email. IMAP (Internet Message Access Protocol) is the modern email account type. Unlike POP3, it does not remove email from the server until you delete the email.
IMAP is recommended, so just tap on the IMAP. You must know that POP and EAS protocols are not supported for iCloud.
Step Four
In this step, you will have to set the information of the Incoming server and Outgoing server. This is the most tricky step because it requires specific information without which your account won’t work. There are different ports and servers you need to enter. Just enter these details and you are good to go.
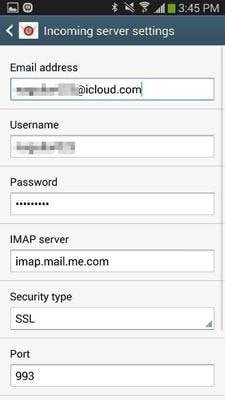
Incoming Server Information
- Email Address- You need to enter your full iCloud email address
- Username- Enter the username of your iCloud email
- Password- Now, enter the iCloud password
- IMAP server- Enter imap.mail.me.com
- Security Type- SSL or SSL (accept all certificates), but it is recommended to use SSL
- Port- Enter 993
Outgoing Server Information
- SMTP server- Enter smtp.mail.me.com
- Security Type- SSL or TLS, but it is recommended to TLS (accept all certificates)
- Port- Enter 587
- Username- Enter the username same as your iCloud email
- Password- Enter the iCloud password
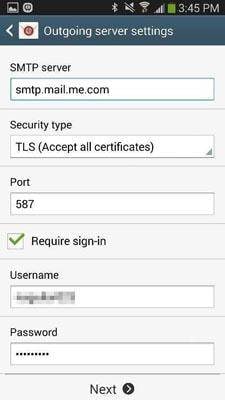
When you go to the next screen, you will be asked if you require SMTP authentication. Now, Select Yes.
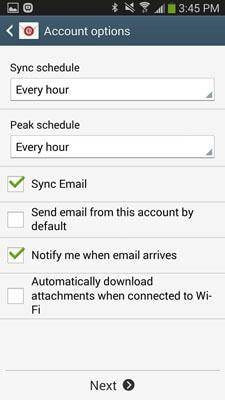
Step Five
You are almost done; the next step is all about setting up your account options. You can set the sync schedule like every hour or at a time interval you would like. You can also set your Peak Schedule for the same. There are other four options that you need to check “Sync Email”, “Send email from this account by default”, “Notify me when email arrives”, and “Automatically download attachments when connected to Wi-Fi”. Check according to your preference and tap Next.
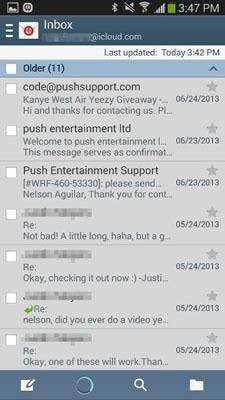
You are done now! The next screen syncs your email account to iCloud and downloads all the emails. Now you can see your email, including editing and managing them from the email app. The whole process takes two to three minutes. All the steps are easy. Just follow them as it is.
Important Note:
1. Always use IMAP protocol as it is the most used protocol, which allows you to access your emails from different clients. Hence, if you access your emails on other devices, IMAP is the best protocol. However, makes sure you enter the correct IMAP details.
2. In step three, you will be entering ingoing server information and outgoing server information. You need to enter the right port and server address, without which you may not be able to access the iCloud account from Android.
3. If you plan to use it over Wi-Fi, you can choose the email account options like Automatically download attachments when connected to Wi-Fi. However, if you are using an active internet connection, you can uncheck this option. Alternatively, you can also uncheck the sync options to save data. You can manually sync from the Email app whenever you need to check your emails.
4. Try to manage your emails from the iCloud official website, especially while working with important emails. Using the Android email client to access the iCloud, managing or setting priorities should be done from the iCloud.
5. Always use the SMTP authentication option to ensure the email is secured when you log in. Try to use good virus protection software on your Android to save your important emails. Importantly, you must know the credentials of your iCloud address and no one else.
Dr.Fone Basic:
Better Control for Your Phone
Manage, transfer, back up, restore, and mirror your device


iCloud Manage
- iCloud Delete
- iCloud How-Tos
- 1. Get More iCloud storage
- 2. Save Documents in iCloud
- 3. Access iCloud Photos
- 4. Access Your Notes on iCloud
- 5. Cancel iCloud Storage Plans
- 6. Sharing iTunes Store Purchases
- 7. Reset iCloud Email on iPhone / PC
- 8. Set Up iCloud Account on Android
- 9. iCloud Two-Factor Authentication
- 10. See Pictures Stored in iCloud
- 11. Buy More iCloud Storage
- 12. See What Is In iCloud Storage
- iCloud Issues
- 1. iCloud Backup Failed Issue
- 2. Not Enough iCloud Storage
- 3. iCloud Contacts Not Syncing
- 4. iCloud Photos Not Syncing
- 5. iPhone Couldn't Be Activated
- 6. iPhone Backup with iTunes/iCloud
- 7. Stuck on Updating iCloud Settings
- 8. iPhone Won't Backup to iCloud
- 9. Notes App Not Syncing with iCloud
- 10. Syncing with iCloud Paused
- iCloud Tricks
- 1. iCloud Tips and Tricks
- 2. Recover iCloud Password
- 3. Disconnect iPhone from iCloud
- 4. Retrieve Contacts from iCloud
- 5. iCloud Alternative For iPhone/iPad
- 6. Bypass iCloud Activation with IMEI
- 7. Bypass Activation Lock on iPhone
- 8. Change iCloud Account on iPhone
- 9. Get Rid of the Repeated iCloud Sign
- 10. Download Videos from iCloud
- 11. iCloud Storage vs. iPhone Storage
- 12. Manage iCloud Storage on iPhone/iPad
- ● Manage/transfer/recover data
- ● Unlock screen/activate/FRP lock
- ● Fix most iOS and Android issues
- Free Download Free Download Free Download


James Davis
staff Editor