7 Ways to Convert HEIC to JPG in Seconds [2026]

Dec 31, 2025 • Filed to: Device Data Management • Proven solutions
Dr.Fone Basic:
Better Control for Your Phone
Manage, transfer, back up, restore, and mirror your device
If you are using iOS 16 or older iOS version, then you must be familiar with HEIC. HEIC is an image container format, which is developed by MPEG and has been adopted by Apple in iOS 14. It is expected to replace the JPEG format in the long run. But due to its lack of compatibility, currently, it is not possible to open HEIC photos on Windows PC. So, a lot of iPhone users are looking for different ways to convert HEIC to a supported file format, such as JPG format.
The good thing is that there are different ways to convert HEIC into JPG. You can make certain changes in your iPhone settings to save the new photos to JPG format directly. Also, there are plenty of online tools that can convert HEIC to JPG free of cost. More conveniently, you can use Dr.Fone to transfer the HEIC photos to Mac/PC directly, and it will help convert HEIC to JPG during the transfer process. Here are 7 ways to convert HEIC photos to JPG format.
Part 1. How to Convert HEIC to JPG on Windows/Mac?
If you wish to transfer HEIC photos from your iPhone to Windows PC or Mac, then simply give Dr.Fone - Phone Manager (iOS) a try. This iPhone file manager comes with tons of advanced features and will certainly make your smartphone experience so much better. You can easily use it to transfer your data between iPhone and computer. Besides that, you can rebuild the iTunes library and even transfer data to another device directly as well. It supports all the leading data types such as photos, videos, music, contacts, messages, etc. The interface also provides a file explorer so that you can take full control of your device.
One of the best things about Dr.Fone - Phone Manager (iOS) is that it can automatically convert HEIC photos into JPG format. Therefore, you can easily transfer and convert HEIC to JPG on Windows 11, 10, 8, 7, and so on.
Dr.Fone - Phone Manager (iOS)
Transfer iPhone Photos to Computer and Convert HEIC to JPG format.
- Transfer, manage, export/import your music, photos, videos, contacts, SMS, Apps, etc.
- Back up your music, photos, videos, contacts, SMS, Apps, etc. to your computer and restore them easily.
- Transfer music, photos, videos, contacts, messages, etc. from one smartphone to another.
- Transfer media files between iOS devices and iTunes.
- Fully compatible with the latest iOS version and iPod.


How to convert HEIC to JPG on Windows PC/Mac?
Step 1. Firstly, download Dr.Fone - Phone Manager (iOS) on your Mac or Windows PC. Whenever you wish to convert HEIC to JPG, launch the toolkit and select the “Phone Manager” module.
Step 3. In no time, the application will provide a preview of the device with some additional features. Instead of choosing any shortcut from the home screen, go to the “Photos” tab.

Step 5. Simply select the photos that you wish to move. If you want, you can select an entire album as well.
Step 6. After selecting the photos, go to the export icon on the toolbar and choose to export these photos to the PC (or Mac).
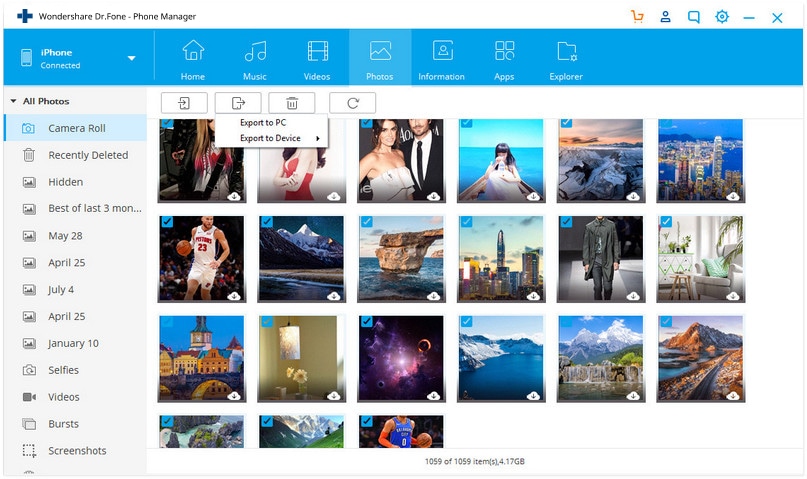
Wait for a while as your photos will be transferred to the specific location. Without any loss in the quality of your photos, they would automatically be converted to JPG format as well. In this way, you can easily move your photos from iPhone to computer without worrying about any compatibility issues.
Part 2. 3 Ways to Convert HEIC to JPG on iPhone
By using Dr.Fone - Phone Manager (iOS), you can automatically convert HEIC photos to JPG. Though, there are a few other solutions that you can further explore. If you don’t want to use any third-party tool, follow these techniques to convert HEIC to JPG on iPhone.
2.1 Turn off the "High Efficiency" feature on iPhone
By default, devices running on iOS 14/iOS 15/iOS 16 capture photos at High Efficiency. Since HEIC is a High Efficiency Image Format, all the photos taken in this mode will be stored in the same format. Therefore, the quickest way to convert HEIC to JPG on iPhone is by simply turning the feature off.
Step 1. Unlock your device and go to Settings > Camera.Step 2. Visit the “Formats” option.
Step 3. Select the “Most Compatible” option instead of “High Efficiency”.

Go back and take some photos to check whether the photos are stored in HEIC or JPG format. While it can’t convert the existing HEIC photos to JPG, it will certainly let you click news photos in a compatible (JPG) format.
2.2 Automatically Change HEIC to JPG on iPhone
Since HEIC is comparatively a newer image format, even Apple is aware of its limitations. To make it easier for its users to access their photos on other devices, it allows us to make an automatic HEIC conversion as well. To convert HEIC to JPG on iPhone, simply follow these steps:
Step 1. Unlock your device and go to Settings > Camera > Formats.Step 2. Under the “Transfer to Mac or PC” section, you would get an option to change the file format.
Step 3. Instead of “Keep Originals”, make sure that you have selected “Automatic”.

Once the “Automatic” mode is enabled, your device will automatically convert the photos from HEIC to a compatible format (JPG) while transferring them to a Mac or PC.
2.3 Email the HEIC Photos
If you only wish to transfer a handful of photos, then you can simply email them to yourself as well. In this way, the emailed photos will be converted to a JPG format.
Step 1. To convert HEIC photos, simply launch the Photos App on your device.Step 2. Select the HEIC photos that you wish to convert and tap on the Share button.
Step 3. You will be provided with different ways to share these photos. Tap on the Email option.
Step 4. As the default Email app would be launched, the selected photos will automatically be attached.
Step 5. Give your own email id and send the mail.

While this option might seem convenient, it has a pitfall. You can’t convert HEIC to JPG photos in a batch. Also, most email services have an upper limit (of 20 or 25 MB) per mail. Therefore, you can only convert a few photos in this way. All of this doesn’t make it a long-term solution.
Part 3. 3 Best HEIC Converters to Convert HEIC to JPG Online
Facing a compatibility issue with HEIC photos is pretty common. To make things easier for iPhone users, there are plenty of online tools available that can convert HEIC to a compatible format. You can simply visit these websites on your computer or any smart device to convert HEIC photos. Therefore, these online tools can also be used to learn how to convert HEIC to JPG in Android as well.
3.1 Best HEIC to JPG converter - HEIC to JPG
As the name suggests, the tool converts HEIC to JPG online. You can drag the HEIC photos and download the converted JPG photos without any trouble.
Website: https://heictojpg.com/
- Supports the conversion of up to 50 photos at a time
- Drag and drop feature available
- Lightweight and easy to use
- Lossy data conversion
- Freely available
3.2 Apowersoft Free HEIC Converter
This free HEIC online converter is developed by Apowersoft. While it also supports a lossy conversion, the quality of the images is kept as close to the original as possible.
Website: https://www.apowersoft.com/heic-to-jpg
- Free and easy to use
- Works on all web browsers and smart devices
- Can convert .heic and .heif files into jpg, .jpeg, .jpe, .jif, .jfif, and .jfi formats
- It keeps the Exif data intact during the transfer
- Users can select the output quality of images
3.3 HEIC to JPG Converter Online
If you are looking for a free, easy-to-use, and effective HEIC to JPG online converter, then you can simply try this option as well.
Website: https://www.iotransfer.net/heic-to-jpg.php
- It is a freely available online tool
- Can convert up to 50 photos at a time
- Maintains the high quality of the images to a great extent
Part 4. Why Apple Adopted HEIC?
HEIC is a file extension (image container name) that is given to High Efficiency Image Files (HEIF). It was originally developed by MPEG (Moving Pictures Expert Group) to replace the age-old JPG format. The JPG format was developed by JPEG (Joint Photographic Experts Group) way back in 1991. While it was effective at that time, there was an evident need for change. To let users save high-quality files in lesser space, Apple introduced the HEIC format in iOS 14.
One of its major advantages is that HEIC supports lossless image data coding. It allows us to save photos in high quality by taking almost 50% less space compared to JPG. Therefore, users can simply store more photos on their devices. Also, it supports ISO Base Media Format and can be included in media streams.

Due to its high efficiency over JPG format, Apple decided to include it in iOS 14. Nevertheless, it also gave users a feasible solution to convert HEIC photos to JPG as well.
Part 5. Tips for Managing HEIC Photos on Dropbox
Dropbox is a popular cloud-sharing service that can also help you manage your HEIC photos. Since it supports the HEIC format, you can follow these quick tips to start managing HEIC photos on Dropbox.
5.1 Upload HEIC photos to Dropbox
Dropbox can be used to take a backup of your photos. In order to upload your HEIC photos to Dropbox, follow these steps:
Step 1. Open the app and tap on the “+” icon.Step 2. Browser and select the photos you wish to save.
Step 3. Once you choose to upload the photos, you will be asked how you wish to save these files. Under the “Save HEIC Photos as”, you can select any file format (like HEIC or JPG).
Step 4. Tap on “Upload” to start the process.
5.2 Download HEIC photos
Since you can access Dropbox on your computer or any other device, you can easily download your files as well. All you need to do is go to the saved location and select the photos (or albums). Simply click on the “Download” button to start the downloading process.

5.3 Share HEIC photos
Using Dropbox, you can also share your HEIC photos with others too. Just open the album where the HEIC photos are stored. Select the photos and click on the “Share” button. After that, you can select how you wish to share photos.
Conclusion
Now that you know how to convert HEIC to JPG, you can easily move your photos from your iPhone to your computer or any other device. Out of all the solutions, I would recommend using Dr.Fone - Phone Manager (iOS) to perform an automatic HEIC to JPG converter. Besides converting the HEIC photos to JPG automatically, it will also let you manage your device. A complete iPhone manager, the tool comes with tons of advanced features that will come in handy to you for sure.
Dr.Fone Basic:
Better Control for Your Phone
Manage, transfer, back up, restore, and mirror your device


Daisy Raines
staff Editor