 Recover photos, messages, WhatsApp, and more — no backup
needed.
Recover photos, messages, WhatsApp, and more — no backup
needed.

 100% Security Verified | No Subscription Required | No Malware

 :
: 
 ChatGPT
 Perplexity
 Gemini
 Claude
 Grok
Grok
If you have recently updated your device to the latest iOS versions, you are likely familiar with the HEIC (High-Efficiency Image Container) format. By 2026, HEIC has firmly established itself as the absolute standard for Apple devices, allowing users to capture and store ultra-high-resolution images while consuming significantly less storage space compared to traditional JPEGs. However, despite their advanced efficiency, these precious digital memories are just as vulnerable to accidental deletion, system crashes, or unforeseen hardware damage as any other file.
Losing important pictures can be a highly stressful experience, but executing a reliable HEIC photos recovery process is entirely achievable. Whether you accidentally cleared out your camera roll or lost vital files during a major iOS software update, you can successfully recover HEIC photos iPhone using specialized data retrieval methods. In this comprehensive guide, we will provide step-by-step solutions to help you restore your lost HEIC files safely, utilizing both iTunes and iCloud backup systems without compromising your current device data.
1. Recover from iTunes Backup Safely
Instead of overwriting your entire iPhone data with a full iTunes restore, use selective extraction software to isolate and retrieve only your lost HEIC images, preserving all existing files on your phone.
2. Extract Files from iCloud Storage
Avoid the mandatory factory reset required by standard iCloud restoration. By analyzing your iCloud backup files, you can seamlessly download specific HEIC photos directly to your computer or iOS device.
In this article
Part 1. How to recover HEIC photos for iPhone from iTunes backup?
If you want to keep your digital memories completely secure, we strongly recommend maintaining a regular backup schedule for your data. You can automatically back up your camera roll via iTunes or iCloud and perform an effective HEIC photos recovery process later if disaster strikes. However, there is a major catch: when performing a standard recovery operation directly through iTunes, you won't be able to select the specific kind of content you want to retrieve. The official Apple method forces you to restore your phone entirely, which overwrites all your current data.
To bypass this limitation, you can take the assistance of the powerful Dr.Fone - Data Recovery (iOS) suite to recover HEIC photos iPhone safely. As a flagship module of the Dr.Fone toolkit, it is an extremely reliable and secure utility that has dominated the recovery industry for more than a decade. It can seamlessly retrieve almost every kind of data, such as photos, high-definition videos, messages, extensive call logs, contacts, notes, and more. It offers broad compatibility with every leading iOS device and software version, accompanied by a dedicated desktop application engineered for both Windows and Mac platforms.
 Recovers data after deletion, crashes, or device damage.
- Supports photos, messages, contacts, WhatsApp, and more.
- Supports all major iPhone, iPad, and iPod models.
- Preview and recover only what you need.

To perform a successful HEIC photo recovery utilizing an existing iTunes backup without erasing your phone, simply follow these straightforward steps:
Step 1 Install and Launch the Recovery Software
Visit the Dr.Fone - Data Recovery (iOS) official website and install the executable file on your Mac or Windows PC. Launch the application whenever you wish to recover HEIC photos iPhone and select the "Data Recovery" option directly from the primary home screen.

Step 2 Connect Your iOS Device
Connect your iPhone or iPad securely to your desktop system using a certified Lightning or USB-C cable and wait a few moments for the application to detect the hardware automatically.
Step 3 Select the iTunes Backup Recovery Mode
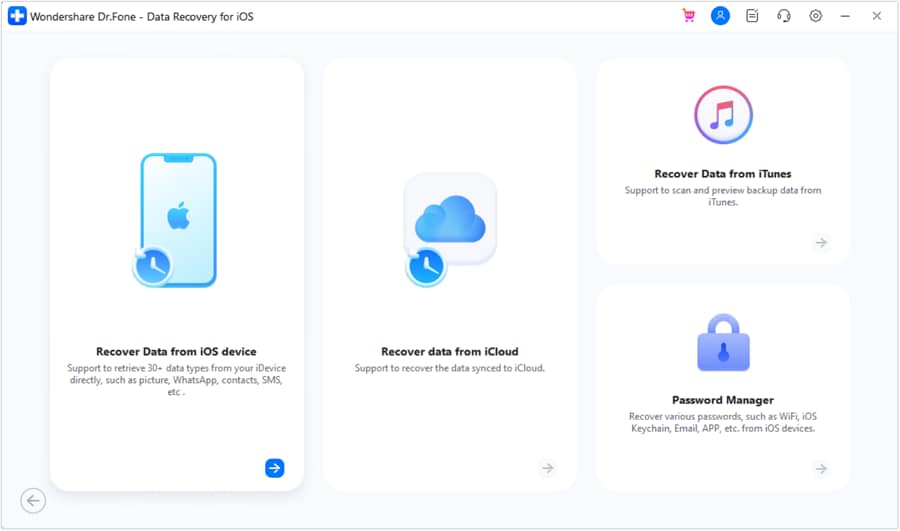
After entering the core Data Recovery interface, navigate to the left sidebar and choose "Recover Data from iTunes" from the comprehensive list of extraction options provided on the program panel.
Step 4 Scan the Target Backup Archive
This action will immediately display all available iTunes backup files currently stored on your computer's local drive. You can meticulously view detailed metrics such as file size, backup creation date, and specific device model. Select the backup archive containing your lost pictures and click on the "Start Scan" button to initiate the extraction process.
Step 5 Preview and Select Your HEIC Images
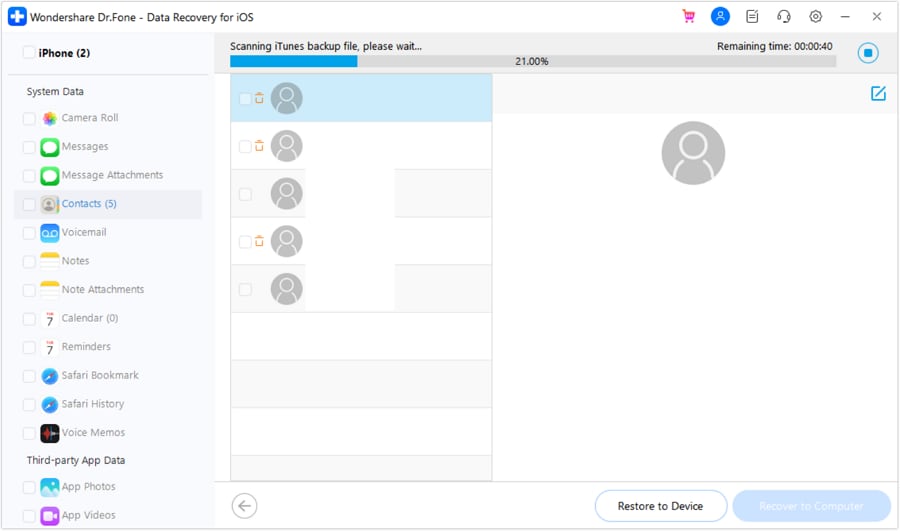
The powerful engine will deeply scan the selected iTunes backup and instantly provide a neatly segregated view of your recovered data, systematically listed under different file categories. To execute the HEIC photos recovery, you must navigate to the "Camera Roll" section from the left panel and carefully select the precise image files you wish to restore.
Step 6 Finalize the HEIC Photo Recovery
After finalizing your photo selection, you are given the flexibility to choose where to save the files. You can opt to recover them safely onto your local PC storage or dynamically transfer the HEIC files directly back to your actively connected iOS device.




Part 2. How to recover HEIC photos for iPhone from iCloud backup?
In a similar fashion to iTunes extraction, you can expertly use the Dr.Fone - Data Recovery (iOS) tool to conduct a highly selective recovery operation directly from your iCloud backup archive. If you have consistently taken a backup of your precious photos on Apple's iCloud servers, then you rarely have to worry about permanently losing your critical data. Normally, you can only natively restore your phone from an iCloud backup while meticulously setting up a brand-new device (or immediately after performing a harsh factory reset). Additionally, Apple’s ecosystem provides absolutely no way to selectively recover only the HEIC format photos from your iCloud storage until you leverage a professional third-party tool like the Dr.Fone toolkit.
To perform a seamless and targeted HEIC photo recovery directly out of an iCloud backup, rely on the robust capabilities of Dr.Fone. All you need to do is follow these sequential steps:
Step 1 Launch the Program and Connect Your iPhone
Install the software on your Windows or Mac environment and launch it to begin the quest to recover HEIC photos iPhone. Connect your phone securely to the system using a compatible cable and let the application interface detect the device automatically.
Step 2 Choose the Data Recovery Suite
After the application initializes on your screen, click on the prominent "Data Recovery" module to proceed to the extraction options.
Step 3 Access the iCloud Recovery Panel
The intuitive interface will present several different data sourcing options on the left navigation panel. Simply select the option explicitly labeled "Recover Data from iCloud."
Step 4 Log into Your iCloud Account
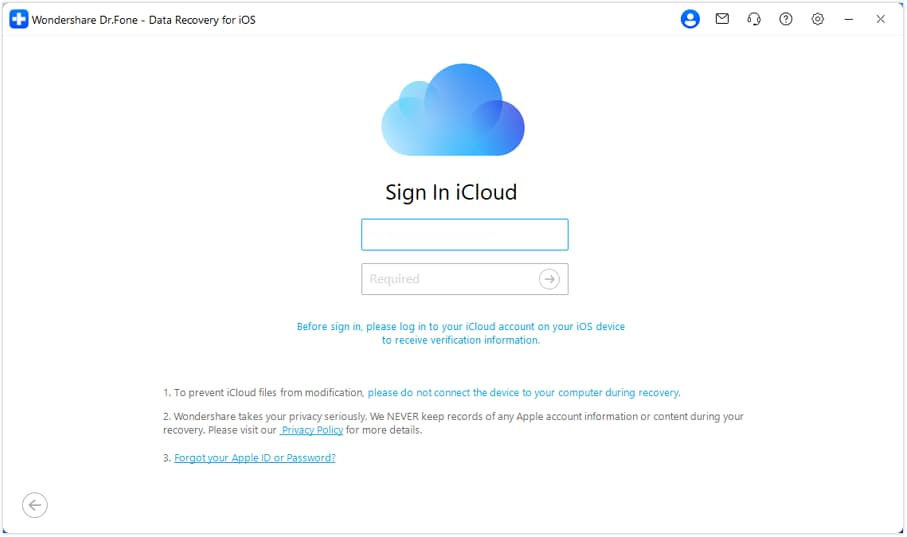
This will securely launch the cloud authentication interface. Provide your accurate Apple ID and iCloud credentials to sign in seamlessly and gain authorization to access your remote backup files.
Step 5 Select Your Desired iCloud Backup
After successfully signing in, the program interface will neatly fetch and provide a comprehensive list of all available iCloud backup files associated with your account, detailing vital metrics regarding the device model, total file size, synchronization date, and more. Simply highlight the specific backup file you wish to recover from and proceed.
Step 6 Filter for HEIC Photo Formats
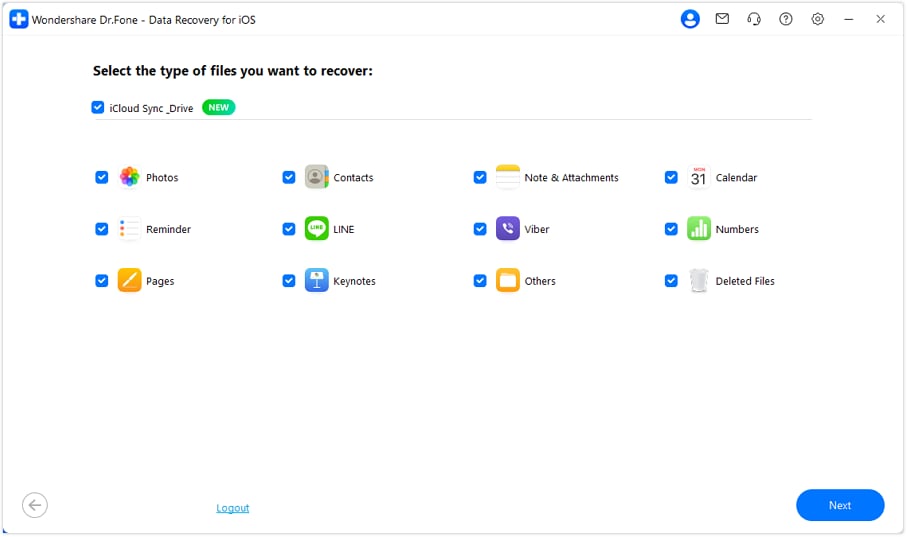
The system will generate a smart pop-up interface requesting your file preferences. From here, you can accurately isolate the kind of data files you wish to download and restore. To strictly execute an HEIC photos recovery operation, ensure you check the "Photos" category and click next to proceed.
Step 7 Download and Preview iCloud Assets
Wait patiently for a brief period as the application actively downloads your targeted backup data directly from Apple's servers. Once the download is successfully finalized, the software will provide a crystal-clear, segregated preview of all the extracted HEIC pictures.
Step 8 Restore the HEIC Pictures
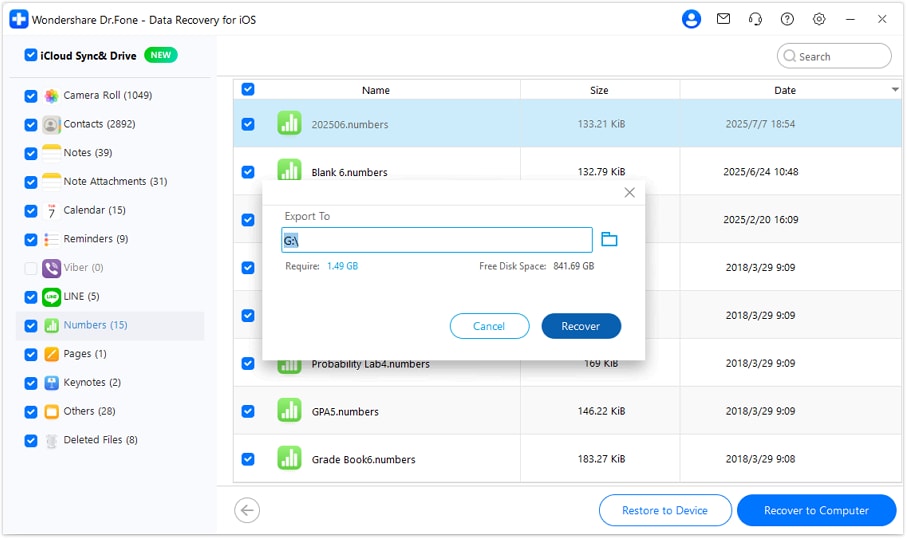
Carefully browse and select the specific photo files you wish to recover, and finally restore them directly to your plugged-in iOS device or export them securely onto your computer's local hard drive.
Part 3. iPhone HEIC photos managing tips
After executing a robust HEIC photos recovery operation, you can happily retrieve your lost images without much friction. However, moving forward, if you wish to efficiently manage your newly restored HEIC files and prevent future compatibility headaches, you should strongly consider following these advanced maintenance suggestions.
- Automatic Format Conversion: There are frequent instances when users struggle with cross-platform sharing and don't intuitively know how to convert native HEIC photos to standard JPEG formats. To automate this process natively, navigate to your iPhone's Settings > Camera > Formats, and scroll down to the "Transfer to Mac or PC" section. By selecting the "Automatic" parameter, iOS will dynamically convert your HEIC photos to a universally compatible format whenever you export them.

- Enable Consistent iCloud Backups: To confidently ensure that you never inadvertently lose your high-resolution photos again, you should configure automatic background backups directly to iCloud. Navigate to Settings > [Your Name] > iCloud > iCloud Backup, and rigorously turn on the primary "iCloud Backup" switch. Furthermore, verify in the iCloud settings panel that you are actively taking a synchronized backup of your entire Photos gallery.

- Toggle Between HEIC and JPEG Modes: You have the total freedom to universally switch between capturing HEIC and legacy JPEG photos within the core camera settings. Navigate to your iPhone's Settings > Camera > Formats. Under the "Camera Capture" header, choose "Most Compatible" to force the camera hardware to click photos exclusively in standard JPEG and other broadly accessible formats. Conversely, to resume clicking highly optimized photos in the native HEIF format, switch the setting back to "High Efficiency."

- Quick Mail Compression Tricks: One of the quickest and most overlooked methods of managing your bulky image sizes is by taking tactical assistance of your default iOS Mail application. If you wish to rapidly compress or instantly convert a small batch of your photos, simply select them in the gallery and share them directly via Mail. This action will invoke the native Mail composing app on your device, and as your full-resolution photos are attached, the system will intuitively prompt you with options to seamlessly compress their dimensions.

- Optimize Internal Storage Usage: If you are constantly battling with limited physical storage space on your aging iOS device, then you must leverage Apple's built-in space optimization feature. To activate this, navigate to Settings > Photos and tick the toggle labeled "Optimize iPhone Storage." By enabling this, iOS intelligently stores only lightweight, dynamically optimized versions of your photos and videos locally on the hardware, while securely uploading the massive full-resolution files directly to your remote iCloud server.

Conclusion
By closely following this advanced 2026 guide, you will be highly equipped to execute a seamless HEIC photos recovery on any modern iOS device without facing disruptive data loss setbacks. Whether your missing images are securely trapped inside a cumbersome iTunes archive or resting within Apple's massive iCloud infrastructure, you no longer need to execute a destructive factory reset just to restore a few missing pictures. Simply use the robust Dr.Fone - Data Recovery (iOS) tool to perform a localized extraction and never stress about losing your important data files again. The application comprehensively supports deep extraction for HEIC images, letting you efficiently retrieve your lost files and consistently make the most out of your iPhone's camera technology!
FAQ
1. Can I recover HEIC photos if I don't have an iCloud or iTunes backup?
Yes, it is entirely possible to recover HEIC photos even if you lack a dedicated backup. When you accidentally delete a file, the iOS operating system merely marks that storage space as "available" for new data. Until a new file physically overwrites that specific memory block, specialized iOS recovery tools can scan your device's internal flash memory to extract and restore the hidden HEIC image data.2. Why can't I open my recovered HEIC photos on a Windows PC?
By default, native Windows environments do not inherently support the Apple HEIC format. To successfully view your recently recovered HEIC photos on a standard PC, you must either download a dedicated HEIF Image Extension from the official Microsoft Store, convert the recovered pictures into conventional JPEGs, or utilize a cross-platform multimedia viewer application capable of decoding high-efficiency formats.3. Will restoring HEIC photos directly from iTunes overwrite my current data?
If you rely strictly on the official Apple iTunes desktop application to execute a standard restore operation, it will unfortunately overwrite all existing data residing on your iPhone with the historical contents of your backup. However, by deploying third-party selective extraction software, you can safely pull out exclusively the HEIC files without triggering a device-wide wipe.4. Are permanently deleted photos from the "Recently Deleted" folder gone forever?
Not immediately. Although clearing the "Recently Deleted" album removes the photos from the user interface, the raw binary data remains intact within the device's storage architecture temporarily. To maximize your chances of a successful rescue, you must cease using the iPhone immediately to prevent overwriting and utilize a deep-scanning data recovery software.
 Add Wondershare Dr.Fone as a preferred source on Google


