The iPhone Software Update Server Could Not Be Contacted[Solved]

May 22, 2026 • Filed to: Phone Repair Solutions • Proven solutions
 TL;DR:
Resolve the "iPhone software update server could not be contacted" iTunes error by temporarily disabling your computer's antivirus programs, restarting iTunes, or bypassing the software to update iOS directly from your device.
● Bypassing iTunes is the most direct workaround; navigate to Settings, select General, and tap Software Update on your iPhone to install the iOS version without relying on a computer.
● Wondershare Dr.Fone offers a third-party fallback through its System Repair module, requiring you to connect the device to a computer and enter Recovery Mode before downloading the replacement firmware.
● Persistent iTunes connection failures can also be caused by altered computer host files that misconfigure domain name mapping and actively block access to Apple's update servers.
Ask AI for a summary
 ChatGPT
 Perplexity
 Gemini
 Claude
 Grok
Grok
Apple's iOS beta update always sparks excitement among users—and for good reason. Every release introduces innovative features and system enhancements that elevate the iPhone experience. With each iOS beta update, Apple continues to set new standards in mobile performance and usability.
Updating to the latest iOS beta update via iTunes is usually straightforward—just connect your iPhone to a computer and follow a few prompts. However, issues can arise. Many users report errors like "iPhone software update server could not be contacted", which can interrupt the iOS beta update process unexpectedly.
In this article, we’ll break down why the "iPhone software update server could not be contacted" error appears on iPhone or iPad—and show you effective ways to fix it. If your iOS update gets stuck, don’t worry—we’ve got practical solutions ready.
What Does "The iPhone Software Update Server Could Not Be Contacted" Mean?
Updating your iOS via iTunes is simple—just connect your iPhone to your computer and authorize the update. However, many users encounter the "The iPhone software update server could not be contacted" error, which can delay or block the process entirely. While the issue is common, its cause and solution often remain unclear to most users.
When iTunes shows the error "The iPhone software update server could not be contacted", it usually means the update server is temporarily unreachable. While the issue may stem from Apple’s servers, it's more often caused by local network or system settings. Here are the most common reasons why iTunes can't connect to the update server.
- A weak or unstable internet connection is one of the main reasons iTunes can't reach the iPhone software update server. Since the iOS update requires downloading data from Apple’s servers, a strong and stable connection is essential to complete the process without errors.
- Misconfigured iTunes or system settings can also prevent access to the iPhone software update server. iTunes requires proper permissions to initiate updates, and if certain preferences or access rights aren’t enabled, errors are likely to occur.
- In some cases, antivirus software may block iTunes from connecting to the iPhone software update server. While designed to protect against threats, certain security programs can mistakenly flag iTunes activity as suspicious, causing connection issues during the update process.
- An altered host file on your computer can also block iTunes from accessing the iPhone software update server. This system file maps domain names to IP addresses, and if it's misconfigured, it may prevent connections to Apple servers and disrupt the iOS update process.
Easy Ways to Fix This Software Update Server Issue
Although the "iPhone or iPad software update server could not be contacted" error is common, it’s easily fixable. This issue isn’t serious, and several simple, effective solutions can resolve it quickly. Here are proven methods to help you fix this update problem for good.
Solution 1: Ensure Your Internet Connection is Strong and Stable
A stable internet connection is essential for a successful iOS update via iTunes. If your network is weak or unstable, iTunes may fail to contact the iPhone or iPad software update server, halting the entire process. Before starting the update, ensure your connection is strong and reliable.
Solution 2: Turn Off Your Anti-virus or Firewall While Updating Your iOS
Although iTunes is a trusted application, some antivirus or firewall programs may mistakenly block its functions. This can prevent iTunes from connecting to the iPhone or iPad software update server during an iOS update. Temporarily disabling your antivirus or firewall may resolve the issue.
Solution 3: Restart Your iTunes Application
Sometimes, iTunes may simply need a restart to function properly. Close the application, wait a few minutes, and launch it again. If the issue persists, restart your computer and try updating iOS again through iTunes. This quick reset often resolves minor connection errors with the update server.
Solution 4: Update Your iOS From Your iPhone
Updating your iOS directly from your iPhone is often faster and more convenient than using iTunes. If iTunes isn’t working, try updating via your device instead. Follow these simple steps to install the latest iOS version on your iPhone.
Manually Update Your iOS
- Step 1: Go to Settings.
- Step 2: Tap on the General option.
- Step 3: Click Software Update.
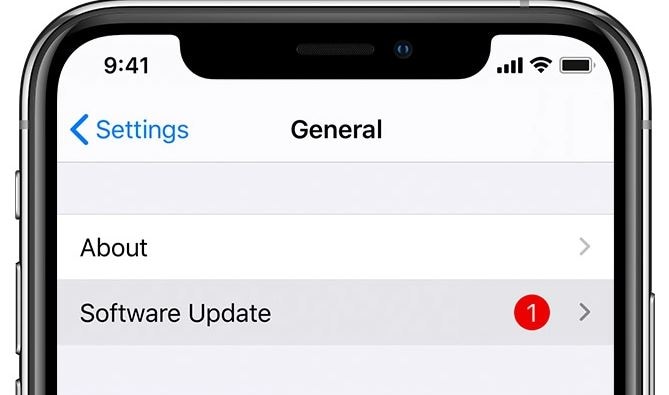
- Step 4: The information about the new iOS will appear on your screen. Check it and then click Download and Install.
- Step 5: Enter your iPhone passcode if necessary.
- Step 6: Terms and Conditions will then pop up on your screen. Read it and then click Agree.
- Step 7: Sit back and wait until the installation process is done. Don’t panic when your iPhone suddenly restarts. It’s part of the process. Your iPhone needs to load up its system to fully implement the new iOS.
Enable Automatic Software Update
- Step 1: Go to Settings.
- Step 2: Click General.
- Step 3: Click Software Update.
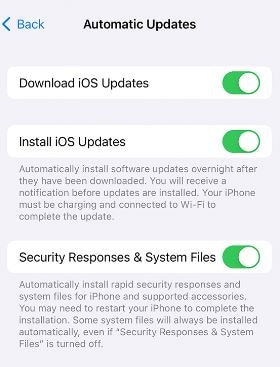
- Step 4: Click Automatic Updates.
- Step 5: Switch on the corresponding radio buttons for Download iOS Updates, Install iOS Updates, and Security Responses & System Files options.
Solution 5: Update Your iOS Using Wondershare Dr.Fone
If updating your iOS via iTunes or directly on your device doesn’t work, consider using a third-party tool. Wondershare Dr.Fone offers a reliable solution for fixing iOS Beta update issues and other system-related problems. Follow these simple steps to update or repair your device using Dr.Fone.
- Step 1: Download Wondershare Dr.Fone from its official website. Launch the application if you already have it on your desktop.
- Step 2: Click System Repair from the main dashboard or from the Toolbox section on the left corner of the window.

- Step 3: Connect your iPhone to your computer. And then, select iOS from the new window that appears on your computer screen.

- Step 4: Choose iOS Repair from the options provided.

- Step 5: Click Standard Repair.

- Step 6: At this point, Wondershare Dr.Fone will ask you to put your iPhone into Recovery Mode. Tap Trust from your iPhone. Consecutively, click Enter Recovery Mode on your computer. In the event you need additional help with this procedure, click Guide on your computer for further instructions.

- Step 7: While your iPhone is under Recovery Mode, Wondershare Dr.Fone will search for several firmware available for your device. Choose the best one that matches the model and specifications of your iPhone. Click Download.

- Step 8: Wondershare Dr.Fone will immediately download the selected firmware. Sit back and wait until the package has been downloaded and verified.

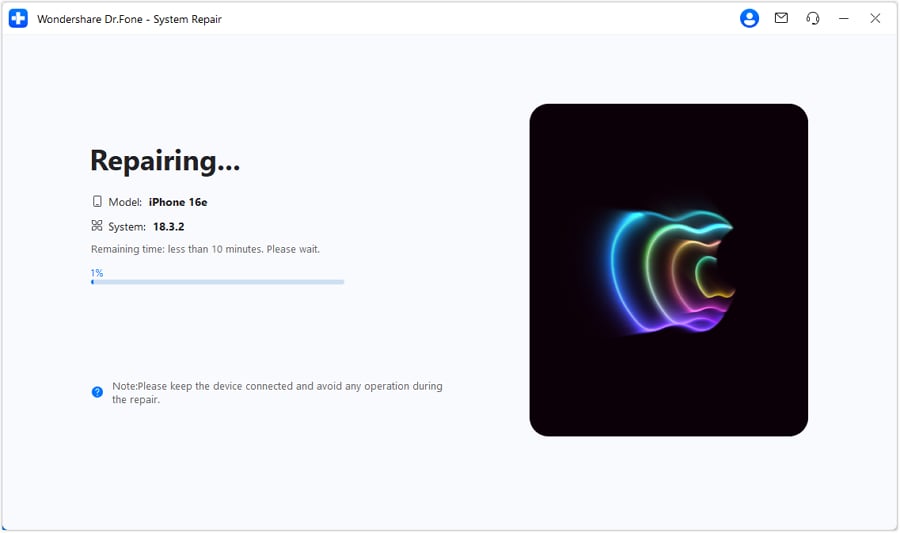
- Step 9: Wondershare Dr.Fone will inform you once the firmware is ready. By then, click Repair Now.

- Step 10: The system repair and installation of the new firmware will commence right away. Don’t use your phone or computer until it’s done to avoid interruptions.
- Step 11: A notification will appear on your computer screen after completing the process. From there, click Done.

4,624,541 people have downloaded it
Conclusion
Does your iTunes say the iPhone or iPad software update server could not be contacted? Don’t frown. As discussed earlier, there are other options you can try to update your iOS to the latest version. You may update it directly from your iPhone or use other tools like Wondershare Dr.Fone. The important thing is you get a hold of Apple’s new features and system improvements.
Wondershare Dr.Fone’s System Repair feature can resolve many issues. And the good news is it’s also available for Android. Aside from system repair, it can also perform other procedures like data recovery, phone backup, password management, and many more. So waste no time and download it now on your computer. You never know. You might need it someday.


Upgrade & Downgrade
- iOS Beta Install
- 1. Download iOS Beta Profile
- 2. Download the iOS 13 Beta
- 3. iOS 16 Beta Download
- 4. Uninstall iOS Beta
- 5. Install iPhone Beta Profile
- 6. Install Mac Beta Profile
- 7. Install iOS 15 Beta Profile
- 8. Upgrade iPad to iOS 14
- iOS News
- 1. Update iPhone 4s to iOS 9
- 2. Cheaper iPhone
- 3. Customize iPhone Home Screen
- 4. Know About iOS 15 Lock Screen
- 5. Add Lyrics to Song on Apple Music
- 6. Current iOS Version
- 7. Current iOS for iPad
- 8. iOS 19 and the iOS 26 Rumor
- iPhone Downgrade Tips
- 1. Downgrade iOS Like a Pro
- 2. Roll Back to an Older iOS Version
- 3. Downgrade to iOS 15
- 4. Install Developer Profile
- 5. Downgrade iOS without iTunes
- 6. Downgrade to iOS 14
- 7. Download and Install the iOS 16
- iPhone Update Tips
- 1. iPhone & iPad Security Updates
- 2. Undo an Update on iPhone
- 3. Update iPhone with/without iTunes
- 4. Fix iPhone Checking for Update Stuck
- 5. Fix iPad Software Update Failed
- 6. Fix iPhone Stuck On Update
- 7. Fix iPhone Won't Update
- 8. Fix Update Server Not Be Contacted
- 9. Fix iPhone Stuck on Update Requested
- 10. Resolve iPhone Cellular
- 11. Resolve iPhone Error 1110
- 12. Fix iPhone Frozen
- iOS 11/12 Problems
- 1. Fix iPhone Stuck on Waiting
- 2. Fix iPhone Can't Make Calls
- 3. Fix iPhone Stuck on Logo
- 4. Fix Photos Disappeared from iPhone
- 5. Fix iPhone Keeps Freezing
- iOS 13/14 Problems
- 1. Fix CarPlay Not Connecting
- 2. Fix Resolve Apps Won't Open
- 3. Fix Song/Playlist Missing
- 4. Fix iPhone Asking for Passcode
- 5. Fix Map Voice Navigation Won't Work
- 6. Fix iMessage Not Working
- 7. Recover Deleted Data on iOS 14
- 8. Recover Disappeared Notes on iOS 14
- iOS 15 Problems
- iOS 16 Problems
- 1. Fix iPhone Wi-Fi Not Working
- 2. Fix iOS 16 Battery Drain Issues
- 3. Fix Screen Mirroring Not Working
- 4. Fix Apple CarPlay is Not Supported
- 5. Fix iPhone Screen Not Responding
- 6. Fix iPhone Apps Keep Crashing
- 7. Fix Call Failed iPhone Issue
- 8. Fix iPhone Stuck On Apple Logo
- 9. Counter iPhone Heating Problems
- 10. Fix iPhone Stuck in Boot Loop
- 11. Fix iPhone Bluetooth Not Working
- iOS 17 Problems
- 1. iPhone Freezing After Update
- 2. iOS 17 Wallpapers Blurry at Top
- 3. Fix iPhone Charging Slow
- 4. Enable Live Activities iOS 17
- 5. Fix iOS 17 Apps Crashing
- 6. Fix iPhone Stuck on Verifying Update
- 7. Overheating after 17 Update
- 8. Fix iOS 17 Keyboard Bug
- 9. Fix iOS 17 Green Screen Issue
- 10. iOS 17 Bugs & Fixes
- 11. No iOS 17 Update on Your iPhone
- 12. iOS 17 Unable to Download
- 13. Missing contacts with iOS 17 update
- iOS 18 Problems
- 1. iOS 18 Black Screen
- 2. iPadOS 18 Math Notes Issues
- 3. iPhone Email Not Working
- 4. iPhone Contacts Disappeared
- 5. iPhone Stuck in Restore Mode
- 6. iPhone Stuck on Preparing Update
- 7. iPhone Flashlight Not Working
- 8. iPhone Bluetooth Issues
- 9. Stuck on Terms and Conditions
- 10. Frozen iPhone iOS 18
- 11. iOS 18 Beta Boot Loop Issue
- 12. iOS 18 Beta Overheating
- 13. iOS 18 Beta Volume Bug
- iOS 26 Topics
- ● Manage/transfer/recover data
- ● Unlock screen/activate/FRP lock
- ● Fix most iOS and Android issues
- Free Download Free Download Free Download


Alice MJ
staff Editor
Generally rated4.5(105participated)