Ultimate Guide to Google Nexus Backup and Data Recovery
Android Backup
- Backp Android
- 1. Backup Android to PC
- 2. Backup Android Photos
- 3. Android Wifi Backup
- 4. Backup Phone with Broken Screen
- 5. Backup Android Rom/Firmware
- 6. Backup SD Card on Android
- 7. Backup Android SMS
- 8. Backup Android Phone With Root
- 9. Backup Android to Mac
- 10. Backup Viber Messages
- Android Restore
- 1. Guide to Restore Android Phone
- 2. Backup and Restore Android Phone
- 3. 2 Ways to Restore Contacts on Android: Step-by-Step Guide
- 4. Restore WhatsApp from iCloud
- Backup Apps
- 1. Android Backup Apps to Backup Files
- 2. 6 Apps to Backup Bookmarks
- 3. Top 10 Contacts Backup App
- 4. Backup Android App and App Data
- 5. The Best Android Backup Extractor
- 6. Top 5 Android Backup Softwares
- 7. 6 Best Android Backup Softwares
- 7. 7 Android Fastboot Reset Tools
- Samsung Backup
- 1. Back Up Samsung to Google Drive
- 2. Backup Contacts on Samsung
- 3. Backup Text Messages on Samsung
- 4. Backup and Restore Samsung Galaxy
- 5. Backup Everything on Samsung
- 6. Backup Samsung Galaxy to PC
- 7. 10 Samsung Cloud Backup Services
- 8. Solution For Samsung Message Backup
- 9. 5 Samsung Photo Backup Solutions
- 10. Backup Samsung S10 to PC
- ● Manage/transfer/recover data
- ● Unlock screen/activate/FRP lock
- ● Fix most iOS and Android issues
- Free Download Free Download Free Download

May 18, 2026 • Filed to: Backup & Restore Solutions • Proven solutions
 TL;DR:
Because Google Nexus smartphones were discontinued in 2016 and no longer receive security patches, securing your data requires immediate backup via direct computer transfer, native Google sync services, or dedicated desktop software.
● Native cloud methods require sorting files by type, utilizing Google Photos exclusively for media auto-syncing and Google Drive for manual folder uploads of general data.
● Wondershare Dr.Fone offers a dedicated desktop application capable of performing standard SMS and file backups, alongside a Data Recovery tool that can scan and extract lost files directly from the Nexus hardware even if no prior backup exists.
● Executing backups through desktop software requires a stable USB data cable connection, and users must completely refrain from operating both the computer and the mobile device during the transfer to prevent interruptions.
Ask AI for a summary
 ChatGPT
 Perplexity
 Gemini
 Claude
 Grok
Grok
Dr.Fone Basic:
Better Control for Your Phone
Manage, transfer, back up, restore, and mirror your device
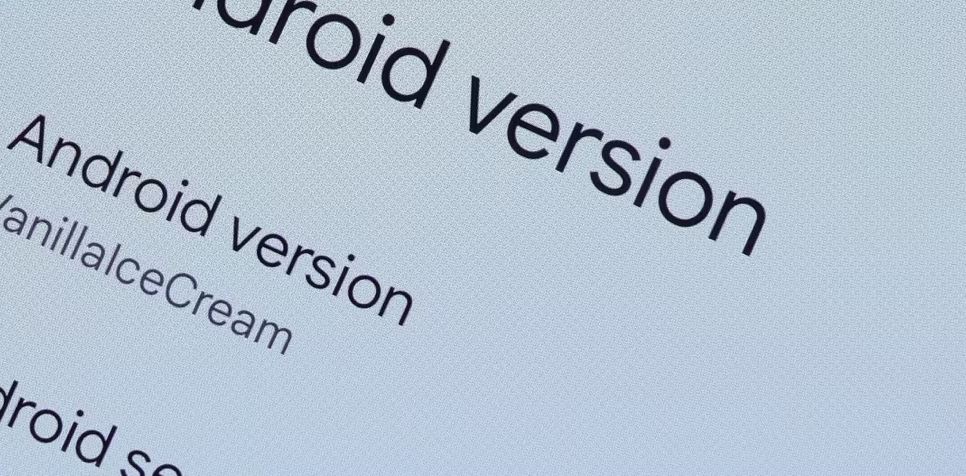
Android smartphones are considered a pillar of modern technology’s history and evolution. They provide significant contributions that allow the developers to test various possibilities and bring cutting-edge ideas to life. At present, it’s fair to say that we have already gone too far. From Android version 1.0, we now have Android 14, which is the latest and most advanced Android model to this date. But at some point, we cannot deny that its early varieties remain the best in specific aspects. That’s why many people are still using old or even discontinued Android smartphones.
Speaking of which, Google Nexus smartphones are still relevant today despite its discontinuation in 2016. Numerous people from different parts of the world are still keeping their units and using them on a daily basis. Well, there is nothing wrong with that so long as the mobile device is still working properly. However, don’t forget that these smartphones are no longer reported. That’s why you need to learn about Google Nexus backup and data recovery tactics for security. It’s better to be safe than sorry.
In this article, we’ll look back at the glorious days of Google Nexus and see what happened along the way. We will also provide a short guide on how to back up and restore Nexus smartphones in easy ways. Continue reading below to learn more.
- Part 1. The Story Behind the Google Nexus Smartphones
- Part 2. Best Google Nexus Backup Techniques
- Part 3. How to Restore Nexus Smartphones From Backup?
Part 1. The Story Behind the Google Nexus Smartphones

In simple terms, Google Nexus is one of the earliest smartphones that run Android Vanilla as its operating system. Android Vanilla is deemed the most pristine OS in the history of Android technology. By that, it means the Android version is served as it is without any alterations and significant amendments to its original software. The interface is extremely basic as well as the default mobile applications. Does Google Nexus with Android Vanilla OS do the job well? Of course, it still does a real work of art in this regard.
The functions it provided back in the day were considered effective and tremendously useful. Therefore, it did not matter a lot whether Google Nexus was using the basic Android version or not. In fact, it flourished for several years and developed a total of eight smartphone units and five tablet models. Most of them are still being used by many people in different parts of the world. That’s why Google Nexus backup and data recovery techniques must be considered nowadays. You never know. The device might suddenly break down out of the blue and all your files go down the drain with it. It’s definitely hard to save them at this point. Hence, it’s best to prevent such unfortunate scenarios from happening.
Nexus One saw the light of day in 2010 when Google sold this HTC-produced mobile device on its website. After gaining traction globally, Samsung’s Nexus S and Galaxy Nexus came into the scene. The sales at that time were constantly skyrocketing. Thus, Google decided to open again its e-commerce platform to put up Nexus smartphones from Samsung and LG for sale. In 2012 and succeeding years, Nexus persisted in forming business partnerships with Motorola, Asus, and Huawei. These cooperations resulted in the production of more Nexus smartphones, tablets, and set-top boxes. Unfortunately, Google Nexus smartphones were discontinued in 2016 to give way to Pixel smartphones. That’s the brief history of Google Nexus smartphones. Are you still using this smartphone model? If so, you better learn how to back up and restore Nexus smartphones. There are many Google Nexus backup and recovery techniques available. You just need to choose the best one that perfectly matches your current situation.
Part 2. Best Google Nexus Backup Techniques
What happens when a smartphone unit is discontinued? First and foremost, the discontinued smartphone unit will no longer be sold in the market. Another thing, the development of software updates for these units will be then halted. Meaning to say, it will no longer receive the necessary support and security patches. That’s why you must learn about the available Google Nexus backup methods. Believe it or not, it will save you the hassle in case the worse comes to worst. Don’t worry. There are numerous techniques you can use in this regard. Do you want to know what those are? Check out the list below.
Method 1: Back up Google Nexus to your computer.
Doubtlessly, the most convenient Google Nexus backup technique is via desktop computer. Well, why not? All you have to do is copy your files from the smartphone to the computer. It’s just as simple as that. Do you want to try this method? If so, below is a short guide for you.
- Step 1: For your convenience, it’s best to consolidate first all your files in one folder. Don’t worry. It’s a piece of cake. Simply access the File Manager application on your Nexus smartphone and then create a backup folder. Locate all the files you want to transfer and then copy them to the backup folder. Once you’re done, connect the smartphone to the computer using a data cable.
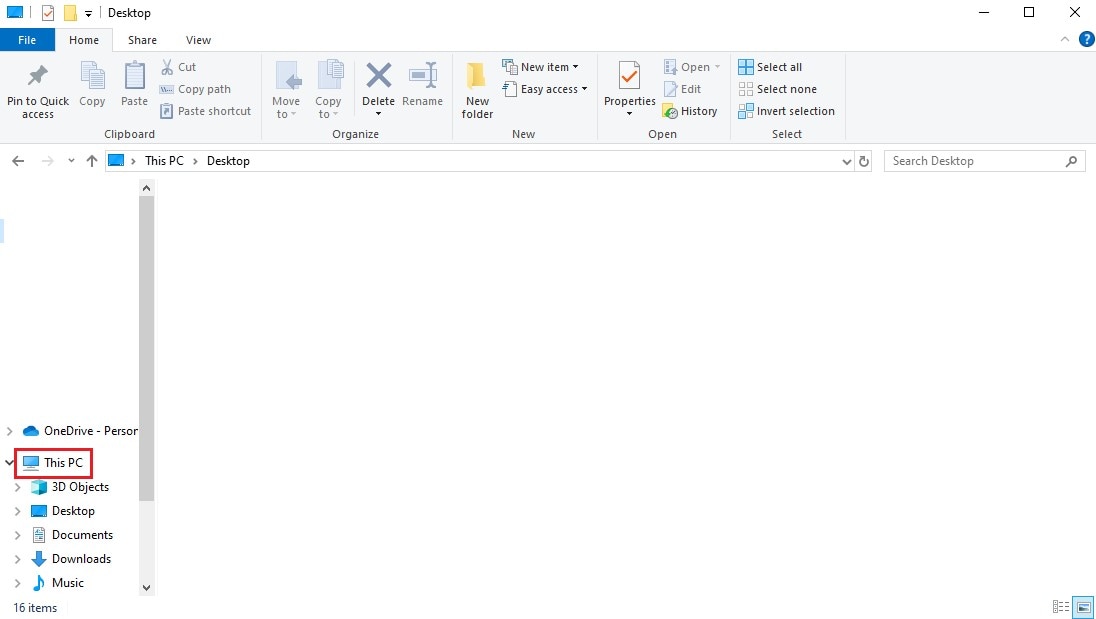
- Step 2: Run the File Explorer application on your desktop afterward.
- Step 3: Click This PC on the left-side panel.
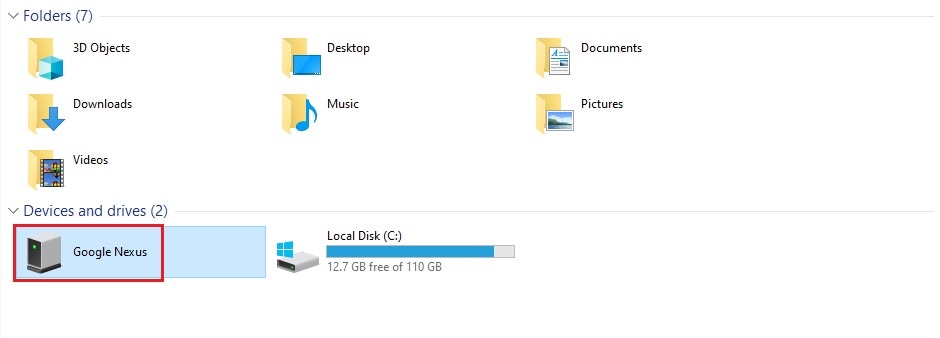
- Step 4: Find and click your Nexus smartphone under the Devices and Drives section.
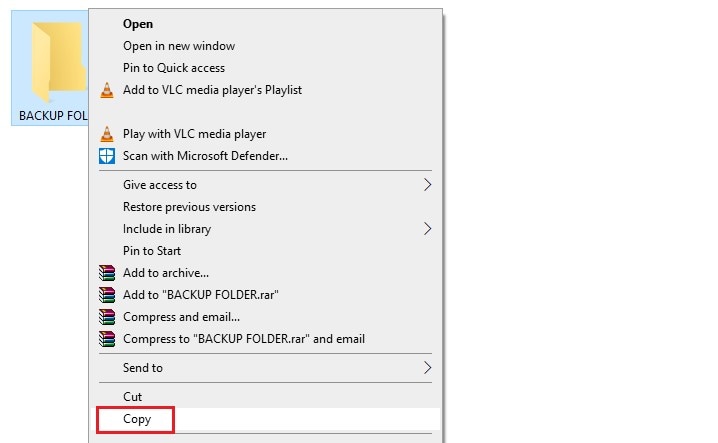
- Step 5: Locate the backup folder that contains a copy of your important files. Right-click on it and then select Copy.
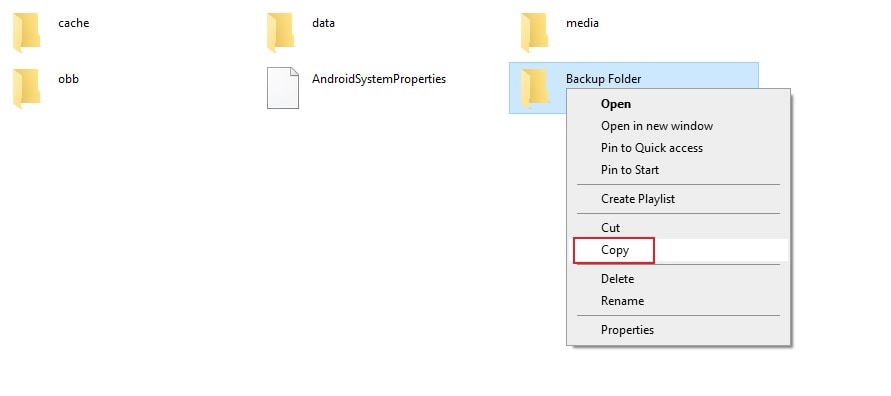
- Step 6: Paste the backup folder on the local storage of your computer. Make sure that its location is readily available and easily accessible.
Method 2: Back up Google Nexus via Settings.
The newer models of Google Nexus offer a backup function to the users. Once activated, your files will be copied to the server and stored there for as long as you want. Don’t worry. It’s very easy to enable on your Nexus smartphone. Do you want to know how? Check out the tutorial provided below.
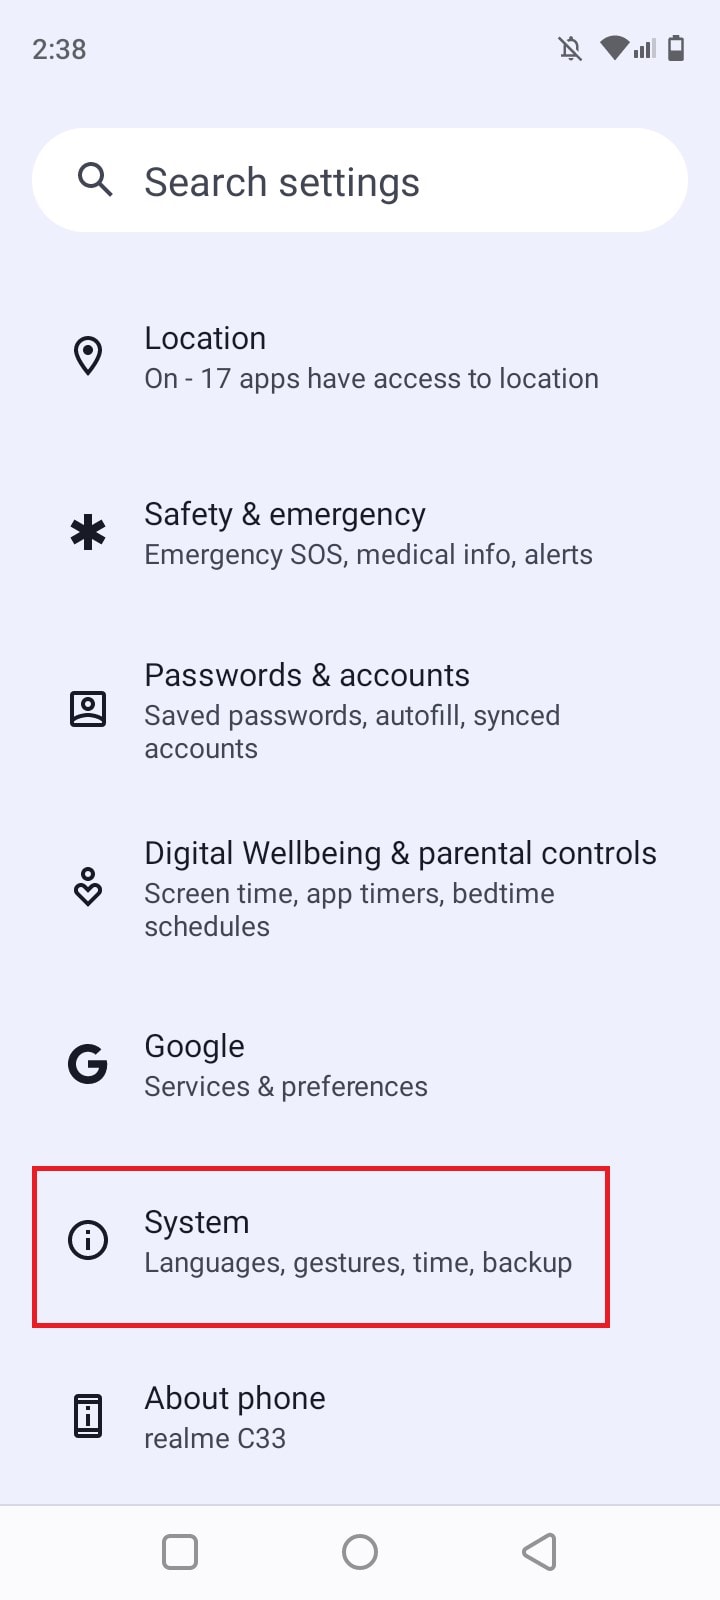
- Step 1: Go to Settings.
- Step 2: Click System.
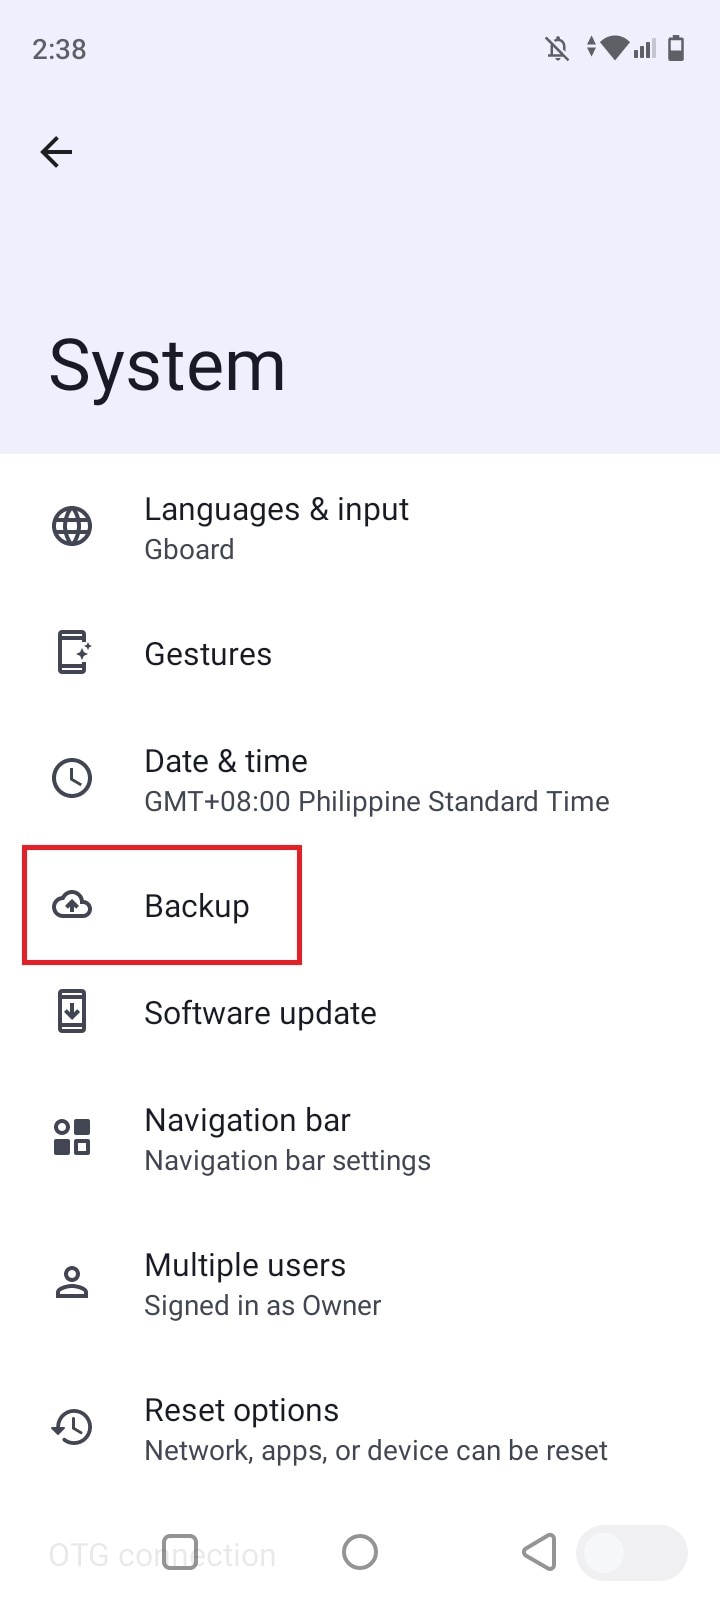
- Step 3: Click Backup.
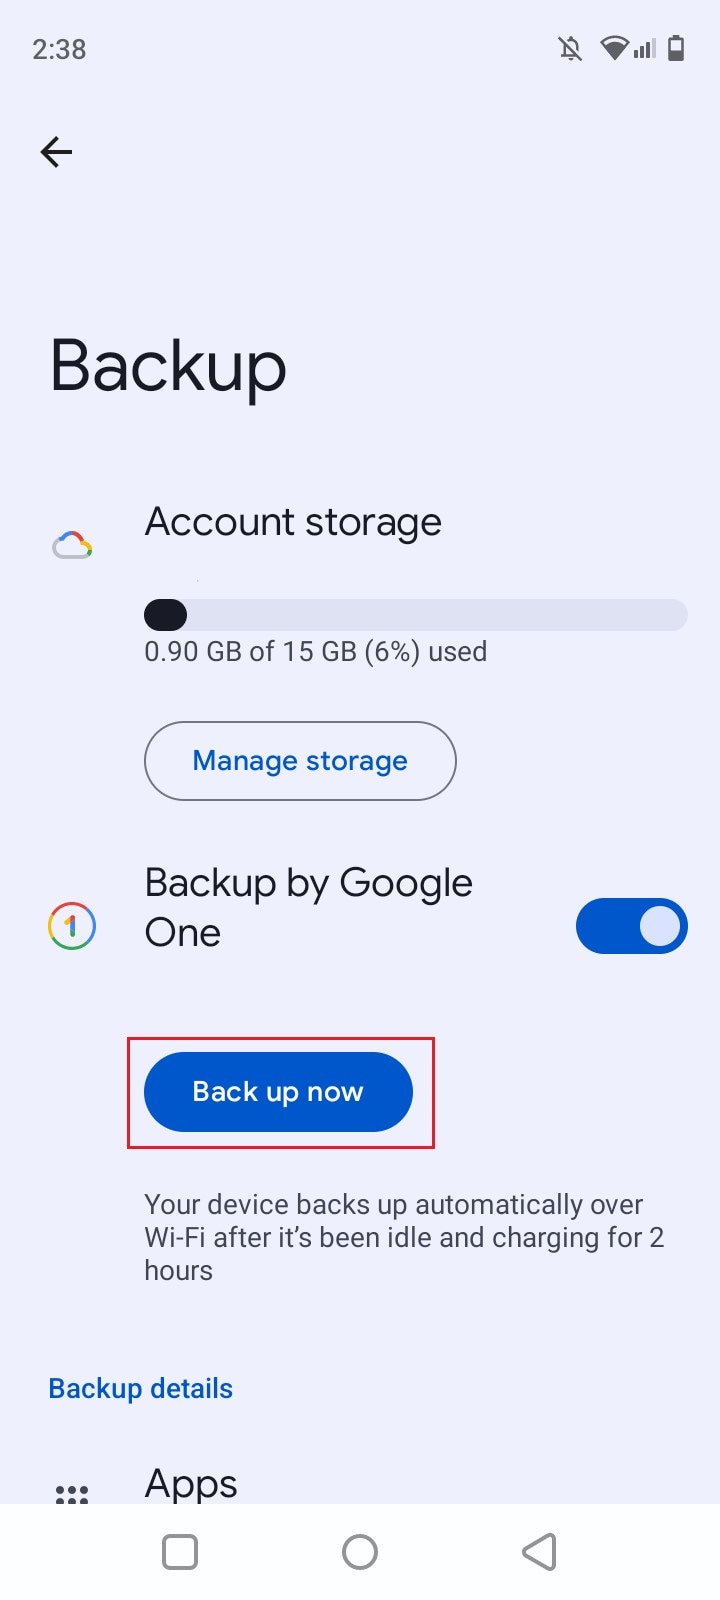
- Step 4: Click Back Up Now under Backup by Google One.
Method 3: Back up Google Nexus Files to Google Drive.
Google Drive is a great storage for your backup files. You just need adequate space to store as much data as you want for as long as you need. Do you want to know how to use this drive service as a Google Nexus backup technique? If so, here is a short guide for you.
- Step 1: Download and install the Google Drive application on your Nexus smartphone. After that, log in to your Google account.
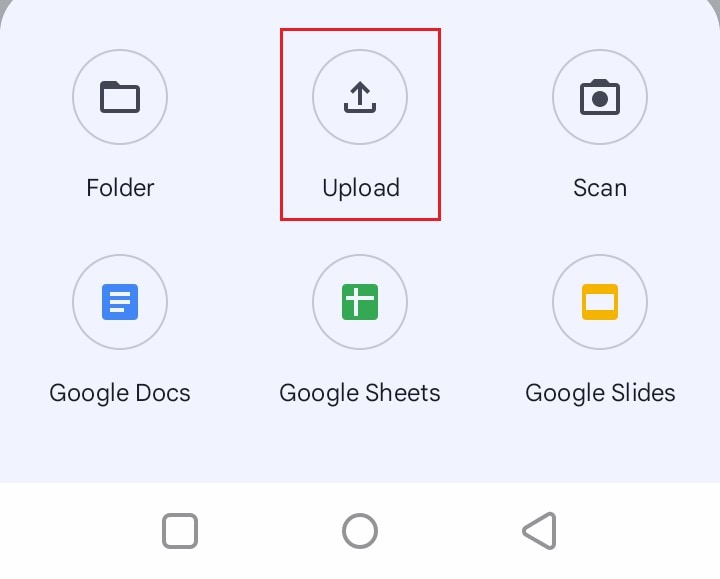
- Step 2: Click the New button and then select Folder. Nominate your desired folder name then click Create.
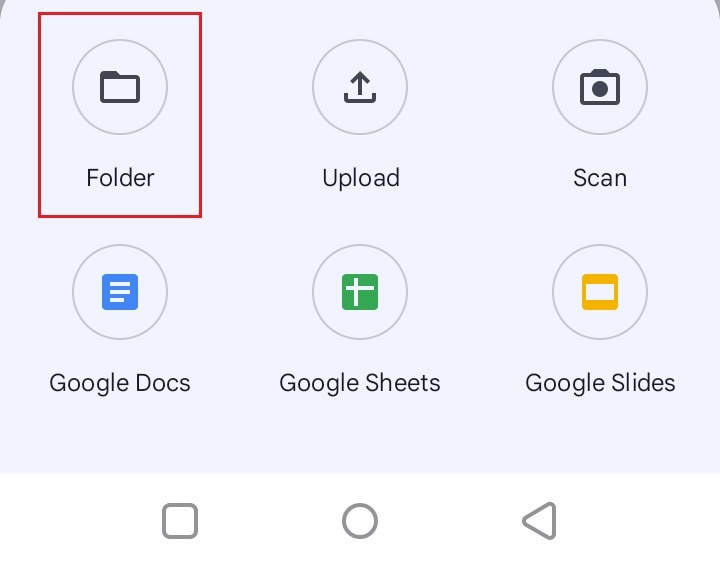
- Step 3: Once the folder has been created, go ahead and click Upload. Choose the files you want to back up and then click Select. Wait until all the files are uploaded. To save a lot of time, create a backup folder on your Nexus smartphone and then consolidate the files there. With this, you can just select all the files inside the backup folder and upload them simultanenously to Google Drive.
Method 4: Back up Google Nexus photos to Google Photos.
Google Photos stores media files on its online server. That said, you can use its service as a Google Nexus backup technique. Are you wondering how to do it in easy steps? If so, check out the guide provided below. Take note that this method only works if the files you want to backup consist of photos. If not, resort to other Nexus backup and restore tactics in this article.
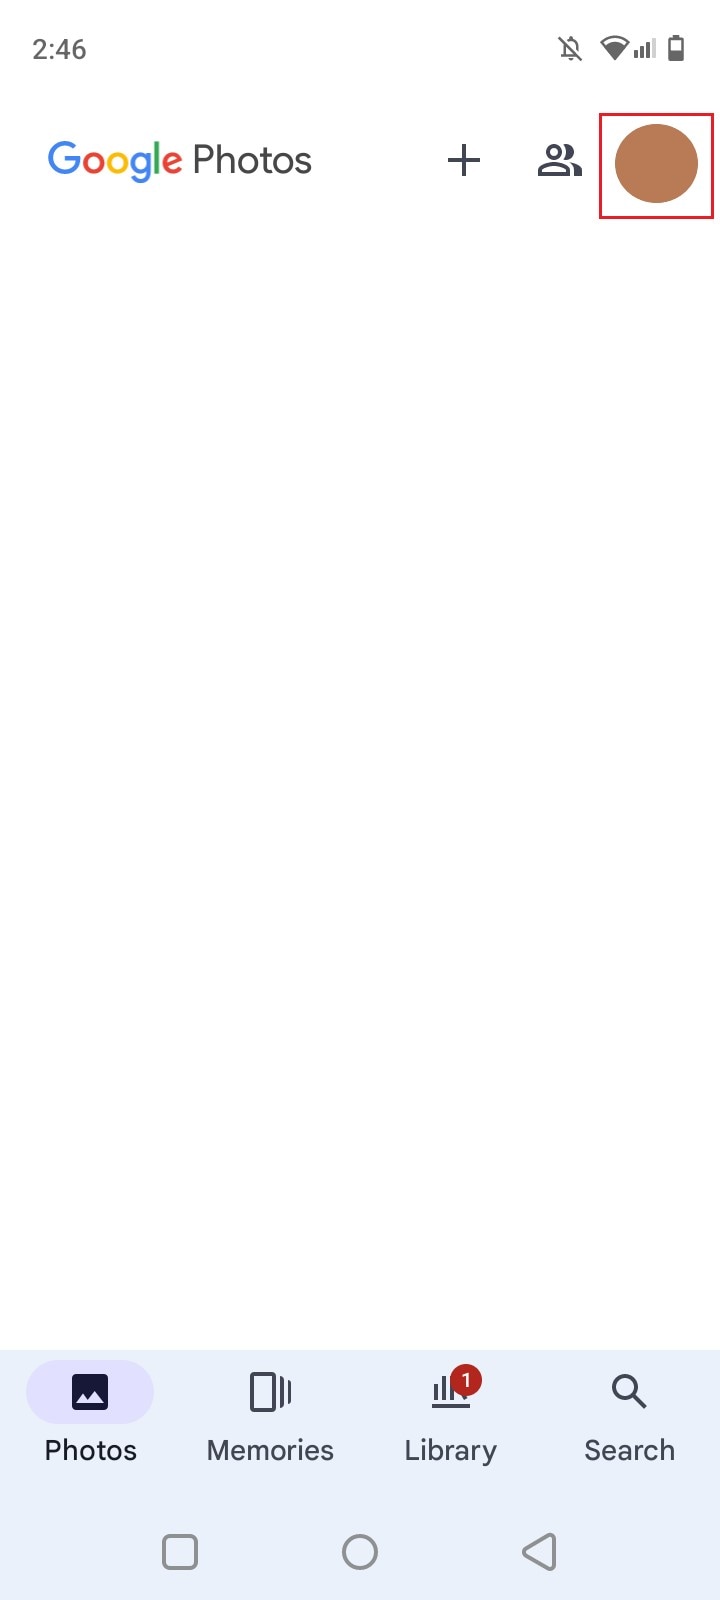
- Step 1: Download and install the Google Photos application on your Nexus smartphone. Right after, log in to your Google account.
- Step 2: Click your profile icon at the top-right corner of your screen.
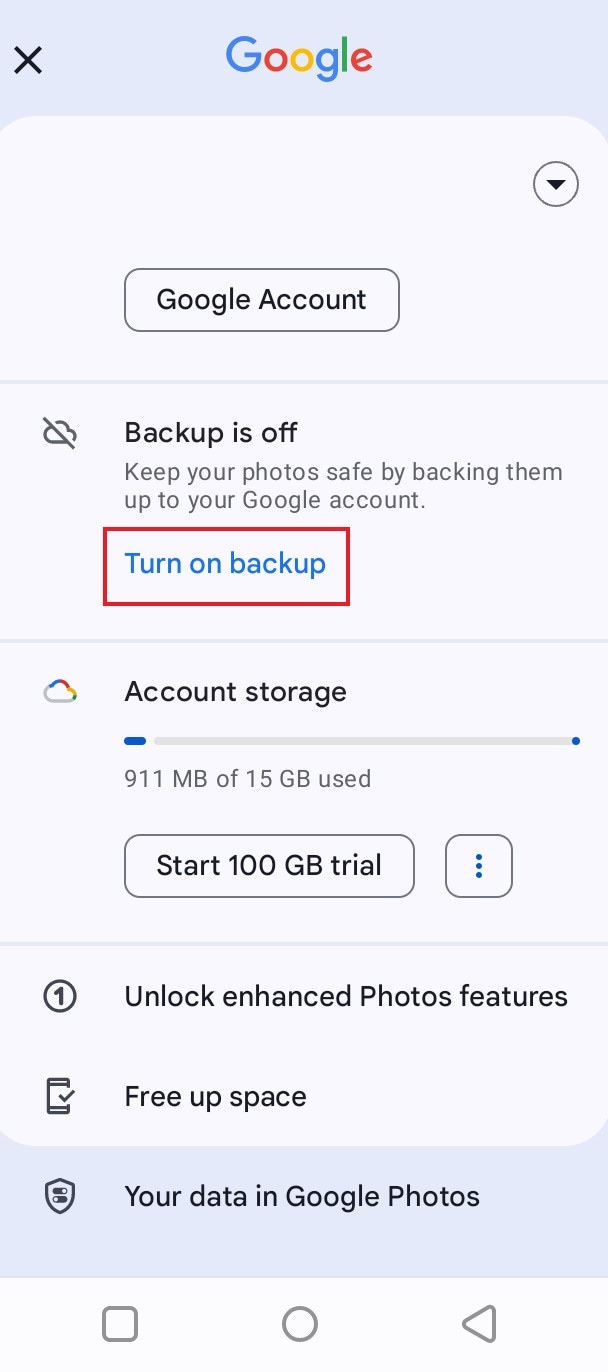
- Step 3: From there, click Turn On Backup. Once activated, expect that the photos on your local storage will be automatically backed up to Google Photos. You can access them anytime and anywhere. All you need to do is log in to the Google account you use for Google Photos backup.
Method 5: Back up Google Nexus With Wondershare Dr.Fone.
Wondershare Dr.Fone has made it a lot easier for everyone to back up Android smartphones. If you want a more convenient approach, this Google Nexus backup technique is indeed a great option. Don’t worry. It’s a piece of cake. To help you get started, here’s a short tutorial you can follow.
- Step 1: Download Wondershare Dr.Fone from its official website. Right after, install it on your computer.
- Step 2: Run the newly installed software on your desktop. Once it fully loads up and the dashboard becomes visible on your computer screen, connect your Nexus smartphone using a data cable. Follow the on-screen instructions and perform the indicated steps accordingly to make sure that the connection between the two devices is stable enough for the procedure.

- Step 4: Follow the guide on your computer screen to proceed with SMS backup. Once you’re done, click OK.

- Step 5: The backup process will then begin immediately. Refrain from using both your Nexus smartphone and computer to avoid unwanted delays and interruptions.

- Step 6: Once the process is completed, it’s time to check the backup files from your Nexus smartphone. Simply click Open in Folder or View Backups to review them quickly and easily.

Part 3. How to Restore Nexus Smartphones From Backup?
Data recovery for Nexus smartphones is a walk in the park if you’re able to secure a backup. If that’s the case, all you need to do is transfer the files from the backup to your desired location. Yes. It’s just as simple as that. Are you planning to restore a Google Nexus backup file? If so, the guide below will help you restore your Nexus device from backup. Pick a specific method that suits your preference and current needs.
Method 1: Restore Google Nexus from computer backup.
Do you have a backup folder on your computer? If so, it’s very easy to restore them to your device with just the snap of a finger. Check out the guide below to know how exactly it is done.
- Step 1: Bring out the smartphone where you wish to restore your backup files and then connect it to your computer.
- Step 2: Locate the backup folder stored on your computer. Right-click on it and then select Copy.
- Step 3: After that, run the File Explorer app on your computer. Then, click This PC on the left-side panel.
- Step 4: Find and click your smartphone storage from the Devices and Drives section. From there, select a specific location where you want to save the backup folder and then open it.
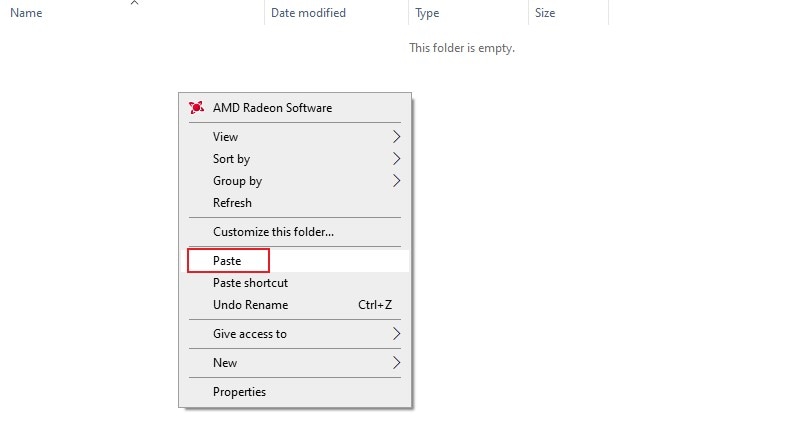
- Step 5: Right-click anywhere on the folder’s window and then select Paste.
Method 2: Restore Google Nexus From Google Backup.
Let’s say your Nexus smartphone uses Google services to back up its data and system. If that’s the case, you can easily restore your files to another smartphone by simply syncing your Google account. Do you want to restore your Nexus smartphone from Google Backup? Well then, check out the guide provided below and follow the steps accordingly.
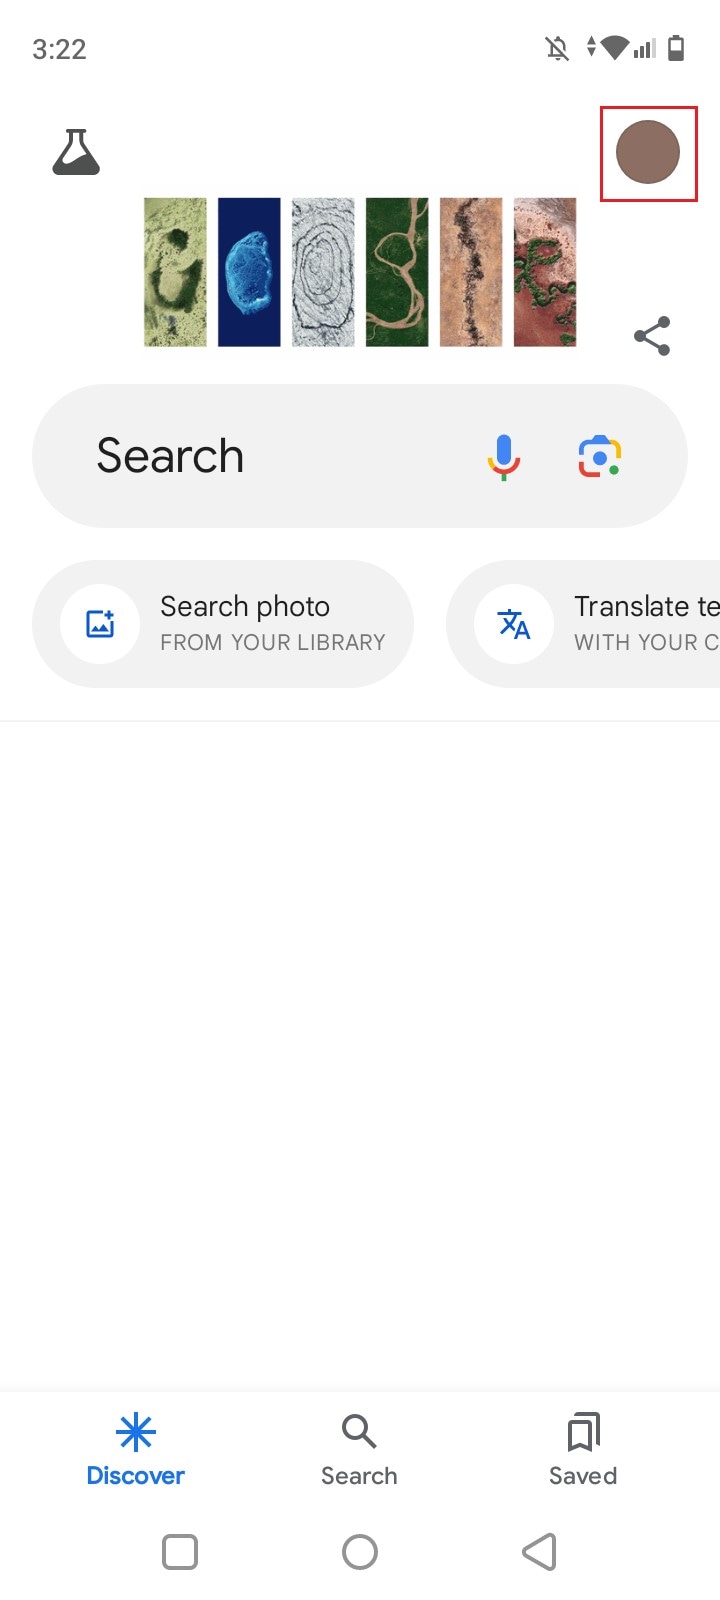
- Step 1: Go to the Google application on your mobile device.
- Step 2: Click on the Profile icon at the top-right corner of your screen.
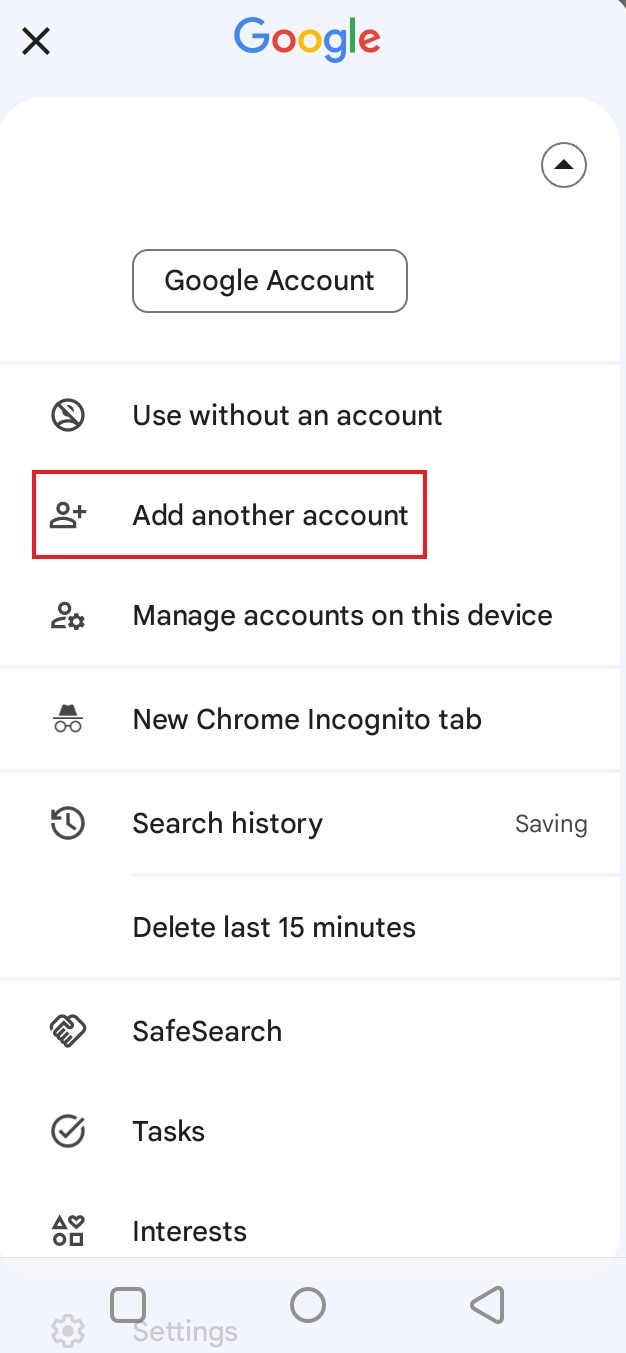
- Step 3: Click the Drop-Down arrow next to your name and email address.
- Step 4: Click Add Another Account.
- Step 5: Log in to the specific Google account you use for your Google Nexus backup and then set it up on your mobile device. Once you’re done, all the files will be synced immediately and become available for your access.
Method 3: Restore Google Nexus From Google Drive.
There is no denying that Google Drive is a great tool for Nexus backup and restore. Why so? The simplest explanation is that it’s readily available and easily accessible. Are you wondering how to restore your Nexus smartphone from backup using this method? If so, here’s a short guide for you.
- Step 1: Launch the Google Drive application on your mobile device. Make sure that you’re currently logged in to the Google account you use to back up your Nexus smartphone.
- Step 2: Find the specific Google Drive folder that contains your backup files. Click on it.
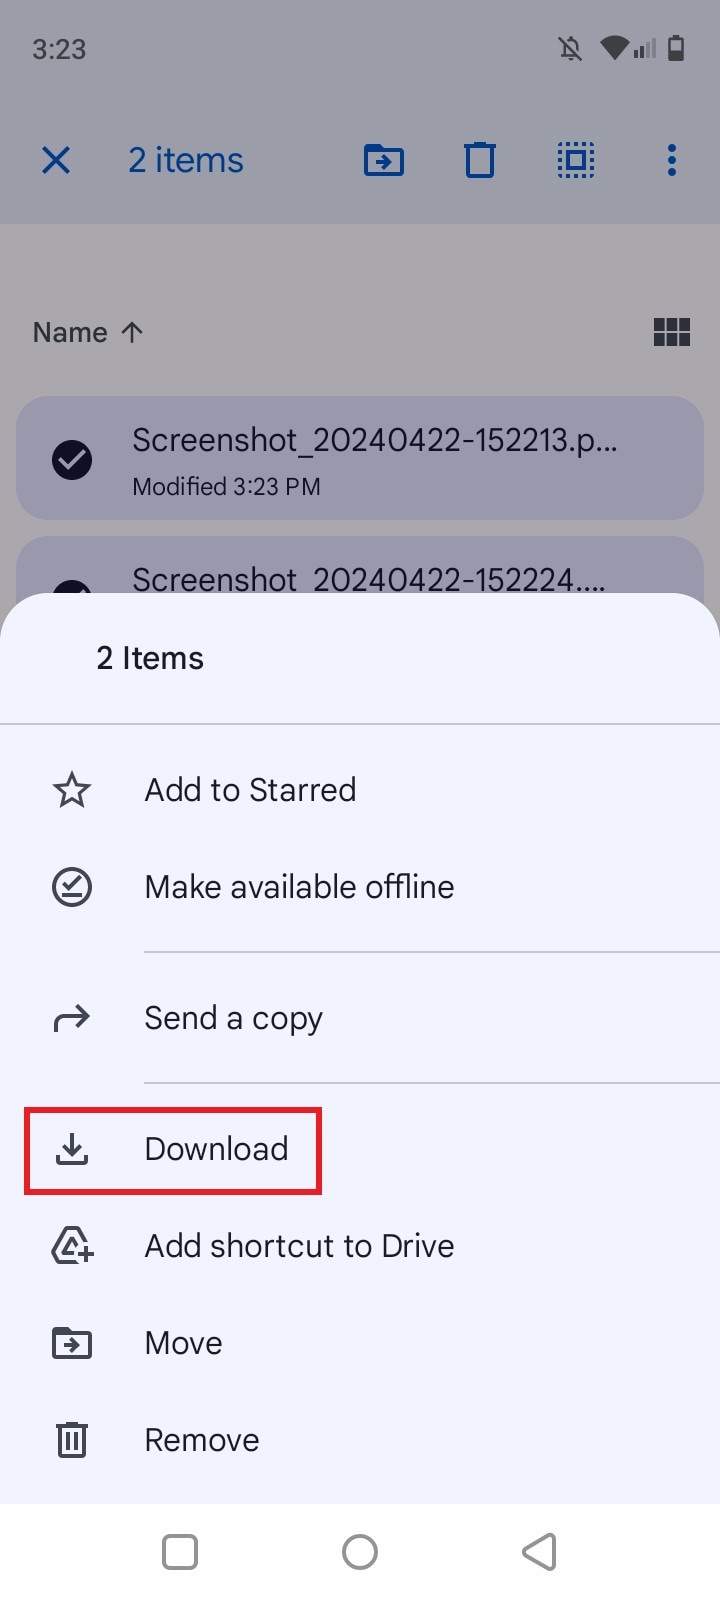
- Step 3: Select all the files you want to restore. After that, click the Three-dotted menu button at the top-right corner of your screen.
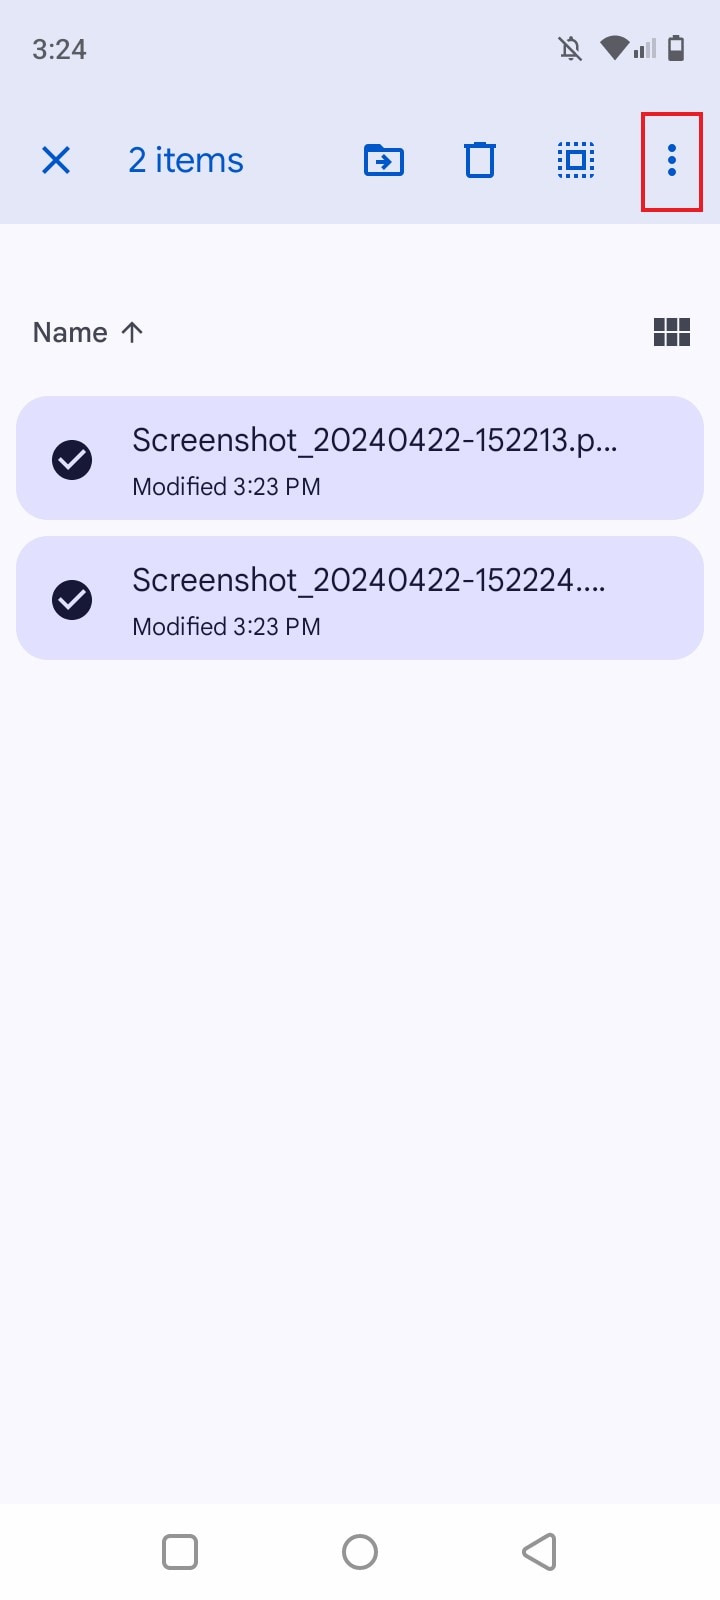
- Step 4: Click Download. Wait patiently as the files are being downloaded to your mobile device. Once down, organize the downloaded files and transfer them to the right locations.
Method 4: Restore Google Nexus photos from Google Photos.
Do you regularly back up your photos to Google Photos? If so, it doesn’t take much to restore them to your mobile device. Do you want to know how to use Google Photos for Nexus backup and restore? Here’s a short guide on how to recover your files quickly and easily.
- Step 1: Run the Google Photos application on your mobile device. Make sure that you’re logged in to the Google account you use for Google Nexus backup.
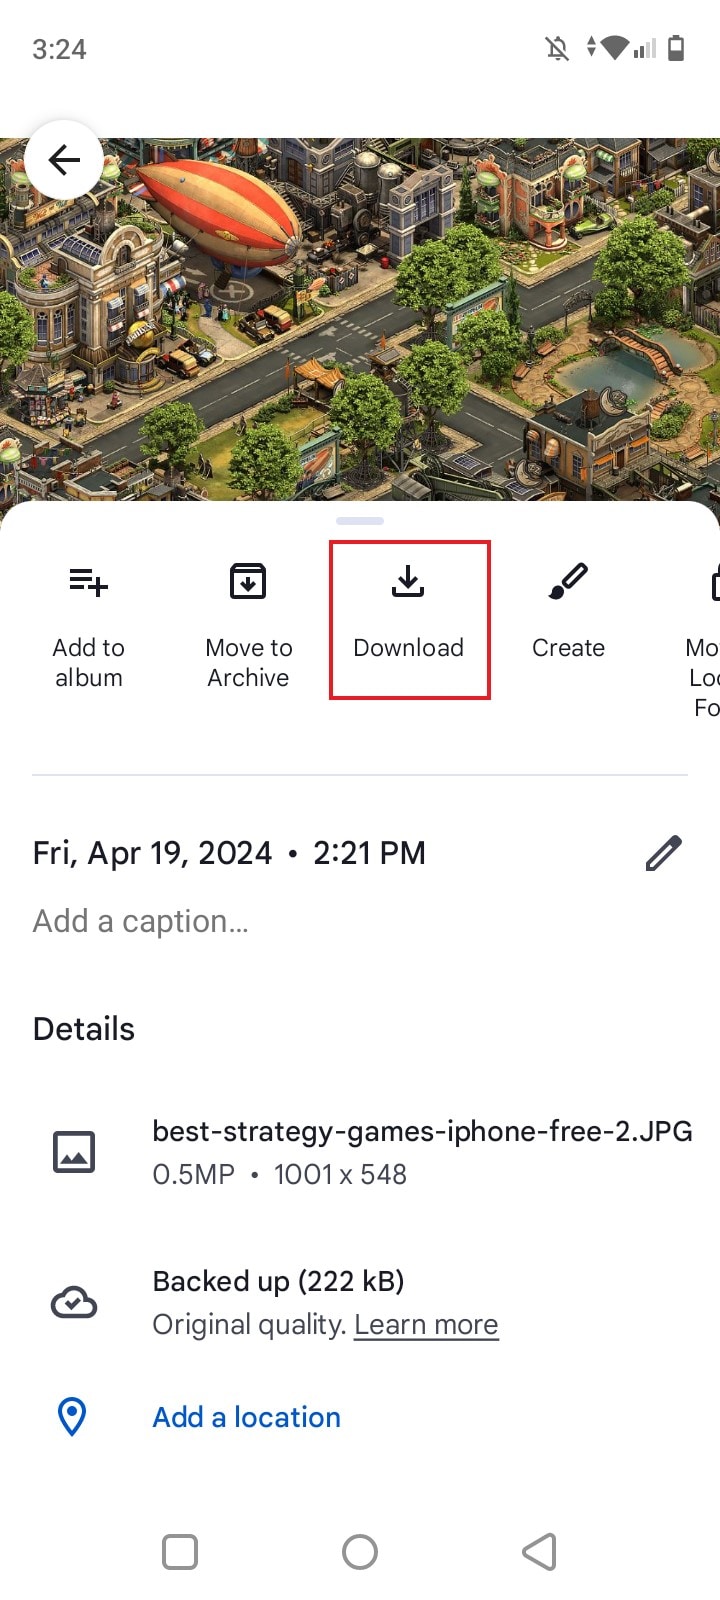
- Step 2: Locate the photo you want to restore. Click on it.
- Step 3: Click the Three-dotted menu button at the top-right corner of your screen. From there, select Download.
- Step 4: Do the same procedure for other photos you want to restore from Google Photos backup.
Method 5: Restore Google Nexus data with Wondershare Dr.Fone.
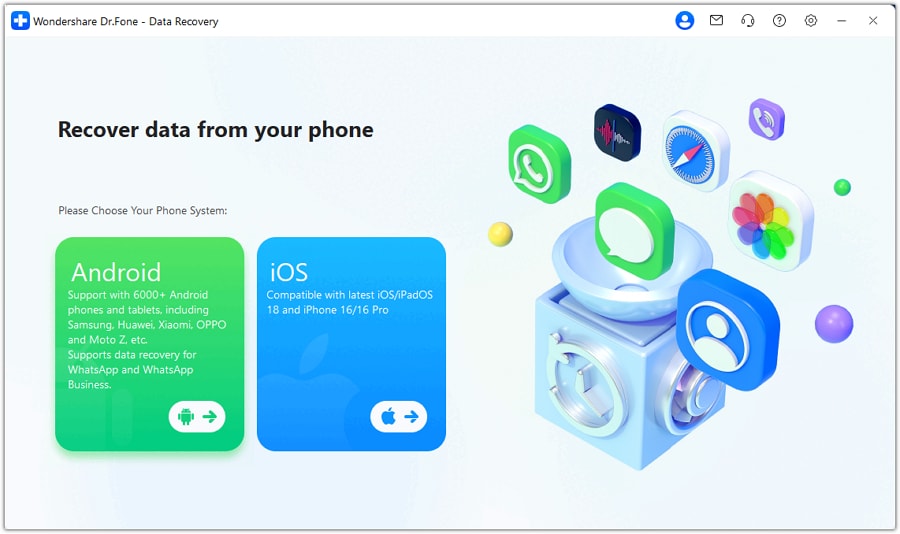
What if your Google Nexus smartphone does not have any backup? Is it still possible to recover your files and data? Luckily, it is. Wondershare Dr.Fone has a powerful data recovery feature that can assist you in this regard. This Google Nexus backup and data recovery technique works effectively. Don’t worry. It’s as easy as shooting fish in a barrel. To get you started, check out the tutorial provided below.
- Step 1: Launch the Wondershare Dr.Fone application on your computer. Once it fully loads up, connect your Nexus smartphone using a data cable.
- Step 2: Go to the left-side panel and then click Toolbox. On the main dashboard, click Data Recovery.

- Step 3: Since you’re about to restore Google Nexus, select Android.
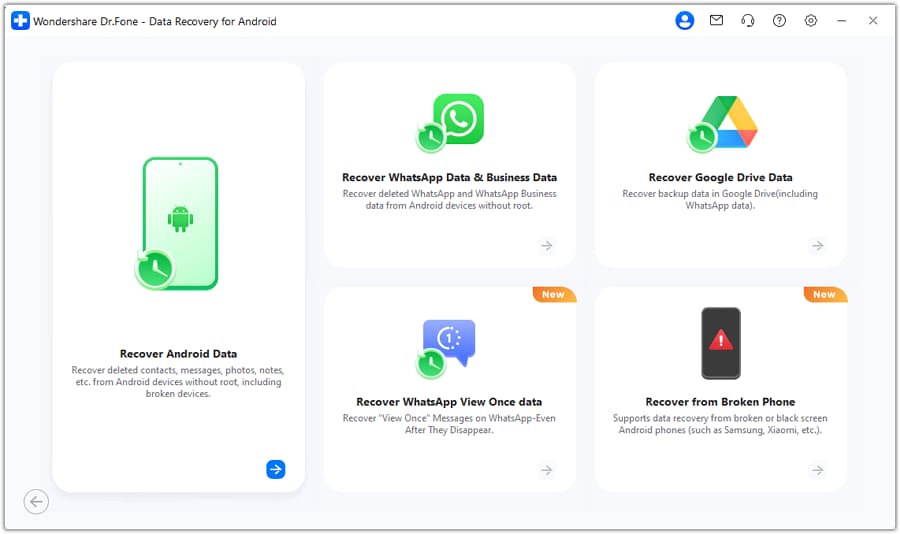
- Step 4: Click Recover Android Data.
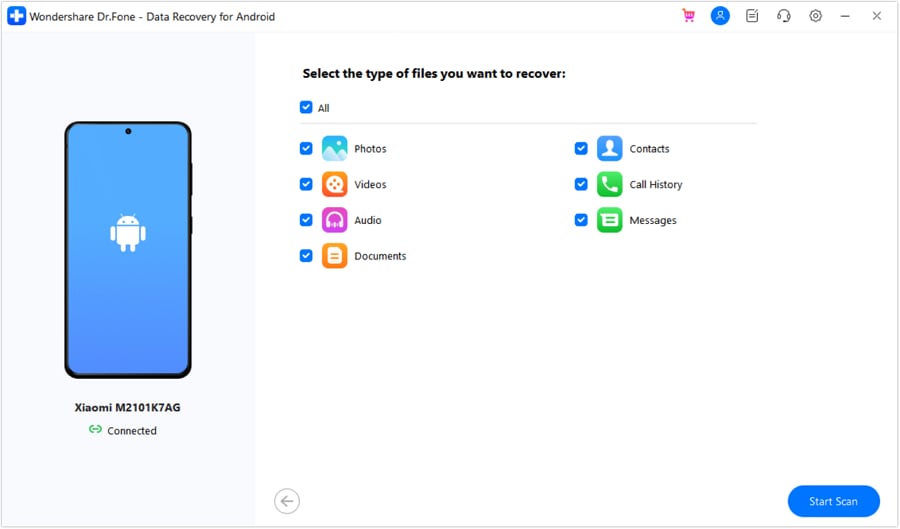
- Step 5: At this point, select the category of files you want to restore from your Google Nexus smartphone. After that, click Start Scan.
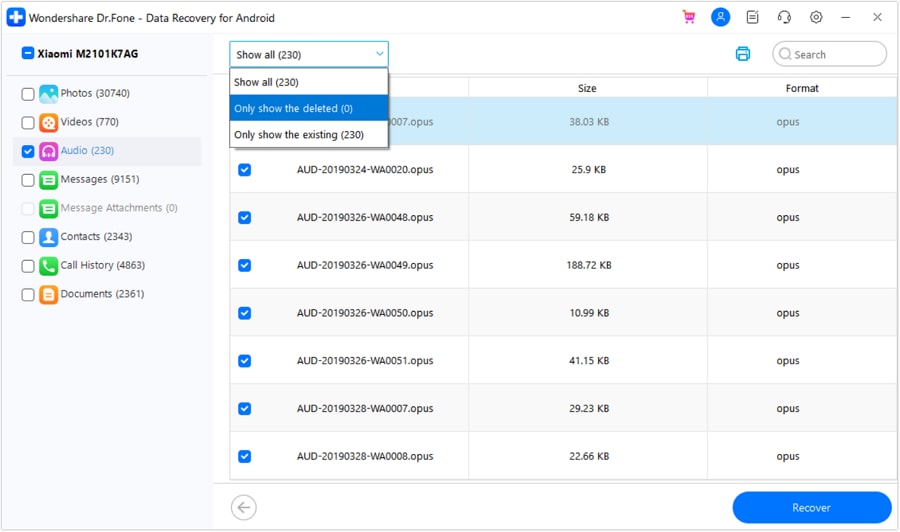
- Step 6: After the scanning process, Wondershare Dr.Fone will display the files fetched from your Google Nexus smartphone. Select the all the data you want to restore. Then, click Recover to proceed.
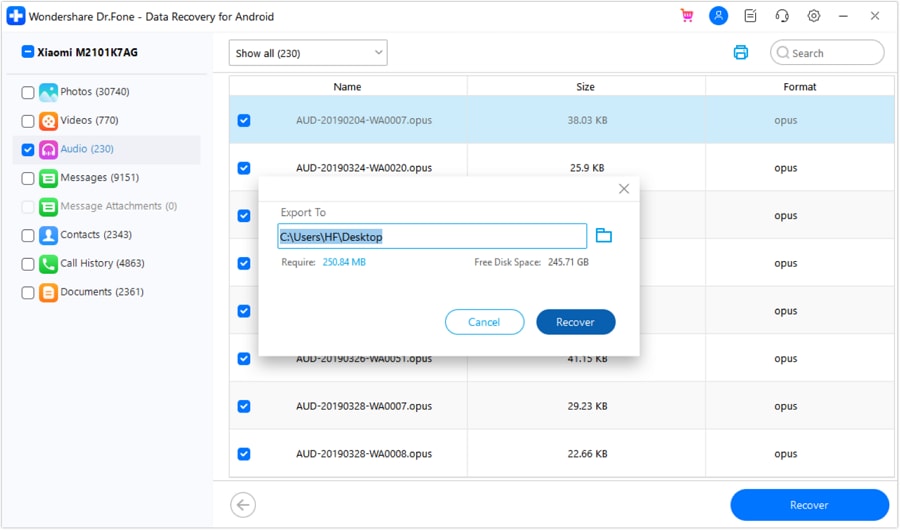
- Step 7: Designate a specific location on your computer where you wish to restore the files from your Google Nexus smartphone. Afterward, click Recover to continue.
Conclusion
We cannot deny that Google Nexus has contributed a lot to the amazing developments of modern smartphones. That’s why it’s completely understandable that many people regard it very highly. There’s nothing to worry about if you prefer to use this smartphone over the others. But for security purposes, make sure that your important files are all backed up. Refer to the Nexus backup and restore techniques provided above. If you wish to incorporate a more convenient Google Nexus backup and restore tactic, download Wondershare Dr.Fone. Its potent file backup and data recovery feature can surely be of great help to you in this regard.
Dr.Fone Basic:
Better Control for Your Phone
Manage, transfer, back up, restore, and mirror your device


James Davis
staff Editor