
3 Solutions on How to Back Up Viber Messages from iPhone and Android
Viber Manage
- Viber Messages
- 2. Backup Viber Messages from Mobile
- 3. Delete Viber Account/Group/Messages
- 4. Recover iOS Deleted Viber Messages
- 5. Restore Viber Messages from iOS
- Viber Tricks
- 1. Use Viber on A PC
- 2. Fake Your Location on Viber
- 3. Change Viber Number on PC/Mobile
- 4. Fix Common Viber Photos Problems
- 5. Top 8 Viber Problems and Solutions
- 6. Free Calls from iPhone on Viber
- 7. Record Viber Calls on PC/Mobile
- Other Social Apps Tips
- 1. Find Facebook Password
- 2. Facebook Dating Is Not Working
- 3. Top 5 Instagram Password Crackers
- 4. Download KIK for PC Windows
- 5. Fix Common LINE App Problems
- 6. Save Snapchats Secretively
- 7. Recover WeChat Account / History
- 8. Backup WhatsApp to PC
- 9. Whatsapp from Android to iPhone
- 10. Retrieve Deleted WhatsApp Message
- ● Manage/transfer/recover data
- ● Unlock screen/activate/FRP lock
- ● Fix most iOS and Android issues
- Manage Now Manage Now Manage Now
Dec 31, 2025 • Filed to: Social App Management • Proven solutions
Have you lost your Viber messages and chat history? Maybe they were deleted, lost during an update, or disappeared for another reason. You know how important those chats can be — proof, reminders, or memories. Many people think deleted messages are gone forever, but you can actually recover your lost Viber messages with the right steps and tools.
To prevent future loss, learn to back up your Viber regularly. In this article we show three simple ways to back up and restore Viber messages from an iPhone. Follow the clear steps and you’ll be able to get your chats back or keep them safe for good. We give step-by-step guides, tips, and easy tools so you can act with confidence today.
Part 1: How to back up and restore Viber messages manually – Time consuming
Actually, how to back up Viber messages is not a difficult question. You can manually back up your Viber messages and chat history. However, it is important to note that your backup history cannot be restored to your device because Viber cannot store any of your message history. Therefore, it cannot retrieve lost data. Backup history is only available in iPhone and Android devices. Let us learn how to back up Viber messages in your device.
How to back up your Viber chat History?
Step 1: Set to Send Viber Chat History
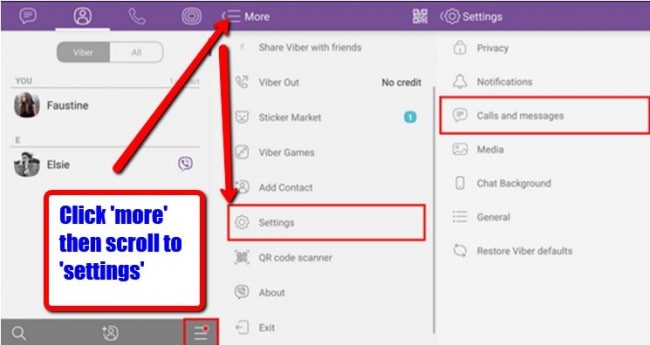
Sign in to your Android Viber account. Click the more button and then scroll to “settings” and select “Calls and Messages”.
Step 2: Select email Provider
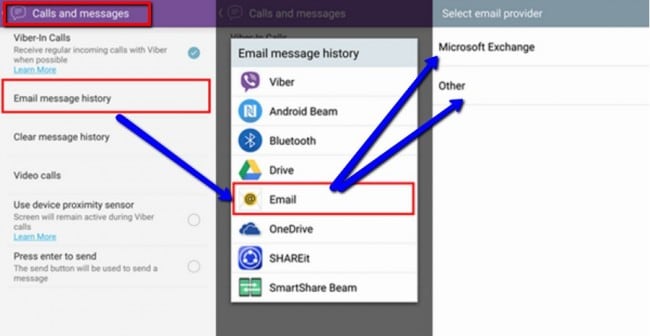
Once you click “Settings” you will be taken to a page called “Calls and Messages”. You will see “Email message history”. Tap the button and choose an application to email message history. Next, you need to select “Email” and choose your preferred email app where your message history will be backed up.
Step 3: Send Viber Chat History
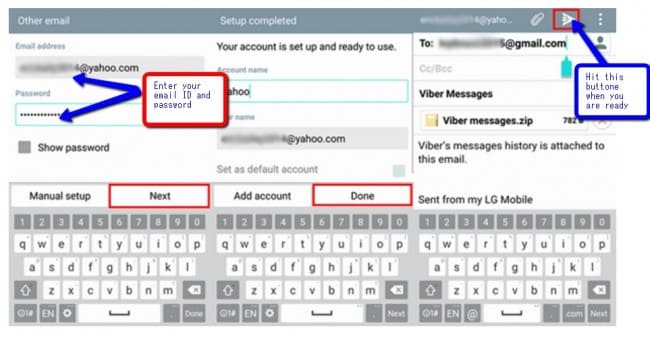
Now the next thing is to set up your email account. Login to your email by entering your email ID and password, then click “next”. Make sure you are connected to the internet because it will not work without being online. After setting up your email, select “Done”. In the next screen, enter the email address that you would like to receive your message history backup and hit the arrow button that can be located in the top right corner of the app.
You have now manually set up your Viber message backup.
How to restore your Viber chat history?
The process of restoring your Viber chat history is very easy. Here is how restoring Viber chat history works.
Step 1: Download Viber Messages from Email
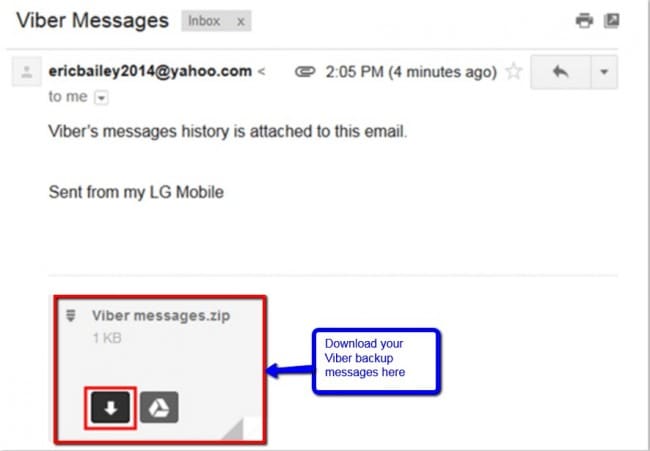
Go to the email you used to receive your Viber backup and sign in. Search for the letter from your Android phone. You will see an email attachment called “Viber messages.zip”. Click the download icon.
Step 2: Restore Viber Chat History
Now that you have downloaded your Viber message history, the next thing is to open the attachment CSV file. The file contains your chat history, and files are named according to the contact's name. You can view your chat history. The files are listed in an orderly manner depending on the time they were sent and received. Both the receiver and the sender are shown.
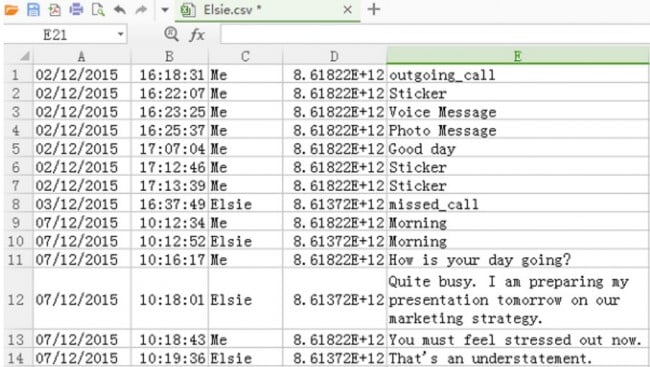
As we have already mentioned, the shortcoming of this backup process is that it can only be used on Android and iPhone devices. Also, You can't preview the backed up messages as well as select the specific messages to back up.
Part 2: How to back up and restore iPhone Viber messages quickly – In 5 minutes
Dr.Fone - WhatsApp Transfer is your go-to tool when it comes to backing and restoring Viber messages. Losing your important Viber messages and documents can be a devastating experience if you have no idea how to retrieve your data. But all is not gloom and doom. In fact, there is no need to panic because Dr.Fone - WhatsApp Transfer is there to help you to avoid losing your Viber data.
Unlike the manual process of backing up and restoring Viber messages (where you have no option of selecting and previewing your data), Dr.Fone makes the backup and restores complete 2-3x faster. You can also preview data before you restore. On top of that, it is easy to operate.

Dr.Fone - WhatsApp Transfer
Backup & Restore iOS Viber Data Turns Flexible.
- One click to back up the whole iOS Viber device to your computer.
- Support to back up Social apps on iOS devices, such as WhatsApp, LINE, Kik, Viber.
- Allow to preview and restore any Viber data item from the backup package.
- Export what you want from the Viber backup to your computer.
- No data loss on devices during the restore.
How to back up Viber messages from iPhone?
Step 1: Install and launch Dr.Fone
The first thing obviously is to launch Dr.Fone on your PC. Next, choose “WhatsApp Transfer” on the screen as shown below.

Step 2: Connect your device to the computer
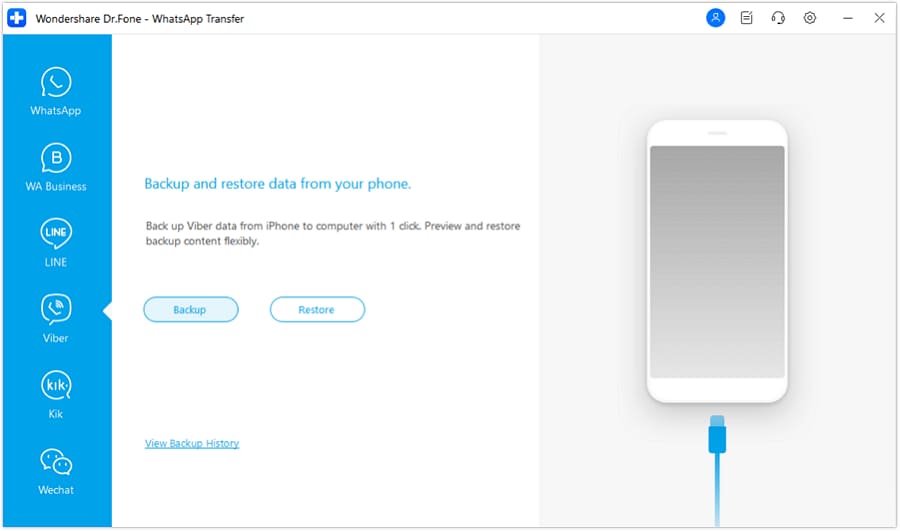
Whether you are using iPhone or iPad, the process is the same. Connect your device to computer and then go to “Viber”.
Step 3: Begin to back up your Viber chats
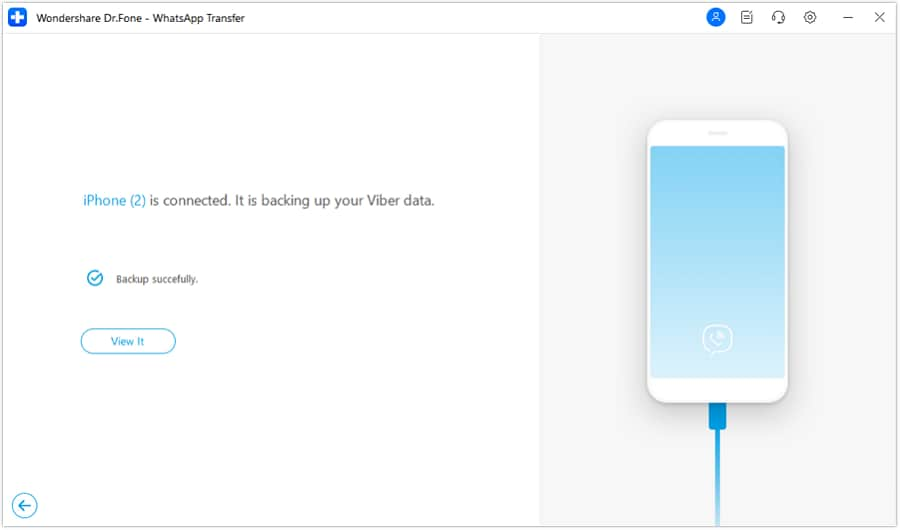
Then click “Backup”. The tool will start backing up your Viber messages and files automatically. Do not disconnect the device while the process is on, as this will abort the process. In other words, your device should be connected all the time.
You will be notified when the process is complete, and you will see the screen below.
How to restore Viber messages from iPhone?
Now that you have backed your Viber messages, chats, photos or videos, you may want to view the backup data you have created and restore. The following process outlines how to restore your Viber backup data using Dr.Fone too.
Step 1: View your backup files
On your screen, click “View it” in order to check the backup files and their content.

Step 2: Extract your backup file
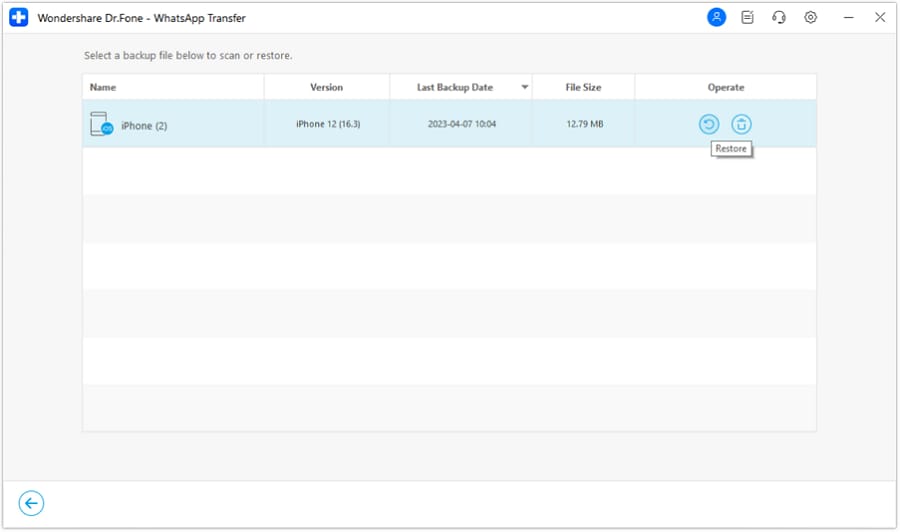
You will then be able to see all your Viber backup files. Select the ones you would like to view and hit the “Restore” button.
Step 3: Restore or export your Viber messages, photos, and call history
When the scan has stopped, all the backup files are displayed. The next thing you need to do is to preview the content in the backup file and select all the items that you would like to restore. You will be given two options: either to “Restore to Device” or to “Export to PC”.
So, you can see this is the most fast and easy solution on how to back up Viber messages. Especially, you can preview and selectively backup Viber messages you want. And the user experience and UI design is wonderful. Why not free download it to have a try?
Part 3: How to back up Viber messages from Android by app – Backup Text for Viber
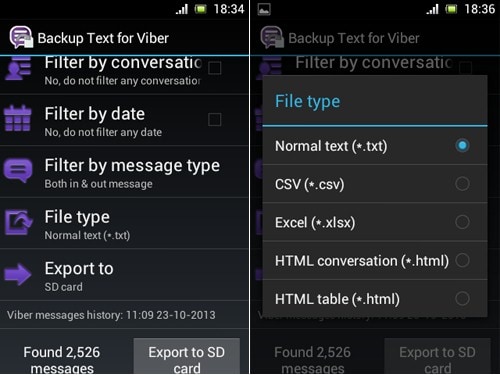
Backup Text for Viber is a Viber backup tool that exports your Viber messages. It converts them to CSV, plain text or HTML formats so that those files can easily be read on your mobile phone depending on the type of mobile phone you are using. The exported files can be stored in your Phone's SD card or stored in your email as an attachment. Here is how to back up and restore your Viber messages using Backup Text for Viber.
How to back up Viber messages from Android?
Step 1: Open your Viber app
Open your Viber app on your android phone and press the “Menu” Item
Step 2: Click “More options”
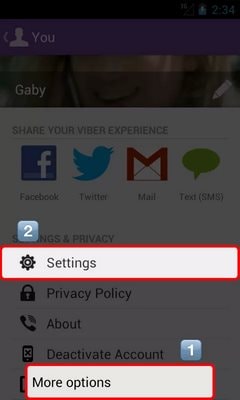
Now click the “More options” button.
Step 3: Backup Viber messages
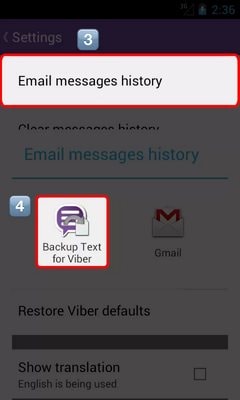
Go to settings and scroll to “Email messages history” and then click “Backup Text for Viber”. Once you do that, the tool will start exporting your messages to your email.
Part 4: Comparison of 3 solutions on Viber backup
The above 3 solutions can all be used to back up and restore your Viber messages, photos, videos and other documents. However, not all backup and restore options/tools are created the same. Some are more complex than others, while others are more effective than others. As we have already mentions, only Dr.Fone - WhatsApp Transfer is able to give you an option of previewing and selecting the specific files you want to back up. The default backup and restore option as well as Backup Text for Viber give limited options in terms of previewing backup files and selecting which files you would like to back up.
With a plethora of tools and options available for Viber backup, protecting your Viber messages, Videos, chat history, message attachments and photos is no long a hassle. What you need is just a cool too like Dr.Fone - WhatsApp Transfer tool, and you will have a peace of mind knowing your most important messages are being protected from loss. You can restore those messages or files whenever you require them.
| Feature | Dr.Fone - WhatsApp Transfer | Manual Email Backup | Backup Text for Viber |
| Direct Transfer (iOS <> Android) | ✔ Yes | ✖ No | ✖ No |
| Selective Restore | ✔ Yes | ✖ No | Partial |
| Ease of Use | ★★★★★ (1-Click) | ★★☆☆☆ (Complex) | ★★★☆☆ (Moderate) |
| Speed | Fast | Slow | Moderate |
| Backup Format | Readable on PC/Device | .zip (CSV/HTML) | .txt, .csv, .html |




Alice MJ
staff Editor