Recover photos, messages, WhatsApp, and more — no backup
needed.
Recover photos, messages, WhatsApp, and more — no backup
needed.

 100% Security Verified | No Subscription Required | No Malware

 :
: 
 ChatGPT
 Perplexity
 Gemini
 Claude
 Grok
Grok

I accidentally deleted crucial files on my iPhone and realized I need to get them back. I know they are saved in Apple's cloud, but how can I selectively restore them without completely wiping my device? What is the best method to retrieve iCloud backup data efficiently?
Sarah Jenkins, iPhone 14 Pro Max User
Data security has become an essential aspect of both personal and professional daily routines, especially as we move further into 2026. The popularity of Apple's iCloud has soared as a favored option among iPhone users, seamlessly integrating across the entire Apple ecosystem. With countless users worldwide, it has become a highly trusted platform to store users' precious data securely. However, even with automated backups constantly running in the background, you can still lose your data on an iPhone due to unforeseen circumstances such as accidental deletion, software glitches, or severe physical device damage.
The result of such unexpected incidents can range from mild inconvenience to critical data loss, threatening years of memories or important business documents. Therefore, exploring effective strategies and knowing exactly how to retrieve data from iCloud is essential for every iOS user today. This article will go through the various techniques and approaches available to you. Whether you want to perform a full device restore or selectively retrieve iCloud backup files, these comprehensive methods will help you successfully recover your data without unnecessary stress.
1. Device Restore Method
Fully restore an iCloud backup to a brand-new iPhone or a factory-reset device, replacing all current system data with your archived state.
2. Web and Third-Party Solutions
Selectively download files directly via the iCloud website or utilize advanced management tools like Wondershare Dr.Fone for targeted data extraction without resetting your mobile device.
In this article
- Part 1. How To Restore the iCloud Backup on a New or Factory Reset iPhone?
- Part 2. How To Recover the Important Data From iCloud Website to PC/Mac?
- Part 3. The Most Innovative iCloud Manager for Restoring iCloud Data on iPhone/Android/PC
- Bonus Tip: Simplified Instructions To Enable All the Backup Features of iCloud on iPhone
Part 1. How To Restore the iCloud Backup on a New or Factory Reset iPhone?
When setting up a brand-new iPhone out of the box or performing a factory reset on an existing one to fix severe software issues, the process of restoring data is of utmost importance. Apple's native iCloud backup serves as an incredibly valuable tool in transferring your data securely from your previous device to the new or freshly reset iPhone. Understanding exactly how to retrieve from iCloud effectively is important to guarantee all your messages, app data, and settings transition flawlessly.
It is key to ensuring a smooth transition and minimizing any risk of data loss. Here is the detailed, step-by-step process to successfully recover your environment from an iCloud backup on a new or reset iPhone:
-
Step 1 Initiate the iPhone Setup Process
Start by turning on your new or factory reset iPhone. Carefully follow the initial setup prompts, select your preferred language and region, and connect to a stable Wi-Fi network. Following this, when you arrive at the "Apps & Data" screen, proceed by selecting the "Restore from iCloud Backup" option.
-
Step 2 Authenticate Your Apple ID
Next, you will be prompted to sign in to your iCloud account using your Apple ID and secure password. Ensure that you are using the exact same Apple ID that was used to create the original iCloud backup containing your desired data.
-
Step 3 Choose the Correct iCloud Backup
After successfully signing in, you will be presented with a comprehensive list of available iCloud backups. Choose the most recent backup that contains the data you wish to restore. Take into careful consideration the timestamp, date, and overall size of the backups to ensure you select the appropriate one.


Part 2. How To Recover the Important Data From iCloud Website to PC/Mac?
Restoring an entire iCloud backup onto a new or factory reset iPhone is the most common method for blanket data recovery. However, there are many situations where you may only need to retrieve specific data, such as a few lost photos or a deleted contact. Or, you might just want to access your iCloud content directly from a desktop computer instead of a mobile device.
For that exact purpose, you can use the official iCloud website. This Apple-provided portal allows users to access, view, and comprehensively manage their synced iCloud data directly from any web browser on a PC or Mac. Below are the steps explaining how to retrieve iCloud backup data directly from the iCloud website to your personal computer:
-
Step 1 Access the iCloud Web Portal
Open a modern web browser on your Windows PC or Mac and navigate to the official iCloud website. On the iCloud homepage, you will be prompted to sign in securely using your Apple ID credentials and password.

-
Step 2 Navigate to the Desired Data Category
Once you are fully signed in and have passed any two-factor authentication requirements, you will see various app icons representing different types of synchronized data (e.g., Photos, Mail, Contacts, Calendar, Notes). Click on the relevant app icon for the data you specifically want to recover. After exploring the interface and finding the targeted data, select it to prepare for extraction.

-
Step 3 Download the Selected Data Locally
In most functional cases on the web portal, you can download individual files or specific batches of files by meticulously selecting them and choosing the appropriate download option (usually a cloud icon with a downward arrow). This built-in feature allows you to save your iCloud data directly to your PC or Mac's local hard drive for permanent safekeeping.

Part 3. The Most Innovative iCloud Manager for Restoring iCloud Data on iPhone/Android/PC
Do you want to manage and restore iCloud data across various distinct platforms with absolute ease? If yes, having a highly reliable and technically innovative tool can dramatically simplify the process without forcing you to factory reset your smartphone. Wondershare Dr.Fone is a highly popular and versatile mobile management solution that effectively bridges the gap between different digital ecosystems. It offers extremely comprehensive iCloud management features for iPhone users. Using this intelligent tool, you can safely recover data from both iCloud and local iTunes backups. It also completely removes OS limitations by allowing you to seamlessly restore your iCloud data to virtually any smartphone, whether running Android or iOS.
Widely recognized for its capabilities, Wondershare Dr.Fone acts as an industry-leading data recovery software designed for all user levels. It scans iOS devices to precisely recover lost photos, video, contacts, messages, notes, and a myriad of other file types. Perhaps most notably, it allows you to dynamically extract and thoroughly preview all content stored inside your iCloud or iTunes backup files before making any permanent changes. This guarantees that you can selectively restore only what you truly want from your iCloud backup directly to your device or computer, while maintaining full compatibility with the latest iPhone models and iOS versions.
 Recovers data after deletion, crashes, or device damage.
- Supports photos, messages, contacts, WhatsApp, and more.
- Supports all major iPhone, iPad, and iPod models.
- Preview and recover only what you need.

Key Features of Wondershare Dr.Fone
- Wondershare Dr.Fone offers a specialized ringtone maker feature natively, which you can use to easily create custom ringtones of your favorite songs and push them directly to your iPhone.
- For iOS users concerned about device integrity, Wondershare Dr.Fone also provides a detailed diagnostic and verification report, offering insights into hardware authenticity.
- With this robust iCloud Manager, you can systematically set up an automatic wireless backup of your mobile device on your computer, circumventing strict iCloud storage limitations.
Steps To Restore iCloud Data on iPhone/Android/PC via Wondershare Dr.Fone
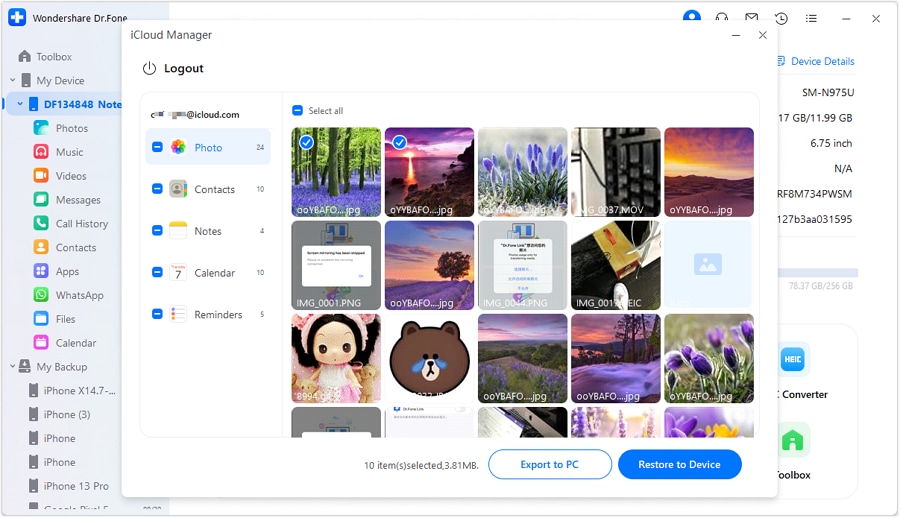
Wondershare Dr.Fone makes it a complete breeze to selectively restore iCloud data exactly where you want it. Here are the detailed, simple-to-follow steps to how to retrieve from iCloud by carefully restoring your files via its dedicated iCloud Manager module:
For Android/iOS Devices
-
Step 1 Access iCloud Manager in Wondershare Dr.Fone
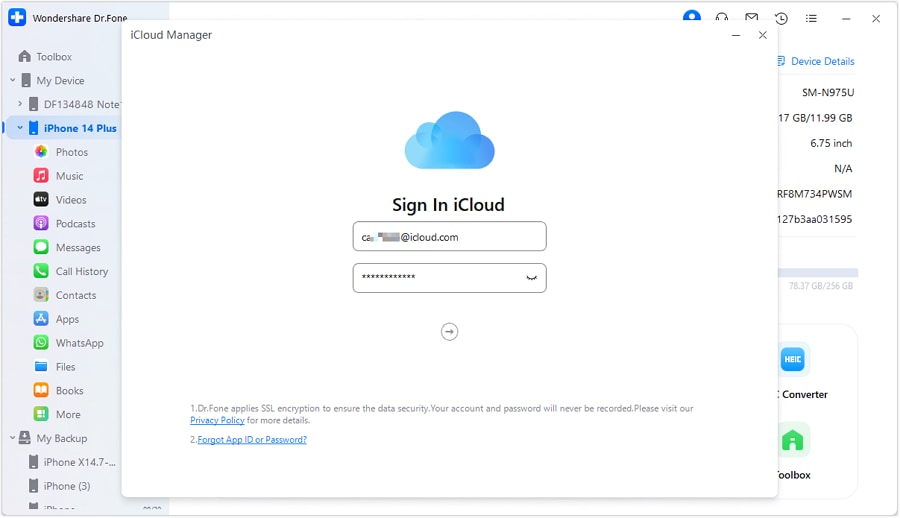
Begin by connecting your iOS or Android target device to your primary computer via a reliable data cable and launch Wondershare Dr.Fone. From the interface's "My Device" tab, confidently click "iCloud Manager." After that, log into your personal iCloud account securely and correctly verify your identity if Two-Factor Authentication (2FA) is currently enabled.
-
Step 2 Restore iCloud Backup to Android/iOS
Once logged in to the dashboard, you can browse and select the specific data sets available in the iCloud servers, then press the "Restore to Device" button. Afterward, click the "Start" button to rapidly begin the data restoration process onto your connected phone. Finally, tap "Done" once the entire iCloud to Android/iOS bridging process is successfully complete.

For Local Computer Retrieval
-
Step 1 Export the iCloud Data to Computer
If you prefer to pull the files offline locally, after launching Wondershare Dr.Fone, firmly tap the "iCloud Manager" button from the available feature options on the main interface. Simply press "Export to PC" to immediately get your cloud-hosted iCloud data safely extracted onto your PC's local storage after successfully logging in and meticulously selecting your desired iCloud data chunks.
Bonus Tip: Simplified Instructions To Enable All the Backup Features of iCloud on iPhone
Proactively enabling iCloud backups continuously on your iPhone is a highly crucial preliminary step for data safety. It will definitively ensure that your device data is securely and consistently backed up in real time and can be effortlessly restored if ever needed in an emergency. To reliably enable all the advanced backup features of iCloud directly on your iPhone, follow these greatly simplified setup instructions:
-
Step 1 Access the Master iCloud Settings
Pick up your phone and access your iPhone's main settings app. Tap the banner displaying your Apple ID at the very top, and thoughtfully select "iCloud" from the resulting menu list. On the following dedicated screen, press the "iCloud Backup" option and quickly toggle the main switch on in the ensuing screen to permanently enable automatic iCloud backup scheduling.

-
Step 2 Manually Trigger and Configure App Sync
If you want to forcefully back up your current data state right this moment, simply tap the "Back Up Now" button. Furthermore, to deliberately sync all other supporting apps on your iPhone up to iCloud, navigate back to the main iCloud settings screen. Here, carefully select an individual app, and on the next subsequent screen, toggle and enable the "Sync this iPhone" option. Repeat this vital process for each desired app that requires cloud protection.




Conclusion
In the expansive and often stressful realm of data retrieval from iCloud, deeply exploring highly effective strategies is absolutely crucial for any iPhone user. It will dramatically help in seamlessly recovering from iCloud all of your temporarily lost or severely deleted information. Throughout this exhaustive article, we have thoroughly delved into various diverse technical approaches. These included total restoration-based methods requiring device wiping, and entirely non-restoration methods to selectively retrieve data directly from iCloud using web portals or third-party desktop tools. By correctly understanding these multifaceted strategies, you can expertly optimize your own data recovery efforts in any crisis.
Among the wide array of available software options, one completely standout choice for flawlessly managing extracted iCloud data is Wondershare Dr.Fone. It masterfully allows the rapid selective restoration of complex iCloud data on iPhones, completely different Android devices, and standalone desktop PCs without compromising existing files. Ultimately, Wondershare Dr.Fone's unmatched cross-platform compatibility and extensive, deep data recovery options truly make it a great and fundamentally reliable choice for modern data rescue.
FAQ
-
1. Can I selectively retrieve data from an iCloud backup without resetting my iPhone?
Yes, you can selectively retrieve data without a factory reset by using the official iCloud website to download specific files (like photos or contacts) or by using specialized third-party tools like Wondershare Dr.Fone, which allow you to preview and extract individual files directly from the backup file itself. -
2. Does restoring an iCloud backup overwrite my current data?
Yes, if you use Apple's official setup method to restore an iCloud backup, it requires you to factory reset your iPhone first. This process will completely overwrite and replace all the data currently stored locally on your device with the contents of the chosen iCloud backup. -
3. How long does it usually take to retrieve data from an iCloud backup?
The time it takes to retrieve and fully restore data from an iCloud backup depends heavily on the total size of your backup file and the speed of your Wi-Fi connection. A small backup might take just a few minutes, while a comprehensive multi-gigabyte backup could take over an hour to finish restoring. -
4. Why can't I see my iCloud backup when trying to restore?
If you cannot see your iCloud backup, ensure you are signing in with the exact same Apple ID used to create the backup. Additionally, check that your device is connected to a stable Wi-Fi network and that the backup was fully completed without interruption. A version mismatch (trying to restore a newer iOS backup onto an older iOS device) can also hide the backup.
 Add Wondershare Dr.Fone as a preferred source on Google