
How to Set up and Use Miracast on Windows 11?

Jun 11, 2026 • Filed to: Phone Mirroring Solutions • Proven solutions
 TL;DR:
To use Miracast on Windows 11, you must verify system compatibility by confirming your WiFi NdisVersion is 6.30 or higher, and manually install the Wireless Display optional feature.
● Projecting an Android device to Windows 11 requires launching the Wireless Display app on your PC and authenticating the connection with an 8-digit PIN.
● Mirroring a Windows 11 screen to a TV requires plugging a Miracast adapter into the television's HDMI port before discovering it via the Add Device menu.
● For incompatible systems, Dr.Fone Air suits users needing cross-platform screen control on newer devices, Chromecast fits Android users prioritizing multitasking, and LetsView serves professionals requiring high visual quality without screen management.
Ask AI for a summary
 ChatGPT
 Perplexity
 Gemini
 Claude
 Grok
Grok
Dr.Fone Basic:
Better Control for Your Phone
Manage, transfer, back up, restore, and mirror your device
Screen mirroring is a practical solution for both professional and personal use. For instance, you might need to show a presentation to your colleagues about a new product or software, guiding them through a PowerPoint project. On a personal level, you may want to watch a movie with friends but have the file saved on your phone and no HDMI cable in sight.
In both cases, you'll need a bigger screen, and Miracast Windows 11 is a suitable choice. It's easy to set up and allows you to mirror your device effortlessly. Let’s explore how to configure these devices and start using screen mirroring on Windows 11.

- Part 1. How To Check If My Windows 11 PC Supports Miracast?
- Method 1: Using the Action Center
- Method 2: Using Command Prompt
- Method 3: Using DirectX Diagnostic Tool
- Method 4: Using Windows PowerShell
- Method 5: Using the Settings Panel
- Part 2. How to Download Miracast on Windows 11?
- Part 3. How to Enable and Use Miracast on Windows 11?
- How to Enable Miracast on Windows 11?
- How to Connect Android to Windows 11 Using Miracast?
- How to Connect Windows 11 to TV /HDTV Using Miracast?
- Part 4. How to Fix Miracast not working on Windows 11?
- Part 5. Best Miracast App Online in 2023
Part 1. How To Check If My Windows 11 PC Supports Miracast?
Users can download Miracast for windows 11, 10, or 8.1 since the operating system does allow its functionality. However, there are some limitations that you can notice in terms of the device model, screen size, and available functions.
The following are some ways to check if the Miracast download windows 11 option applies to your system.
Method 1: Using the Action Center
Step 1: Open the Action Center from the Taskbar and choose the "Network, Volume, and Battery" option.
Step 2: Tap on Cast. The software will start detecting any available Wireless Displays connected via Miracast. If the device does not support Miracast, the "Your device doesn't support Miracast" prompt will appear.
Method 2: Using Command Prompt
Step 1: Tap on Win + R. When the Run dialog box comes up, insert the term "cmd" and tap on OK.
Step 2: Next, when the Command Prompt section opens, type in the following command: netsh wlan show drivers. Press Enter.
Step 3: Scroll down to the Wireless Display Supported part. If the components like WiFi Driver and Graphics Drive show "YES", your computer supports Miracast.
Method 3: Using DirectX Diagnostic Tool
Step 1: Hit Win + R on your keyboard. In the Run dialog box, type in "dxdiag" and press Enter.
Step 2: When the DirectX Diagnostic Tool window opens, tap on the Save All Information button under the System tab.

Step 3: Go to the folder where you want to save your DxDiag.txt file, and hit Save.

Step 4: Go to File Explorer and double-click the folder where you saved the file.
Step 5: The file will open in the Notepad feature. Scroll down the list of details and check that there is an entry related to Miracast. If the Windows 11 system you are checking does not have this entry, the device is not compatible with Miracast.

Method 4: Using Windows PowerShell
Step 1: Tap the Search button from the menu and type in "Windows PowerShell". Choose the app option and tap on Open or double-click on it.

Step 2: In the Windows Powershell window, add the following command and hit Enter: Get-netadapter|select Name, ndisversion.

Step 3: Take note of the NdisVersion column and see the value mentioned beside WiFi. If this number is 6.30 or more, it signifies that the device is suitable with Miracast.

Method 5: Using the Settings Panel
Step 1: Tap on Win + I. Under Settings, tap on Projecting to this PC.
Step 2: If the PC works with Miracast, you will see many choices on the screen. Otherwise, you will notice a red prompt mentioning that the system is incompatible with Miracast.

Tips: Screen mirroring has become essential for everyone—from students to office professionals. Whether you need to share a presentation, display important information, or enjoy media on a larger screen, mirroring your phone is the perfect solution. Wondershare Dr.Fone's Basic Screen Mirror feature makes this task incredibly simple and efficient.
With Dr.Fone, you can easily mirror your Android device to a PC, either wirelessly or with a cable. This tool ensures a seamless and reliable connection, so you don’t have to hover over your phone anymore. Dr.Fone is designed to be user-friendly, making it accessible even if you're not tech-savvy.
Dr.Fone not only enhances your viewing experience but also boosts productivity by allowing you to share your screen effortlessly. Whether you're in a meeting or a classroom, Dr.Fone provides a convenient and effective way to mirror your Android device.
How To Use Screen Mirror on Android?
Part 2. How to Download Miracast on Windows 11?
After checking whether your device is compatible with Miracast, you can proceed with the Miracast windows 11 free download process. You have to activate the Wireless Display feature on your system and download and install optional packages.
Step 1: On your keyboard, tap on Win + I. When the Settings app opens, Choose Apps from the left pane > Optional features.

Step 2: Find the Add an optional feature selection and then click on the View Features option to its right.

Step 3: Scroll down and tap on the checkbox beside Wireless Display > Next.
Step 4: Then, on the next window, tap on Install. The system will start downloading the files related to it. Enable it afterward to begin using the Wireless Display for Miracast screen mirroring.

Part 3. How to Enable and Use Miracast on Windows 11?
Different methods are available for activating the Miracast drivers and software on your Windows 11 device.
How to Enable Miracast on Windows 11?
Firstly, you have to take the time to upgrade the Miracast driver for windows 11 to make them compatible.
Step 1: On the Start Menu, find and tap on Settings.
Step 2: Click the Windows Updates option on the left pane > Check for updates.
Step 3: Download all the scanned updates and install them. Look for "Optional update" and install all the options there. Then, restart the Windows 11 device.
Following the driver installation process for Miracast, you can proceed with the steps for casting the display.
Step 1: Tap on Win + I to access Settings.
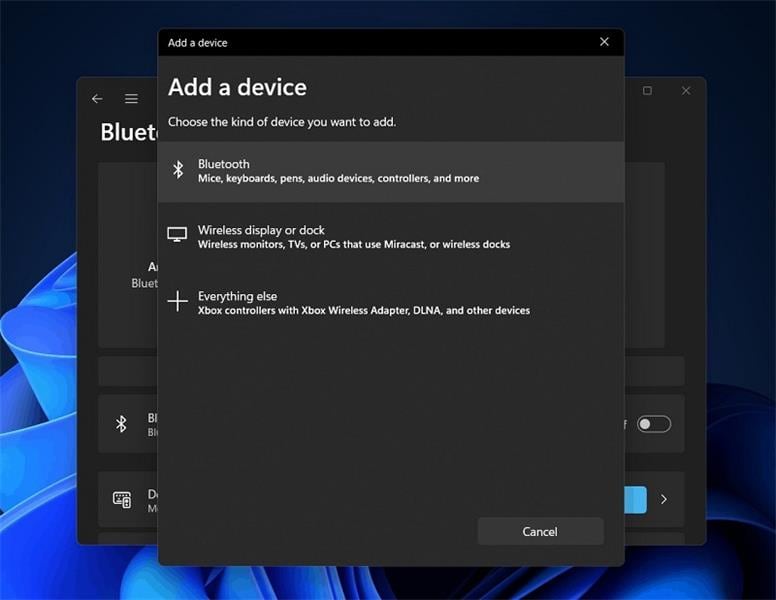
Step 2: Click on Bluetooth & Devices > Add a device.
Step 3: When the following window appears, tap on the "Wireless display or dock" option. Then, choose the listed wireless display available. This will enable the wireless connection to the PC.
Step 4: Then, you must choose the orientation of the screen projection to the wireless display. Tap on Win + P keys and access the Projection Settings window.
Step 5: Four projection options will appear- Second Screen Only, Extend, Duplicate, or PC Screen Only. Make you're your choice, and the projection will appear accordingly.

How to Connect Android to Windows 11 Using Miracast?
Connecting the Android smartphone or tablet to a Windows 11 system is relatively simple to handle if the devices are compatible. This occurs in two phases- configuring the system and the Android smartphone in two stages.
Step 1: On your computer, click on Win + I.
Step 2: When the Settings app opens, scroll lower and tap on Projecting to this PC.

Step 3: In the next window, make changes to all of the drop-down options for projecting to the screen, as directed.

Step 4: Now, tap on the "Launch the Wireless Display app to project to this PC" choice. Click the toggle to the active status for the prompt, allowing the PC to become discoverable to users for projection.

Next, you will see a blue screen on your device interface that states that the system is ready for screen mirroring. After seeing this, you can begin the configuration steps for your Android smartphone.
Step 1: Go to the Settings menu on your Android smartphone or tablet. Or you can also swipe the Notifications down from the top of your screen.

Step 2: Next, go to Bluetooth & Device Connection > Cast under the Settings menu.

Remember that this part can look slightly different for all Android phone interfaces depending on their brand and model.
Step 3: Next, click on the toggle for "Enable wireless display" to activate it.
Step 4: Under the list of all Nearby devices, choose the name you set or your PC. When the Invitation to Connect box comes up, add the 8-digit PIN code you received on your Windows PC.

Step 5: After inserting the code, press the Accept button. After that, your Android smartphone's interface will display on the PC.

How to Connect Windows 11 to TV /HDTV Using Miracast?
You can also connect your Windows 11 screen to the HDTV or TV with the help of the Miracast functionality.
Step 1: Get your Miracast windows 11 adapter and plug it into the HDMI port of your television system.
Step 2: Choose the correct HDMI channel to use on your television for the mirroring.
Step 3: On your PC, tap on Win + I to access the Settings menu.
Step 4: From the left panel, click Bluetooth & Devices and tap on the Add Device choice.

Step 5: The Windows 11 PC system will show all the display options in its vicinity. Choose the Miracast adapter option and tap on it. The mirroring will activate automatically.
Part 4. How to Fix Miracast not working on Windows 11?
If your Miracast connection is not operating on Windows 11, you can try different tactics to fix the issue.
These include running the trouble-shooter, disconnecting and then reconnecting the devices to the same WiFi, updating the network drivers, or adjusting the value for Wireless Mode Selection.
Check your system to find the leading cause of the issue.
Part 5. Best Miracast App Online in 2023
There are different online solutions that users can try out for screen mirroring.
1. Dr.Fone Air
Wondershare Dr.Fone Air is a suitable online solution for quick and efficient screen mirroring functions. It is easy to connect via a QR code or 9-digit PIN code and wirelessly activates the screen mirroring functioning, all in some simple steps.
Pros:
- Cross-platform support.
- Easily control elements on screen like rotation, zoom-in, etc.
Cons:
- Does not work on older devices.
2. Chromecast

Chromecast is a type of built-in screen mirroring tool that works on Android devices. Developed under Google, this works efficiently with various platforms and smart TV systems, with simple UI and strong streaming capacity.
Pros:
- Handle multi-task management benefits across connected devices.
- Easily mirror streaming movies or games.
Cons:
- Not available for multiple device types.
3. LetsView

LetsView is one of the most reliable online solutions available currently for users who want a unified system for screen projection. You can use it for real-time screen mirroring processes on different devices with high visual quality.
Pros:
- Suitable for different platforms and devices.
- Great for different professional user types.
Cons:
- Does not have screen management support yet.
Conclusion
Overall, downloading and activating the Miracast function on Windows 11 devices is possible, but with specific steps. You should first check that your device is compatible with Miracast first-hand. If it is not and you want to mirror your device screen, you can consider other alternatives like Dr.Fone Air.
Dr.Fone Basic:
Better Control for Your Phone
Manage, transfer, back up, restore, and mirror your device


Xiaomi Topics Series
- Xiaomi Screen & FRP Unlock
- 1. Unlock Xiaomi Bootloader
- 2. Mi Account Unlock Tools
- 3. Redmi Note 8 FRP Unlock Tool
- 4. Redmi Note 9 FRP Bypass Tool
- 5. Redmi 9A FRP Bypass
- 6. Remove FRP on Xiaomi/Redmi
- Xiaomi Repair
- Xiaomi Recover
- Xiaomi Reset
- Xiaomi Tips & News
- 1. Xiaomi HyperOS 3.0
- 2. Screen Mirror Xiaomi to PC
- 3. Run Hardware Tests on Xiaomi
- 4. Conduct battery test on Xiaomi
- 5. How Do I Obtain the Security Code Xiaomi
- 6. DND Mode Xiaomi
- Xiaomi Transfer & Backup
- ● Manage/transfer/recover data
- ● Unlock screen/activate/FRP lock
- ● Fix most iOS and Android issues
- Free Download Free Download Free Download


James Davis
staff Editor