
How To Enable Developer Options On Android Phone
Android Backup
- Backp Android
- 1. Backup Android to PC
- 2. Backup Android Photos
- 3. Android Wifi Backup
- 4. Backup Phone with Broken Screen
- 5. Backup Android Rom/Firmware
- 6. Backup SD Card on Android
- 7. Backup Android SMS
- 8. Backup Android Phone With Root
- 9. Backup Android to Mac
- 10. Backup Viber Messages
- Android Restore
- 1. Guide to Restore Android Phone
- 2. Backup and Restore Android Phone
- 3. 2 Ways to Restore Contacts on Android: Step-by-Step Guide
- 4. Restore WhatsApp from iCloud
- Backup Apps
- 1. Android Backup Apps to Backup Files
- 2. 6 Apps to Backup Bookmarks
- 3. Top 10 Contacts Backup App
- 4. Backup Android App and App Data
- 5. The Best Android Backup Extractor
- 6. Top 5 Android Backup Softwares
- 7. 6 Best Android Backup Softwares
- 7. 7 Android Fastboot Reset Tools
- Samsung Backup
- 1. Back Up Samsung to Google Drive
- 2. Backup Contacts on Samsung
- 3. Backup Text Messages on Samsung
- 4. Backup and Restore Samsung Galaxy
- 5. Backup Everything on Samsung
- 6. Backup Samsung Galaxy to PC
- 7. 10 Samsung Cloud Backup Services
- 8. Solution For Samsung Message Backup
- 9. 5 Samsung Photo Backup Solutions
- 10. Backup Samsung S10 to PC
- ● Manage/transfer/recover data
- ● Unlock screen/activate/FRP lock
- ● Fix most iOS and Android issues
- Free Download Free Download Free Download

Jun 11, 2026 • Filed to: Backup & Restore Solutions • Proven solutions
 TL;DR:
You can unlock advanced system settings on Android 5.0 and newer devices by navigating to Settings, opening "About phone" or "About tablet," and tapping "Build number" seven consecutive times.
● On devices running Android 4.0 to 4.2 (such as the HTC One M8, Samsung Galaxy S5, and LG G3), the "Build number" is hidden within specific sub-menus like "Software information" or "More," while Android versions older than 2.3 require enabling "USB debugging" directly through Settings > Apps > Development.
● To safely disable the feature, navigate to Settings > System > Developer Options and toggle the main switch off; while simply leaving the mode active does not expose your phone to malware, manually altering unfamiliar settings can drain battery life or reduce performance.
● Before testing system changes, you can secure your data using Wondershare Dr.Fone - Phone Backup (Android) on Windows or Mac, which requires connecting the device via USB and temporarily setting the Dr.Fone Link app as your default SMS handler during the extraction process.
Ask AI for a summary
 ChatGPT
 Perplexity
 Gemini
 Claude
 Grok
Grok
Dr.Fone Basic:
Better Control for Your Phone
Manage, transfer, back up, restore, and mirror your device
When you enable developer options on an Android device, you can access advanced settings and features that developers and technology lovers need. These settings give you more power and flexibility, which helps with fixing bugs, keeping an eye on the system, and making it run at its best. Turning on Android's developer settings can make the user experience much better and give you tools for better managing your device.
This article will show you step-by-step how to enable Developer Options on Android and introduce you to Dr.Fone Basic-Phone Manager (Android), a useful app for making your device run better. This article will be helpful, whether you're a developer who needs to access advanced features or a curious user who wants to learn more about their phone.
Part 1: Understanding Developer Options
1.1 What Are Android Developer Options?
As the name implies, Developer Options on Android, also referred to as Developer Mode, are for use by developers. hidden menu in the Settings app that has a lot of features and choices that can help you test and fix apps.
Most users won't care about many of these things, but developers and experts will find them useful. That's why they're set to hide. One should mess around with these choices without being careful. Still, there are some developer options on Android that everyone can find useful.
1.2 Characteristics of Developer Settings on Android
Android's developer settings have several additional features, such as:
- Wireless Debugging: you can fix problems with apps while connected to Wi-Fi.
- Shortcut for Bug Reports: This makes thorough bug reports quickly.
- Display Updates on the Surface: Draws attention to parts of the screen that are being remade.
- Display Cutout: This option changes the screen to adjust devices with camera Cutouts or notches.
- Profile HWUI Rendering: The rendering speed of apps can be seen.
- Animation Scales: Changes the size of animations or turns them off to make the device run faster.
- USB Debugging: Let the device and computer talk to each other so that apps can be tested and improved.
- Stay Awake: Keeps the screen on while the gadget charges.
- Running Services: Displays apps and services that are running in the background.
1.3 Importance for Developers and Tech Enthusiasts
Developers can improve their workflow, and tech admirers can explore and improve their devices by enabling Developer Mode on Android. Developer settings on Android are very important because they give developers tools to:
- make testing and fixing bugs in apps faster and easier.
- allow keeping an eye on and improving how well the app works.
- change and improve how their gadgets work.
- You can access features and options that are hidden from normal people.
Part 2: Steps to activate Android Developer mode
Depending on the model of Android you have, there are different ways to enable Developer Options on Android. If you're running an Android device that is at least 5.0, follow these steps to turn on Developer Mode on Android.
Step 1: Go to the settings on your phone or tablet. Start up your gadget and go to the main Settings menu. Tap on "About tablet" or "About phone" when you see it further down the list.
Step 2: Go to "About Phone" and scroll downward until you see "Build Number."

Step 3: Press "Build number" 7 times. Tap again and again until you see "You are now a developer." This means that you have set your Developer Options on your Android "on." There will be a message on your screen telling you how many more taps you need to make to turn on Developer Mode on Android.

For phones that run Android 4.0 to 4.2, the steps are a little different because the "Build number" choice is not visible. But here are the steps you can take to still turn on Developer Options on Android:
2.1 HTC One (M8):
Press "More" after going to "Settings" and then "About".

You will see "You are now a developer" after seven taps of "Build number."

2.2 Galaxy S5 from Samsung:
Select "About device" from the menu.

Just keep tapping "Build number" over and over until you see "You are now a developer."

2.3 LG G3:
Select "Settings," "About," and "Software information" from the menu.

It takes seven taps of "Build number" to see "You are now a developer."

2.4 Android Versions Older Than 2.3:
Navigate to Settings > Apps > Development.


Check the box next to "USB debugging" to turn it on.

Part 3: Managing Developer Options
Turning Off Developer Mode
Step 1: Tap and hold the bottom of the screen and swipe up.
Step 2: Go to your list of apps and tap the Settings button.
Step 3: Select System at the very end of the list.

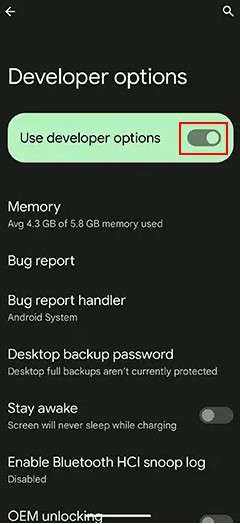
Step 4: At the very bottom of the screen, tap the ‘’Developer Options’’ button.

Step 5: To turn off developer mode, tap the switch next to "Use developer options" on the next screen.
Part 4: Bonus Tip: Backup Your Data in Few Minutes
A lot of advanced settings and tools are available once you know how to turn on Developer Options on your Android phone or computer. This part will tell you about Dr.Fone, show you some of its features, and explain why you should use it with your newly enabled Developer Options on Android.
Dr.Fone is an inclusive app that will help you better manage your Android devices. It has an easy-to-use design and a bunch of powerful functions that make managing devices faster and easier. As long as you want to back up your data, move files, or make your device run faster, Dr.Fone has you covered. Along with convenient phone management tools, Dr.Fone also has a powerful Backup & Restore feature. This function is great for keeping your data safe and making sure you do not lose important data.Using Wondershare Dr.Fone has several advantages, especially when incorporated with Developer Options on Android:
Getting the most out of your device: turning on developer settings on Android gives you access to features like "Running services" and "Memory usage." With Dr.Fone, you can go one step further by getting rid of useless files and making good use of your storage. This will make sure that the device works perfectly.
Dr.Fone - Phone Backup (Android)
Flexibly Backup Your Data in Few Minutes
- Selectively backup Android data to the computer with one click.
- Preview and restore the backup to any Android device.
- Supports 8000+ Android devices.
- There is no data lost during backup, export, or restoration.


It is recommended to follow these steps to maximize the benefits of using Dr.Fone Backup & Restore:
Steps to Backup Your Android Device with Dr.Fone
Step 1: Start up the computer and run Dr.Fone.Connect your Android phone or tablet. Go to My Backup and click on Back Up Now.

Step 2: Open the Dr.Fone Link app on your phone. When asked, set it up as your default SMS app. Press OK.

Step 3: the backup procedure will begin on its own. Keep an eye on the progress bar.

Step 4: When asked, reset your original SMS app to its default state. If you don't want to back up your text messages, tap Cancel instead of OK.

Step 5: Once you're done, click Open in Folder to see the copy on your computer. Click on View all backups to see all of your backups.

Conclusion
To sum up, turning on Developer Options on an Android device gives developers and tech devotees access to advanced features that make debugging, system monitoring, and speed better. This article has discussed a step-by-step guide to activate Android developer mode, from pressing "Build number" several times to finding the right settings menus.
When you use these features with Wondershare Dr.Fone, it makes managing your devices easier. Dr.Fone makes it easy to back up, recover, and control your data, so your device works well. Whether developers are changing the scale of animations or keeping an eye on services that are running, it adds to their choices and makes the user experience smoother and better. Adding this tool to your Android device helps keep it stable and running at its best.
FAQs
Dr.Fone Basic:
Better Control for Your Phone
Manage, transfer, back up, restore, and mirror your device


Alice MJ
staff Editor