Take Control of Your Phonebook: Tips for Editing Contacts on Android
Nov 21, 2025 • Filed to: Device Data Management • Proven solutions
Dr.Fone Basic:
Better Control for Your Phone
Manage, transfer, back up, restore, and mirror your device
Contacts are a vital part of our phones, allowing us to quickly reach out to friends, family, and business associates. Having accurate and up-to-date contacts is essential for smooth communication and to stay organized. When we don't keep our contacts updated, we may miss important calls or messages, or worse, send a message to the wrong person.
Additionally, with the rise of social media and messaging apps, many of us have multiple contact lists, which can quickly become cluttered and confusing. To avoid these issues, it's important to regularly edit and manage your contacts. This can include merging duplicate entries, deleting outdated contacts, and updating information such as phone numbers and email addresses. In this blog, we'll provide tips and tricks for managing your Android contacts and help you take control of your phonebook.
Part 1. Editing Contacts on Android Using Built-in Features
Android phones come with several built-in features that allow users to edit their contacts easily. It's essential to keep your contacts updated and accurate to ensure you can communicate with the right people when you need to. With these built-in features, you can easily edit and manage your contacts on your Android phone. Below are the different methods for editing contacts on Android using these built-in tools:
Method 1: Via Settings
If you want to manage your contacts and make changes to them, you can do so by accessing the settings on your device. Editing contacts through settings is a straightforward process and can be done quickly and easily. Whether you need to update a phone number, add a new email address, or delete an outdated contact, the settings menu on your device can help you accomplish these tasks with just a few clicks.
Step 1: Open the Settings app on your Android phone.
Step 2: Scroll down and select Accounts.

Step 3: Select the account that contains the contact you want to edit.
Step 4: Tap on Sync Account and wait for it to sync.

Step 5: Go back to the main Settings screen, scroll down, and select Apps or Application Manager.
Step 6: Find and select the app that contains the contact you want to edit.
Step 7: Tap on Storage >> Clear Data.

Step 8: Go back to the app and find the contact you want to edit. Make the necessary changes and save.
Method 2: By Built-in Contacts App
If you're looking to manage and organize your contacts on your device, the built-in contacts app is an excellent tool to use. Whether you want to add new contacts, update existing ones, or delete old contacts, the contacts app makes it easy to make changes quickly and efficiently. With its user-friendly interface and intuitive features, the contacts app is a convenient and effective way to keep your contact list up-to-date and organized.
Step 1: Open the Contacts app on your Android phone.

Step 2: Find and select the contact you want to edit.
Step 3: Tap on the pencil icon or Edit button.

Step 4: Make the necessary changes to the contact's details, such as name, phone number, or email address.
Step 5: Tap Save to save the changes.

Note: You can also add a new contact by tapping on the + icon and filling in the details.
Method 3: In Google Contacts App
If you use Google services for managing your contacts, the Google Contacts app is a great tool to help you keep your contact list organized and up-to-date. With its powerful search and filtering features, you can quickly find the contact you need and edit their information with ease. The Google Contacts app also provides seamless integration with other Google services like Gmail and Google Calendar, making it a convenient way to manage all your contact information in one place.
Step 1: Open the Google Contacts app on your Android phone.

Step 2: Find and select the contact you want to edit.
Step 3: Tap on the pencil icon or Edit button.

Step 4: Make the necessary changes to the contact's details.

Step 5: Tap Save to save the changes.

Note: The changes you make in the Google Contacts app will sync across all your devices if you're signed in with the same Google account.
Part 2. Editing Contacts on Android Using Third-Party Apps
In addition to the built-in tools, there are several third-party apps available for editing contacts on Android phones. These apps offer additional features and functionality, allowing you to manage your contacts more effectively. Below are some examples of third-party apps for editing contacts on Android:
Simple Contacts
Simple Contacts is a free and open-source app that allows you to manage your contacts easily. With Simple Contacts, you can add, edit, and delete contacts with just a few taps. The app also has a feature that allows you to back up your contacts to your Google Drive account, ensuring that you never lose your contact list. Here's how to use Simple Contacts:
Step 1: Install and open the Simple Contacts app.

Step 2: Tap on the contact you want to edit.

Step 3: Tap on the pencil icon or Edit button.

Step 4: Make the necessary changes to the contact's details.

Step 5: Tap check button to save the changes.

Contacts Optimizer
Contacts Optimizer is a paid app that allows you to manage your contacts more efficiently. The app has several features, including duplicate contact detection and merging, contact backup and restore, and contact group management. Here's how to use Contacts Optimizer:
Step 1: Install and open the Contacts Optimizer app.
Step 2: Choose an account.

Step 3: Click Edit contacts.

Step 4: Tap on the contact you want to edit.
Step 5: Make the necessary changes to the contact's details.

Step 6: Click OK to save changes.

Sync.ME
Sync.ME is a free app that offers more than just contact management. With Sync.ME, you can also identify unknown callers and block spam calls and messages. The app also has a feature that allows you to sync your contacts with your social media accounts, ensuring that your contact list is always up to date. Here's how to use Sync.ME:
Step 1: Install and open the Sync.ME app.
Step 2: Tap on the contact you want to edit.

Step 3: Tap on the pencil icon or Edit button.

Step 4: Make the necessary changes to the contact's details.

Step 5: Tap Save to save the changes.

Wondershare Dr.Fone
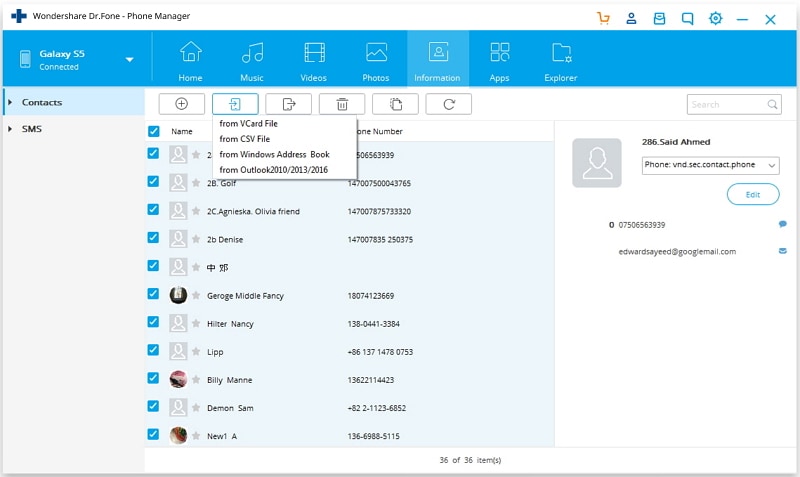
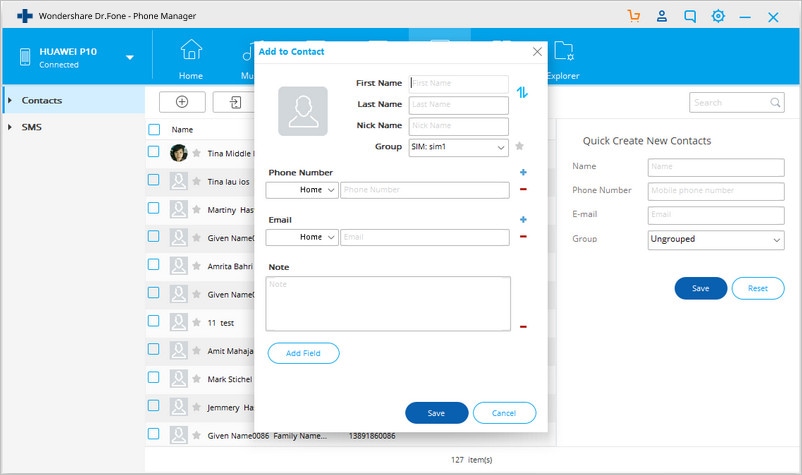
Try Wondershare Dr.Fone if you want a stress-free experience managing contacts on your Samsung S21. With this Android device manager, you may easily move files between your PC and mobile device. All of your contacts may be imported and exported, and you can also remove them, combine duplicates, delete specific contacts, add new ones, and more. The S21's file manager can be used for more than just managing your contacts; it can also handle your images, movies, music, and other media files. It works with the most popular Android versions and is easy to navigate. Here are some simple tips for utilizing Wondershare Dr.Fone to organize and edit your S21's contact list.

Step 1: First, get your Android smartphone connected to the computer and open the Wondershare Dr.Fone toolbox. Navigate to the Phone Manager >> Information >> Contacts.

Step 2: To make changes to a contact, just double-click on it. Any of the fields may be changed in this manner. Click the + button in the toolbar to create a new contact. Clicking this will open a new window where you can fill in the required fields and save the contact.

Part 3. Troubleshooting Common Issues with Editing Contacts on Android
Sometimes, you may encounter issues when trying to edit contacts on your Android phone. These issues can be frustrating, especially if you need to make urgent changes to your contact list. Some common issues include being unable to edit contacts or sync contacts across devices. Below are some troubleshooting tips to help you fix these issues:
Unable to Edit Contacts:
If you're unable to edit a contact, it may be because the contact is stored on a read-only account, such as a SIM card or Google account. To fix this issue, you can try the following:
- Ensure that your phone is connected to the internet and has a stable connection.
- Check if the syncing option is enabled for your account in the Accounts section of your phone's settings.
- Restart your phone and check if the syncing issue persists.
- Clear the cache and data of the Contacts app and try syncing again.
- Remove the account and add it back again to re-establish the syncing process.
Duplicate Contacts:
Sometimes, you may notice duplicate contacts in your list, which can make it challenging to manage your contacts effectively. To fix this issue, you can try the following:
- Use a third-party app like Wondershare Dr.Fone to merge or delete duplicate contacts.
- Manually merge the duplicate contacts by selecting the Merge option in the Contacts app.
Conclusion
Keeping our phone contacts updated and accurate is vital. It ensures that we can always reach out to the right person at the right time without any hassle. Updating contact information regularly can also prevent us from losing touch with people, especially when they change their phone numbers or email addresses.
Third-party apps offer additional features and functionality that can help you manage your contacts more efficiently. By using apps like Simple Contacts, Contacts Optimizer, Sync.ME, and Wondershare Dr.Fone, you can edit and manage your contacts easily, backup and restore your contact list, and identify unknown callers.
Dr.Fone Basic:
Better Control for Your Phone
Manage, transfer, back up, restore, and mirror your device
Android Tips
- Android How-Tos
- 1. Get Out of Android Odin Mode
- 2. Android Keyboard Settings
- 3. Get the Most Memory of Android
- 4. Partition SD Card for Android
- 5. Turn Off/On Emergency Alerts
- 6. Exit Android Factory Mode
- 7. Play MP4 files on Android
- 8. Play WMV on Android Phone
- 9. Reboot your Android Phone
- 10. Turn off Safe Mode on Android
- Android Password Find
- 1. Find Passwords Stored On Android
- 2. See Wi-Fi Password on Android
- 3. Show Wi-Fi Password on Android
- Broken Android Manage
- Data Manage
- 1. Top 3 Android Notification Manager
- 2. Edit Contacts on Android
- 3. Import Contacts from CSV File
- 4. Remove Facebook from Android
- 5. Transfer Phone Contacts to SIM
- 6. Unlock Android with Solid Explorer
- 7. Text from Android to Computer
- 8. Manage Audio on Android Device
- 9. Change System Fonts on Android
- 10. View HEIC File on Android
- Android Tricks


James Davis
staff Editor