
How to Backup Android Call Logs and History - Full Guide
Android Backup
- Backp Android
- 1. Backup Android to PC
- 2. Backup Android Photos
- 3. Android Wifi Backup
- 4. Backup Phone with Broken Screen
- 5. Backup Android Rom/Firmware
- 6. Backup SD Card on Android
- 7. Backup Android SMS
- 8. Backup Android Phone With Root
- 9. Backup Android to Mac
- 10. Backup Viber Messages
- Android Restore
- 1. Guide to Restore Android Phone
- 2. Backup and Restore Android Phone
- 3. 2 Ways to Restore Contacts on Android: Step-by-Step Guide
- 4. Restore WhatsApp from iCloud
- Backup Apps
- 1. Android Backup Apps to Backup Files
- 2. 6 Apps to Backup Bookmarks
- 3. Top 10 Contacts Backup App
- 4. Backup Android App and App Data
- 5. The Best Android Backup Extractor
- 6. Top 5 Android Backup Softwares
- 7. 6 Best Android Backup Softwares
- 7. 7 Android Fastboot Reset Tools
- Samsung Backup
- 1. Back Up Samsung to Google Drive
- 2. Backup Contacts on Samsung
- 3. Backup Text Messages on Samsung
- 4. Backup and Restore Samsung Galaxy
- 5. Backup Everything on Samsung
- 6. Backup Samsung Galaxy to PC
- 7. 10 Samsung Cloud Backup Services
- 8. Solution For Samsung Message Backup
- 9. 5 Samsung Photo Backup Solutions
- 10. Backup Samsung S10 to PC
- ● Manage/transfer/recover data
- ● Unlock screen/activate/FRP lock
- ● Fix most iOS and Android issues
- Back up Now Back up Now Back up Now
Dec 31, 2025 • Filed to: Backup & Restore Solutions • Proven solutions
Dr.Fone Basic:
Better Control for Your Phone
Manage, transfer, back up, restore, and mirror your device
For most people, it might sound like nonsense. However, for businessmen, having a backup for those business call logs and job interviews is always important.
When you make a lot of important deals from your mobile, you always want to save those call logs. Accidents happen anytime, and our data can be at risk. Backups ensure that if anything unexpected happens, you have a copy of data saved on the back end, and you can retrieve it anytime.
That's the reason you are here, right?

In this article, we'll show you how to create call records backup using different methods.
We will also explore Wondershare Dr.Fone. It's an excellent tool for all the essential management needs of a mobile device. Dr.Fone can not only help you safeguard your call records by keeping a backup, but you can also set up backups automatically so the backup data is always up-to-date.
Before exploring Dr.Fone in detail, let's first check some common methods used to back up call logs and history.
Part 1. Common Methods to Backup Call History
Method 1. Android Phone's Google Backup Service
Many Android phones have a way to back up everything, including call logs to the linked Google account. This method varies with different phone models. Here's a step-by-step guide on how to backup call history on Android:
Step 1 Open the “Settings” app on your phone.
Step 2 Search for “Backup”.
Step 3 Look for “Backup data (Google Drive)” or a similar option.
Step 4 Make sure the toggle switch is turned ON.
Step 5 Make sure that "Call history" or "Call logs" are in the backup details list.

Using your phone's Google backup is easy but has some downsides. You can only restore your call logs backup in case you're setting up a new phone or having a factory reset. You cannot select your desired date and backup manually using this method. Also, your backup is connected to your Google account. If you ever have issues with your Google account or decide to switch to a different service, you might face trouble.
Let's check another method for Android call log backup restore.
Method 2. Use Playstore Apps for Backup
Many apps on the Google Play Store can be used to back up SMS and call logs to cloud storage or other places. We will discuss two of them in detail.
Phone Backup app is an app specially designed to back up call logs, SMS, and contacts. Let's learn how to use this app.
Steps to Backup Call Logs & History
Follow the steps below to backup call logs and history using the Phone Backup app:
Step 1 Search the "Phone Backup" app on the Google Play Store and install it on your Android device.
Step 2 Tap the app's icon to launch it.
Step 3 Inside the "Call logs" tab, click “Backup”.
Step 4 It will need access to your call logs and all files. Allow the permissions carefully.

Step 5 Click “OK” and confirm to backup. It will create a backup file and show its path. You can also share the backup file to any external storage or email ID.

Steps to Restore Call Logs & History
Follow the steps below to restore call logs and history from the Phone Backup app:
Step 1 Launch “Phone Backup”. Inside the “Call Logs” tab, tap “Restore”.
Step 2 It will scan the files and show backups. Select your desired backup.
Step 3 Tap “Yes” and it will restore the backup file.

Let's review another app to export call logs and history as PDF or Excel files.
This handy app is used to backup, restore, and export call logs and contacts in PDF, CSV (Excel), and other formats.
Steps to Backup and Export
Follow the step-by-step procedure mentioned below to back up call logs using this app and export the backup file as a PDF or CSV file:
Step 1 Install the “Call Log Backup & PDF export” app from the Google Play Store.
Step 2 Launch the app and click “Backup.”
Step 3 Allow the required permissions to the app, and it will make the backup file.

Step 4 After the successful completion of the backup, click “Export as PDF” or any other export option of your choice. This will show backup data in the desired file format. Here, you can share it to any of your external devices or email IDs.
Steps to Restore Backup File
Follow the below steps to restore your backup file:
Step 1 Launch the app and tap “Restore.”
Step 2 Select your desired backup file from your Android phone's storage or cloud drive.
Step 3 Tap “Start”, and it will start restoring your desired backup file to your phone.

Using apps is helpful, but there are some things to watch out for. Backup apps need access to call logs and other data. This raises privacy concerns in some cases. Some free backup apps display ads, which can be annoying. And on top of all that, app developers might change features or discontinue support for an app. This will affect your ability to access or restore your backups in the future.
So, let's move towards a more convenient and reliable method for call records backup: Wondershare Dr. Fone.
Part 2. Secure SMS & Call Log Backup
Losing your call history can happen for many reasons, like accidentally deleting it, damaging your phone, or getting a new device. Wondershare Dr.Fone is a simple tool that helps you create backups and keep your call logs and SMS safe on your PC. So, whether it's an important work call or a number you can't remember, Dr.Fone ensures you don't lose track and have a secure SMS & call log backup. It is a secure and reliable backup solution.
It not only backs up your data, but you can also preview your backups, move them to any external drive, or even upload them to cloud service manually. It is a complete mobile management solution.
Let's review some of the prominent features it offers. Dr.Fone offers an effortless solution to backup call history. With just one click, you can save all the call log details. In case you're switching phones, you can preview your backups and restore them to any Android or iOS device you want.
Now that you know Dr.Fone can easily cater to your SMS & call log backup needs, let's learn how to backup SMS and call log history to keep them safe.

Dr.Fone - Phone Backup (Android)
Wondershare Dr.Fone: An Ultimate Backup Solution
- Selectively backup Android data to the computer with one click.
- Preview and restore the backup to any Android device.
- Supports 8000+ Android devices.
- There is no data lost during backup, export, or restoration.
Dr.Fone has a user-friendly and intuitive interface. With Dr.Fone, backing up your call logs and history is simple. Let's walk through the process:
Step 1 Install and start Dr.Fone. Log in using your Wondershare ID or create one if you don't have any.

Step 2 To connect your Android wirelessly, open the “My Device” tab on Dr.Fone computer screen and select “Wireless”. You can also connect using a USB cable.
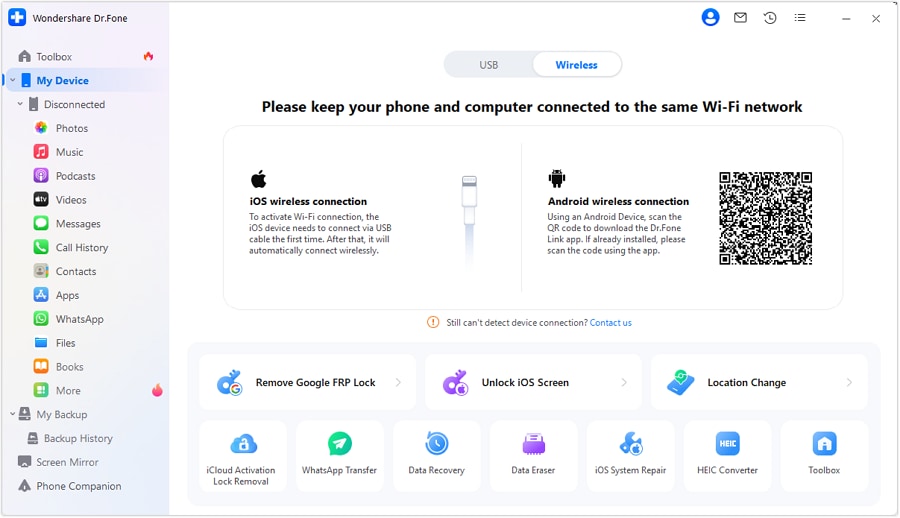
Step 3 Install the Dr.Fone Link app from the Play Store and scan the QR code from the computer screen to connect both devices. Once both devices are connected, you're ready for call records backup. Let's learn how to do this.
Step 4 Go to the “My Backup” tab and select only the green phone button saying “Call History.” If you want to backup SMS too, select the green message button “Messages” also. Now click “Back Up Now”.

Step 5 To backup SMS, you need to set the Dr.Fone Link app as the default SMS app. Dr.Fone will show a prompt for this on the computer screen. Follow the instructions and make the Dr.Fone Link app your default SMS app on your Android phone.
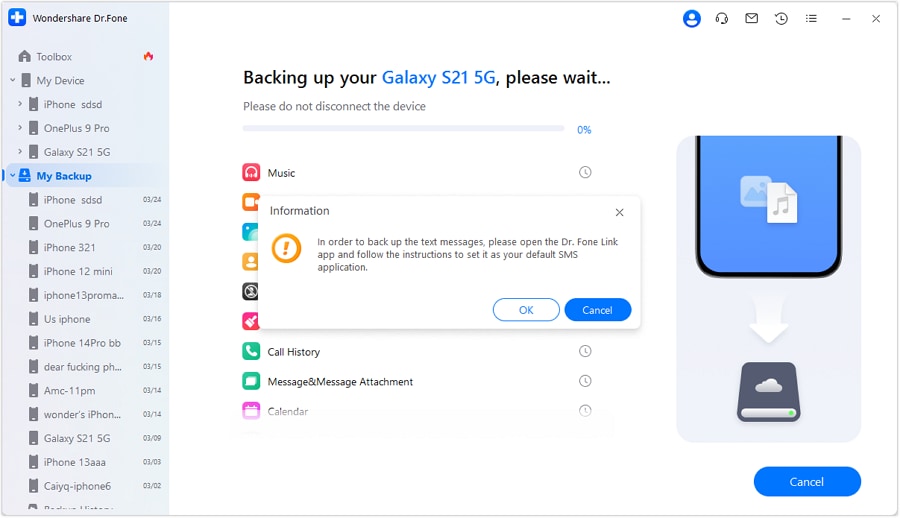
Step 6 Once you are done, click “OK,” and the backup process will begin automatically.
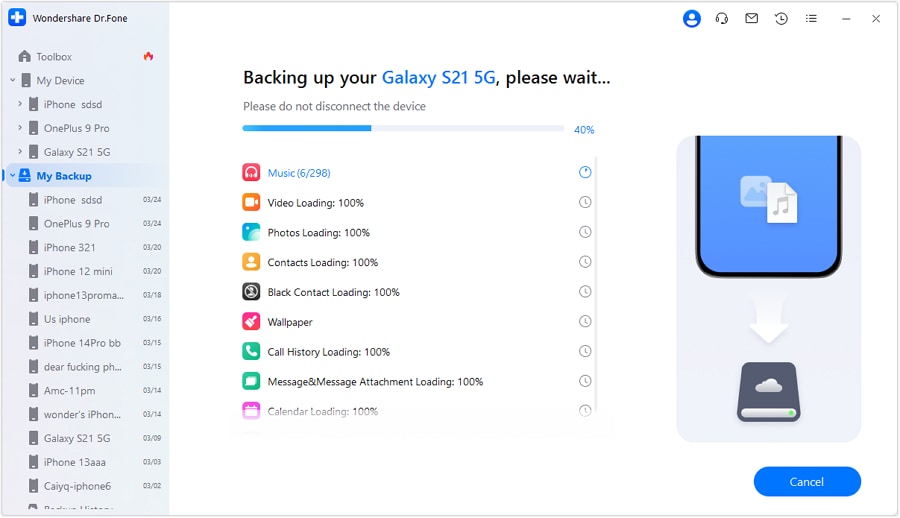
Step 7 Before the backup is complete, set the default SMS application for your Android so you can use it normally. Click ok to the prompt, and you will see a screen saying the backup is complete. You can now view the backup inside Dr.Fone or open it in the folder.

Let's learn to restore your deleted call history backup with Dr.Fone.
Part 3. Important Consideration - Keep Your Backups Up-to-date
Don't just back up once and forget about it. You must back up call logs regularly to keep your backup updated. This will ensure you don't lose any important call logs and history.
Wondershare Dr.Fone also supports automatic backups. Let's learn how to back up call logs automatically with Dr.Fone.
Step 1 Open the “My Backup” tab from the left side panel. Click “Backup Preferences”. A window with some backup-related settings will open.
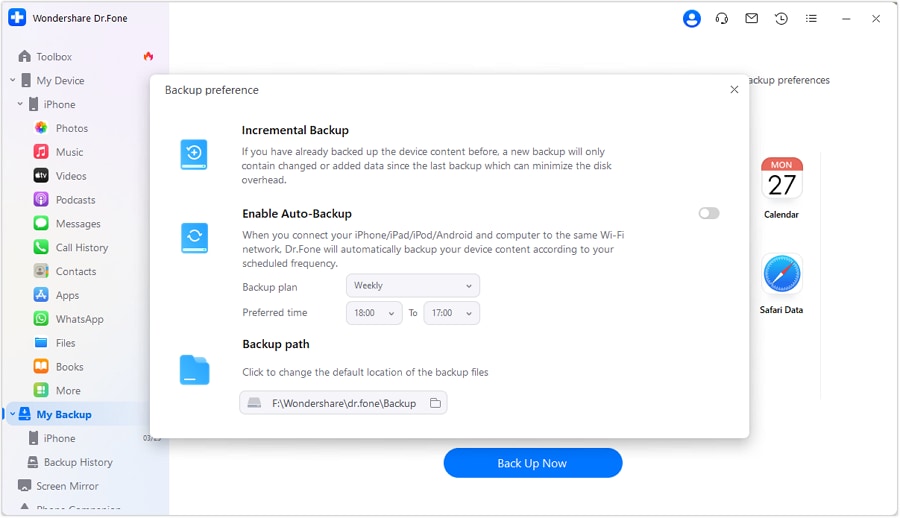
Step 2 Enable the toggle next to “Enable Auto-Backup.” When both devices connect with the same network, Dr.Fone will automatically back up according to a pre-defined plan and time.
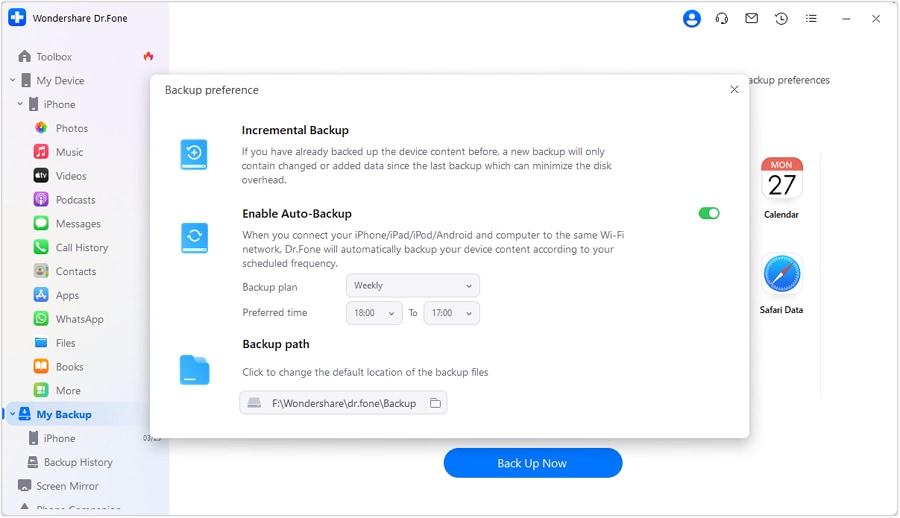
Step 3 Click “Backup History,” and you can view all backup history. View the backup file's contents, and you can restore any of them.
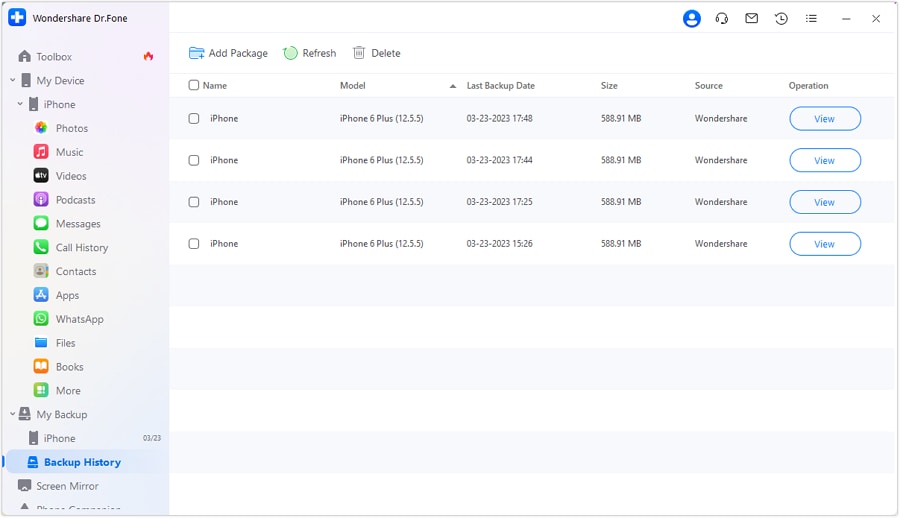
So, set up automatic backups and make sure you never lose any vital call logs.
Part 4. Backup and Restore to Multiple Devices
Dr.Fone offers cross-platform capability. This means that with Wondershare Dr.Fone, you're not tied to one platform. You can backup and restore your data to and from different devices. Dr.Fone can not only back up Android data but also back up iPhone call history, and you can restore it to your Android phone if you want to.
Please refer to the iOS backup and restore guide to back up your iPhone data. Move your data between Android and iOS devices effortlessly.
So, switch phones, restore data to a tablet, or simply back up iPhone call history – Dr.Fone makes it easy.
Conclusion
Accidental deletions are no longer a threat when you have a reliable backup plan. Whether it's an important business call or a chat with a loved one, a call record backup will ensure your data will never get lost.
With Wondershare Dr.Fone's user-friendly interface and powerful features, creating these backups is simple. Don't forget keeping regular backups can save your call logs in unexpected situations. So, try this and experience the peace of mind of knowing your data is protected.
FAQs
Dr.Fone Basic:
Better Control for Your Phone
Manage, transfer, back up, restore, and mirror your device


Daisy Raines
staff Editor