
How to Easily Backup Android to SD Card [Step-by-Step]
Android Backup
- Backp Android
- 1. Backup Android to PC
- 2. Backup Android Photos
- 3. Android Wifi Backup
- 4. Backup Phone with Broken Screen
- 5. Backup Android Rom/Firmware
- 6. Backup SD Card on Android
- 7. Backup Android SMS
- 8. Backup Android Phone With Root
- 9. Backup Android to Mac
- 10. Backup Viber Messages
- Android Restore
- 1. Guide to Restore Android Phone
- 2. Backup and Restore Android Phone
- 3. 2 Ways to Restore Contacts on Android: Step-by-Step Guide
- 4. Restore WhatsApp from iCloud
- Backup Apps
- 1. Android Backup Apps to Backup Files
- 2. 6 Apps to Backup Bookmarks
- 3. Top 10 Contacts Backup App
- 4. Backup Android App and App Data
- 5. The Best Android Backup Extractor
- 6. Top 5 Android Backup Softwares
- 7. 6 Best Android Backup Softwares
- 7. 7 Android Fastboot Reset Tools
- Samsung Backup
- 1. Back Up Samsung to Google Drive
- 2. Backup Contacts on Samsung
- 3. Backup Text Messages on Samsung
- 4. Backup and Restore Samsung Galaxy
- 5. Backup Everything on Samsung
- 6. Backup Samsung Galaxy to PC
- 7. 10 Samsung Cloud Backup Services
- 8. Solution For Samsung Message Backup
- 9. 5 Samsung Photo Backup Solutions
- 10. Backup Samsung S10 to PC
- ● Manage/transfer/recover data
- ● Unlock screen/activate/FRP lock
- ● Fix most iOS and Android issues
- Free Download Free Download Free Download

Jun 30, 2026 • Filed to: Backup & Restore Solutions • Proven solutions
 TL;DR:
You can back up an Android phone to an SD card manually via the native File Manager, through a PC USB connection for bulk file transfers, or by using Wondershare Dr.Fone to include restricted data like SMS and apps.
● Native manual transfers and USB-to-PC methods limit backups to media, documents, and exported contacts, completely preventing the direct transfer of SMS, messages, and application data.
● Wondershare Dr.Fone circumvents SMS restrictions by requiring you to temporarily set the Dr.Fone Link app as your default messaging client, though it initially saves the full backup to a Windows or Mac PC before you manually copy those files to the SD card.
● Contacts cannot be moved via the standard file directories and must be saved independently by navigating to the Android Contacts application settings and executing the specific "Export to SD card" function.
Ask AI for a summary
 ChatGPT
 Perplexity
 Gemini
 Claude
 Grok
Grok
Dr.Fone Basic:
Better Control for Your Phone
Manage, transfer, back up, restore, and mirror your device
Do you want to preserve your phone's data before resetting it? Or, perhaps the storage is cramming up, and you want to clear up some space. Whatever the reason, the solution lies in creating a backup!
You can save your phone's data to your PC or cloud storage like Google Drive, Dropbox, or Samsung Cloud. But nothing is more accessible than a local backup to an SD card.
That said, this article will explore the best solutions to back up Android to SD card. From manual methods to using USB and intelligent Android backup software, we've got all the solutions you've been looking for!
Let's start with the first method!
Part 1. How to Backup Android Data to SD Card Manually
A convenient solution to backing up your phone to an SD card is to do it manually. This implies moving or exporting your phone's data to the SD card without using an app or a USB cable. There are two solutions to achieve this.
Let's learn more about it and how to directly back up an Android phone to the SD card.
Solution 1. Back up All Android Files to the SD Card
Some Android phones store media files such as audio, photos, and videos to the SD card by default. This won't be the case if you've never inserted an SD card in your phone. But don't worry! You can transfer the files such as multimedia, documents, and APKs, manually using your device's File Manager.
Let's find out how to do it below.
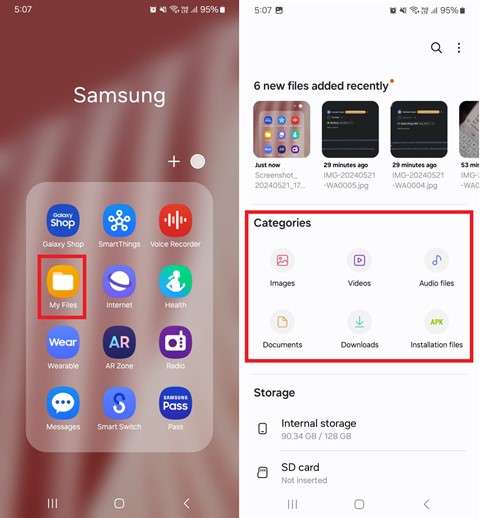
Step 1. Go to your Android phone's “File Manager” or “My Files” app. Galaxy phone users can find it in the “Samsung” folder.
Step 2. Tap on the file types you want to backup under “Categories.” You can also open “Internal storage” to find the required files.
Step 3. Press and hold to enable the selection of multiple files. Tap the “All” option to select all the files in the folder simultaneously. Or, click on the three vertical dots and tap “Edit” to select files.
Step 4. After selecting, tap “Move” or “Copy” to transfer the files. Once transferred, moving will delete the files from your phone.
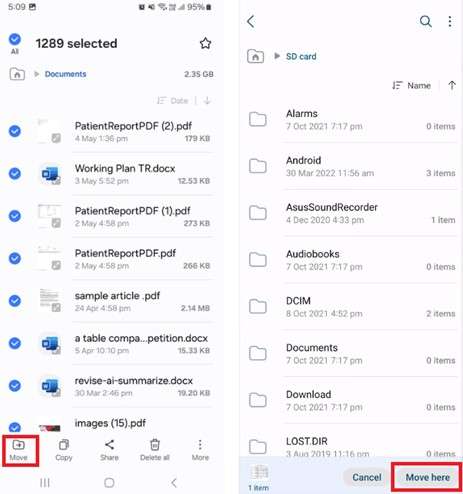
Step 5. Now go back and tap “SD card” to open it. Then, press “Move/Copy here” to back up files on the SD card.
That's all. You are one step closer to grasping how to back up your Android phone to the SD card. Let's move forward and find out how to back up your contacts.
Solution 2. Back up Contacts to SD Card
Among all types of Android data, the prospect of losing important contacts is quite dreadful. Keeping these contacts is essential. And you can do it in several ways. One way is to share them on Google Drive, One Drive, or with yourself on WhatsApp.
You can also send them to your PC using the Windows Link app. But backing them up to an SD card ensures quick accessibility while using your smartphone. You can manually save contacts to the SD card using the built-in contacts app.
The following guide will show you how!
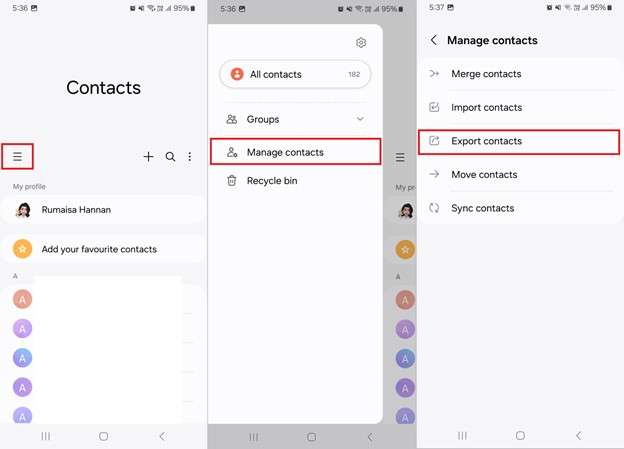
Step 1. Open “Contacts” on your Android phone and tap the three horizontal lines on the left. It will open the side panel for your contacts' settings.
Step 2. Tap the “Manage contacts” option and select “Export contacts.” You can also choose to move contacts from your phone to your SD card.
Step 3. A screen will open showing the different options for exporting your contacts. Tap the “ SD card” option to save contacts to the SD card.
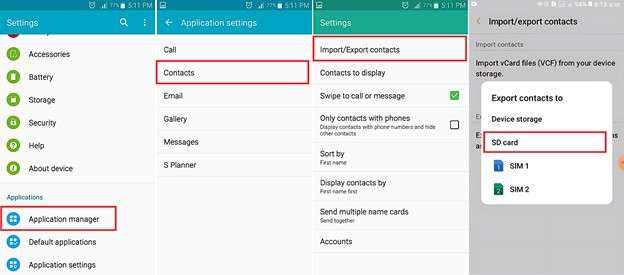
Step 4. You can use the settings app to export contacts on older Samsung phones. Go to the “Settings” app and select “Application settings.”
Step 5. Select “Contacts” and tap “Import/Export contacts.” A pop-up will appear on your screen. Tap “Export to SD card” from the options to save the contacts to your memory card.
And that's how to back up your phone to an SD card manually! Let's look at the pros and cons of this method.
Pros
- You don't need to download additional tools to back up your data.
- This method does not require you to remove your SD card.
Cons
- You cannot back up messages or SMS using this method.
- It is time-consuming and may get stuck depending on the backup size.
You can also use a USB cable to backup your phone's data to SD. Keep reading to learn more about it!
Part 2. How to Backup Android Data to the SD Card with a USB Cable
Manual Android backup requires no additional tools but can be time-consuming. A USB cable and your PC are all it would take to transfer your phone's data to an SD card in a few clicks. You'll only need to copy the data from the internal storage and paste it into your memory card.
However, there is one thing you should know. This method cannot transfer all of your phone's data, such as app data and messages. Still, it is an efficient solution to back up multimedia files quickly. Here are the steps to do it.
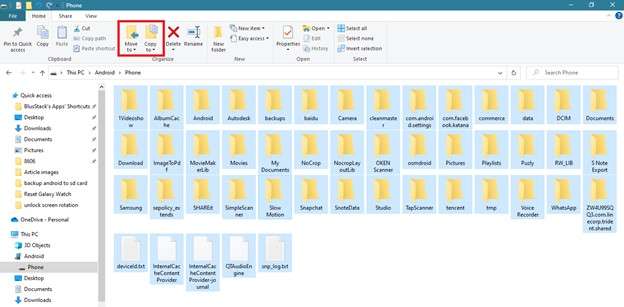
Step 1. Link your Android to your PC with a USB cable. Wait until a window on your screen shows your phone's contents. Alternatively, go to “This PC” and click on your phone's name to open it.
Step 2. You can see two different storage options on your screen named "Card” and “Phone.” Double-click the “Phone” option to open the internal storage. You can also right-click and select “Open” to do it.

Step 3. Press “CTRL+A” to select several folders to back up. You can also choose multiple folders individually by holding the “CTRL” key and selecting your desired folders.
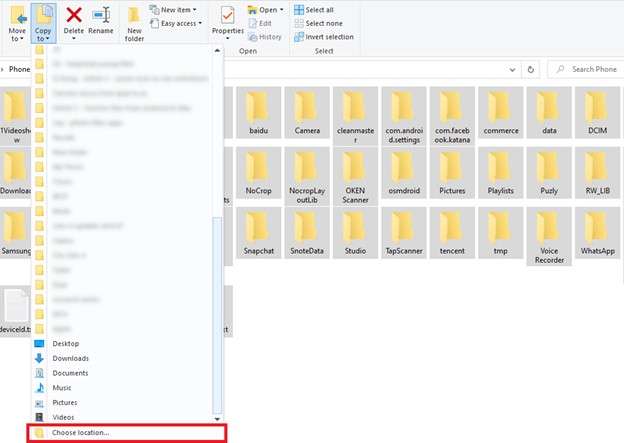
Step 4. Go to the “Home” section in the top panel and click the “Move to” or “Copy to” option. It will open up a list of locations to transfer your data.
Step 5. Select the “Card” option from the list. If you cannot find it, click “Choose location” to select it manually. Then, click “Copy/Move” to back up Android to the SD card.
You can also use the keys “CTRL+C” for copying and “CTRL+V” for pasting the contents to your SD card. Using “CTRL+X” lets you move the files.
And that's how you can transfer your phone's contents to the SD card with a USB cable. Here are the lowdowns of this method.
Pros
- You can back up data easily with a quick copy and paste.
- It gives you more control over the type of data to back up.
Cons
- It requires a USB cable to back phone data to the SD card.
- You cannot transfer app data, SMS, or messages with this method.
Let's explore our next solution to backup all Android data to the memory card.
Part 3. Quickly Backup All Android Data to the SD Card with Dr. Fone Basic [Best!]
Are you looking for the easiest solution to back up all of your Android data? Wondershare Dr.Fone is your answer! This powerful desktop solution lets you transfer your phone's data in a single click. You can effortlessly back up your contacts, SMS, text messages, apps, photos, videos, and more!
The cool thing about Dr.Fone is that you can restore your data directly to your phone, whether iOS or Android. Despite its advanced solutions, it requires no technical expertise. With its extensive support for all Android devices, you don't have to worry about compatibility issues!
Dr.Fone - Phone Backup (Android)
Backup All Android Data to the SD Card
- Selectively backup Android data to the computer with one click.
- Preview and restore the backup to any Android device.
- Supports 8000+ Android devices.
- There is no data lost during backup, export, or restoration.


Let's find out how to use it to back up Android to the SD card.
Steps to Backup Phone to SD Card with Dr.Fone Basic
Download and install Dr.Fone Basic (Phone Backup) on your PC. Then, use the following steps to back up your phone with it.
Step 1. Open Dr.Fone on your PC. Click “My Backup” from the left panel and wait for your phone to get detected. Then, click “Back Up Now”.

Step 2. Download the Dr.Fone Link app on your phone and set it as the default SMS app. Then, click “OK” from the new pop-up window.

Step 3. Dr.Fone will start backing up all of your phone's data immediately. You can check the types of data on your screen.

Step 4. Wait for the backup to complete. Then, set your phone's default SMS app to send and receive messages and click “OK.”

Step 5. Now all of your phone's data is backed up successfully! You can verify it with the backup completed message displayed on your screen.

Now, connect your phone's SD card to your PC and copy/paste the backup files to it. That's all! You're all done backing up your phone to an SD card with Dr.Fone! It is an efficient solution to preserve all data types without much effort!
Still have questions about backing up data to the SD card? Go through our FAQs section to find your answers.
Conclusion
If you've ever wondered how to back up your Android phone to an SD card, there are several ways. You can do it directly, using a USB cable or a dedicated phone backup tool like Wondershare Dr.Fone.
While all offer excellent solutions, Dr.Fone stands out with its advanced solutions. It is designed to back up and restore phone data effortlessly. You don't need to follow lengthy steps to use it. It is fast and reliable, helping you manage your phone's data effortlessly!
FAQs
Dr.Fone Basic:
Better Control for Your Phone
Manage, transfer, back up, restore, and mirror your device


Daisy Raines
staff Editor