3 Easy Ways To Transfer Your iCloud Photos to an Android Device
iCloud Transfer
- Transfer to iCloud
- 1. Sync Data from iTunes to iCloud
- 2. Transfer Google Drive to iCloud
- 3. Transfer iPhone Music to iCloud
- 4. Move iPhone Photos to iCloud
- 5. Upload Camera Roll to iCloud
- 6. Upload Photos to iCloud
- Transfer from iCloud
- 1. Transfer iCloud Data to Android
- 2. Transfer iCloud Data to Samsung
- 3. Transfer iCloud Contacts to Android
- 4. Transfer iCloud Photos to Android
- 5. Transfer iCloud Photos to iPhone
- 7. Export iCloud Contacts to Outlook
- 8. Restore WhatsApp Backup from iCloud to Android
- 9. Transfer WhatsApp Backup from iCloud to Google Drive
- iCloud Tips
- ● Manage/transfer/recover data
- ● Unlock screen/activate/FRP lock
- ● Fix most iOS and Android issues
- Free Download Free Download Free Download

May 18, 2026 • Filed to: Device Data Management • Proven solutions
 TL;DR:
You can transfer iCloud photos to an Android device by utilizing Wondershare Dr.Fone for selective computer-based backups, initiating a direct server transfer to Google Photos, or manually downloading files via iCloud on a computer or desktop-mode mobile browser.
● The Google Photos transfer method requires two-factor authentication on your Apple ID and sufficient Google storage, taking 3-7 days to complete while strictly excluding shared albums, live photos, and photo stream contents.
● Manually downloading files from the iCloud website requires enabling the Request Desktop Site option to navigate the interface on Android browsers, while Mac users must install the third-party Android File Transfer app to move the downloaded images to the phone.
● Wondershare Dr.Fone - Phone Backup offers selective photo restoration across 8,000+ Android models without data loss, but this method strictly requires a computer to facilitate the transfer and a paid license for full functionality.
Ask AI for a summary
 ChatGPT
 Perplexity
 Gemini
 Claude
 Grok
Grok
Dr.Fone Basic:
Better Control for Your Phone
Manage, transfer, back up, restore, and mirror your device
If you switch from an iPhone to an Android phone, you'll need to figure out how to get your iCloud images onto your new phone. The photographs stored on our phones are important memories that must be protected throughout the upgrade.
This article will examine three simple methods to transfer photos from iCloud to Android, including Google Photos, an excellent third-party app - Dr.Fone, etc. Put your worries about sharing iCloud photos to Android devices behind you. Prepare to learn how simple it is to access your iCloud images from your Android device.
Method 1: One-Click iCloud Photos to Android Transfer Tool: Wondershare Dr.Fone
Third-party apps have become popular for transferring iCloud photos to Android devices, offering a convenient and efficient way to migrate cherished memories seamlessly. Dr.Fone - Phone Backup feature is a reliable and feature-packed option among these apps.
Dr.Fone is a versatile tool that simplifies transferring pictures from iCloud to Android devices. The user-friendly interface and comprehensive features have gained popularity among users seeking a hassle-free solution for sharing iCloud photos to their new Android phones.

Key Features
- One-Click Transfer - Users can transfer iCloud photos to Android devices with a single click.
- Wide Compatibility - The software is compatible with various iOS and Android devices, making it suitable for users to switch between different phone brands and models.
- Selective Transfer - Users can choose specific iCloud photos they want to transfer.
Pros
- Backup of 10+ data kinds supported, including photographs, music, and contacts.
- Backups can be previewed and restored to any Android or iOS device.
- Allows backup restoration from iCloud/iTunes to Android devices.
- Over 8,000 Android smartphones are supported.
- Its intuitive and user-friendly interface makes it accessible to users of all technical backgrounds.
- No loss of data during the backup, restoration, or export process.
Cons
- Requires a computer for the transfer process, which may not be ideal for users seeking a purely mobile solution.
- While Dr.Fone - Phone Backup offers a free trial, the full version is paid software. However, the price is often reasonable by its extensive features and convenience.
Step-by-Step Guide: Restore iOS Backup to Android
If you use Dr.Fone to create a backup for your iPhone, you can then use that backup to restore data to an iOS or Android device. The platform offers a complete restoration model, which is described in detail below:
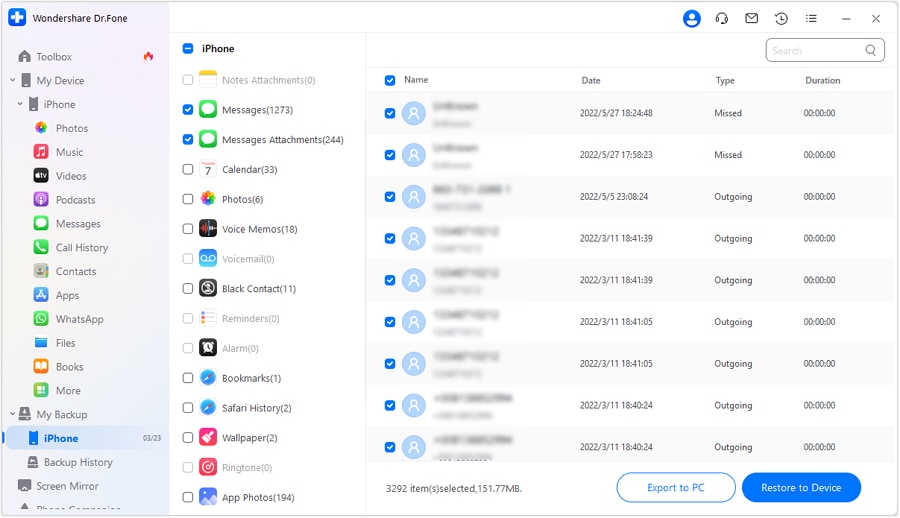
- Step 1: Dr.Fone will list all kinds of files once the backup is complete. Alternatively, you can access the Backup History tab from the left sidebar. Choose a backup from the list there, then tap View to begin restoring from your iOS backup.

- Step 2: When you select a specific file category, like Call History, you can see all the information stored in that folder and flag the items you want to restore. Once finished, click the Restore to Device button.
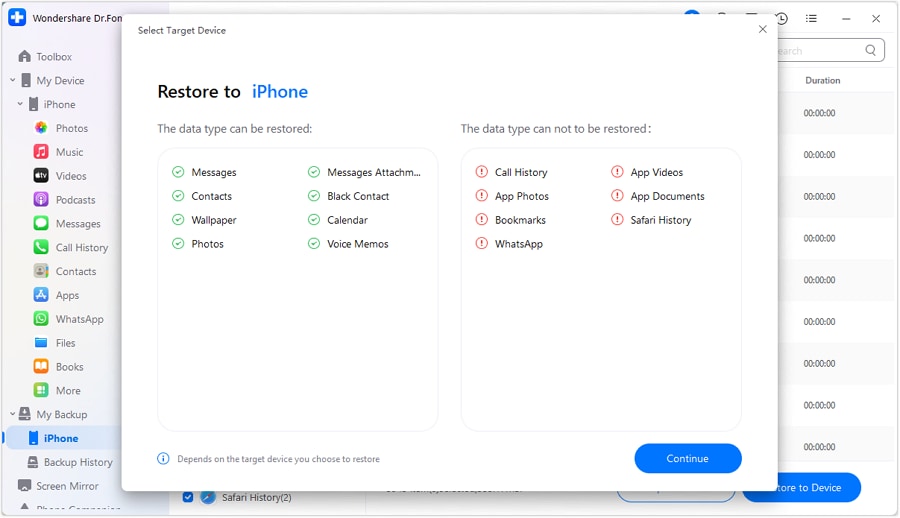
- Step 3: The list of supported and unsupported file formats for device restoration will appear in a new window. You can proceed with the repair by viewing their information and tapping Continue.
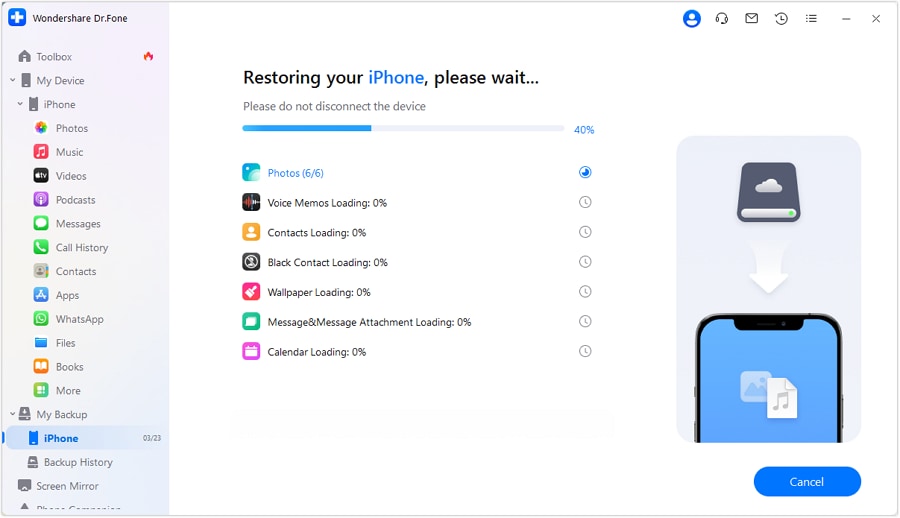
- Step 4: A restoration progress bar appears to indicate the process has begun. You can use the Cancel button at the bottom of the screen to abort the backup restore.
- Step 5: The restoration is complete and will be confirmed in the next window. It will display the complete information about the restored data. To finish, select the Done button.
Method 2: Using iCloud on Windows, Mac, and Android Browser
In addition to Dr.Fone, there are a few other options to transfer photos from iCloud to Android phones. This section will discuss transferring pictures from iCloud to Android devices using iCloud on three different platforms: Windows, Mac, and Android browser.
iCloud For Windows
To download images to your PC, use the iCloud for Windows software or the iCloud website. You can later transfer your iCloud photos to an Android device. Needless to say, it is a time-consuming and laborious solution. Aside from your time, it will consume network bandwidth and system space. There could also be copied images, which could jeopardize your privacy.
However, if you want to transfer photos from iCloud to Android phones using a Windows PC, follow the steps given below:
- Step 1: Download iCloud for Windows and run the installation. Open the application when you want to move iCloud photos to Android phones.
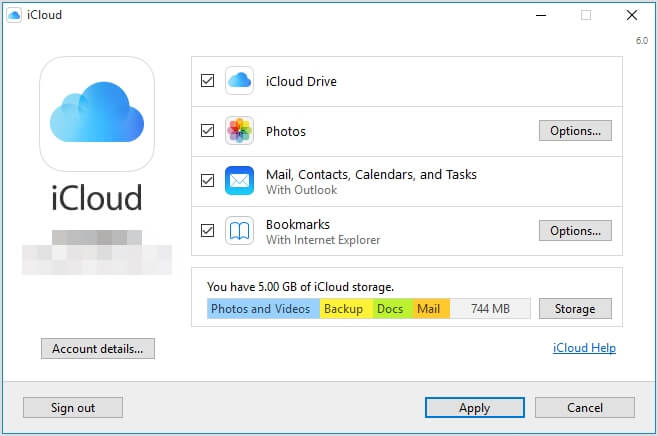
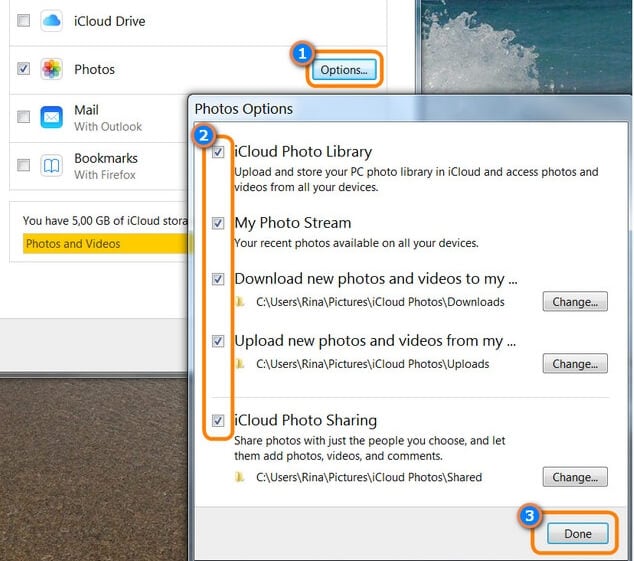
- Step 2: Check Photos and then navigate to its Options…. You must then activate the iCloud Photo Sharing and iCloud Photo Library features. Check that you have applied all of the changes before closing the application.
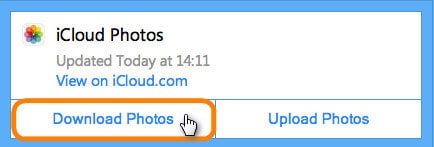
- Step 3: Right-click the iCloud icon in the system tray.
![]()
- Step 4: Click the Download Photos button under the iCloud Photos category.
- Step 5: Allow some time for all photographs to be downloaded. Following that, navigate to your Windows directory > Users > [Username] > Pictures > iCloud Photos. You can find all the downloaded photos from iCloud on your PC in the Downloads folder.
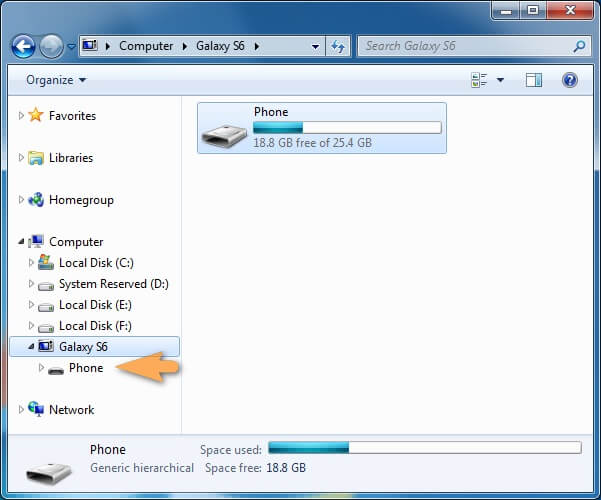
- Step 6: You may now connect your Android handset to the PC. When your device is discovered, a prompt will appear on its screen. Select it as a media device (MTP). Then after connecting your phone, you can manually transfer iCloud images to Android phonesusing Windows Explorer.
iCloud For Mac
Similarly to Windows, you may use your Mac to transfer photos from iCloud to your Android phone. However, you cannot connect your Android phone to a Mac in a typical manner. As a result, you must employ a third-party service such as Android File Transfer. It makes the entire process exceedingly time-consuming. It not only takes extra time, but it can also be confusing.
Nonetheless, you may use Mac to transfer pictures from iCloud to Android phones by following the steps below:
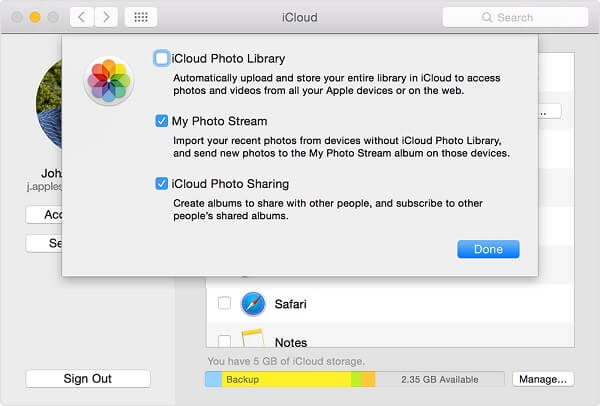
- Step 1: Launch the iCloud software on your Mac and enable the iCloud Photo Library option.
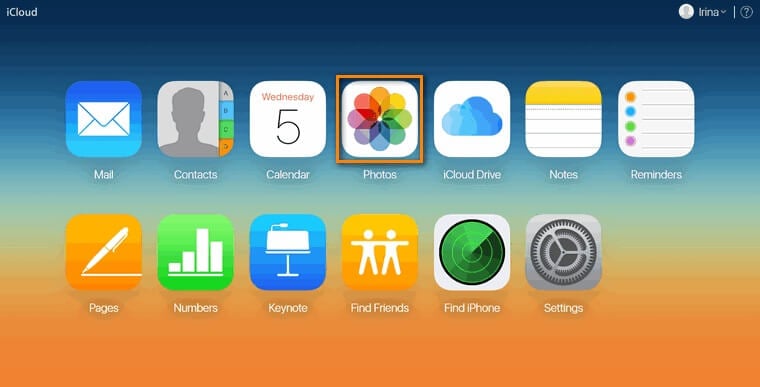
Note: You can also access your photographs by visiting the official iCloud website. Log in to your account and select Photos from the welcome page.
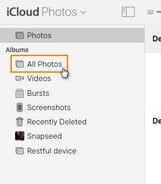
- Step 2: You may access all of your iCloud albums from here. Select All Photos from the left side to see all the photos.
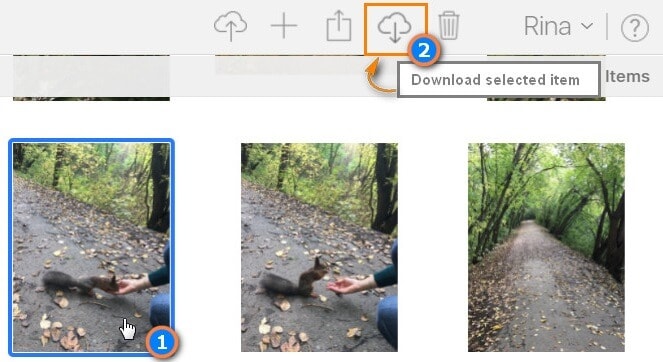
- Step 3: Choose the pictures (or albums) you want to save and click the "download"icon. This will store the photographs you've chosen on your Mac.
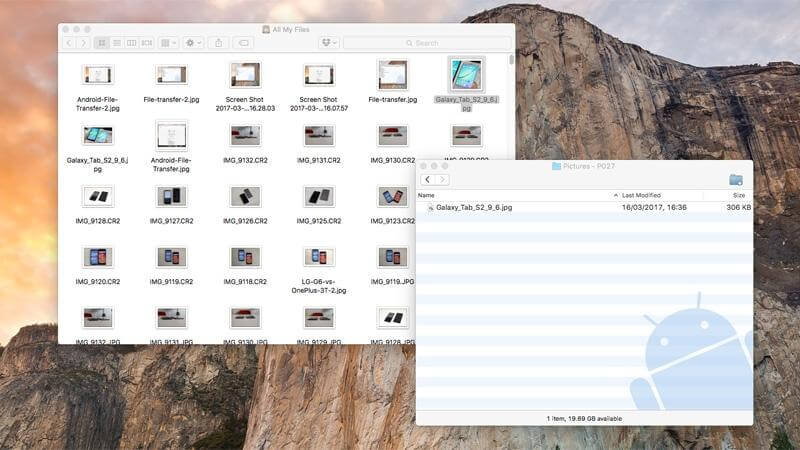
- Step 4: To access your Android device on your Mac, you must first install Android File Transfer.
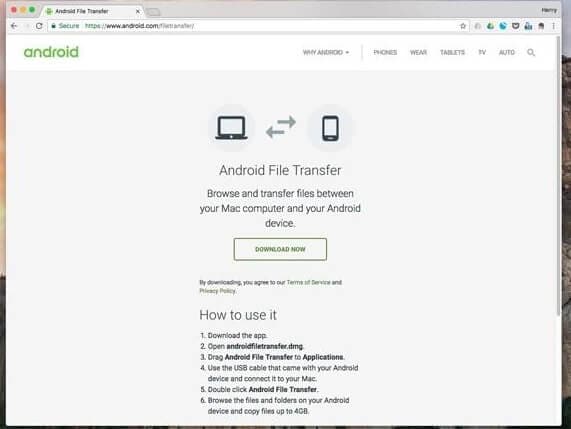
- Step 5: Connect your Android to your Mac to transfer media. You can also use your Mac to launch Android File Transfer. It will detect the connected device automatically.

- Step 6: Navigate to the location where your downloaded images are saved and drag and drop them into the file system of your Android device.
iCloud on Android Browser
Many people dislike using a computer (Windows or Mac) to transfer photos from iCloud to Android phones. After all, transferring iCloud photos to Android devices via computer (without a dedicated tool like Dr.Fone) can be time-consuming and difficult. On your Android device, you may always go to the iCloud website and download the photos you want.
However, loading and previewing photographs on a small screen may take a long time. It will also consume a significant amount of your mobile data. Your Android phone may not have enough free space, and adding too many images may cause it to slow down even more. Nonetheless, downloading iCloud photos to Android directly is a more practical and helpful method, and here's how you can do it:
- Step 1: Open a web browser on your Android device and navigate to the iCloud website.
- Step 2: Navigate to your browser's settings/options and select the Request Desktop Site option. It's because the browser's default display of the mobile version of the website makes it difficult to explore your iCloud images.
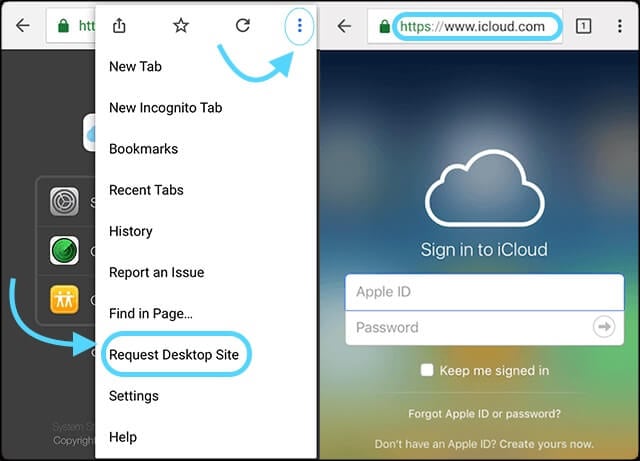
- Step 3: Input your iCloud credentials and log in to your account after loading the site's desktop version.
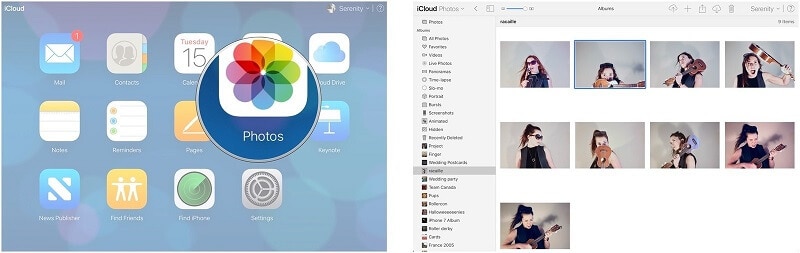
- Step 4: Go to the Photos option on the home screen to view your saved pictures. Choose the images (or albums) to transfer and click the "download" icon.
- Step 5: Accept the download request and wait for the selected photos to be saved on your Android device.
Method 3: Using Google Photos
If you wish to transfer photos from iCloud to your Android phone, obtain a copy of your iCloud photos from Apple services and transfer them to Google Photos.
Before you begin, ensure that you have the following criteria;
- You must be storing photographs and videos on your iPhone using iCloud.
- Two-factor authentication should be enabled on your Apple ID.
- To use Google Photos, you must have a Google account.
- You should have enough storage space in your Google account to complete the photo transfer operation.
Now to transfer iCloud photos to an Android phone, follow the steps provided below:
- Step 1: Navigate to Apple's Data and Privacy login page. Sign in to your iCloud account with the right login information, then scroll to the third option, Transfer a copy of your data, and click on Request to transfer a copy of your data from the new interface.

- Step 2: From the drop-down option, choose Google Photos as the photograph's destination, then check the box Photos, Videos, or both and click Continue.

- Step 3: Confirm the required storage space, then sign in to the Google account to which you wish to transfer the iCloud photos or videos.

- Step 4: Click the Allow button to Grant Apple Data and Privacy permission to add photos and videos to your Google Photos.

- Step 5: Finally, validate the details and press the Confirm Transfer button. This Apple transfer method typically takes 3-7 days to complete. When Apple completes the transfer, you will receive an email confirmation.

Notes: Photos/videos saved in the shared album, live photos, photo stream contents, and photos/videos not saved on iCloud will not be transferred to Google Photos.
Conclusion
Whether you use third-party apps, iCloud, or Google Photos, options are available to suit your preferences. And among the various methods discussed above, Dr.Fone - Phone Backup emerged as a standout solution for transferring iCloud photos to Android devices. Its one-click transfer feature, wide compatibility, and data selectivity make it reliable and user-friendly.
With Dr.Fone – Phone Backup, you can effortlessly transfer your iCloud photos to Android devices without compromising convenience or losing precious memories. Make the switch today and embark on a seamless transfer of images from iCloud to Android phones.
Dr.Fone Basic:
Better Control for Your Phone
Manage, transfer, back up, restore, and mirror your device


Alice MJ
staff Editor