How to Download Photos from iCloud to iPhone [2026]Full Guide

Dec 31, 2025 • Filed to: Device Data Management • Proven solutions
Dr.Fone Basic:
Better Control for Your Phone
Manage, transfer, back up, restore, and mirror your device
Have you recently upgraded to a new iPhone? Do you want to transfer your photos from iCloud to your new device? If yes, then you are in for a treat!
Every year, Apple launches its new series of iPhones, tabs, and Macs, tempting users to upgrade. However, most of the users are concerned about their data, especially photos. They don’t know how to transfer their pictures from iCloud to their new device.
But don't worry! In this article, we are going to find out how to download photos from iCloud to iPhone. We will explore various methods with their step-by-step guide.
Let's get started!
- Methods to Download Photos from iCloud to iPhone
- Method 1. How to Transfer Photos from iCloud to iPhone Via iCloud Photos
- Method 2. How to Get Pictures from iCloud to iPhone Via iCloud Backup
- Method 3. How to Download Photos from iCloud to iPhone Using iCloud.com
- Method 4. How to Get the Photos from iCloud to iPhone With Shared Albums

- Bonus Tip: How to Download Photos from iCloud to iPhone Using Dr.Fone
Methods to Download Photos from iCloud to iPhone
This section is going to provide you with some methods to download photos from iCloud to iPhone. You can follow the instructions given with each method and get it done.
Method 1. How to Transfer Photos from iCloud to iPhone Via iCloud Photos
iCloud is one of the convenient ways to transfer photos from iCloud to iPhone. All you need to do is just activate iCloud on your iPhone and then download the full-sized copies of the photos. However, this method can take longer because you cannot select specific pictures. You have to download all your photos, which sometimes is not required.
If you don’t know how to do it, you can follow the steps given below:
Step 1: Open the "Settings" app on your iPhone.
Step 2: Click "[Your name]" > "iCloud" > "Photos"
. .
Step 3: Turn on the "Sync this iPhone" toggle and select "Download and Keep Originals".

By doing so, all your photos will be automatically downloaded to your iPhone. However, make sure that you use the same Apple ID on your new iPhone. Also, you have enough storage space. Otherwise, you can try another method.
Method 2. How to Get Pictures from iCloud to iPhone Via iCloud Backup
There is another easy way to get pics from iCloud to iPhone. However, you must have a backup of your pictures in your iCloud. This method involves a hard reset, which means you will lose all your data. But if your phone is brand new, you won't have much to lose. You can follow the instructions given below:
Step 1: Open the "Settings" app on your iPhone.
Step 2: Go to "General" > "Transfer or Reset iPhone"

Step 3: Now click "Erase All Content and Settings" and confirm the process.

Step 4: After confirming the process, all your iPhone data will be erased. Now you are supposed to set up your phone as new.
Step 5: Select ""Restore from iCloud Backup" " on the Apps & Data screen. The pictures that are available on your iCloud will be restored to your new iPhone.
Since this method involves a hard reset, most users don’t want to try this. If you are also not ok with it, you can try the next method.
Method 3. How to Download Photos from iCloud to iPhone Using iCloud.com
With this method, you can download photos from iCloud to your iPhone as well as on your Mac. In this method, you are supposed to visit the official website of iCloud. You can select any specific photos and download them on any of your iOS devices. If you don't know how to access the iCloud portal, you can follow the steps given below:
Step 1: Open the browser on your iPhone. Visit iCloud.com and sign in with your Apple ID.

Step 2: Click on the "Photos" app to open all your photos and videos.

Step 3: Now, select the photos you want to download, click the three dots and select “Download.”

So this is how do you download photos from iCloud to iPhone using iCloud.com." If, for any reason, you cannot follow this method, you can try the next one.
Method 4. How to Get the Photos from iCloud to iPhone With Shared Albums
Shar.d Albums is also a convenient way to access photos from iCloud on your iPhone. It is a feature in iOS devices that allows you to share photos/videos with your family or friends. Moreover, it also allows you to download any picture from the Shared Albums to your iPhone. Here's how to get pictures from iCloud to iPhone using Shared Albums:
Step 1: Open the "Photos" app on your iPhone.
Step 2: In "Albums", find and open the "Shared Album" folder.
Step 3: Now, select the photos that you want to download. Click the "Share" icon and click "Save Image/video".
It will save your picture to your iPhone. However, some users don't use the Share Album feature of the iPhone. In that case, there is another method. It will help you to download photos from iCloud to your iPhone.
Bonus Tip: How to Download Photos from iCloud to iPhone Using Dr.Fone
If you're looking to download photos from iCloud to iPhone, Wondershare Dr.Fone gets all the crowns! It stands out as the most reliable and efficient way to get pictures from iCloud.
Apart from that, Dr.Fone offers many other useful features. You can also manage your iOS device, restore data, remove locks, and more. It serves as a comprehensive toolkit for your smartphone needs.
Dr.Fone - Phone Manager (iOS)
Download Photos from iCloud to iPhone
- Transfer, manage, export/import your music, photos, videos, contacts, SMS, Apps, etc.
- Back up your music, photos, videos, contacts, SMS, Apps, etc., to the computer and restore them easily.
- Transfer music, photos, videos, contacts, messages, etc., from one smartphone to another.
- Transfer media files between iOS devices and iTunes.
- Fully compatible with the newest iOS system.


But here's the best part: this powerful tool offers a user-friendly interface. Whether you're tech-savvy or not, it caters to users of all skill levels and expertise.
Steps to Download Photos from iCloud Using Dr.Fone
First, make sure to download and install the Dr.Fone app on your Laptop. Then, follow the instructions given below:
Step 1: Launch the Dr.Fone app and connect your iOS device via a USB cable or wireless connection. After the device is connected, click the “iCloud Manager” button on the home screen.
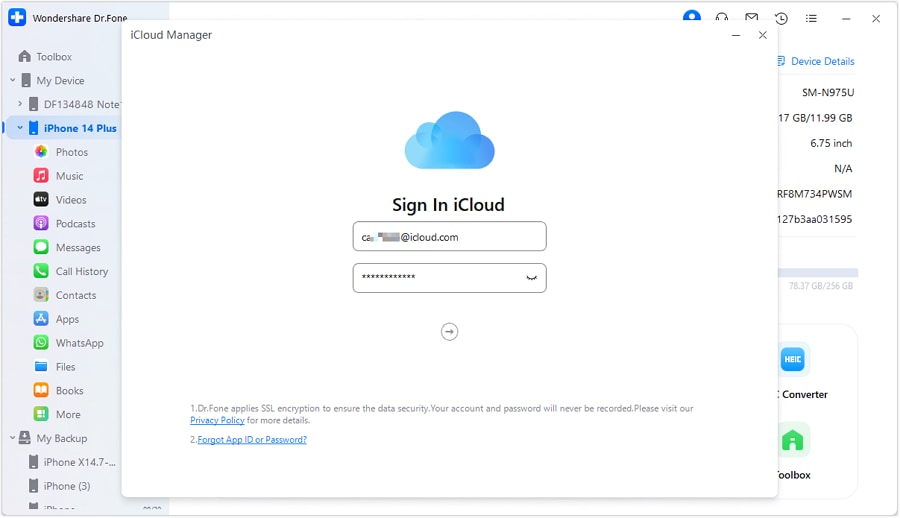
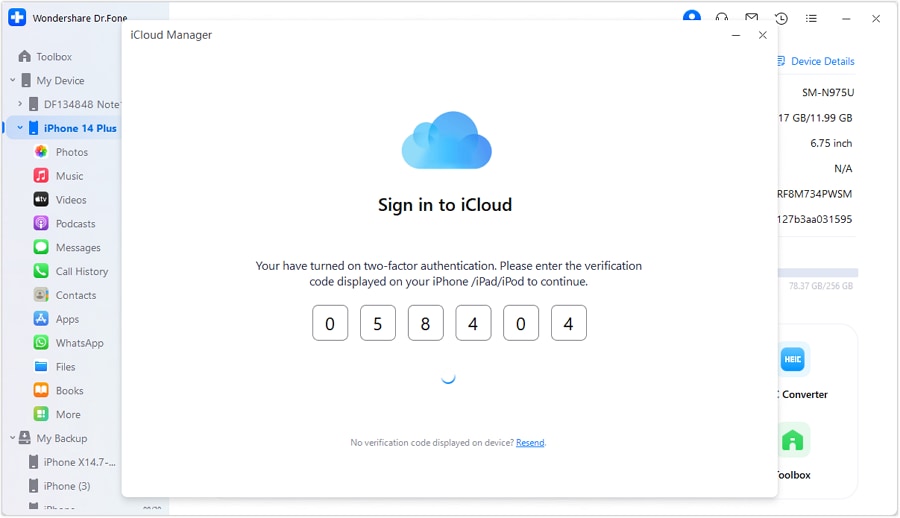
Step 2: Now. enter your Apple ID credentials and sign in. If two-factor authentication is enabled for your iCloud account, you will receive a verification code. Enter this verification code and wait for Dr.Fone to verify it.
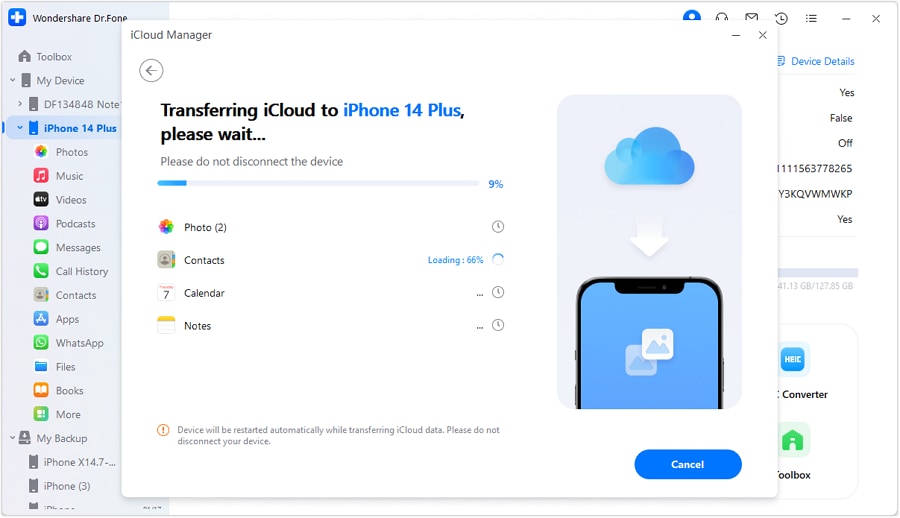
Step 3: In the next window, select the Photos app icon. You can also download Videos, Contacts, Calendars, etc. After selecting, click the "Start" button to initiate the process.

Step 4: You can see the progress bar shown on the screen. Wait until the data is transferred to your iPhone. If you want to cancel the process, click the "Cancel" button.
Step 5: Once the transferring process is completed, you will see the interface given below. Click "Done" and enjoy your photos on your iPhone.

So, this is how to download photos from iCloud to iPhone. There is no need to go through manual and daunting steps. Dr.Fone is here to make you do it in just a few clicks.
However, remember this method only works if you have a backup of your data in iCloud. If not, you need to back up your data to your iCloud first.
FAQs
Conclusion
So, here is a wrap to "How to download photos from iCloud to iPhone." We have explored various methods, including the Photos app, iCloud.com, iCloud Backup, and Shared Albums. Each method has its own instructions.
However, if you want to go for a hassle-free way, then there is no better option than Dr.Fone. It will help you get all your iPhone data in your new phone in just a few clicks. Not only that, you can also use this tool to manage your digital world of iPhone. So, what are you waiting for? Download it now!
Dr.Fone Basic:
Better Control for Your Phone
Manage, transfer, back up, restore, and mirror your device


iPhone Photos
- Convert HEIC to JPG
- 1. Convert HEIC to JPG on Linux
- 2. Convert HEIC to JPG Windows
- 3. Best HEIC Converter Online
- 4. Convert HEIC to JPG High Quality
- Export iPhone Photos
- 1. Upload iPhone Photos to Google Drive
- 2. Transfer Photo from iPhone to PC
- 3. Transfer Photo from iPhone to iPhone
- 4. Transfer from iPhone to iPhone
- 5. Transfer from iPhone to iPad
- 6. Move iPhone Photo to External Drive
- 7. Transfer from iPhone to Flash Drive
- 8. Extract Photos from iPhone
- 9. Download Photo from iPhone
- Import Photos to iPhone
- 1. Transfer from Laptop to iPhone
- 2. Transfer Photo from Camera to iPhone
- 3. Transfer Photo from Mac to iPhone
- 4. Transfer Photos from PC to iPhone
- 5. Transfer from iPhone to PC
- 6. Transfer from Android to iPhone
- 7. Transfer from Samsung to iPhone
- Manage iPhone Photos
- 1. Back up iPhone Photos
- 2. Get Photos off iPhone
- 3. Send Large Size Photos from iPhone
- 4. Photo/Video Compressor Apps
- 5. Delete Photos from iPhone/iPad
- 6. iPhone Photos Disappeared Suddenly
- 7. iPhone Photoshop Alternatives
- Recover iPhone Photos
- 1. Restore Deleted Photos from iPhone
- 2. Recover Photos from iPod Touch
- 3. Recover Deleted Picture from iPhone
- Transfer iPhone Photos to Mac
- Transfer iPhone Photos to PC
- 1. Transfer Data from iPhone to PC
- 2. Transfer Photo to Computer
- 3. Transfer Photo to PC without iTunes
- 4. Transfer Library to Computer
- 5. Send Photo from iPhone to Computer
- 6. Import Photo from iPhone to Windows
- 7. Transfer Photo to Windows
- Transfer Photos from Google Drive
- 1. Download from Google Drive to iPhone
- 2. Transfer from Google Photo to iPhone
- 3. Download from iCloud to iPhone
- Transfer Photos to Google Drive
- Image Convert Tips
- ● Manage/transfer/recover data
- ● Unlock screen/activate/FRP lock
- ● Fix most iOS and Android issues
- Learn More Learn More


Alice MJ
staff Editor