Learn How To Move and Upload Photos From iPhone to iCloud With Simple Steps
Oct 24, 2025 • Filed to: Device Data Management • Proven solutions
Dr.Fone Basic:
Better Control for Your Phone
Manage, transfer, back up, restore, and mirror your device
With a generous 5GB of free storage, iCloud serves as a seamless cloud storage solution with integration across various devices. Users can store and upload photos, videos, documents, and music on iCloud servers. These data can then be accessed and synchronized across multiple devices Image nameed to the user's iCloud account.
If you're interested in using iCloud, you may start to wonder, "How do I move photos from iPhone to iCloud?" Where do I start? To help you with this task, the next sections will break down the steps, making it easy for you to transfer your photos from your iPhone to iCloud.

Part 1. How To Move Picture From iPhone to iCloud
To answer the question of how to upload photos from iPhone to the cloud, you have the convenience of choosing between automatic and manual options. Let's explore these two methods in detail to ensure a smooth and efficient upload of your photos to iCloud.
Method 1: Upload Photos to iCloud Using Automatic Sync
Taking advantage of the automatic sync feature in iCloud streamlines the process of moving your photos to iCloud with minimal effort. By enabling this function, your iPhone will seamlessly upload any captured photos to iCloud without the need for manual intervention.
So, how do I upload photos from iPhone to iCloud automatically? Follow the steps below.
Step 1: Open your iPhone settings.
Step 2: Tap your account to access the Apple ID settings.
Step 3: Select "iCloud" > "Photos."
Step 4: Toggle the "Sync this iPhone" switch to enable iCloud auto-backup of your photos. By turning on iCloud Photos, your device will continuously and automatically upload your entire photo library, including newly captured images, to iCloud.

Note: If you are wondering how to upload photos to iCloud and delete them from iPhone, the iCloud settings usually prompt you with the option to "Remove from iPhone" when you are toggling the sync feature. If you wish to delete the photos from your iPhone, simply tap this option.
Method 2: Manually Upload Pictures on iCloud
If you prefer a more hands-on approach to managing your photos, you can also manually choose and move only the photos you want. This way, you have the flexibility to curate and upload only the photos that hold significance to you while also being mindful of the storage limit on iCloud.
How do I upload photos to iCloud from iPhone manually?
Step 1: Go to the icloud.com website on your browser and log in to your iCloud account.
Step 2: Navigate to the "Photos" section, click on "Upload" and select "Photo Library."
Step 3: From your Photo Library, choose the photo you want to transfer and click "Add." Wait until the uploading process is complete, and you are done.

Part 2. Problems and Solutions When Uploading Pictures to iCloud
While the process of transferring photos from iPhone to iCloud is generally straightforward, users may encounter occasional challenges. Understanding and addressing these issues is important for a smooth and frustration-free experience.
Let's explore some common problems that may arise during the photo upload process and their corresponding solutions.
1. Slow or unstable internet connection
An unstable internet connection can interfere the timely upload of your photos to iCloud. Make sure you are connected to a stable Wi-Fi network before initiating the transfer. If issues persist, consider troubleshooting your Wi-Fi connection or connecting to a different network to facilitate a faster and more stable upload.
2. iCloud syncing delays
Sometimes, iCloud syncing may experience delays, causing newly captured photos not to appear promptly in your iCloud account. To address this, manually refresh your iCloud sync by navigating to Settings, tapping your Apple ID, selecting iCloud, and toggling off and on the Photos option.
3. Photo upload failures
In some instances, your photos may fail to upload to iCloud. This can be attributed to various factors, such as file corruption or format incompatibility. Verify that the photos are in a supported format and free from corruption. If the issue persists, try to upload the photos individually or in smaller batches to identify and address the problematic files.
4. Insufficient iCloud storage
A common hurdle users face is running out of iCloud storage space. The initial 5GB may prove insufficient for extensive photo collections. To overcome this issue, consider upgrading your iCloud storage plan to accommodate more photos.
5. Missing photo files
If you delete photos or videos from your iPhone, they'll also be removed from iCloud due to the iCloud syncs. So, if you upload photos to iCloud to free up space on your iPhone, it won't really work as a solution. You can consider using an alternative backup tool.
Part 3. iCloud Alternative: Move Photos from iPhone to Computer with Wondershare Dr.Fone
When looking for an iCloud alternative, tools like Wondershare Dr.Fone can provide you with a reliable and secure way to move your iPhone photos to your computer. Dr.Fone’s Phone Manager tool can help you easily back up photos to your computer, ensuring they remain intact even if you decide to delete them from your iPhone.
Some key features of Dr.Fone-Phone Manager include: intuitive user interface with easy navigation and quick data transfer capabilities. Besides, it supports both iOS and Android devices with regular updates.

Dr.Fone - Phone Manager (iOS)
Move Photos from iPhone to Computer without iTunes
- Transfer, manage, export/import your music, photos, videos, contacts, SMS, Apps, etc.
- Back up your music, photos, videos, contacts, SMS, Apps, etc., to the computer and restore them easily.
- Transfer music, photos, videos, contacts, messages, etc., from one smartphone to another.
- Transfer media files between iOS devices and iTunes.
- Fully compatible with the newest iOS system.
Here is how to move iPhone photos to a computer with Dr.Fone’s Phone Manager tool:
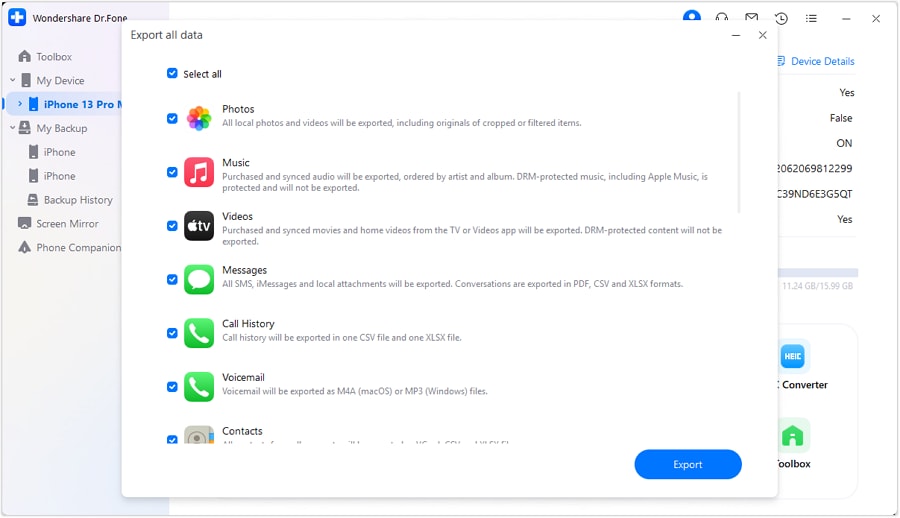
Step 1: Launch Dr.Fone on the computer and connect your devices.
Start with connecting your iPhone and launching the Dr.Fone application on your computer. Then, open the My Device section.

Step 2: Choose “Photos” as the file type for export.
Select “Photos” as the file type you want to transfer. Then, click "Export" to initiate the process. Choose a preferred location on your computer to save the exported data.

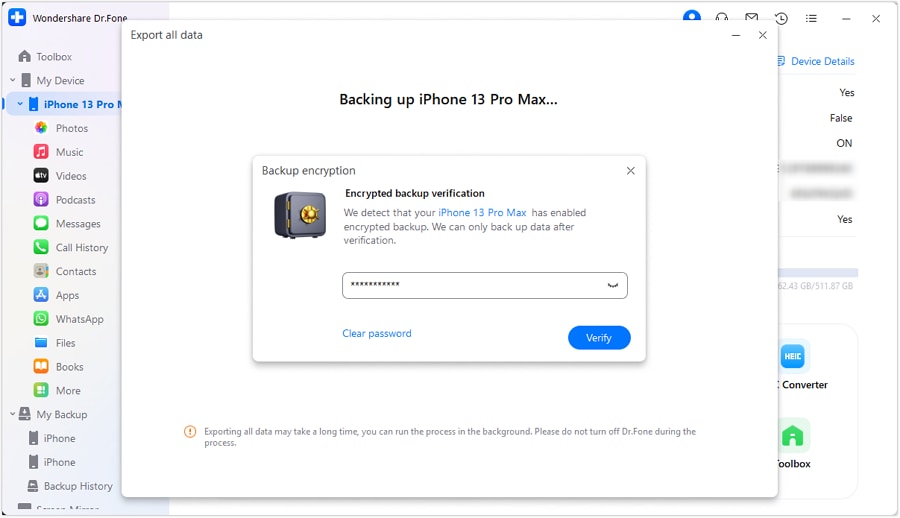
Step 3: Create a password for the backup photos.
Create a password for the backup file to enhance security. Set and confirm the password, then click "Done" to execute the encryption process.

Step 4: Watch the export progress.
Monitor the progress as your iPhone transfers its information to the computer through Dr.Fone. You can see the progress displayed on the screen.

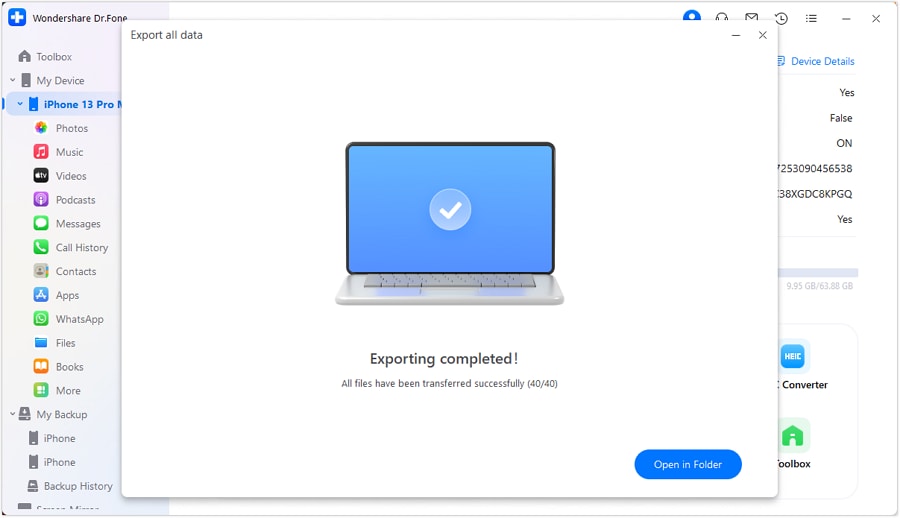
Step 5: Successfully export your iPhone photos to the computer.
After successful completion of exporting the photos, a window will appear on your computer screen. Click "Open" to see the exported photos.

FAQs
To do it, you can select the photo you want to share. Then, tap the "Share" icon and select Copy Image name. Paste the Image name on your messages and send it to your friends.
Conclusion
iCloud is known as a versatile and user-friendly cloud storage solution for Apple devices, offering a generous 5GB of free storage and seamless integration across various devices. This makes it a convenient choice for users looking to store and access their files, such as photos.
When looking for ways how to upload photos on iCloud from iPhone, you can do it by either automatic sync or manual upload. For those seeking alternatives, we also introduce Wondershare Dr.Fone as a reliable option. Dr. Fone's Phone Manager tool offers an intuitive user interface, compatibility with various data types, and safeguarding your data from data loss.
Dr.Fone Basic:
Better Control for Your Phone
Manage, transfer, back up, restore, and mirror your device
iPhone Photos
- Convert HEIC to JPG
- 1. Convert HEIC to JPG on Linux
- 2. Convert HEIC to JPG Windows
- 3. Best HEIC Converter Online
- 4. Convert HEIC to JPG High Quality
- Export iPhone Photos
- 1. Upload iPhone Photos to Google Drive
- 2. Transfer Photo from iPhone to PC
- 3. Transfer Photo from iPhone to iPhone
- 4. Transfer from iPhone to iPhone
- 5. Transfer from iPhone to iPad
- 6. Move iPhone Photo to External Drive
- 7. Transfer from iPhone to Flash Drive
- 8. Extract Photos from iPhone
- 9. Download Photo from iPhone
- Import Photos to iPhone
- 1. Transfer from Laptop to iPhone
- 2. Transfer Photo from Camera to iPhone
- 3. Transfer Photo from Mac to iPhone
- 4. Transfer Photos from PC to iPhone
- 5. Transfer from iPhone to PC
- 6. Transfer from Android to iPhone
- 7. Transfer from Samsung to iPhone
- Manage iPhone Photos
- 1. Back up iPhone Photos
- 2. Get Photos off iPhone
- 3. Send Large Size Photos from iPhone
- 4. Photo/Video Compressor Apps
- 5. Delete Photos from iPhone/iPad
- 6. iPhone Photos Disappeared Suddenly
- 7. iPhone Photoshop Alternatives
- Recover iPhone Photos
- 1. Restore Deleted Photos from iPhone
- 2. Recover Photos from iPod Touch
- 3. Recover Deleted Picture from iPhone
- Transfer iPhone Photos to Mac
- Transfer iPhone Photos to PC
- 1. Transfer Data from iPhone to PC
- 2. Transfer Photo to Computer
- 3. Transfer Photo to PC without iTunes
- 4. Transfer Library to Computer
- 5. Send Photo from iPhone to Computer
- 6. Import Photo from iPhone to Windows
- 7. Transfer Photo to Windows
- Transfer Photos from Google Drive
- 1. Download from Google Drive to iPhone
- 2. Transfer from Google Photo to iPhone
- 3. Download from iCloud to iPhone
- Transfer Photos to Google Drive
- Image Convert Tips
- ● Manage/transfer/recover data
- ● Unlock screen/activate/FRP lock
- ● Fix most iOS and Android issues
- Learn More Learn More


Alice MJ
staff Editor