A Complete Guide to Rooting Kindle Fire
Oct 24, 2025 • Filed to: Device Data Management • Proven solutions
Dr.Fone Basic:
Better Control for Your Phone
Manage, transfer, back up, restore, and mirror your device
Kindle Fire is probably one of the most renowned devices produced by Amazon. It has a wide range of functionality and can be used to perform various other tasks after rooting it as well. Just like any Android device, one can also root Kindle Fire and unleash its true potential. In this guide, we will help you understand how to root Kindle Fire with ADB drivers and with a Fire Utility tool. Let’s get it started!
Part 1: Prerequisites
Before we explain the process to root Kindle Fire HD, let’s explore the basic prerequisites. After getting the root access, you can customize your device easily and can even install apps from Google Play. Nevertheless, before proceeding you should note that rooting your device will tamper its warranty and you might not have the access to update the firmware in the future.
Before you root Kindle Fire, make sure that you have fulfilled the following prerequisites.
1. Since there is no feasible solution to root Kindle Fire HD without a computer, you need to have a working Windows computer.
2. Your device should be at least 85% charged.
3. Install the necessary Kindle drivers on your computer.
4. Install the Fire utility or ADB drivers on your system.
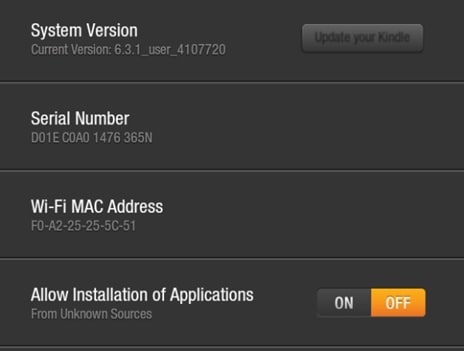
5. Make sure that the option for “Allow Installation of Applications” in “on”. You need to visit Settings > More > Device and turn it on.
6. Additionally, on your Windows system, you need to turn on the option for “Show hidden files, folders, and drives”. This will help you access the Utility files.
7. To perform rooting using ADB drivers, you need to download and install Android SDK. You can visit Android Developer website right here to do so.
8. Most importantly, make sure that you have a backup of your files on a cloud before rooting your device.
Great! You are now ready to learn how to root Kindle Fire with its Utility program and ADB drivers. Let’s do it sequentially by focussing on one step at a time.
Part 2: Root Kindle Fire with ADB Drivers
After following all the above-mentioned prerequisites, you can easily root Kindle Fire using ADB drivers. All you need to do is follow these easy steps to perform the rooting operation.
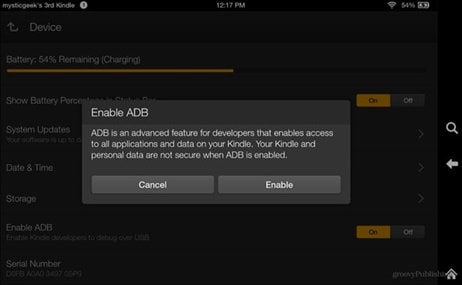
1. Start by enabling the ADB option on your device. Simply go to Settings > Device and tap the “Enable ADB” option.
2. Download the Kindle Fire ADB Drivers and extract the zipped folder to a desirable location.
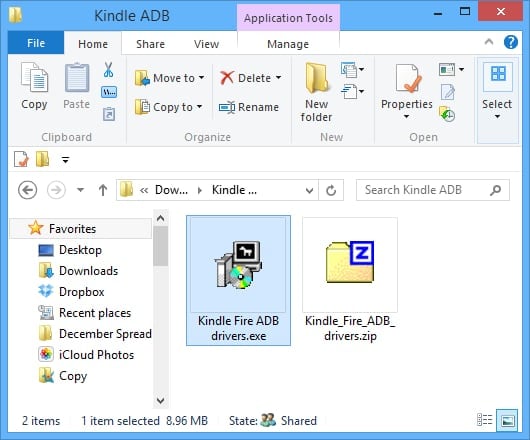
3. After extracting it, you would find a “Kindle Fire ADB drivers.exe” file. Simply click it and it will commence the installation process. Agree to the relevant terms and finish the installation. Also, you might be asked to reboot your system for the installation to be successfully completed.
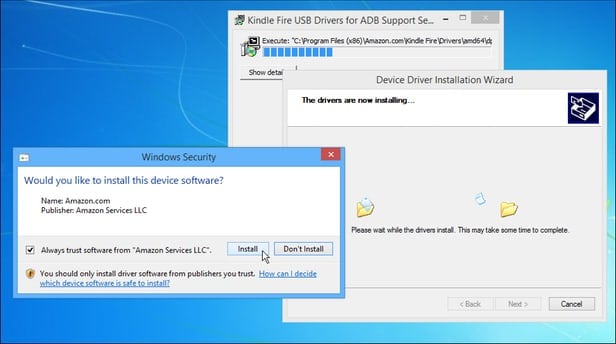
4. Now, after when the system has been successfully restarted, connect your Kindle Fire device to your system.
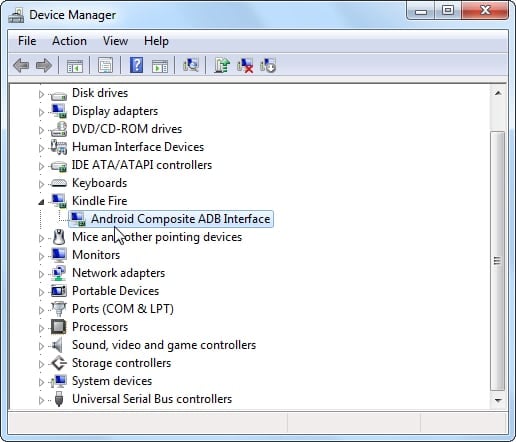
5. Go to your Windows Device Manager and look for “Android Composite ADB Interface” under “Kindle Fire”. In case if it is not updated, you might see a yellow sign. It will simply ask you to update the interface which would take a few seconds.
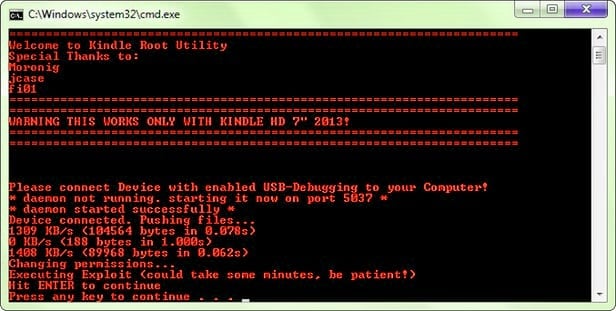
6. You can either script the entire code or can simply download the automated scripted file for your Kindle from several sources on the internet. One of them is right here. After downloading, unzip the file and run the “runme.bat” file. The script will run automatically. You might need to simply press enter on a few occasions. It would look like the provided screenshot.
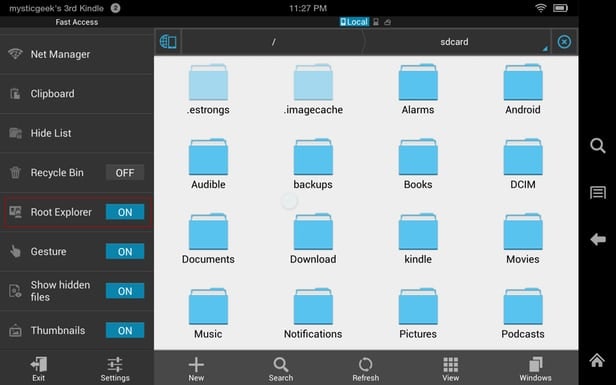
7. After successfully running the script, just unplug your Kindle device. To make sure that you have successfully rooted your device, install any File Explorer and go to “Tools” section. As you scroll down, you can see “Root Explorer” option. Tap it and it will be turned on.
Great! You have successfully learned how to root Kindle Fire using ADB drivers. Let’s explore another method to perform the same task.
Part 3: Root Kindle Fire with Kindle Fire Utility
If you want to root Kindle Fire HD or a related device using Fire Utility, simply perform these easy steps.
1. Make sure that you have installed the Kindle Fire drivers on your system. You can go to XDA developers here and download the “Kindle Fire Utility” for Windows.
2. Unzip the file and connect your Kindle device to your system.
3. After connecting it, your system might ask you to install a few additional drivers. Click on the “install_drivers.bat” file and it will commence the installation. Simply follow the on-screen instructions, as it might take a few minutes to install the needed drivers.
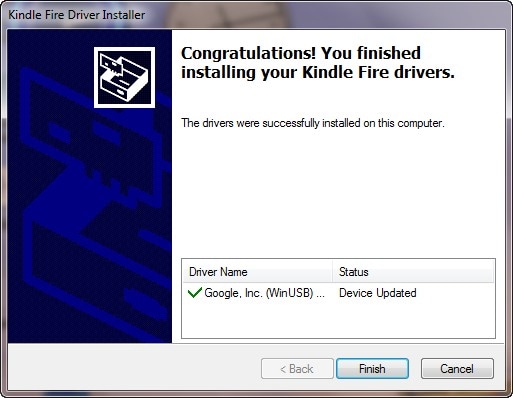
4. To check if the drivers have been installed successfully, you can click on the “run.bat” file and it will show the ADB status as Online.
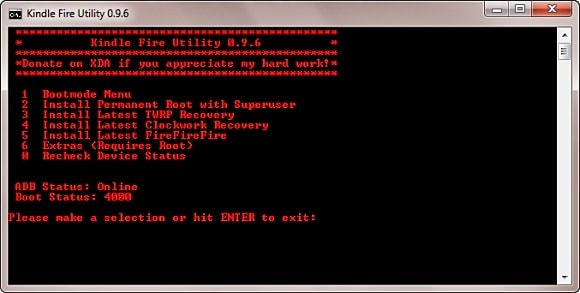
5. You will get different options on the screen. We recommend selecting the “Install Permanent Root with Superuser” option to begin the rooting process. As soon as you would select it, the system will perform the necessary operations to root Kindle Fire. Sit back and be patient for a few minutes until the system will let you know that it has successfully rooted your device. Make sure that you don’t disconnect your Kindle during the process.
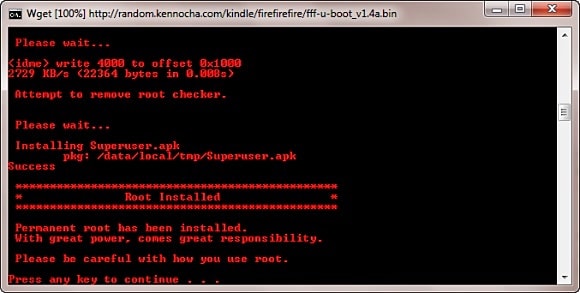
6. Additionally, you can also install Google Play on your device. To do so, again run the “run.bat” file. This time, select the “Extras” option, which will let you access all the root features. Simply select the “Install Google Play Store” options and you would be good to go!
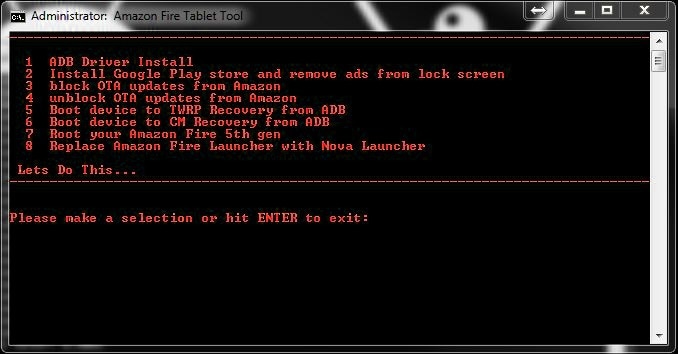
By undertaking the above-mentioned process, you would be able to root Kindle Fire HD and its other versions without facing any setback.
Congratulations! You have learned two easy ways to root Kindle Fire. Select the option of your choice and perform the above-stated set of operations to root your Kindle device. Now, you can truly unleash the true potential of your device and make the most out of it in no time!
Dr.Fone Basic:
Better Control for Your Phone
Manage, transfer, back up, restore, and mirror your device
Android Root
- Generic Android Root
- 1. Text Message Apps for Android
- 2. Root Android ONE Devices
- 3. Best Android Root File Managers
- 4. Get Root Access with Computer
- 5. Delete Preinstalled Apps on Android
- 6. Get Free In-APP Purchase
- 7. Wifi Hotspot Apps without Rooting
- 8. Get Root Access on Android
- 9.Root Android Devices
- 10.Root Android Phones and Tablets
- 11.Root Smartphone on Android
- 12.Why Root Android and How to Root it
- 13.Root Android 4 Series in Two Ways
- 14.Tools to Root Android Online
- 15.Root Android without PC
- Specific Android Root
- 1. Root Samsung Galaxy S7& S7 Edge
- 2. Root LG Devices with Root Script
- 3. Samsung Root Software to Root
- 4. Root Motorola Devices
- 5. 2 Solutions to Root ZTE Devices
- 6. Solution to Root Huawei P9 Safely
- 7. 2 Methods to Root Nexus 7 Easily
- 8. Solutions to Root Sony Devices
- 9. Root Any HTC Device in One Click
- Android Root Tools


James Davis
staff Editor