How to Root Motorola Devices: 2 Methods for 2026 (61/70 chars)

May 19, 2026 • Filed to: Device Data Management • Proven solutions
 TL;DR:
Rooting your Motorola device requires either executing technical command-line instructions through the Android SDK Fastboot tool or installing the automated PwnMyMoto application.
● The Fastboot method requires a computer connection, enabling USB Debugging on your phone, and manually running ADB and SQLite commands to modify the settings database.
● The PwnMyMoto app provides a simpler alternative that handles the rooting process automatically across several reboots, but it is exclusively compatible with Motorola Razr models running Android 4.2.2 or higher.
● Proceeding with either rooting method will permanently void your manufacturer warranty and carries a risk of bricking the device, making a full data backup a necessary prerequisite.
Ask AI for a summary
 ChatGPT
 Perplexity
 Gemini
 Claude
 Grok
Grok
Dr.Fone Basic:
Better Control for Your Phone
Manage, transfer, back up, restore, and mirror your device
Rooting is the process of gaining administrative or 'root' access to an Android device's operating system, similar to how an iPhone is jailbroken. When you root a Motorola phone, you unlock its full potential, allowing you to install custom software, remove pre-installed apps, and significantly enhance performance. This guide provides two distinct methods to safely achieve Motorola root access and take complete control of your device.
Key Takeaways:
- Rooting a Motorola phone gives you full administrative control over the device.
- This article covers two main rooting methods: using Fastboot with the Android SDK and using the PwnMyMoto app.
- The Fastboot method is more technical and requires a computer.
- The PwnMyMoto app is a simpler, one-click solution, particularly for devices like the Motorola Razr.
- Always back up your device before attempting to root to prevent data loss.
Part 1: How to Root Motorola Devices Using Fastboot?
The Android SDK comes with a nifty little tool called Fastboot, which you can use to root your Motorola device. Fastboot starts on the device before the Android system loads, and it is therefore useful in rooting and updating the firmware. The Fastboot method is rather complicated because it has to be operated from two ends – on the Motorola and on the computer. Here you will learn how to safely use Fastboot to root your Motorola.
Follow these steps carefully to root your Motorola device with Fastboot:
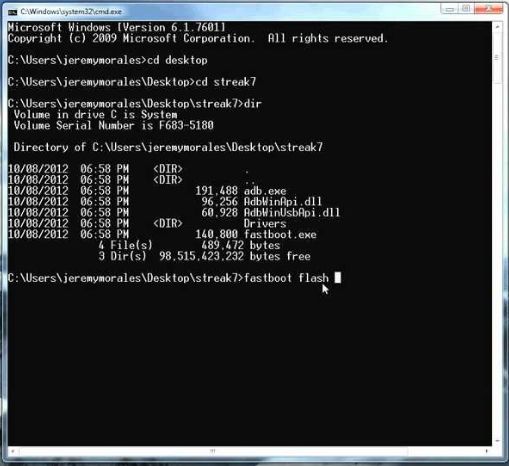
- Download and Set Up Android SDK: First, download and install the latest Android SDK, which includes the Fastboot tool. Once installed, connect your Motorola device to your computer via a USB cable. Navigate to the Android SDK folder, hold the 'Shift' key, right-click on an empty space, and select 'Open Command Prompt Here'. Type
adb devicesand press Enter. If your device's serial number appears, it's successfully connected.
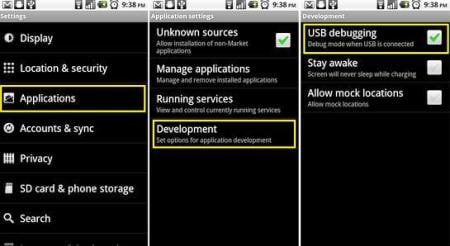
- Enable USB Debugging: On your Motorola phone, go to Settings > About Phone. Tap on 'Build Number' seven times until you see a message saying, "You are now a developer!". Return to the main Settings menu, find and open the new 'Developer Options', and toggle on 'USB Debugging'. Accept the confirmation prompt on your phone.
- Execute Rooting Commands: In the command prompt window on your computer, type the following commands exactly as shown, pressing Enter after each line:
adb shell
cd /data/data/com.android.providers.settings/databases
sqlite3 settings.db
update system set value=0 where name='lock_pattern_autolock';
update system set value=0 where name='lockscreen.lockedoutpermanently';
.quit
These commands will unlock your phone, giving you root access.
Part 2: How to Root a Motorola Razr Using the PwnMyMoto App?
PwnMyMoto is an application that enables you to root Motorola Razr; the device must be running on Android 4.2.2 and above. This s an application that exploits three vulnerabilities in the Android system to gain access to the root, then allow write to the root system. There is no hacking involved when you use this application, and it is completely safe. In order to root your Motorola using PwnMyMoto, here are the steps to follow
PwnMyMoto offers a simpler way to root your Motorola Razr. Here’s how:
- Download and Install PwnMyMoto: Locate a trusted source for the PwnMyMoto APK file and download it. You can either download it directly to your phone and install it using a file explorer, or you can install it from your computer using the command:
adb install –r PwnMyMoto.apk.
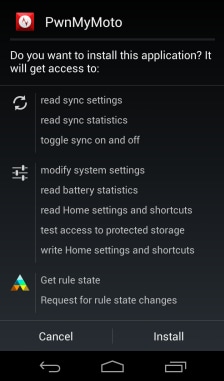
- Run the Rooting Application: After installation, find the PwnMyMoto app in your app drawer and open it. The application will handle the rest of the process automatically. Your phone may reboot several times. Once it completes the final reboot, your Motorola device will be successfully rooted.
Part 3: FAQs about Rooting Motorola Devices
Rooting your Motorola allows you to have developer access to the system, and you can customize your phone in any manner that you wish. You should exercise caution when you are rooting your phone. It is advisable to backup your device before you attempt to root it.
Dr.Fone Basic:
Better Control for Your Phone
Manage, transfer, back up, restore, and mirror your device


Android Root
- Generic Android Root
- 1. Text Message Apps for Android
- 2. Root Android ONE Devices
- 3. Best Android Root File Managers
- 4. Get Root Access with Computer
- 5. Delete Preinstalled Apps on Android
- 6. Get Free In-APP Purchase
- 7. Wifi Hotspot Apps without Rooting
- 8. Get Root Access on Android
- 9.Root Android Devices
- 10.Root Android Phones and Tablets
- 11.Root Smartphone on Android
- 12.Why Root Android and How to Root it
- 13.Root Android 4 Series in Two Ways
- 14.Tools to Root Android Online
- 15.Root Android without PC
- Specific Android Root
- 1. Root Samsung Galaxy S7& S7 Edge
- 2. Root LG Devices with Root Script
- 3. Samsung Root Software to Root
- 4. Root Motorola Devices
- 5. 2 Solutions to Root ZTE Devices
- 6. Solution to Root Huawei P9 Safely
- 7. 2 Methods to Root Nexus 7 Easily
- 8. Solutions to Root Sony Devices
- 9. Root Any HTC Device in One Click
- Android Root Tools
- ● Manage/transfer/recover data
- ● Unlock screen/activate/FRP lock
- ● Fix most iOS and Android issues
- Free Download Free Download Free Download


James Davis
staff Editor