Dr.Fone Support Center
Find out here the most complete Dr.Fone guides to easily fix the problems on your mobile.
Help Category
Dr.Fone - Data Recovery FAQs
1. What to do if Dr.Fone - Data Recovery (Android) failed to root my device?
Normally Dr.Fone - Data Recovery (Android) helps you to root your Android device and retrieve the lost data. But some devices, such as Samsung S9/S10 is not supported to root yet. You need to root the device with other root tools first. Click here to check all the supported devices.
If your device is in the list and Dr.Fone still fails to root it, don’t hesitate to contact us for troubleshooting.
To contact us, click the Menu icon next to the Minimize icon, click Feedback on the dropdown list. On the popup feedback window, remember to check the "Attach the log file" option and describe your situation in details. We will provide further solutions to assist you better.
2. What to do if my phone doesn't start (or gets bricked) after using Dr.Fone - Data Recovery(Android)?
- Connect your Android phone to computer.
- Launch Dr.Fone and select Recover function.
- You will see the option “Fix my bricked phone”. Follow the onscreen instruction to get your phone back to normal.
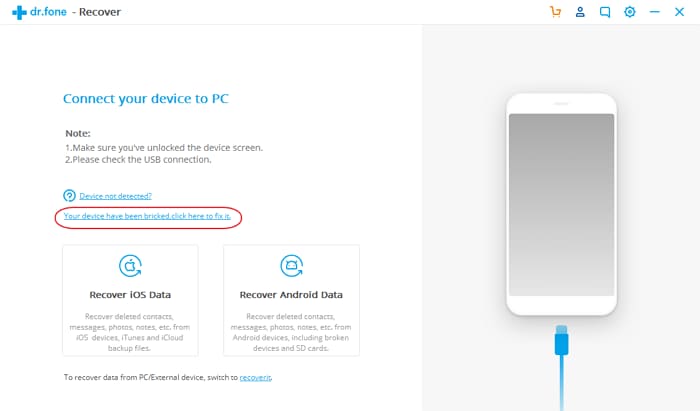
Please note this function only works when your phone is bricked after using Dr.Fone - Data Recovery. If your have Android system issues which is not caused by Dr.Fone, you can try to use Dr.Fone - System Repair (Android) to fix it.
3. Why I can’t recover the lost files using Dr.Fone - Data Recovery (Android/iOS)?
What really happens is that the file system removes the path to access that file and marked the space that the file is using as being available for future use. But the file is still there, until they are overwritten with another new file.
So when data recovery fails, the high chance is that the deleted file is already been overwritten. To increase the data recovery success rate, it’s better to stop using your phone instantly and recover your data sooner.
4. Can I recover data from broken Android devices?
5. Why Dr.Fone takes so long to scan my phone?
- Choose only the file types you need and scan the phone again.
- If you have iTunes/iCloud backup, it’s recommended to try Recover from iTunes backup file and Recover from the iCloud backup file. It will be much faster in these two modes.
6. What to do if Dr.Fone failed to detect my iTunes backup file?
- Click the Apple logo in the Menu bar at the top of the screen.
- Go to System Preferences > Security & Privacy.
- If it asks, enter the user name and password to allow to change the settings.
- Click Full Disk Access > Privacy.
- Click the + icon to add Dr.Fone or just drag Dr.Fone icon from Finder to the Privacy list.
In this way, Dr.Fone will then be able to detect and scan the iTunes backup file on your Mac.