How To Manage iOS Devices From a PC?
Storage problems in smartphones are a common issue for people around the world. Being an iPhone user, you might face similar issues while managing your device. People always look for better options that can help them manage their iOS devices. Dr.Fone comes with a dedicated solution to manage data on iOS devices from the PC.
Index
Part 1: iOS Data Manage
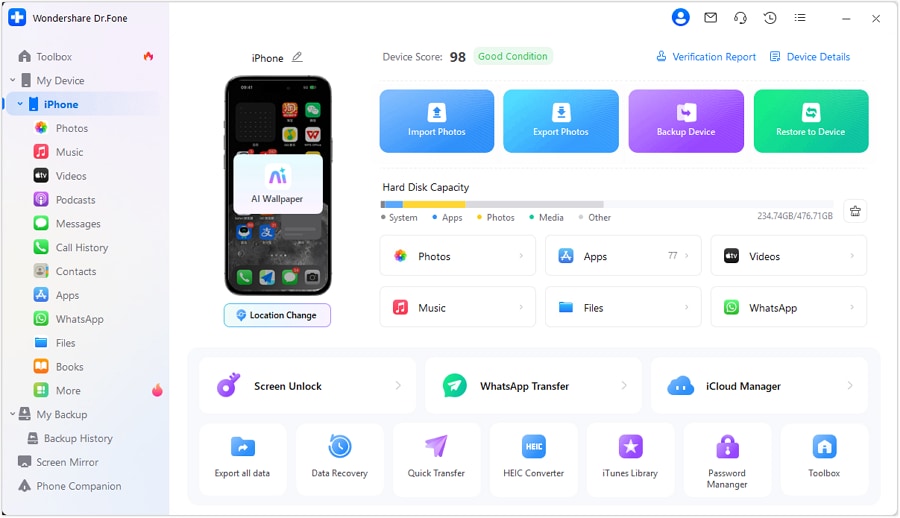
Dr.Fone provides a comprehensive system of managing all kinds of iOS data through its service. You are required to connect your iOS data with the computer through a wireless or wired connection. It entirely depends on the situation, where all data is displayed and accessible from the options available on the left panel.
Continue to manage specific iOS data and perform multiple functions on it:
- Video Manage
- Podcast Manage
- Books Manage
- Files Manage
- Call History Manage
- Messages Manage
- Safari Manage
- Calendar Manage
- Reminder Manage
- Notes Manage
- Voice Memo Manage
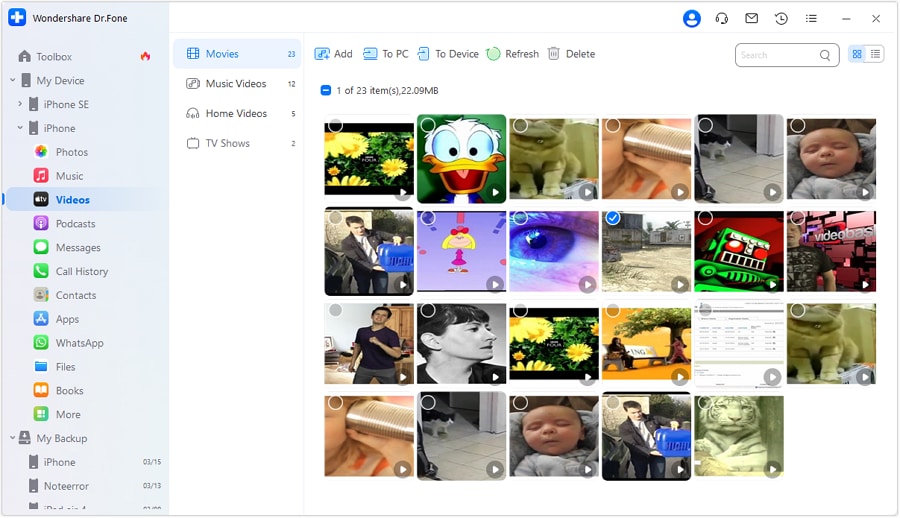
1. Video Manage
As you connect your iOS device, find the Videos tab from the left-hand panel to continue to the specific screen. You will observe multiple forms of videos, which include Movies, Music Videos, Home Videos, and TV Shows.

You can change the form of display for the videos accordingly. Look for the Album View and List View buttons appearing on the top-right side of the screen.
If you seek to import more videos into your iPhone, proceed from My Device > iDevice > Add button. Similarly, you can export the files using the To PC button or export the videos to iTunes using the To Device option.
Along with that, manage the videos category by refreshing the section, deleting the unnecessary videos, and searching for specific videos with the available options.
To preview any specific video, tap on the Play button adjacent to the respective video and view the video on the screen.

2. Podcast Manage
Podcasts on the iPhone can also be accessed on Dr.Fone separately. With the device connected with Dr.Fone, continue under the My Device > iDevice > Podcasts flow from the left panel. Observe the complete list of podcasts present within the iOS device on the screen.

You can easily preview a specific podcast by double-clicking on the file to play it on your computer. Following this, import more podcasts into your iPhone with the Add button.
To export the file to PC, use the My Device > iDevice > To PC navigation on the top and access the To Device option if you seek to export podcasts to iTunes. Refresh, delete, and search for podcasts with the options available on the platform.

3. Books Manage
Dr.Fone keeps good control of the books present on the iOS device. From PDFs to EPUB documents, you can also manage audiobooks within the specific section of My Device > iDevice > Books present in the left panel.
Continue to add more books with the Import button and export books to the computer. You can also preview the books directly from the platform by double-clicking on them.
Furthermore, ensure to delete the unwanted books and refresh the section with the available buttons. Search for any specific eBook using the search bar available on the right side of the screen.

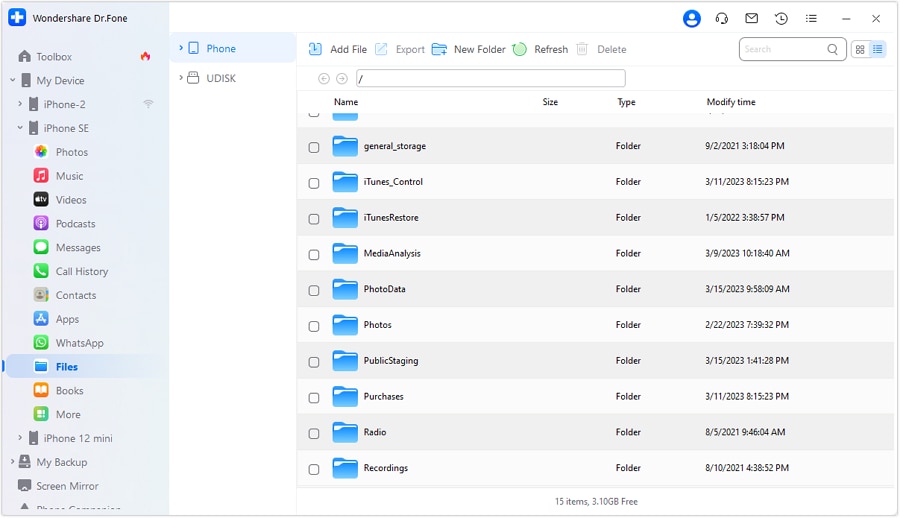
4. Files Manage
File management is as simple as it seems on Dr.Fone. Redirect into the respective file folders by navigating through Files > Phone. Continue to click the Add File button if you want to add specific files. Create a New Folder if you wish to manage files of your iOS device within the platform.
To export files to the computer, use the Export button on the top and search for specific files in the Search bar. Refresh the platform to keep the files updated and delete those that are not required.
5. Call History Manage
Dr.Fone also retrieves the entire call history against the connected iOS device. From voicemails to call history and the details of Facetime, everything is displayed in the Call History section, which can be accessed from the left panel. Continue to Call History > Export to retrieve all the call history data as an Excel or CSV file.
If you intend to print the call history for accessing data in such a way, a Print option is available. Furthermore, use the Refresh button to update the call history of your iPhone in Dr.Fone.

6. Messages Manage
To manage messages on your iOS device, look for the My Device > iDevice > Messages tab on the left panel. You will find different message forms available. To access the complete inbox of your iPhone, look for the All Messages section. Here you can export the complete chats with the Export button in PDF, Excel, or CSV files, along with the complete attachments. Print the chats and refresh messages according to requirements.
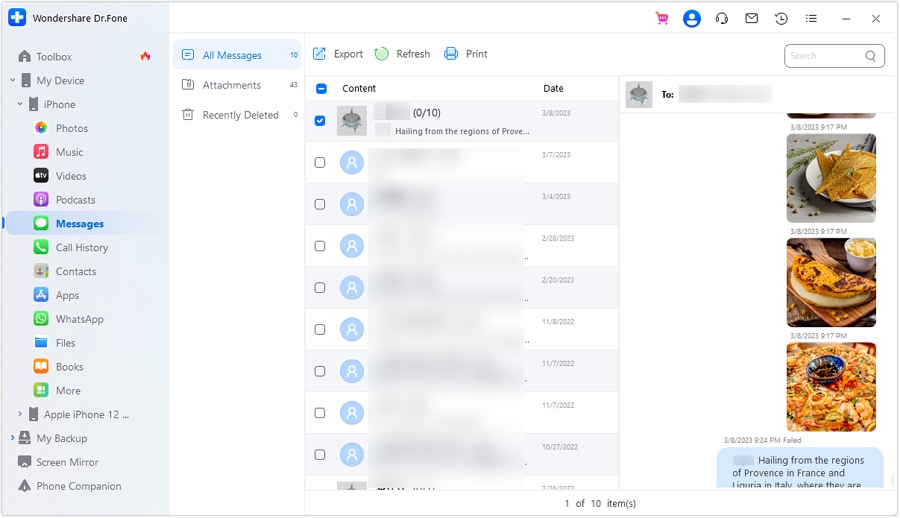
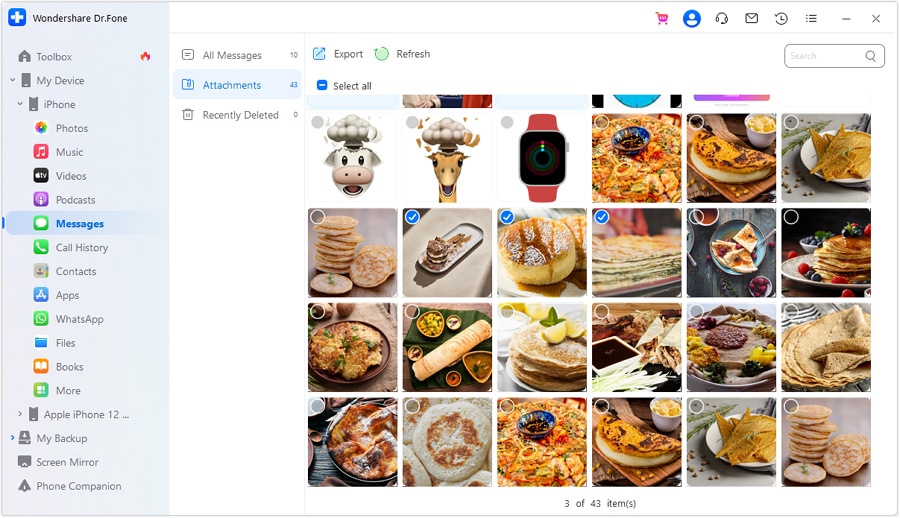
If you wish to access the specific attachments within the Messages of your iOS device, look for the Attachments section. Export the entire attachments or specific ones with the Export option. Search for specific attachments with the search bar available on the top-right.
7. Safari Manage
Look for the data associated with Safari in the My Device > iDevice > More flow present in the left panel. Continue to select Safari History to observe the history of your browser. Export data in Excel or CSV format if needed. You can also print the entire history with the Print option.

Navigate to the Bookmarks section from the sub-panel to open the saved bookmarks on Safari. Similar to Safari History, it can also be exported and printed from the platform.

To manage the reading list of your Safari browser on Dr.Fone, access the particular option from the sub-panel. Export or print the data according to your requirements.

8. Calendar Manage
Locate calendars by navigating through the More section from the left and continue into the specific section from the sub-panel. Look through the details of your calendar and find all specifications listed in the right column. You can export your calendar data in ICAL, Excel, or CSV formats. Furthermore, print, refresh, and select whether to repeat a specific event on data for every year with the available options.

9. Reminder Manage
If you have any reminders set within your iPhone, you can access the option after navigating through My Device > iDevice > More > Reminder from the left panel. Go through the reminders list and export them as an Excel or CSV file. Print and refresh the reminders list with the buttons available.

10. Notes Manage
You can also access your entire Notes made on the iPhone from the More section. Continue in the Notes category to export as Excel or CSV, print, or refresh the data.

To reach out to the specific attachments saved in the Notes, go into the Notes Attachments option just below the Notes option and export them as required.

11. Voice Memo Manage
All the voice memos recorded across the iPhone can be viewed in the My Device > More > Voice Memos sub-section. Export the voice memos to your computer, if required.

Part 2: Photos Manage & Similar Search
While you can find Dr.Fone to be helpful in managing minimal data from your iPhone, you can have a complete management set for the photos saved on the device. To know how to manage data on iPhone, specifically photos, look through the steps provided below:
Access the section from the left panel in the following navigation of My Device > Photos. As you find the complete set of photos displayed on the screen in a categorized format, look through the categories and albums to manage your photos. You can import more photos into specific albums with the Add button. To find similar photos within the gallery of your iPhone, use the Similar Photos filter.

As the filter operates, it will show all the similar photos in the Similar Photos section present on the sub-panel. You can select the photos and export them to the computer using the To PC button or to iTunes using the To Device option. Furthermore, these files can also be deleted with the Delete option.
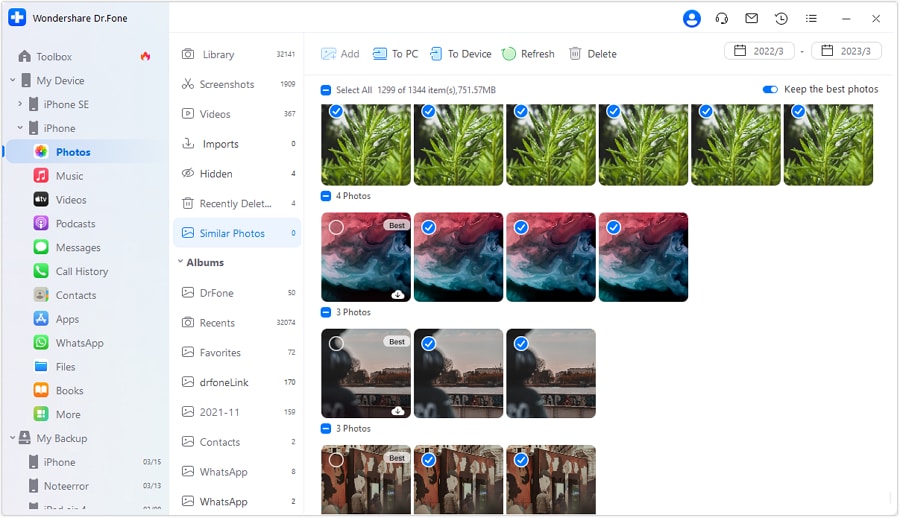
To open a specific photo, double-click on it to open it on a new screen. Refresh the list or search for specific photos with the options available.

Part 3: Music Manage & Deduplicate
There is an extensive set of options available for the management of music on your iPhone. Find out how Dr.Fone helps in the management of music within the device:
Look into the My Device > Music section from the left panel to open the entire music catalog saved in the iOS device.

To play a specific music file, click the Play icon on the song to preview it on a new screen.

You can change the viewing system of the music with the Album View and List View buttons available on the top-right side.

Select the specific music files from the list present on the screen of the platform by checking and marking their status.

As you click the Delete option from the top, a prompt appears to confirm the process, where you should tap Yes to delete the music files.

To import new music or entire music folders into the iPhone, use the Add > Add File or Add Folder button on the top.

If you intend to delete duplicate music off your iPhone, select the Deduplicate button and let the platform recognize duplicate files. On the next window, select the columns for identifying the duplicates. Click Delete Duplicates to execute the process.

To export a specific music file, right-click after selecting it to open a drop-down menu. Navigate to the Export option and continue to export the file to the computer, iTunes, or Note error.

Once the files are exported, a prompt appears showing the completion of the process.

Part 4: Contacts Manage & Deduplicate
You can also control the contact list of your iPhone with the options available on the platform. To know how to manage data on iPhone, including contacts, follow the steps guided below:
Locate the Contacts section from the panel available on the left. Continue to observe the entire contact list on the screen of the platform. You can consider adding new contacts and importing entire CSV files, Windows Address Book, Outlook Address Book, or specific vCard. Export contacts in similar formats and delete contacts according to the options available on the top.
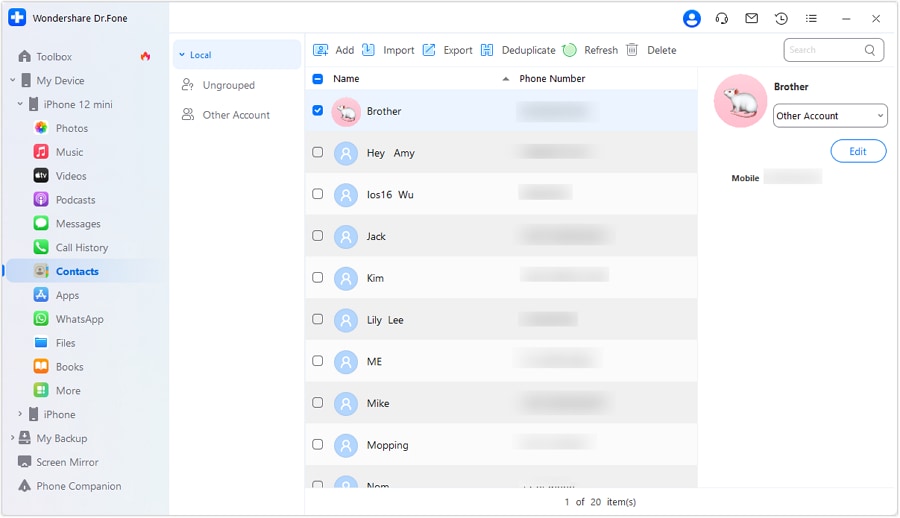
If you intend to merge the duplicate contacts present in the list, use the Deduplicate button on the top. As the platform detects the contacts, a progress bar appears on the front.

The comprehensive list of duplicate contacts is displayed in the next window. Define a proper filtering option under the Select a match type option. Use the Merge or Don’t Merge option against a specific contact. If you seek to merge all contacts, tap the Merge Contacts button to conclude the process.

Part 5: Apps Data Manage
Dr.Fone provides a comprehensive app management system in its platform. With the autonomy of installing and uninstalling applications from the platform, you can manage the iOS apps with ease. To know how it can be done, follow the steps provided next:
Access the My Device > iDevice > Apps section from the left panel to open the applications installed on your iPhone.
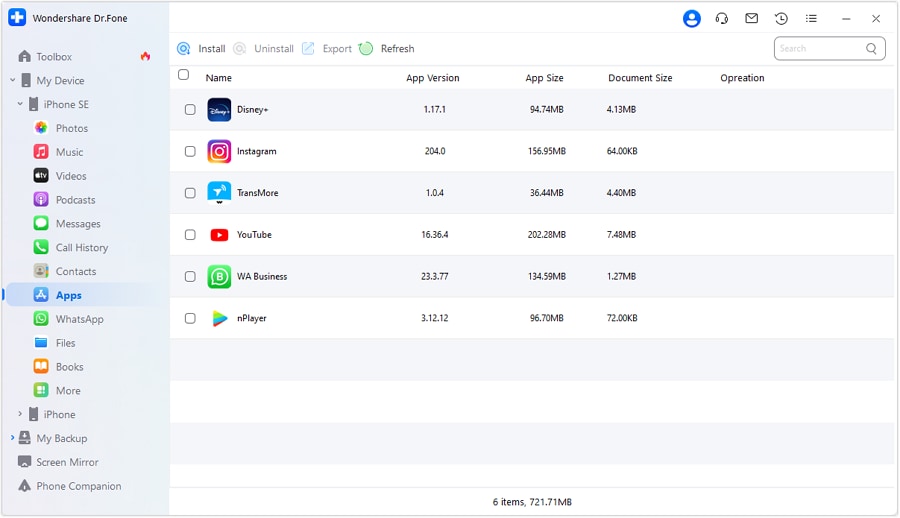
Click the Install button to look for applications that you can install on your iPhone.

Select any particular application and click the Uninstall button to remove and make space on your iPhone. You can also export any application from the platform; however, it only supports iOS 9.0 and below.

Following this, you can also access specific app data, including videos, documents, and photos from the My Device > iDevice > More navigation. As you lead into the particular section, look for the App Videos in the list of options within the sub-panel. Access the videos and export them, if required.

You can also look out for the saved App Documents in the same section.

Walkthrough the App Photos section to access all images of apps saved in the folders.

Click on a specific folder to access the images of a particular application. You can easily export the images as per your requirements into the computer.

Part 6: Social Apps Manage
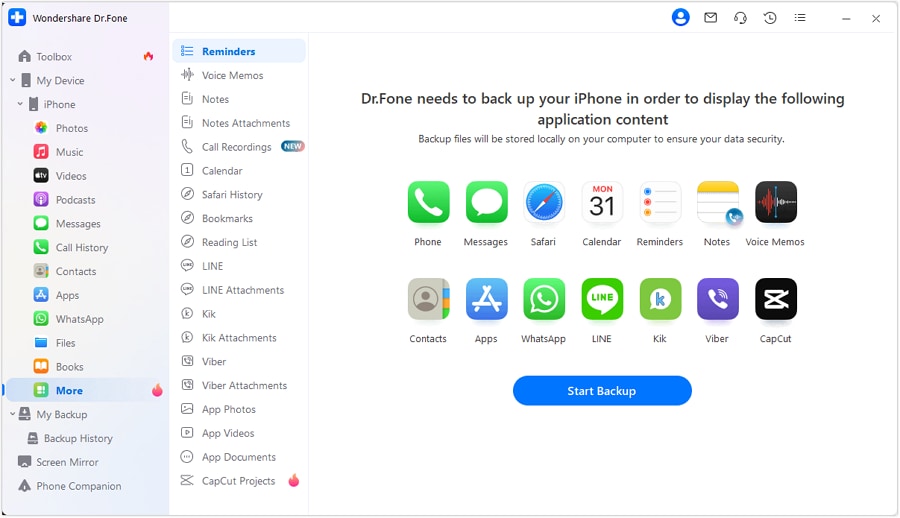
Social applications and their data are also available and previewed within Dr.Fone. However, there is a specific provision that needs to be completed before accessing the data. The data of these social apps needs to be backed up on the platform before it can be previewed. To find out how social apps are managed across Dr.Fone, follow the steps guided next:
1. WhatsApp Manage
You can find a dedicated option of My Device > iDevice > More > WhatsApp available in the left panel of Dr.Fone. As you access it, look for the Messages tab and observe the entire chats backed up on the platform. Click Export or Print if you wish to extract specific chats or entire data of WhatsApp.

If you wish to access specific photos, lead into the Photos section and select photos that you want to export as an attachment.

You can also access the TV Video and export it according to the conditions.

Find the list of Audio separated from the WhatsApp data, and export the data according to your ease.

Apart from that, other forms of data present within WhatsApp are present in the Others section. Go through and export data to your computer using the Export button.

2. LINE Manage
Open the More section and look for the LINE option in the sub-menu. Here, you will find the entire chat list made on LINE. Export the data as CSV, Excel, or PDF, if required. Furthermore, you can also Print the chats made on LINE.

For focusing particularly on LINE attachments, look for this option in the sub-menu and open the list of attachments. Export the attachments according to your likelihood.

3. Viber Manage
Lead through My Device > iDevice > More and find the option of Viber in the sub-menu. Look through all chats and make corresponding changes and management, as required.

To open the attachments of Viber in specific, look for the Viber Attachments option.

4. Kik Manage
Get hold of Kik data in the sub-menu discovered from the More section. Find all the chats and export or print them according to your liking.

You can check out specific attachments of Kik in the Kik Attachments section, where you can export the data as well.

Part 7: Use iPhone as a USB Flash Drive
Dr.Fone has made it possible for iPhone users to use their device as a USB flash drive. To know how it is done to manage iOS devices, follow the guidelines provided below:
Look for the My Device > iDevice > Files section in the list provided in the left-panel and proceed to select UDISK from the options that appear on the screen.
Here, you can use the Add File button to import files into the iPhone. Create a New Folder for folder management and use the Export button for downloading specific files from the iPhone present within the UDISK.

Part 8: Capcut Files Manage
Dr.Fone empowers social media users to recover, backup, and export a wide range of files from their mobile devices, including photos, videos, and even CapCut project files. To know how to manage pictures and videos, specifically project files, look through the steps provided below:
Connect your mobile device to your computer using a USB cable. And click on "My Device" and then select "More" to proceed.

Choose the "Start Backup" option to begin the backup process. Note: The first backup may take some time, depending on the size of your phone's memory. Please be patient and let the process complete.

Once the backup is complete, click on "App Videos" and select "Capcut" from the list.


Click on "App Photos" and select the "Capcut" folder.


Select "Capcut Projects" to access and export all your Capcut project files.

WHAT YOU'LL NEED

Dr.Fone provides a complete set of tools for solving all iOS/Android phone problems.
Need help?
You might find the answer to your question in the FAQ or additional information below: