Details about the Dr.Fone iDevice Verification Report?
Are you wondering if your smartphone or tablet is in good health? Regardless of the device being new or old, there are different certifications and device diagnostic tests available that can be tried. For the perfect phone check, you need something to assist you in verifying the data. Dr.Fone comes with its dedicated iDevice Verification feature for a proper iPad or iPhone diagnostic test.
Go through the provided guide and see how and what to discover in the iDevice verification report provided by Dr.Fone. Find out more details about the basic device information, multiple hardware and software parameters, and device statuses with the help of such diagnostics. This will help you ensure that the iPhone you are about to buy is real and is not involved with the Apple refurbished section.
Index
Part 1: How to View Verification Report on Dr.Fone?
The first task associating the iDevice verification report on Dr.Fone involves how to view it properly. After you have downloaded and installed the latest version of Wondershare Dr.Fone on your computer, continue with the following steps to check phone credibility:
Connect the iPhone that needs to be checked with Dr.Fone using a cabled or wireless connection. As it appears on the left panel under the My Device section, select it.

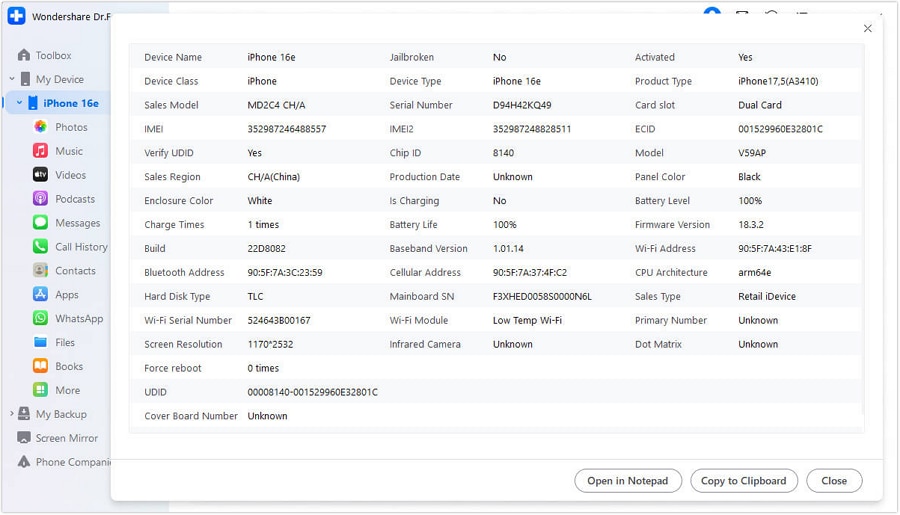
With the panel appearing on the front, you can check the device details in general. For that, select the Device Details option on the top right to access a new window. You can find all the information on the device listed below.
You can also use the option of Open in Notepad to access the device details in the Notepad. Conversely, copy all the details with the Copy to Clipboard option.
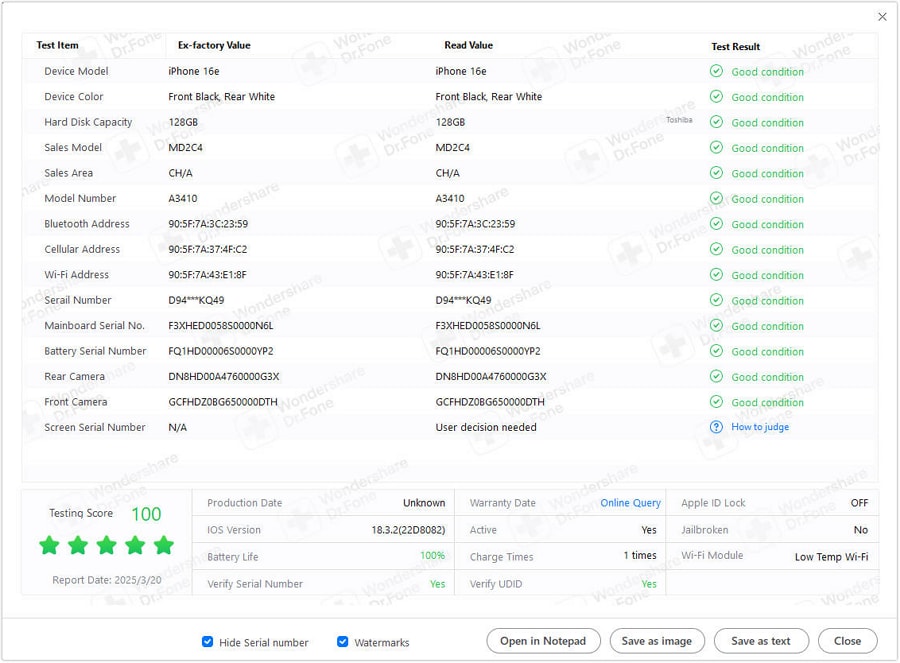
If you seek to verify the details of your iDevice, select the Verification Report button on the top-right side of the screen. This will help you view the verification report of the iDevice after an in-depth assessment.
A comprehensive report with all the device details and comparisons will be displayed. You can use the Open in Notepad option or use the Save as image or Save as text option to save all verified details.
Part 2: How Does Dr.Fone iDevice Verification Work?
Information on a particular device is saved against universally recognized standard numbers such as the IMEI. This factory value is matched with the current values of the device for Apple product verification.
In the case of a difference in the device's value, it is equivalent to the fact that some parts of the device are changed. You will also receive a testing score against the values received after verification of the iDevice.
WHAT YOU'LL NEED

Dr.Fone provides a complete set of tools for solving all iOS/Android phone problems.
Part 3: What Can Dr.Fone Verify?
The question that arises against this feature is what Dr.Fone can verify for its users. While the platform addresses a fundamental problem of blacklisted phones, it is necessary to assess how easily it makes the complete process for the user. For this section, look into what Dr.Fone verifies for its users in the iPhone diagnostic test:
Get an idea of the factory color with the diagnostic tests of Dr.Fone. Visually verify the actual color of the device and see if it matches. Secondly, check if the verification report recommends "Upgrade Capacity" of your device's hard disk. Secondly, it can also refer to trying to "Change Hard Disk" or "Remove Hard Disk" due to technical issues.
The iDevice verification report provides an idea of whether the iOS device under assessment is replaced, refurbished, or is a demo device. The status of the device will be displayed properly within the report.
Get the factory value and the actual real value of the Wi-Fi, Bluetooth, and cellular addresses in the report. Tally all the values and see which values are different from each other.
Check out the battery and main serial numbers within the report and try to determine the difference in the numbers, if any. If there are differences in the readings, it is evident that there are some changes in the device.
There is no proper way to determine the difference between the factory and actual rear and front cameras. However, the user can determine such differences from the available readings in the iDevice verification report. Usually, the difference in such numbers indicates that the main board of the hard disk has been changed.
To check the screen and Touch ID serial numbers, there are no proper ways to determine the numbers manually. This can be recognized with the results obtained in the report, which, if changed, indicates that there are some changes made in the device over time.
Open the Settings app on your iOS device and continue to the General tab. Find the Legal & Regulatory option to access the device details.

Need help?
You might find the answer to your question in the FAQ or additional information below: