
iPhone DFU Mode Tools in 2026: Free Options, Legacy Utilities & What Actually Works

Nov 10, 2026 • Filed to: Phone Repair Solutions • Proven solutions
 TL;DR:
Choose the tool by the task
- Enter true DFU for free: use your iPhone model's button sequence and confirm a black screen plus computer detection. The model table below gives the timing.
- Only need an update or ordinary restore: try Recovery Mode first. Finder on Mac and Apple Devices on Windows handle Apple's update/restore workflow.
- Need to exit DFU: start with a model-specific force restart. Dr.Fone's Exit DFU feature provides model-specific button guidance; check your license access before using exit or repair actions.
- Considering an old utility: RecBoot and EasyiRecovery control Recovery Mode; TinyUmbrella, iREB and RedSn0w belong to older, limited workflows.
- Protect your data: entering DFU alone does not erase it. Restore and Advanced Repair erase data; back up an accessible iPhone first.
Ask AI for a summary
 ChatGPT
 Perplexity
 Gemini
 Claude
 Grok
Looking for a free iPhone DFU mode tool? On current iPhones, the direct method is a model-specific button sequence while the device is connected to Finder on a Mac, the Apple Devices app on Windows, or iTunes where applicable. Many older “DFU tools,” including RecBoot and EasyiRecovery, actually manage Recovery Mode rather than true DFU mode.
Use DFU only when Recovery Mode or standard repair steps are not enough. Entering DFU mode is not the same as erasing the iPhone; however, performing a DFU restore will erase the device, so back up first whenever possible.
This guide separates current options from legacy utilities, explains what each tool actually does, and points out which older tools may no longer be suitable for modern iPhones.
In this guide:
- iPhone DFU Mode Tools Compared: Current Options vs Legacy Utilities
- DFU Mode vs Recovery Mode: Why the Difference Matters
- Can Software Put an iPhone into DFU Mode Automatically?
- RecBoot: Legacy Recovery Mode Utility (Not True DFU)
- TinyUmbrella: Legacy SHSH / Recovery-Era Utility
- iREB: Legacy Custom-Firmware / Pwned DFU Utility
- EasyiRecovery: Legacy Recovery Mode Utility
- RedSn0w: Legacy Jailbreak / DFU Workflow
- What to Do If Your iPhone Is Stuck in DFU Mode
- FAQ About iPhone DFU Mode Tools
- Conclusion: Choose the Method by Your Actual Goal
iPhone DFU Mode Tools Compared: Current Options vs Legacy Utilities
The key question is not how many “DFU tools” exist, but what each option actually does. Recovery Mode, true DFU mode, DFU restore, and iOS system repair are different workflows.
For most current iPhones, the model-specific button sequence is the direct route into true DFU mode. Software can still be useful for guided instructions, exiting DFU, managing Recovery Mode, or repairing iOS when the device will not boot normally.
| Option | Actually does | Cost signal | Status | Recommendation |
|---|---|---|---|---|
| Manual DFU sequence | True DFU entry | Free | Current | Use this when you need true DFU entry on a current iPhone; the button timing varies by model. |
| Dr.Fone - System Repair | Guided Exit DFU; Enter/Exit Recovery; iOS repair | Recovery entry is free; check license access for exit and repair | Current | Use the guided exit path if you need model instructions, or select the appropriate repair mode for a software fault. This is not automatic true DFU entry. |
| RecBoot | Enter/Exit Recovery Mode | Legacy freeware | Legacy | Suitable for older Recovery Mode workflows; it does not provide true DFU entry on current iPhones. |
| TinyUmbrella | SHSH / recovery-era functions | Legacy | Legacy; current compatibility unclear | Saves SHSH blobs and runs a local TinyTSS server for historical restore workflows; requires Java and iTunes. Not a general modern DFU-entry tool. |
| iREB | Old custom IPSW / pwned DFU workflows | Legacy | Legacy | Designed for older supported devices and custom-firmware or pwned DFU workflows. |
| EasyiRecovery | Recovery Mode enter/exit | Legacy freeware | Legacy | Suitable for older Recovery Mode workflows; it is not a current method for true DFU entry. |
| RedSn0w | Legacy jailbreak / DFU workflow | Legacy freeware | Legacy | Designed for older jailbreak and DFU workflows; it is not a current solution for modern iPhones. |
Windows and Mac: Which software do you need?
For an iPhone DFU mode tool on Windows, start with the Apple Devices app and a USB data cable; on a current Mac, open Finder. In older supported setups, iTunes may apply. These apps detect the connected iPhone and perform Apple's restore; they do not replace the DFU button sequence. Dr.Fone is a separate Windows/Mac option for guided exit and iOS repair, with access depending on the feature and license.
Use the iPhone-specific instructions here. A search result for a development-board DFU driver or a Mac firmware tool is a different device workflow.
Compare guided exit and repair options on the Dr.Fone System Repair page.
DFU Mode vs Recovery Mode: Why the Difference Matters
DFU stands for Device Firmware Update. DFU Mode and Recovery Mode are not interchangeable. Recovery Mode loads Apple’s recovery environment so the iPhone can be updated or restored through Finder, Apple Devices, or iTunes where applicable. DFU Mode communicates at a lower level and does not boot iOS normally.
For most update, restore, or boot problems, try putting your iPhone into Recovery Mode first. Use DFU Mode as a deeper fallback when Recovery Mode does not solve the problem or when a specific legacy firmware workflow requires DFU.
Neither entering Recovery Mode nor entering DFU Mode automatically erases the iPhone. Data is erased when you perform a restore or use a repair mode that resets the device.
| Mode | What you see / what loads | Typical use | Data impact |
|---|---|---|---|
| Recovery Mode | Apple recovery screen; recovery environment loads | Standard update or restore troubleshooting | Entering the mode alone does not erase data; a restore can erase the device. |
| DFU Mode | Screen stays black while the computer detects a connected device; iOS does not boot normally | Deeper restore or certain legacy firmware workflows | Entering the mode alone does not erase data; a DFU restore erases the device. |
Can Software Put an iPhone into DFU Mode Automatically?
On modern iPhones, true DFU entry still depends on the correct model-specific button sequence. A desktop program may guide the timing, detect the device state, or provide one-click Recovery Mode controls, but those features are not the same as automatically placing the iPhone into true DFU mode.
A DFU helper can display instructions or detect the connected phone. For example, iMazing's Reinstall iOS action can put a working phone into Recovery Mode, while its DFU procedure still uses model-specific button presses. Likewise, Dr.Fone's Exit DFU Guide asks you to select your model and follow button instructions. Neither example establishes buttonless true DFU entry.
No Home button is different from a broken button. An iPhone 8 or later, including iPhone SE (2nd/3rd generation), uses Volume and Side buttons for DFU. An iPhone 7 uses Side and Volume Down. If a button required by your model is physically broken, the sequence below cannot be completed as written. Recovery automation may help a recognized, working device, but it does not repair the button or prove DFU entry. If a failed button prevents Apple's Recovery workflow, Apple recommends service.
For Dr.Fone's model-selection and exit steps, see the Exit Recovery/DFU Guide.
- Need true DFU entry: use the correct button sequence for your iPhone model.
- Stuck in DFU: try the model-specific force-restart sequence or a verified Exit DFU feature.
- Need Recovery Mode: use Apple’s recovery workflow or a verified Recovery Mode utility.
- Need system repair: use a current repair tool and check whether the selected repair mode preserves or erases data.
Free DFU entry: Button sequences by iPhone model
Before you begin: connect the iPhone to your computer with a working USB data cable. Open Finder on a current Mac, Apple Devices on Windows, or iTunes in an older supported setup. Use the row for your actual model; a Home button on an iPhone 8 or SE (2nd/3rd generation) does not mean it uses the older Home-button sequence.
| iPhone model | Button sequence while connected | Release and confirm |
|---|---|---|
| iPhone 8 and later, including iPhone SE (2nd/3rd generation) | Quickly press and release Volume Up, then Volume Down. Hold Side until the screen goes black. Keep holding Side and add Volume Down for about 5 seconds. | Release Side; keep holding Volume Down for about 10 seconds, or until the computer detects the device. Then release. The iPhone screen must remain black. |
| iPhone 7 / 7 Plus | Hold Side + Volume Down together for about 8 seconds. | Release Side and keep holding Volume Down until the computer detects the device, then release. The screen stays black. |
| iPhone 6s or earlier, including iPhone SE (1st generation) | Hold Home + Lock (Side or Top) together for about 8 seconds. | Release Lock and keep holding Home until the computer detects the device, then release. The screen stays black. |
The button timing depends on your iPhone model. For additional setup details, see the detailed iPhone DFU entry guide.
Confirm DFU and troubleshoot a failed attempt
| What you see | Meaning | Next action |
|---|---|---|
| Black screen + connected device detected by the computer | Consistent with DFU. Finder/iTunes may still describe it as a device in "Recovery Mode." | Release the held button after detection. Select Restore only if you intend to erase and reinstall; use force restart if you only want to leave DFU. |
| Cable or computer graphic | Recovery Mode, rather than DFU | If Update solves the problem, finish in Recovery. If you need DFU, keep the cable connected and repeat the model sequence above; releasing or holding at the wrong point can miss DFU. |
| Apple logo | The phone restarted; DFU timing was missed | Let it restart, then retry the correct model row. Pay attention to the point where Side/Lock is released. |
| Black screen with no computer detection | A black screen alone cannot confirm DFU | Check power, the USB data cable, the computer port and current Apple software, then retry. If the device remains undetected or a required button is faulty, seek service. |
Recovery Mode to DFU: there is no verified one-click conversion in the tools described here. With the iPhone connected, follow the same model-specific DFU sequence and confirm the black-screen/detection combination. A computer's "Recovery" label alone does not distinguish the two states, including on iPhone 8/8 Plus/X. Specialized legacy forensic procedures should not be treated as universal methods for current iPhones.
RecBoot: Legacy Recovery Mode Utility (Not True DFU)
RecBoot is often listed in older "DFU tool" roundups, but its core function is entering or exiting Recovery Mode. That makes it a Recovery Mode utility rather than a tool for true DFU entry on current iPhones.
If you need to put a modern iPhone into true DFU mode, use the model-specific button sequence for your device instead.

Best for: older Recovery Mode workflows on legacy iPhones. RecBoot's two-button interface controls Recovery Mode on compatible older setups; it does not establish a true DFU-entry feature for current iPhones.
Pros:
- A compact, dedicated Recovery Mode interface rather than a full repair suite.
- Its two controls are Enter Recovery Mode and Exit Recovery Mode.
- One-click Recovery control on compatible older setups; confirm computer detection first.
Cons:
- Historical Windows builds were reported as 32-bit-only; that is not evidence of support for current 64-bit Windows or current macOS.
- Its mode controls do not perform true DFU entry or a full iOS repair.
TinyUmbrella: Legacy SHSH / Recovery-Era Utility
TinyUmbrella is best understood as a legacy utility from the SHSH and recovery-era iPhone ecosystem. It is not a current general-purpose DFU-entry tool for modern iPhones.
If you need TinyUmbrella for an older device or SHSH-related workflow, confirm device and operating-system compatibility first. Current trusted download availability may be limited, so avoid unverified mirror sites.

Best for: older SHSH and recovery-era workflows. TinyUmbrella is legacy Java freeware for Mac/Windows, with a final release in 2014 and a preview in 2015. Saving SHSH files is not a guarantee that any current firmware can be downgraded.
Pros:
- Combines Umbrella for saving SHSH files with TinyTSS, a local server for historical restore workflows.
- Historical versions also offered iPhone 4 (iPhone3,1) baseband preservation; this is device-specific, not a current general repair feature.
Cons:
- Requires Java and iTunes. Its Windows Java requirement was 32-bit Java even on a 64-bit OS; these dependencies can be a barrier on current computers.
iREB: Legacy Custom-Firmware / Pwned DFU Utility
iREB belongs to older custom-firmware and pwned DFU workflows. It was designed for legacy devices and restore scenarios rather than as a general DFU solution for current iPhones.
Use iREB only when you specifically need a supported legacy custom-firmware workflow. For a current iPhone, use the model-specific DFU sequence instead.

Best for: older supported devices and custom IPSW / pwned DFU workflows. iREB uploads patched files so iTunes can accept custom IPSW firmware on supported legacy devices.
Normal DFU vs pwned DFU: ordinary DFU is the device firmware service state. A pwned DFU workflow modifies the boot environment on vulnerable supported hardware to work with custom images. You do not need iREB or a pwned state for an ordinary Apple restore, and entering normal DFU does not itself jailbreak a phone.
Pros:
- Historical compatibility was Windows XP/Vista/7 and OS X 10.4+, rather than every PC operating system.
- The pictured interface has three tabs: iREB, Recovery Mode Loop Fixer / SHSH Blobs Grabber, and Credits. The selected tab shows Auto-Boot and SHSH Blobs Grabber controls, rather than three universal repair buttons.
- Historical Windows and Mac builds existed; the name does not imply Mac-only support.
Cons:
- A custom-firmware restore can erase data; ordinary DFU entry and a restore are separate actions.
- Its old supported hardware and firmware scope does not establish compatibility with a current iPhone.
EasyiRecovery: Legacy Recovery Mode Utility
EasyiRecovery is a legacy utility designed around Recovery Mode and restore-loop problems on older iPhones. It is not a current method for entering true DFU mode.
Avoid downloading EasyiRecovery from unverified mirror sites. If you are using a modern iPhone, choose a current, verified recovery method instead.

Best for: older Recovery Mode workflows.
Pros:
- The old interface exposes two Recovery Mode controls; these are mode controls, not deleted-file recovery.
- A focused Recovery/restore-loop utility for old setups, rather than a full modern iOS repair suite.
Cons:
- The old interface and article do not establish current iPad, iPhone or operating-system support. Do not treat an unverified mirror download as a supported modern solution.
RedSn0w: Legacy Jailbreak / DFU Workflow
RedSn0w is a legacy jailbreak utility from the iPhone Dev Team era. It may still appear in older jailbreak and DFU guides, but it is not a current DFU solution for modern iPhones.
Avoid downloading RedSn0w from unverified mirror sites. For true DFU entry on a current iPhone, use the model-specific button sequence instead.

Best for: older jailbreak and DFU workflows on supported legacy devices. RedSn0w had Mac/Windows releases with specific device and iOS-version limits; it is not a recommended jailbreak method for a current iPhone.
Pros:
- Provides jailbreak and custom-firmware functions on its historically supported devices and iOS versions.
- Historical builds offered custom IPSW and boot workflows; this does not guarantee a fix for every recovery loop.
Cons:
- Its final release was 0.9.15b3 in 2012. The 32-bit Mac app cannot run on macOS Catalina (10.15) or later; USB issues are also reported on newer Windows/macOS systems.
Poll: Which DFU tool for iOS 17 do you like best?
This is a historical iOS 17 reader poll. Votes do not establish support for newer iPhones or iOS releases.
What to Do If Your iPhone Is Stuck in DFU Mode
If your iPhone is stuck in DFU mode, try the correct force-restart sequence for your model first. If it still will not boot normally, Dr.Fone - System Repair (iOS) provides guided Exit DFU instructions and Recovery Mode controls. Recovery entry is free; check current license access before using exit or repair actions.
For deeper system problems, start with Standard Mode when appropriate because it is designed to repair common iOS issues without deleting data. Advanced repair modes may reset the device and erase data, so back up your iPhone before restore whenever possible.
First: Force restart using your model's buttons
Wait for any active firmware restore to finish before trying to restart. For an idle iPhone in DFU, use the row below and release when the Apple logo appears. A force restart itself does not perform an erase-based restore.
| Model | Force restart to exit DFU |
|---|---|
| iPhone 8 and later, including SE (2nd/3rd generation) | Quickly press/release Volume Up, quickly press/release Volume Down, then hold Side until the Apple logo appears. |
| iPhone 7 / 7 Plus | Hold Side + Volume Down together until the Apple logo appears. |
| iPhone 6s or earlier, including SE (1st generation) | Hold Home + Side/Top together until the Apple logo appears. |
Let the phone finish booting, then check that it reaches the lock screen and responds normally. If it immediately returns to a cable screen or stays black, confirm the state using the screen and detection checks before choosing repair or restore.
Dr.Fone Exit DFU Mode: Two core steps
Install the desktop Dr.Fone application on your Windows PC or Mac and connect the iPhone with a USB data cable. Check feature access in your current license. This guided feature still requires working model-specific buttons; it is useful when you want the instructions displayed on the computer.
Step 1: Open the iPhone Exit DFU option. In Dr.Fone, open Toolbox > System Repair, choose iPhone, then select Exit DFU Mode.
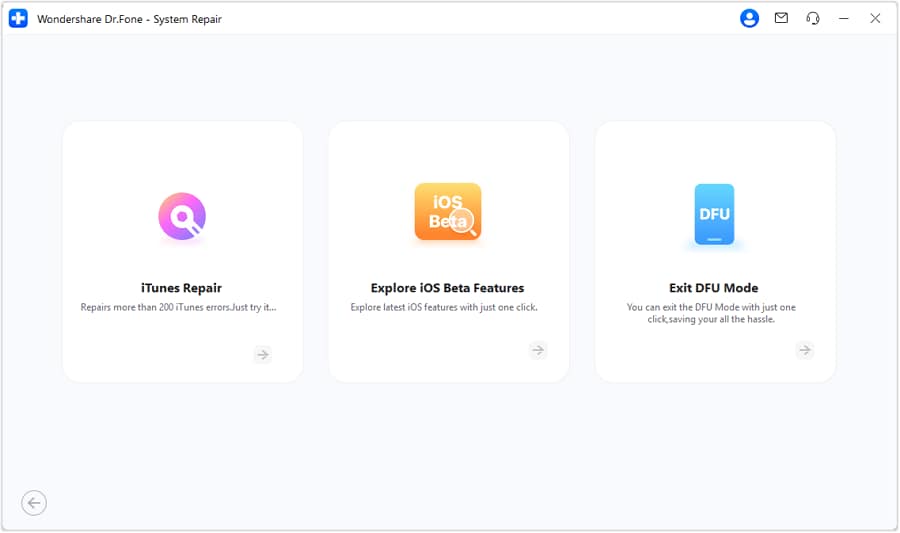
Step 2: Select your model and follow its button instructions. Choose the range containing your actual iPhone and follow the displayed sequence to exit DFU. Allow the phone to restart and confirm it reaches a responsive lock screen. If it still will not boot, use the options below; repeating guided button presses will not repair a hardware fault.
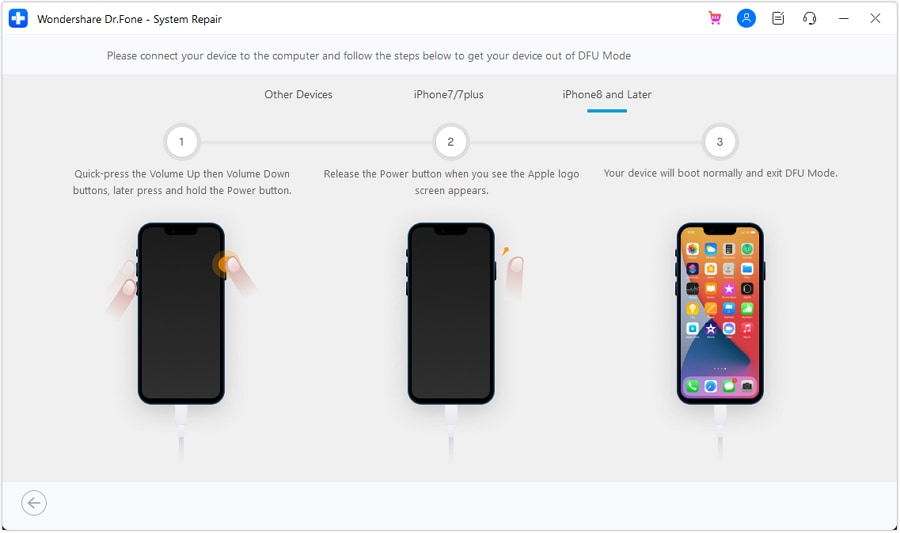
For interface differences between Windows and Mac, see the official Exit Recovery/DFU Guide.
If the iPhone still will not boot: Update, repair or restore
Choose by the actual state: if Recovery Mode offers Update, Apple recommends trying it first when you have not already done so. A deeper DFU restore is an erase-based fallback. Dr.Fone Standard Repair is designed to retain data during supported software repairs; Advanced Repair resets/erases the device. For the full firmware-download and repair procedure, use the Standard Repair Guide. Do not select Advanced or Restore if your aim is only to leave DFU.
- Prepare and select the iPhone. Back up first if it is accessible. Open current Finder or Apple Devices, keep the USB cable connected, and select the detected device. For Recovery entry, use Apple's model-specific Recovery instructions. For DFU, use the entry table above.
- Decide before confirming. In Recovery, try Update if available and not already attempted. If you accept erasing the iPhone, select Restore and follow the computer's confirmation prompts. DFU can offer Restore without an Update option. Keep the phone connected while the software downloads and reinstalls.
- Complete setup and verify. After Restore, wait for the Hello screen, set up the iPhone and restore an available backup when offered. Confirm your important data after setup. If update/restore fails, record the error and use Apple support; if a required button is damaged or the device stays undetected, arrange service.
 safe & secure
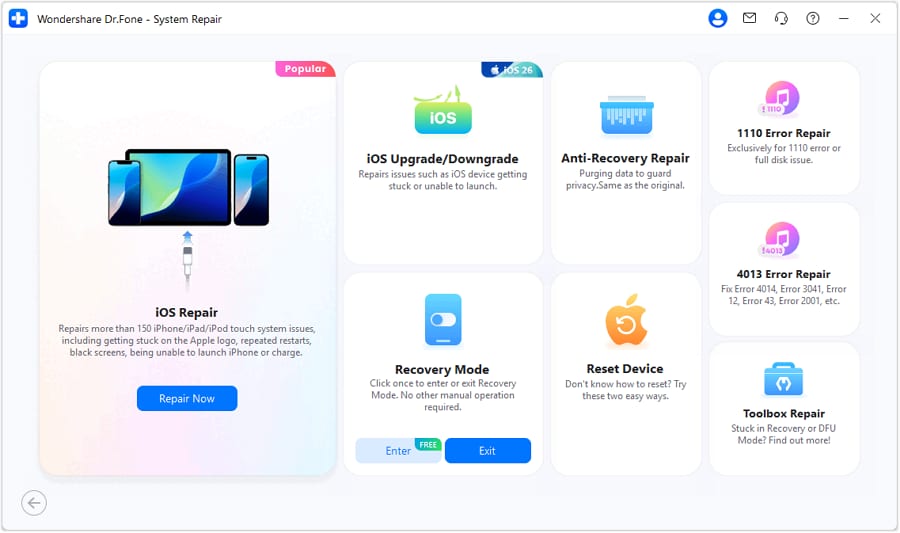

Dr.Fone - System Repair
Get guided DFU exit instructions and choose the right iOS repair mode.
- Fix with various iOS & iPadOS system issues like stuck in DFU mode, stuck in recovery mode, white Apple logo, black screen.
- Standard Repair is designed to retain data; Advanced Repair erases the device.
- Select the supported device and the correct model instructions for your operation.
- Desktop tools for Windows and Mac; feature and license access vary.



FAQ About iPhone DFU Mode Tools
Is there a free iPhone DFU mode tool?
Yes. The model-specific button sequence is a free way to enter true DFU; Finder or Apple Devices detects the connected iPhone. Recovery control and iOS repair are separate features. Dr.Fone confirms free Recovery entry, while exit and repair access should be checked against your current license. Use the comparison table to choose by the actual task.
Can I put an iPhone into DFU mode without buttons?
The current methods documented here require model-specific buttons for true DFU. An iPhone 8 or newer does not need its Home button for DFU, but still needs Volume and Side buttons. Software-triggered Recovery and on-screen DFU guidance do not establish automatic, buttonless DFU. If a required button is physically faulty and prevents Recovery, seek service.
Does entering DFU mode erase iPhone data?
Entering DFU alone does not perform a restore. Selecting Restore erases the iPhone and reinstalls iOS. Dr.Fone Standard Repair is designed to retain data; Advanced Repair resets/erases it. Back up an accessible device before choosing an erase-based action.
Is RecBoot a DFU tool?
RecBoot is primarily a legacy Recovery Mode utility. It can enter or exit Recovery Mode, which is different from true DFU mode.
What should I use on Windows or Mac?
On a Mac, current Apple restore workflows use Finder. On Windows, Apple uses the Apple Devices app; iTunes may still apply in older supported setups. For DFU itself, use the correct button sequence for your iPhone model.
What if my iPhone is stuck in DFU mode?
Use the model-specific force-restart table above, then confirm a normal boot. For guidance on the computer, follow the two Dr.Fone Exit DFU steps. If it still fails, try Update in Recovery when available, consider supported Standard Repair, or choose Restore only after accepting that it erases data. The complete exit and fallback paths are in the stuck-DFU section.
How long does a DFU restore take?
There is no single verified completion time for every DFU restore; the software download, connection and device determine it. Keep the iPhone connected and follow progress on the computer. In Apple's Recovery Mode workflow, a download taking more than 15 minutes can cause the iPhone to leave the cable screen: let the download finish, then repeat Recovery entry. That 15-minute rule is not a promise about total DFU restore time.
Conclusion: Choose the Method by Your Actual Goal
For a current iPhone, start with the correct model-specific DFU sequence rather than an old utility. Use legacy tools such as RecBoot, iREB, EasyiRecovery, TinyUmbrella, and RedSn0w only when you specifically need an older workflow and can confirm the source and compatibility. If your iPhone is already stuck in DFU mode or still cannot boot after simpler steps, use a current exit or system-repair option before moving to an erase-based restore.
Can’t exit DFU mode or your iPhone still won’t start? Try Dr.Fone - System Repair’s guided Exit DFU Mode feature after checking license access. Choose a repair mode only for deeper software recovery, and review its data-loss boundary first.
safe & secure

iPhone Reset
- iPhone Recovery Mode
- 1. Exit iPhone Recovery Mode Loop
- 2. iPhone in Recovery Mode
- 3. iPhone Recovery Mode
- 5. Get Data from iPhone in Recover Mode
- 6. Put iPhone in Recovery Mode
- 7. Recuva Data Recovery Review
- 8. DFU Mode vs Recovery Mode
- iPhone DFU Mode
- 1. Put iPhone in DFU Mode
- 2. Enter and Exit DFU Mode
- 3. Get Data from iPhone in DFU Mode
- 4. Tools for iPhone to Enter DFU mode
- 5. Enter/Exit DFU Mode on iPhone X
- 6. Enter/Exit DFU Mode on iPhone SE
- 7. DFU Mode Works on iPhones
- 8. Enter DFU Mode on iPod Touch
- iPhone Factory Reset
- 1. Factory Reset iPhone
- 2. Factory Reset iPhone without iTunes
- 3. Reset iPhone without Passcode
- 4. Reset iPhone Without Apple ID
- iPhone Hard Reset
- 1. Hard Reset Without Computer
- 2. Force Restart iPhone
- 3. Restart or Force Restart iPhone
- 4. Hard/Soft/Factory Reset iPhone 8
- iPhone Reset Tips
- 1. Soft Reset iPhone
- 2. Restart or Reboot iPhone
- 3. iPhone Reset All Settings
- 4. Reset iPhone Battery
- 5. Reset iPhone without Apple ID
- 6. Reset Jaibroken iPhone
- 7. Reset Network Settings On iPhone
- 8. Reset Restriction Passcode iPhone
- 9. Restart iPhone Without Power Button
- 10. Turn Off iPhone Without Home Button
- 9. Turn off iPhone without Screen
- 10. Reset Disabled iPhone
- ● Manage/transfer/recover data
- ● Unlock screen/activate/FRP lock
- ● Fix most iOS and Android issues
- Free Download Free Download Free Download


 > How-to > Phone Repair Solutions > iPhone DFU Mode Tools in 2026: Free Options, Legacy Utilities & What Actually Works

Alice MJ
staff Editor
Generally rated4.5(105participated)