Easily Root Samsung J7 without PC

May 19, 2026 • Filed to: Device Data Management • Proven solutions
 TL;DR:
You can root a Samsung J7 without a PC by installing the Framaroot APK, selecting Install Superuser, and running the Aragom exploit, but success relies entirely on your specific device variant and security configuration.
● Essential prerequisites before starting include maintaining at least a 50% battery level, disabling Fast Boot, and manually enabling Unknown Sources to permit the third-party APK installation.
● The exploit is not universally compatible and frequently fails on models like the Samsung J7 2016, J7 Prime, and J7 Pro because differing firmware builds and tighter security protections block the process.
● Gaining root access involves permanent trade-offs that void your device warranty, break OTA updates, and trigger compatibility errors with banking or security-sensitive applications.
Ask AI for a summary
 ChatGPT
 Perplexity
 Gemini
 Claude
 Grok
Grok
Dr.Fone Basic:
Better Control for Your Phone
Manage, transfer, back up, restore, and mirror your device
If you want to root a Samsung J7, the short answer is yes—you can try rooting it without a PC, but you need to prepare the device properly and understand the risks first. Root access can unlock deeper control over your phone, help you remove restrictions, and give advanced users more customization options. For people searching for how to root Samsung J7, root Samsung J7, or Samsung J7 root, the most important part is not the APK itself but making sure the phone is ready, backed up, charged, and allowed to install required files. This guide explains the essential preparation steps and then shows a no-PC method you can try on a Galaxy J7.
Part 1: Preparation of rooting Galaxy J7
Before you start the Samsung J7 root process, prepare the device carefully. Proper preparation improves the success rate, reduces the chance of boot issues, and helps protect your personal data if something goes wrong. Whether you are trying to root a standard Galaxy J7 or searching for information related to root Samsung J7 2016, the checklist below covers the basics you should complete first.
1. Backup all your files first
Always create a full backup before you attempt to root your phone. Rooting can fail, force a reset, or cause apps and files to become inaccessible. It is strongly recommended that you back up all your important files on Samsung J7, including photos, contacts, messages, videos, and app data, so you can restore everything if the process does not go as planned.
2. Keep the device powered on
Your Samsung J7 must remain powered on during the entire procedure. Any interruption while installing a root package, granting permissions, or applying an exploit can break the process and may leave the phone stuck, unstable, or unresponsive.
3. Maintain at least 50% battery level
Make sure the battery is at least 50%, although a higher level is even better. Rooting can take longer than expected, especially if you need to retry a step, reboot the phone, or wait for an app to finish processing. A low battery during rooting is an unnecessary risk.
4. Disable Fast Boot
If Fast Boot is enabled, disable it before you begin. On many Android devices, this helps avoid boot-related conflicts during advanced system changes. You can usually check this by going to Settings > Battery and turning Fast Boot off if the option is available.
5. Ensure a steady internet connection, WiFi if possible
A stable internet connection helps when downloading the required APK, verifying app resources, or checking updates. WiFi is recommended because interrupted downloads or incomplete installation files can cause the rooting process to fail before it even starts.
6. Allow installation of apps from unknown sources
Most no-PC root methods rely on third-party APK files, so you need to allow installation from unknown sources before proceeding. On Samsung J7, go to Settings > Security > Unknown Sources and enable the option. Only install files from sources you trust, because unofficial APKs can be modified, outdated, or unsafe.
7. Understand the risks before you continue
Rooting gives you elevated system access, but it also comes with trade-offs. You may void your warranty, weaken device security, break OTA updates, or run into compatibility issues with banking, streaming, or security-sensitive apps. Some Galaxy J7 software versions also have tighter protections, so root methods that worked on one model or patch level may not work on another.
8. Confirm your exact device variant
Before rooting, verify your exact Galaxy J7 model number and Android version. This matters because a method that works for one version may fail on another. Many users search for terms like root J7, root Samsung J7 2016, or Samsung J7 root without realizing that variant differences can affect compatibility, exploit availability, and success rate.
- Check your model number in Settings > About phone.
- Confirm the Android version and security patch level.
- Do not assume that one APK works for every Galaxy J7 variant.
- Read user feedback on the specific version you plan to root.
Part 2: How to root Galaxy J7 without PC
If you do not have a computer available, you can try rooting the Galaxy J7 directly on the phone by using a rooting APK. In this guide, the no-PC approach uses Framaroot. This method is popular because it is simple and does not require a desktop setup, but it may not work on every Samsung J7 software build. The exact result depends on your model, Android version, and security configuration.
Before you begin, remember these points:
- This method is designed for users who want to root Samsung J7 without a PC.
- Success is not guaranteed on every Galaxy J7 device.
- Download files carefully and avoid unofficial mirrors you do not trust.
- If the exploit fails, the problem is often device compatibility, not your steps.
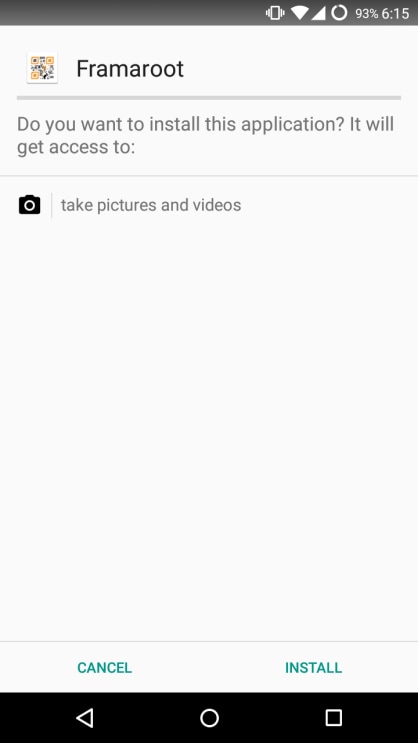
Step 1 - Download and install the Framaroot APK on your Samsung J7
First, download the Framaroot APK to your phone and install it. One source mentioned in the original workflow is https://framarootappdownload.net/framaroot-apk/. After the file is downloaded, open it with your Android file manager and tap INSTALL. If installation is blocked, go back and confirm that Unknown Sources has been enabled in your security settings.
At this stage, make sure the APK finishes downloading completely. A corrupted or incomplete file is one of the most common reasons a no-PC root attempt fails early.
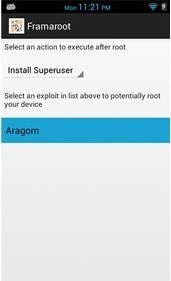
Step 2 - Launch Framaroot
After installation, open Framaroot on your Galaxy J7. When the app launches, choose the option Install Superuser. This step tells the app what type of root management action you want to perform. If your device is compatible, this is the point where Framaroot prepares to apply the exploit needed for root access.

Step 3 - Select the exploit
Once you choose Install Superuser, the app will show available exploit options. Tap Aragom to continue. Framaroot then attempts to use the exploit to gain the permissions required for rooting.
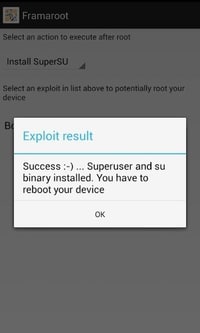
During this step, do not close the app or interrupt the process. Wait a few seconds and watch for the result message. If the exploit works on your Samsung J7, you should see a confirmation popup indicating that the device has been rooted successfully.
When the success popup appears, restart the phone if the app recommends it. After rebooting, you can verify root access by checking for the installed Superuser app or by using a root checker utility from a trusted source.
What to do if Framaroot does not work
If Framaroot fails, it does not always mean your phone has a problem. In many cases, the exploit is simply not compatible with that Galaxy J7 firmware version. You can try the following:
- Recheck your exact model number and Android version.
- Make sure the APK was installed correctly and fully downloaded.
- Restart the phone and try again once.
- Verify that battery level and internet connection are stable.
- Look for a root method that specifically targets your J7 variant.
Is rooting the Samsung J7 worth it?
Rooting can still be useful if you want more control over an older device, remove system restrictions, run advanced apps, or customize Android more deeply. However, it is best suited to users who understand the trade-offs. If you mainly want better maintenance, backup, or device management rather than full root access, a safer software-based solution may be the better choice.
That is how to prepare for and attempt a Samsung J7 root without a PC. In short, the process is simple on paper: back up your data, prepare the device correctly, install Framaroot, choose the exploit, and confirm whether the root succeeds. The real key is compatibility. If your exact Galaxy J7 variant supports the exploit, the method can be quick and convenient. If not, do not force repeated attempts without checking the device model, Android version, and potential risks first.
FAQs
Dr.Fone Basic:
Better Control for Your Phone
Manage, transfer, back up, restore, and mirror your device


Android Root
- Generic Android Root
- 1. Text Message Apps for Android
- 2. Root Android ONE Devices
- 3. Best Android Root File Managers
- 4. Get Root Access with Computer
- 5. Delete Preinstalled Apps on Android
- 6. Get Free In-APP Purchase
- 7. Wifi Hotspot Apps without Rooting
- 8. Get Root Access on Android
- 9.Root Android Devices
- 10.Root Android Phones and Tablets
- 11.Root Smartphone on Android
- 12.Why Root Android and How to Root it
- 13.Root Android 4 Series in Two Ways
- 14.Tools to Root Android Online
- 15.Root Android without PC
- Specific Android Root
- 1. Root Samsung Galaxy S7& S7 Edge
- 2. Root LG Devices with Root Script
- 3. Samsung Root Software to Root
- 4. Root Motorola Devices
- 5. 2 Solutions to Root ZTE Devices
- 6. Solution to Root Huawei P9 Safely
- 7. 2 Methods to Root Nexus 7 Easily
- 8. Solutions to Root Sony Devices
- 9. Root Any HTC Device in One Click
- Android Root Tools
- ● Manage/transfer/recover data
- ● Unlock screen/activate/FRP lock
- ● Fix most iOS and Android issues
- Free Download Free Download Free Download


James Davis
staff Editor