
How to Unlock SIM on iPhone 7/6s/6/5s/5c: 3 Step-by-Step Guides

Jun 30, 2026 • Filed to: Screen Lock Removal • Proven solutions
 TL;DR:
You can unlock a carrier-restricted iPhone by submitting an official request to your network provider if contract conditions are met, or bypass the lock directly using dedicated software like Dr.Fone - Screen Unlock (iOS).
● Official carrier requests require a fully paid contract, an account in good standing, and a minimum active service period of 60 days for AT&T and Verizon, or 40 days for T-Mobile.
● Bypassing the carrier lock via Dr.Fone - Screen Unlock (iOS) removes the need for provider approval but strictly requires you to jailbreak the device, manually forget all saved Wi-Fi networks, and disable Wi-Fi before the software can execute the unlock.
● Remote IMEI unlocking websites provide an alternative for older models like the iPhone 7, 6, and 5 series, though general third-party services carry high scam risks and low success rates compared to refund-backed options like Dr.Fone SIM Unlock.
Ask AI for a summary
 ChatGPT
 Perplexity
 Gemini
 Claude
 Grok
Grok
Dr.Fone Basic:
Better Control for Your Phone
Manage, transfer, back up, restore, and mirror your device
Are you stuck with a single carrier on your iOS device and want to remove this restriction? A locked SIM can prevent you from switching carriers, making it frustrating when you need flexibility. Hence, removing these limitations is vital to enjoy a full user experience on your iDevice. Several methods exist to achieve this goal, from contacting your carrier to using dedicated tools.
Some solutions are quick and free, while others may require a small fee. Nevertheless, the selection of a suitable method is dependent on the specific situation. This deep dive will walk you through simple and effective ways you can learn how to unlock your SIM on your iPhone. Follow the steps carefully to restore network compatibility and enjoy effortless connectivity.

Part 1. What Are the Key Benefits of Unlocking SIM Restrictions on Your iPhone?
Removing the carrier limitations from your smartphone grants you the freedom to do a lot more. Unlocking the SIM on your iOS device provides several advantages, enhancing both flexibility and usability. Summarized below are a few benefits you can reap after learning how to unlock your iPhone carrier:
1. Freedom to Switch Carriers
With a locked SIM, you might not be able to take advantage of deals or coverage from other networks. By removing this restriction, you can switch to any carrier of your choice and select better plans or coverage.
2. Hassle-Free International Travel
When journeying abroad, a locked SIM forces you to rely on expensive roaming services. Getting rid of it lets you utilize a local network, significantly reducing roaming charges.
3. Increased Resale Value
Mobiles without any SIM restrictions attract more buyers since they are compatible with multiple carriers. Doing so can boost its market value and make it easier to find a buyer if you plan to sell your device.
4. More Affordable Plans
Carrier-locked devices often come with higher-priced plans. With an unlocked phone, you can choose budget-friendly prepaid or postpaid options to save money in the long run.
5. No Carrier Restrictions
Some network providers impose restrictions on features like hotspot sharing or specific apps. Unlocking your phone removes these limitations, and it lets you use your device without restrictions.
Part 2. How to Check If Your iPhone is Carrier Locked or Unlocked?
Before attempting removal, verify that these restrictions are present on your phone. Knowing that they actually will help you choose the best unlocking method. Several ways to check your mobile’s carrier status exist but doing it through the device's settings is the easiest one. By following these simple steps, you can quickly determine if you want to run the carrier unlock iPhone operation:
Step 1. Make your way to your phone’s Settings app icon and tap to access the device configurations. Within this app, scroll down to find the “General” tab and press the option to access its options.

Step 2. Following that, press “About” from the top of the list and locate the “Carrier Lock” option on the next screen. If this option is set to “SIM Locked,” that means your iOS device is locked to a specific carrier.

Part 3. Basic Methods | How to Unlock SIM on iPhone
Getting rid of the carrier restriction is a straightforward process as long as you meet certain requirements. You can choose to go through your carrier or use third-party services, both ways can effectively remove the SIM lock. The optimal approach should be chosen based on individual preferences and aptitudes. Detailed below are the two approaches you can take to deal with a SIM-locked iPhone:
Method 1. Contact the Carrier Support [Too Many Requirements]
The most straightforward way to remove the SIM restrictions is to utilize the official method. However, it only works when you have completed the requirements set by your carrier. The following prerequisites are needed before submitting an unlock request:
- To proceed, an account in good standing with no left-over balances or unpaid bills is needed. Unresolved financial issues may result in the denial of your request.
- Verify that your phone is eligible for unlocking by meeting the requirements, such as minimum period of service or device age. For instance, AT&T and Verizon need your device to be at least 60 days on the network, while T-Mobile requires 40 days.
- Confirm that your device is no longer under a service contract or installment plan with your carrier. Carriers typically require the contract to be completed before processing an unlock request.
Once you meet these requirements, you can proceed to unlock a network-locked SIM card. While the methods for each carrier differ a bit, the following steps should help AT&T users:
Step 1. After you have verified your eligibility, go to the AT&T Device Unlock Portal (https://www.att.com/deviceunlock/). Here, you need to select your device brand under the “Unlock an AT&T device” section.

Step 2. Once you select “Apple” as the brand, it will tell you that the company unlocks iOS devices automatically when you meet the requirements. In a scenario where your phone is prepaid, you can “Start an Unlock Request.”

Method 2. Try Any Online SIM Unlocker Service [Low Success Rate]
One way to deal with the carrier restrictions is to approach web services that offer to remove them remotely. However, it's important to note that the success rate of these services can vary a lot. Most of these are considered to be authentic ones and most likely scams. One such service is iPhoneIMEI.net, which offers unlocking solutions for various iOS models. These steps can help you get the network to unlock the code:
Step 1. Begin by accessing the iPhoneIMEI.net website and tapping “Unlock Now” to initiate the operation. Following that, enter the 15-digit IMEI number of your iDevice and the network details.

Step 2. Once done, click the “Unlock for any SIM Card” button and proceed to pay the required fee using one of the available methods. Afterward, wait for up to a day for the service to unlock your iDevice from carrier restrictions.

Method 3. Dr.Fone SIM Unlock Online
If you want to unlock the SIM on older iPhone models without depending only on manual carrier requests, Dr.Fone SIM Unlock can be added as a convenient online option. It helps users remove carrier restrictions through a more guided process and makes switching to another network feel easier.
This is especially useful for users who want a clearer unlock workflow for iPhone 7 Plus, 6, 6s, 5s, 5c, or iPhone 5.
Why many users may prefer this route:
- Use your iPhone with a wider choice of SIM cards and carriers.
- Extra peace of mind through refund-backed protection.
- No reset process or risky system changes involved.
- Switch carriers in a more convenient way.
- Your device stays with you from start to finish.
- Built for faster handling than many traditional unlock paths.
Go to the Dr.Fone SIM Unlock website and begin the request from your browser.
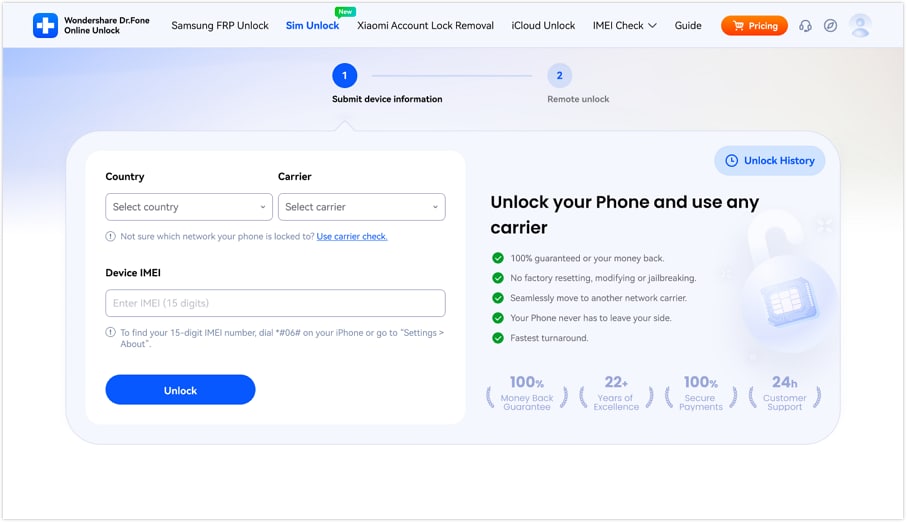
Select the matching carrier information and enter the IMEI of your iPhone carefully to continue.
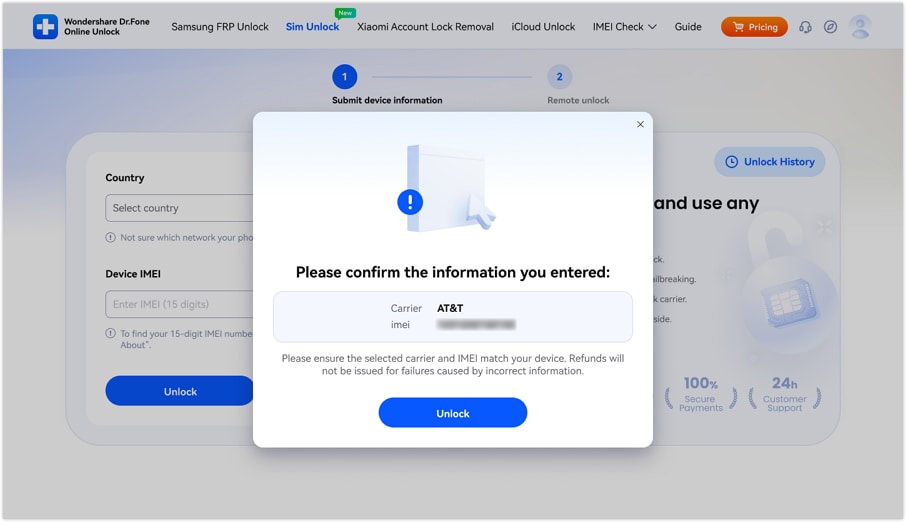
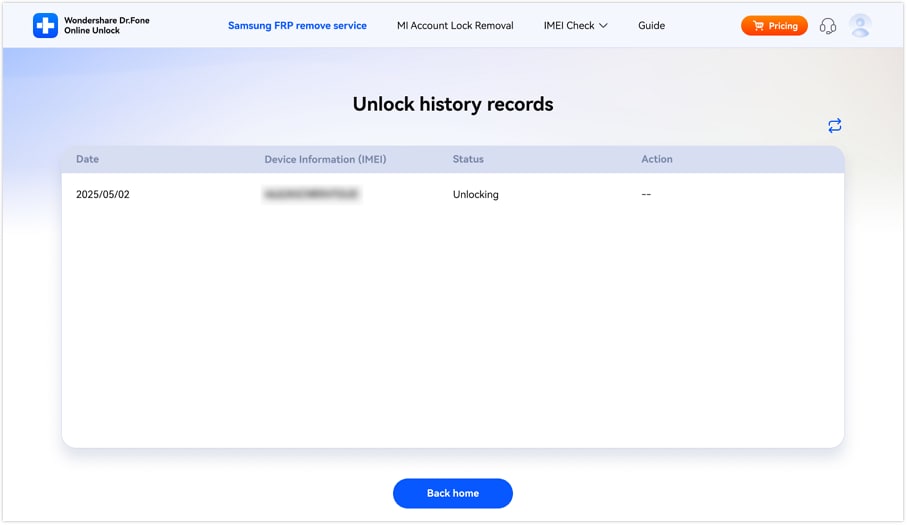
Review the details, submit the order online, and later check the unlock result through the status page or your notification email.
Part 4. Uncover the iPhone Unlocker to Fix SIM Not Supported on iPhone Error
Trying to use a SIM card from a different network when your phone is carrier-locked will result in an error. While the methods mentioned earlier may work in certain situations, you need a more reliable solution. The best choice in this regard is to opt for Dr.Fone - Screen Unlock (iOS), an advanced SIM unlocker. This powerful software is designed specifically for iDevice to remove different sorts of phone restrictions.
It offers an effortless and efficient way to fix carrier-related issues such as the "SIM Not Supported" error. Unlike traditional unlocking methods, this tool guarantees a quick and easy unlock process with a few clicks. Moreover, it supports all SIM not supported iPhone models and is compatible with the latest iOS versions. The software also ensures that your data remains intact, offering peace of mind throughout the unlocking process.
Benefits Associated with Using Dr.Fone - Screen Unlock (iOS)
- Unlock your SIM card without requiring an Apple ID, making the process simple even if you’ve forgotten your credentials.
- Get your phone unlocked in no time without waiting for carrier approval, providing a quick and effective solution.
- Resolves common SIM-related errors, including "Invalid SIM," "SIM Not Supported," and "No Service."
Dr.Fone - Screen Unlock
Unlock SIM on iPhone
- Simple, click-through, process.
- Unlock screen passwords from all iPhones and iPads or bypass the activation lock.
- No tech knowledge is required, everybody can handle it.
- Support all iPhone/iPad/iPod Touch and all iOS versions fully!


Step-by-step Guide on Fixing SIM Not Supported on iPhone Error via Dr.Fone - Screen Unlock (iOS)
Its user-based approach with clear instructions ensures that even non-technical users can perform the operation. You can adhere to the following detailed instructions to learn how to unlock a SIM-locked iPhone:
Step 1. Access the Remove SIM Locked Feature to Select It
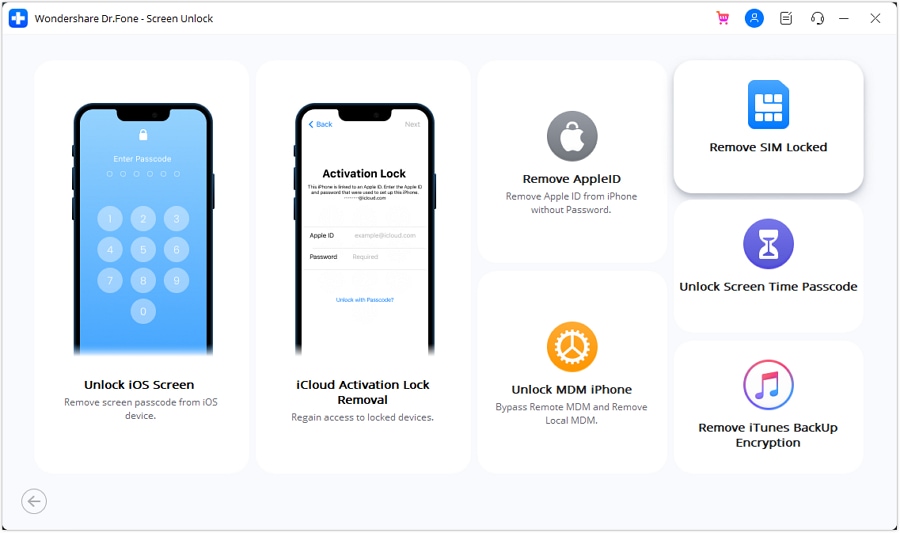
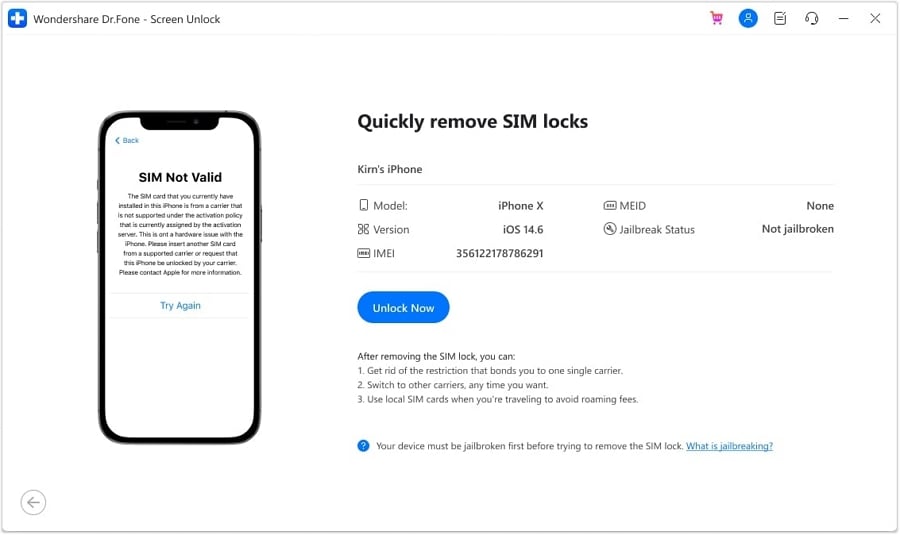
Kickstart this task by running Dr.Fone on your system and navigating to the “Toolbox” section. Here, opt for the “Screen Unlock” option and choose “iOS” when the program asks for the device type. Following that, click “Remove SIM Locked” from the screen unlock menu and link your iDevice using a USB cable.
Step 2. Proceed With the Carrier Lock Removal
Once the phone is attached, hit the "Start" button and follow it by clicking "Unlock Now" on the next screen. At this point, you will be asked to jailbreak your iOS device to proceed with the operation. Here, the program will provide both visual and textual guides to ensure you are capable of doing this. Afterward, approach your phone and access the “WLAN” settings to view the list of connected networks.
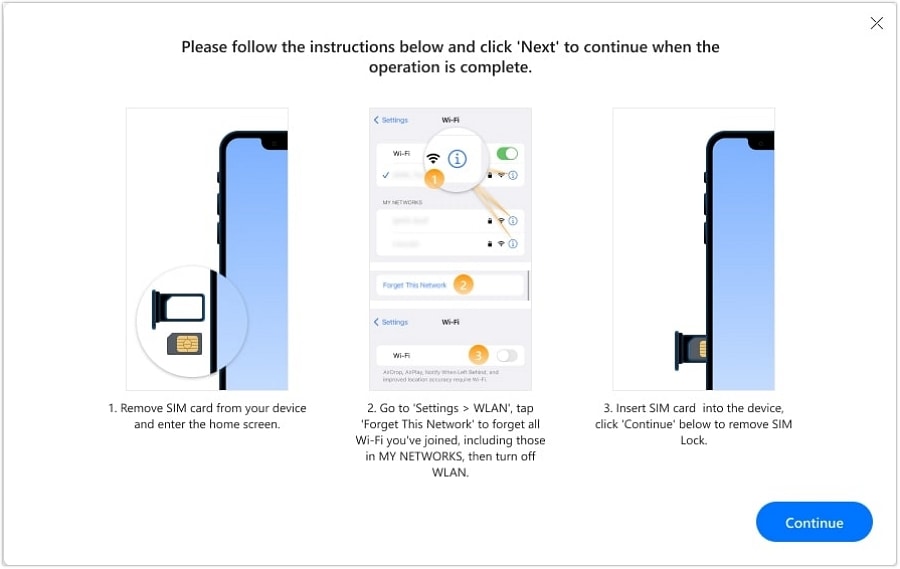
Step 3. Remove All Saved Wi-Fi Networks to Remove the Restrictions
Here, use the "Forgot this Network" option on all saved networks on your phone and turn off the Wi-Fi afterward. When done with that, hit "Continue" on the program screen and wait for it to remove the carrier lock from your mobile. Lastly, tap "Done" to conclude this operation when your iDevice has been freed from restrictions.
Conclusion
In summary, unlocking a SIM-locked iPhone opens up new possibilities to change your network carrier. While contacting your carrier is the official method, it comes with strict eligibility requirements. Online unlocking services may seem convenient but often have a low success rate. For a fast, reliable, and hassle-free solution, Dr.Fone - Screen Unlock (iOS) stands out as the best option.
It bypasses SIM locks without needing carrier approval, works on almost all iOS models, and ensures data safety. Hence, this tool provides the most effective way to unlock your device if you’re facing the "SIM Not Supported" error.
Dr.Fone Basic:
Better Control for Your Phone
Manage, transfer, back up, restore, and mirror your device


iPhone 7 to 8 Series
- iPhone 7 Problems
- 1. iPhone 7 Problems
- 2. Screen Record on iPhone 7
- 3. iPhone 6/7 Touch ID Not Working
- 4. Activate iPhone 7 Plus/7/SE(No SIM)
- 5. iPhone 6/7/8 Stuck On Apple Logo
- iPhone 7 Series Tips
- 1. Screen Mirroring iPhone 7/7 Plus
- 2. DFU Mode in Apple iPhone 7/7 Plus
- 3. Factory Reset iPhone 7/7 Plus
- iPhone 7 Transfer
- 1. Restore iCloud Backup to iPhone 7
- 2. Restore iTunes Backup to iPhone 7
- 3. Transfer from iPhone 7 to iPhone 8
- iPhone 7 Unlock
- iPhone 8 Problems
- 1. iPhone 6/7/8 Won't Turn On
- 2. iPhone 6/7/8 Black Screen
- 3. Siri Not Working On iPhone
- 4. Turn Off Find My iPhone
- iPhone 8 Series Tips
- 1. Delete Apps on iPhone 8
- 2. Enter & Exit DFU Mode On iPhone 8
- 3. Screen Mirror on iPhone 8/8 Plus
- 4. Screen Record on iPhone 8/8 Plus
- 5. Recover Deleted Message on iPhone 8
- 6. Sell iPhone 8/8 Plus
- 7. Hard/Soft/Factory Reset iPhone 8
- 8. iPhone 8 Tips and Tricks
- iPhone 8 Transfer
- 1. Transfer from iPhone 5S to iPhone 8
- 2. Transfer from iPhone 6 to iPhone 8
- 3. Back up iPhone 8
- 4. Back up Locked iPhone Data
- iPhone 8 Unlock


Selena Lee
chief Editor