Recover photos, messages, WhatsApp, and more — no backup
needed.
Recover photos, messages, WhatsApp, and more — no backup
needed.

 100% Security Verified | No Subscription Required | No Malware

 :
: 
 ChatGPT
 Perplexity
 Gemini
 Claude
 Grok
Grok
As technology progresses into 2026, preserving the cherished memories, essential contacts, and critical documents on your mobile devices remains absolutely critical. If you use and operate an older but reliable device, knowing exactly how to back up iPhone 8 is the ultimate safeguard. With a robust archiving strategy in place, you never have to panic about losing your device, since all the essential data stored on your damaged or misplaced phone will be securely preserved in your chosen backup repository.
Unlike simply copying files to a portable memory card, a dedicated backup framework provides you with a comprehensive safety net, particularly if you manage a massive volume of application data, photos, and messages that you wish to safeguard for future restoration. In this extensive guide, we will painstakingly describe three highly effective methods on how to back up your device, including the popular (Red) iPhone 8 edition.
In this article
Part 1. How To Back up (Red) iPhone 8 Using iCloud
If you are actively searching for a completely wireless and integrated manner of saving your (Red) iPhone 8 data, look no further than the official iCloud ecosystem. Learning how to backup iPhone 8 via iCloud means you don't need external cables or a secondary computer. Just follow these streamlined steps to initiate your secure cloud upload.
-
Step 1 Connect to a Stable Network
The very first thing to do is to securely connect your iPhone 8 to an active and reliable Wi-Fi connection. A stable network ensures your backup completes without data corruption.
-
Step 2 Navigate to Your Profile
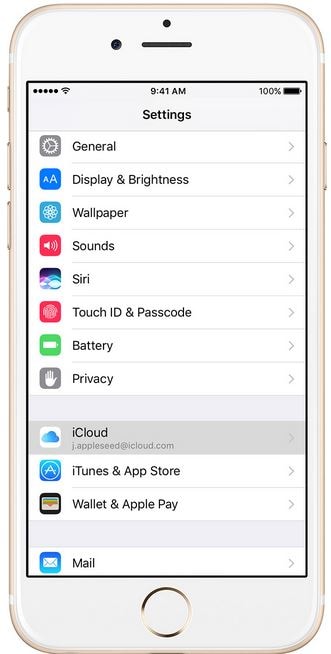
Once you establish an active connection, tap on the "Settings" application on your iPhone's home screen. Tap on your Apple ID banner at the top, scroll down, and select "iCloud" to reveal your storage details.
-
Step 3 Enable the Feature
Under the iCloud menu options, tap on "iCloud Backup." Turn on your automatic cloud synchronization by toggling the button to the right so it turns green.
 Note: You should only need to toggle this switch if your iCloud backup status was previously turned off.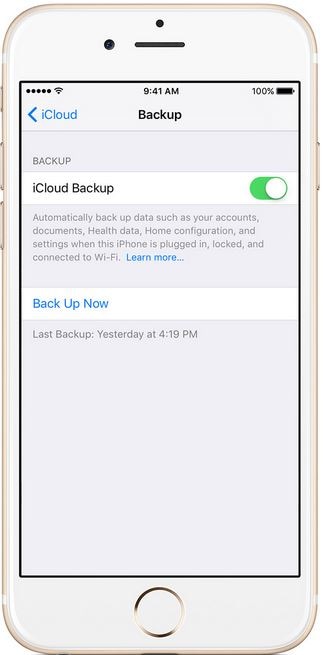
-
Step 4 Execute the Backup
Tap on the "Back Up Now" prompt to forcefully trigger the backup process immediately. Try to maintain an active Wi-Fi connection during this entire period to prevent unexpected pauses.
-
Step 5 Verify the File
To confirm your data has been successfully saved, navigate back to Settings > [Your Name] > iCloud > Manage Storage > Backups, and finally select your current Device. You should be in a position to easily spot your latest timestamped backup here.
- No external computer or software download is required.
- It is entirely free to execute standard backups.
- Supports seamless daily automatic updates when turned on.
- You cannot selectively choose which files to extract.
- The overall transfer speed relies heavily on Wi-Fi stability.
- Free storage is strictly limited to 5GB per account.
Part 2. How To Backup (Red) iPhone 8 By Using iTunes
Another excellent and time-tested method to back up iPhone 8 is by leveraging the power of iTunes. Apart from streaming live music or organizing your media libraries, this desktop application gives you the incredible opportunity to securely back up all iPhone 8 data right to your local hard drive. This local strategy is perfect for large capacity devices. The following instructions provide a detailed process on how you can execute this seamlessly.
-
Step 1 Launch the Application
Open the latest version of your iTunes program using your PC or Mac. Next, physically connect your iPhone 8 to your computer using its original USB lightning cable.
-
Step 2 Locate Your Device
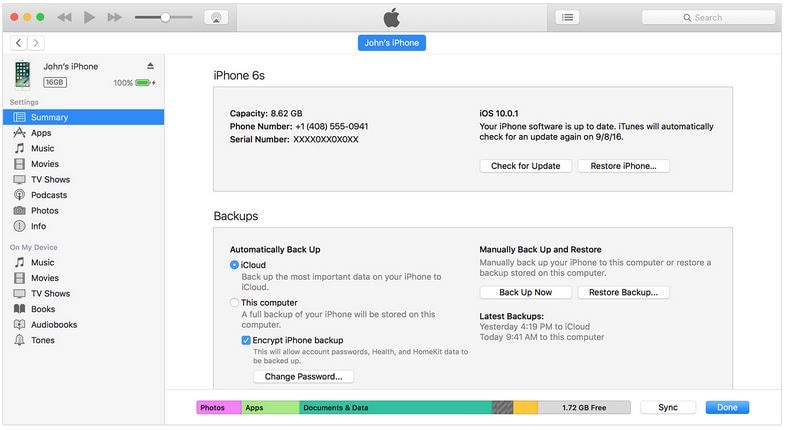
On your main iTunes interface, keep an eye out for a small smartphone icon near the top left corner. Click on the device symbol that displays your specific iPhone's name to open its summary dashboard.
-
Step 3 Initiate Local Backup
A new detailed interface will populate on your screen. Under the "Backups" section, manually click on the "Back Up Now" button to initiate the extensive data transfer process directly to your machine.
-
Step 4 Verify Success
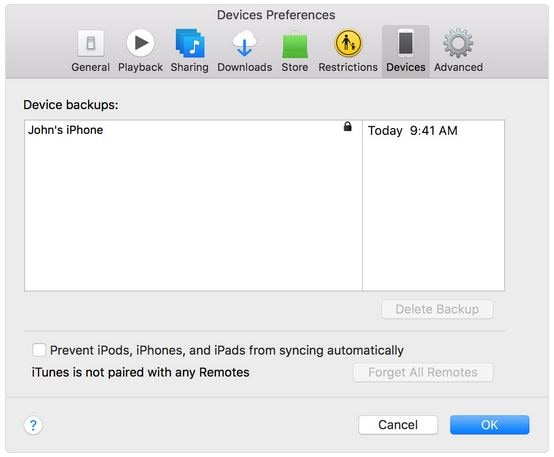
If you are utilizing a Mac, verify the newly created backup folder by navigating to "iTunes Preferences" and finally checking the "Devices" tab. If you happen to be using Windows, click "Edit" from the top menu and then select "Preferences" followed by "Devices" to view the timestamp.
- It is entirely free to preserve extensive device files.
- No complex expertise is required to operate the basic functions.
- Data encryption enables secure storage of saved passwords and health metrics.
- Eliminates dependency on continuous internet availability.
- Tethering with a physical cable can be restrictive.
- The interface and sync processes can feel exceptionally slow and bloated.
- Restoring from it requires overwriting all current device files completely.
Part 3. How To Backup iPhone 8 Fastly and Flexibly
Though iTunes and iCloud represent internally built architectures specifically tailored for standard Apple hardware management, you aren't limited to these rigid frameworks. External third-party programs have evolved to provide far more flexibility to safely back up iPhone 8. One of the most prominent software suites available for this purpose is Wondershare Dr.Fone. With this professional utility, you bypass traditional restrictions and can easily view, select, and manage your (Red) iPhone 8 archives on either your Windows computer or Mac.
 Effortlessly manage data through preview, delete, export, etc.
- Transfer all data between devices.
- Robust backup solutions for reliable data protection.
- Mirror screens to PC for meetings, teaching, and control.

By employing a dedicated manager, users gain unprecedented control over their device preservation without wiping existing logic boards. Here is exactly how to complete the operation using this robust platform.
-
Step 1 Install the Application
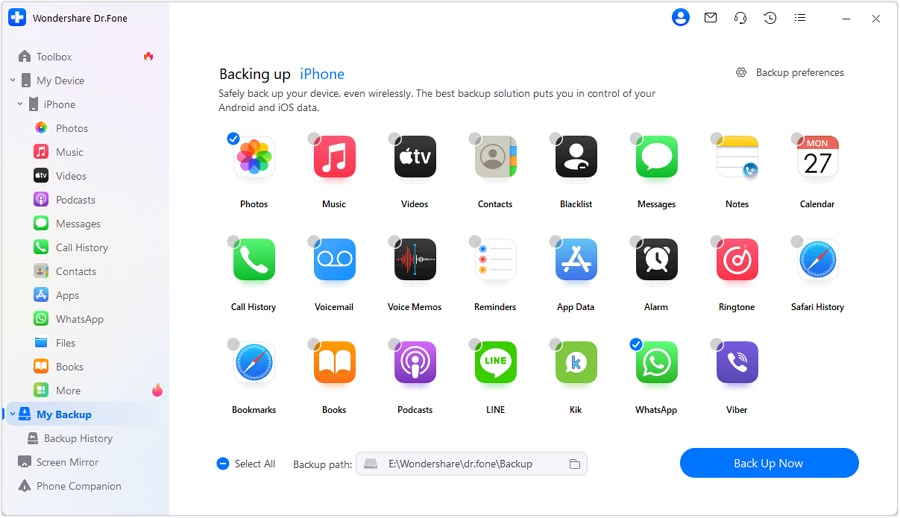
Download and effectively install the software onto your trusted computer, then launch the program. Once you arrive on the primary interface module as depicted below, locate and click on the dedicated "My Backup" utility icon.
-
Step 2 Choose Desired File Types
Once you have securely selected the aforementioned option, a comprehensive, categorized list mapping out all your distinct file types existing on your iPhone 8 will be automatically listed. Select what you need and then click on the prominent "Back Up Now" button to commence.

-
Step 3 Monitor Processing Status
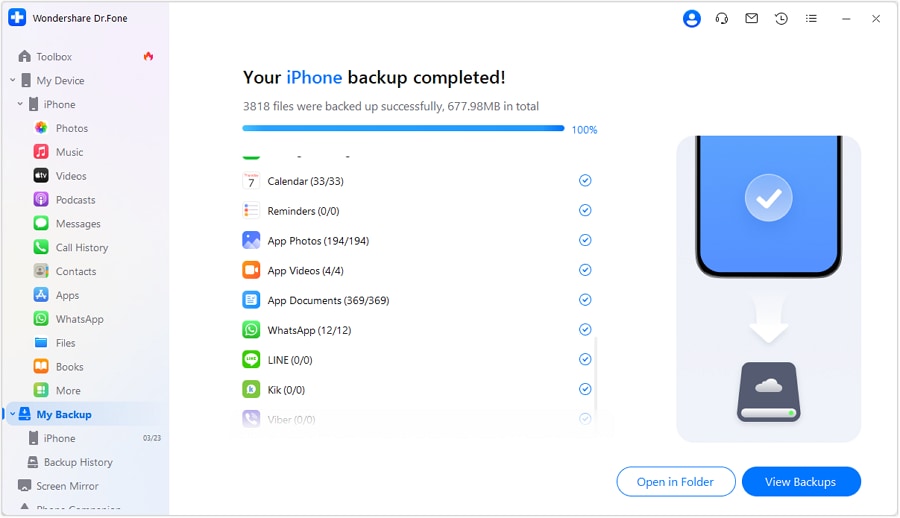
The system will systematically start to back up all targeted files. A progress bar allows you to comfortably view the real-time advancement of the data packaging, ensuring transparency throughout the whole operation.
-
Step 4 Review and Export
When the program fully concludes packaging, the next logical step will be to actively review the generated archives. From here, the choice lies securely with you. If you desperately want to send information back to your mobile hardware, simply click on "Recover to Device." On the flip side, if you just want to read or safely store these items locally on your hard drive, effortlessly click on the "Export to PC" function.

There you have it. Each and every distinct document, photo, or message thread that you deliberately selected for safety reasons will now be perfectly preserved right onto your PC or available for immediate deployment back to your iPhone hardware.




- Allows highly selective exporting rather than demanding full system restores.
- The operational timeframe is exceptionally short compared to traditional software.
- Operates completely independently of active internet requirements.
- Outputs highly readable formats that you can preview on a PC monitor.
- Requires desktop installation before executing mobile operations.
- Access to the absolute full suite of advanced capabilities requires a premium license after the free trial.
Conclusion
From the extensive information rigorously covered throughout this article, it is completely evident that you can swiftly back up your (Red) iPhone 8 using multiple different methods tailored for modern 2026 workflows. In simple terms, the exact framework you choose will essentially depend on your specific personal preferences, internet availability, as well as the exact type of internal information needing to be preserved. It is my sincere hope that when the critical time arrives for you to preserve your memories, you will certainly possess a distinct and professional understanding of what constitutes the best preferred methodology for your circumstances.
FAQ
-
1. Can I safely back up my iPhone 8 if my iCloud storage is completely full?
Yes, absolutely. If your default 5GB iCloud capacity is maxed out, you can securely pivot to utilizing the local iTunes method or specialized software tools which bypass cloud restrictions by archiving your data directly onto your computer's local hard drive.• Local iTunes: Utilizes your available computer storage space.• Desktop Software: Allows selective archiving to prevent redundant file duplication. -
2. Does restoring an iCloud backup erase current data?
Yes, to correctly restore an official cloud archive, Apple requires you to completely factory reset your hardware. This ultimately implies all currently unsaved information since the last cloud sync will be entirely erased and replaced by the downloaded snapshot. -
3. Why is my iPhone 8 taking several hours to successfully back up?
Excessive processing times are heavily tied to severely slow Wi-Fi networks when utilizing cloud servers, or massive storage consumption involving bulky videos. For noticeably faster performance, local transfer applications operating through a direct USB connection are recommended. -
4. Are my stored passwords strictly included when I execute a standard backup?
If you enable the "Encrypt Local Backup" option within your desktop interface, highly sensitive metrics like stored Wi-Fi passwords, specific website logins, and integrated Health app tracking are securely locked away alongside your documents.
 Add Wondershare Dr.Fone as a preferred source on Google