How Do I Reboot an iPhone 7? Complete 2026 Reset Guide

Selena Lee
Selena Lee Originally published Jul 27, 2026, updated Aug 06, 2026
clock :
robot TL;DR:

To resolve iPhone 7 performance issues, a soft restart or a force reboot is highly recommended. If you plan to sell the device, a factory reset is mandatory to wipe personal data.

  • Soft Reset: Best for minor app freezing. Hold the Sleep/Wake button, slide to power off, then turn it back on.
  • Hard Reset: Resolves system crashes. Press and hold both the Volume Down and Sleep/Wake buttons simultaneously until the Apple logo appears.
  • Factory Reset: Erases everything. Always back up your data using reliable tools before proceeding via Settings or Recovery Mode.

Ask AI for a summary

Encountering a frozen screen, sluggish performance, or minor software glitches on your device can be incredibly frustrating. Fortunately, you can get rid of many of these common smartphone issues by simply restarting the device. Rebooting your iPhone 7 remains the simplest yet most effective way to resolve technical hiccups and restore optimal performance. Understanding how do I reboot an iPhone 7 properly can spare you unnecessary stress and a trip to the Apple Store.

This comprehensive 2026 guide covers everything you need to know about fixing your device. We will walk you through step-by-step instructions for performing a soft reset, a hard reset iPhone 7 procedure, and a complete factory reset. Additionally, we will explore advanced methods to securely back up your files or permanently erase your phone data before handing it over to a new owner.

how to reboot iphone
In this article
  1. Part 1. What Is the Difference Between Soft, Hard, and Factory Reset?
  2. Part 2. How To Perform Soft, Hard, and Factory Reset on iPhone [Built-In Functions]?
  3. Pro Tip. How To Secure Your Important iPhone 7 Data Before Factory Reset?
  4. Part 3. How To Factory Reset iPhone 7 With the Most Advanced Data Eraser To Wipe Everything?
  5. Part 4. Other Ways To Factory Reset iPhone 7

Part 1. What Is the Difference Between Soft, Hard, and Factory Reset?

Before diving into the exact steps on how do I reboot iPhone 7, it is crucial to learn about its different forms. You will frequently come across terms like soft, hard, and factory reset across various Apple support forums, and understanding the distinctions between them is the key to applying the right fix.

Each reset type serves a highly specific purpose, and choosing the right one depends entirely on your current system issue. For a clearer understanding, review the comparison table below to see how these troubleshooting methods differ in scope and their overall impact on your storage:

Reset TypeDefinitionUse CasesEffect on Data
Soft ResetRestarting the device gracefully without interrupting its core state.Resolving minor glitches like UI freezing, app lag, or network bugs.No personal data or settings are erased.
Hard ResetForcibly cutting the power cycle and restarting the hardware logic board.Fixing severe unresponsiveness, black screens, or system-wide crashes.No data is erased, but background apps are force-closed instantly.
Factory ResetRestoring the device to its out-of-the-box original settings completely.Preparing the device for resale or fixing deeply corrupted iOS files.All data is permanently erased, reverting to the pure factory state.

Part 2. How To Perform Soft, Hard, and Factory Reset on iPhone [Built-In Functions]?

Now that you fully understand the critical differences between these reset types, it is time to check how you can actively employ them. Each type of reset on your phone is meticulously designed to address specific software severities, and Apple has integrated built-in options for executing them easily. Follow these detailed instructions on how do you reset a iPhone 7 directly from your physical device:

1. Performing a Soft Reset

A soft reset simply involves turning your phone off and back on without disrupting its current data state. Use this basic method to resolve minor glitches like keyboard lag or sudden freezing:

  1. Step 1 Initiate the Power Off Sequence

    Press and hold the “Sleep/Wake (Power)” button located on the right side of the device until the "slide to power off" slider visibly appears on your screen.

  2. Step 2 Turn the Device Back On

    Drag the on-screen slider to switch off the mobile entirely. Wait for about 30 seconds for the power to drain, and then utilize the power key again to turn it back on until you see the Apple logo.

slide to power off iphone7

2. Performing a Hard Reset

A hard reset forcibly restarts your mobile hardware and is the ideal solution for fixing an unresponsive touch screen or severe software crashes. If you've been wondering how to reboot iphone7 when the screen won't work, follow these specific instructions to perform a force reboot:

  1. Step 1 Hold the Correct Button Combination

    Unlike older models, you will have to press and maintain a solid hold on the “Volume Down” button and the “Sleep/Wake” button at the exact same time.

  2. Step 2 Wait for the Apple Logo

    Maintain consistent pressure on both buttons for roughly 10 seconds. Release them only when the iconic Apple emblem shows itself on the screen, indicating a successful hard reboot for iphone 7.

hard reset iphone7

3. Performing a Factory Reset

A factory reset comprehensively restores your device to its original state by securely erasing all personal content and customized settings. Use this method as a last resort for persistent iOS issues or right before selling or trading in your phone.

  1. Step 1 Navigate to Transfer or Reset Settings

    Make your way to the Settings app and launch it to approach the “General” tab. Here, scroll down to the very bottom of the page and opt for the “Transfer or Reset iPhone” option.

locate transfer or reset iphone settings

  1. Step 2 Confirm the Data Erasure

    On the subsequent screen, tap “Erase All Content and Settings”. The system will ask you to confirm the action by providing your passcode or Apple ID password. Finally, confirm your choice and wait for the extensive wiping process to complete.

tap erase all content and settings

Pro Tip. How To Secure Your Important iPhone 7 Data Before Factory Reset?

While soft and hard resets don’t affect your mobile content in any way, a factory reset definitely will. Performing a factory wipe makes it absolutely essential to back up your important files beforehand. Losing irreplaceable contacts, cherished photos, or vital app data can be extremely inconvenient and stressful, so creating a secure, verified backup ensures you have unfettered access to your information whenever needed.

Dr.Fone Basic

Manage, Transfer, Backup & Mirror Your Devices
  • gouEffortlessly manage data through preview, delete, export, etc.
  • gouTransfer all data between devices.
  • gouRobust backup solutions for reliable data protection.
  • gouMirror screens to PC for meetings, teaching, and control.

Dr.Fone Basic

To vastly simplify the backup process, let’s explore Wondershare Dr.Fone for creating local backups quickly and efficiently. It offers unmatched flexibility, allowing you to selectively save specific files or mirror the entire device's contents with just a few clicks. Unlike iCloud or iTunes, which can be restrictive or slow, it gives you complete offline control over the backup and subsequent restore process.

Moreover, you can perform these essential backups wirelessly at regular intervals or rely on the traditional high-speed wired connection. The robust toolkit acts as an indispensable safety net. Get started with the official tool below:
The following is the practical guide to secure your phone content right before you learn how to factory reset your iPhone 7:

  1. Step 1 Launch Dr.Fone and Start Backup

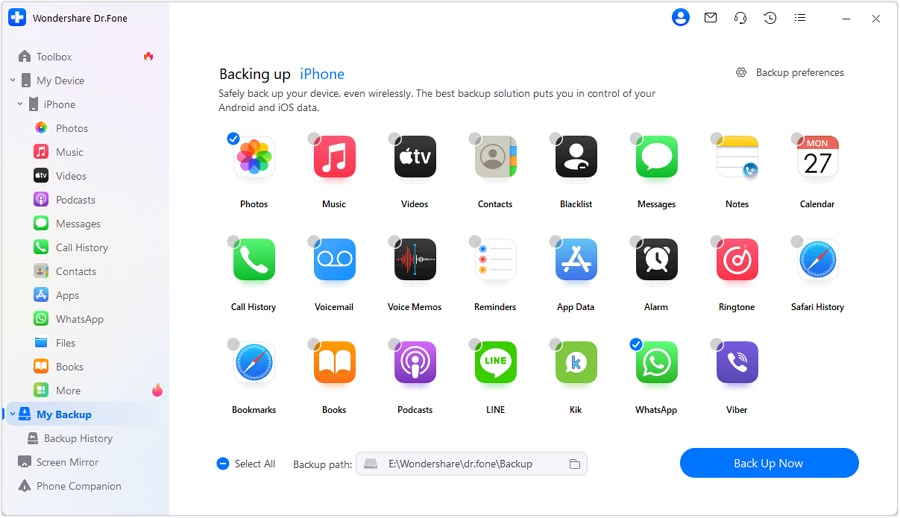
    Launch Dr.Fone on your computer system and securely attach your iOS device to it via USB. Proceed by accessing the “My Backup” tab from the main interface. Now, click the “Back Up Now” button to kickstart the full data backup process of your phone content onto your local hard drive.

click backup now button

  1. Step 2 View and Automate Your Backups

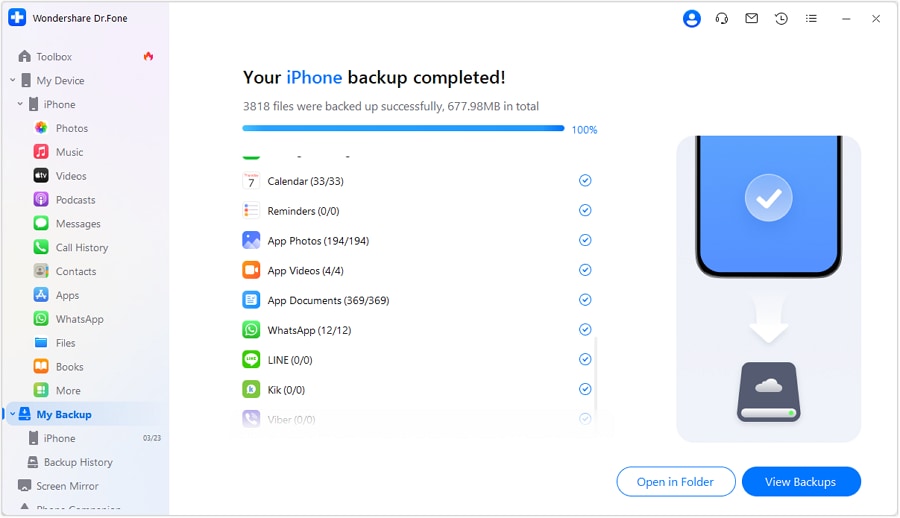
    Once the intensive backup procedure has been verified and completed, you can click “View Backups” to inspect its precise contents. Furthermore, you can press “Backup Preferences” to set up an automatic wireless backup protocol for whenever both your phone and PC are connected to the exact same Wi-Fi network.

press view backup button
google play button app store button

Part 3. How To Factory Reset iPhone 7 With the Most Advanced Data Eraser To Wipe Everything?

When it genuinely comes to securely erasing all sensitive data, a standard iOS factory reset may not always guarantee that your personal information is permanently unrecoverable. Believe it or not, standard resets often leave unallocated traces of data deep in the storage drive that can potentially be retrieved using advanced third-party recovery tools. This oversight could be a massive privacy risk, especially if you are strongly considering selling, recycling, or giving away your mobile.

Dr.Fone - Data Eraser

Erase iOS & Android Data Permanently
  • gouPermanently erase all data on iOS & Android — completely unrecoverable.
  • gouMilitary-grade wiping to fully protect your privacy.
  • gouGenerate verified erasure reports to boost device resale value.
  • gouSelectively erase private data and remove junk & large files.
Dr.Fone Data Eraser

Using Dr.Fone - Data Eraser is undeniably the best option to guarantee your personal information is thoroughly and irretrievably overwritten. It implements complex, advanced data wiping techniques, heavily surpassing standard factory resets to achieve the strictest global data privacy compliance protocols.

What truly sets this specific module apart is its unparalleled ability to selectively erase fragmented private data or confidently wipe the entire device while maintaining optimal hardware efficiency. Armed with military-grade overwrite algorithms, this dedicated tool ensures your phone storage is fundamentally as good as new with absolutely no lingering traces of your past identity. Get the dedicated tool here:

Detailed Guide on How To Securely Wipe Everything Permanently on iPhone 7 via Dr.Fone – Data Eraser (iOS)

The specialized tool features a beautifully quick procedure with unmistakably clear instructions, making it perfectly accessible to digital beginners without severely compromising the advanced functional depth required by tech-savvy power users. Adhere strictly to the following in-depth instructions to securely overwrite your phone content in just a few minutes:

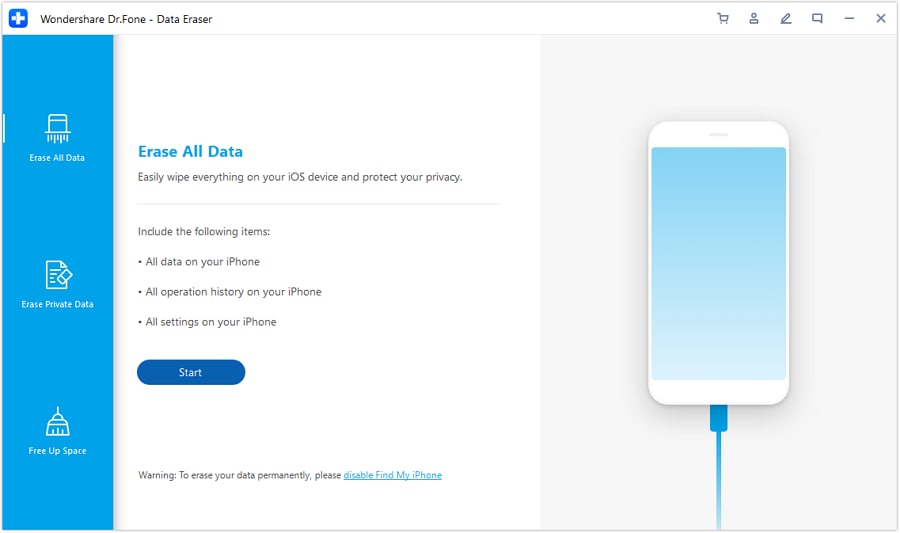
  1. Step 1 Choose Erase All Data & Set Security Level

    Once you have Wondershare Dr.Fone actively running on your desktop system, attach the iPhone 7 and navigate directly to the "Toolbox" tab. Opt for the highly visible "Data Eraser" option and approach the "Erase All Data" segment on the following interface screen. Next, click "Start" and deliberately choose an appropriate security level based on how critical the historical data is. You can freely select between low, medium, and high-security overwrite levels to safely proceed.

start erase all data

  1. Step 2 Confirm Erasure and Review Report

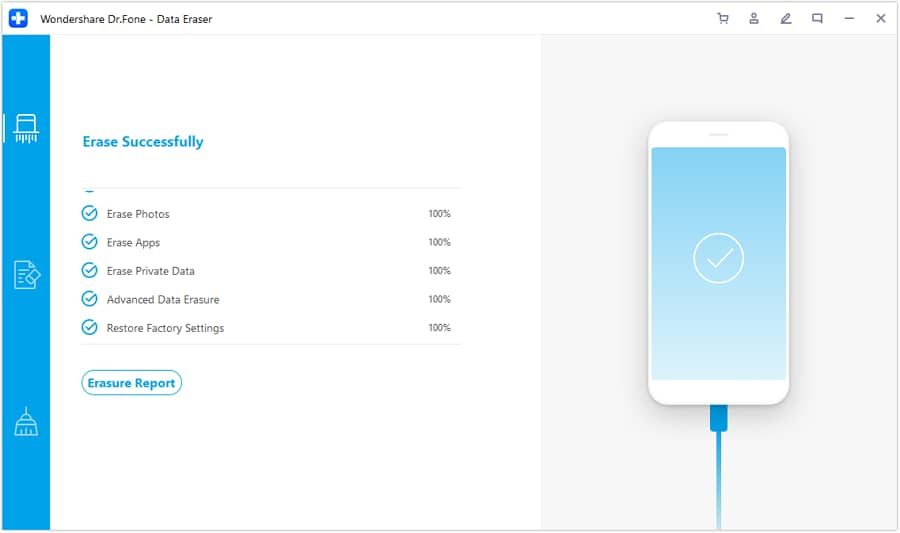
    After finalizing your security choice, carefully enter the provided confirmation code into the prompt and hit "Erase Now" to officially start the permanent data eraser process. Now, simply wait for the program to methodically wipe your mobile storage blocks and subsequently reboot your phone for the systemic changes to take firm effect. Finally, you can utilize the generated "Erasure Report" option to access and save a complete, certifiable operation report.

get erasure report
google play button app store button

Part 4. Other Ways To Factory Reset iPhone 7

There are a few other highly dependable options to restore your device to its pure original settings if you cannot use the built-in Settings app or a dedicated third-party toolkit. These native Apple methods are ideal if you prefer a remote cloud-based wipe or a more comprehensive firmware-level approach to erasing corrupted data. Fully explained below are two other credible solutions for answering how do you factory reset an iPhone 7:

Way 1. iCloud Find My

The Find My tracking feature is remarkably handy when you are actively looking for a remote way to format your device. It is particularly crucial if you've tragically lost access to your physical phone due to theft or misplacement. You can securely command the system to wipe all internal data and restore deep factory settings from literally anywhere by leveraging the online iCloud platform.

Although, you will absolutely need to have the Find My device feature enabled beforehand on the targeted mobile. Follow these rigorous steps to seamlessly factory reset your iPhone 7 via this wireless method securely:

  1. Step 1 Access Find My on the Web

    Visit the official iCloud website using any preferred desktop web browser and sign in securely with the exact Apple ID attached to the targeted phone. Following that verification, click the “Find My” icon from the main grid menu and input the account password once again to successfully approach the iCloud Find Devices locator page.

access find my on icloud browser

  1. Step 2 Issue the Remote Erase Command

    Here, carefully choose the specific iPhone 7 from the central "All Devices" dropdown list and consciously opt for "Erase The Device" from the remote options panel. Finally, tap "Next" and quickly enter the Apple ID credentials to firmly confirm and kickstart the irreversible remote wipe operation.

use erase this device option

Way 2. Recovery Mode Using iTunes/Finder

Another powerful way you can thoroughly erase all your corrupted phone content is to heavily utilize the time-tested iTunes platform (or Finder on newer Macs). This advanced firmware method lets you effectively restore the device's deepest factory settings even if you've frustratingly forgotten the screen passcode or if the device is stuck in a boot loop.

It also works exceptionally well when your mobile operating system isn't functioning correctly and refuses to start. You will need a verified Lightning cable and the latest version of iTunes/Finder for it to run smoothly. Follow these precise steps for learning how to put iPhone 7 in Recovery Mode:

  1. Step 1 Connect and Trigger Recovery Mode

    Utilize a certified lightning cable to reliably link your mobile to the computer system and firmly hold down both the “Sleep/Wake” and “Volume Down” physical buttons simultaneously. Keep tightly pressing them even after you see the Apple logo, until the dark screen specifically displays a diagnostic cable pointing to a computer icon.

put iphone 7 on recovery mode

  1. Step 2 Execute the Restore Process

    With Recovery Mode successfully activated, a prompt will immediately appear on your computer monitor asking to either “Restore” or “Update” the connected device. Now, purposely click “Restore” to permanently begin the firmware-level factory reset process and carefully follow the remaining on-screen prompts to definitively complete it.

use restore or update button

Conclusion

To summarize, discovering how do I reboot an iPhone 7 correctly can ultimately be a bit more complex than it initially appears, given the distinct differences between soft, hard, and factory resets. Knowing exactly when and how to reset your mobile is highly crucial for resolving persistent graphical issues, adequately preparing your vintage device for a secure resale, or simply ensuring a completely fresh start free of software bugs. You can easily utilize the built-in hardware buttons, native Settings options, or strategically step up to an advanced privacy tool like Dr.Fone - Data Eraser. While Apple's standard built-in methods are largely sufficient for basic everyday use, they tragically may not guarantee complete, irrecoverable data erasure against modern scanning technology.

Therefore, we firmly recommend that Wondershare Dr.Fone stands out as the absolute best choice in 2026 for users who highly prioritize digital privacy and demand absolute, verifiable assurance that their private personal information is strictly irretrievable. Its intuitive advanced features, paired with comprehensive military-grade erasure options, make it the ultimate dependable solution for responsibly safeguarding your long-term data privacy.

FAQ

  • 1. Will a hard reset delete all my photos and apps on iPhone 7?
    No. A hard reset (or force restart) simply cuts the power cycle to forcibly restart the system hardware. It does not erase any personal data, photos, or downloaded applications. It is strictly used to resolve severe screen freezing or system unresponsiveness.
  • 2. How long does a standard factory reset take on an iPhone 7?
    A typical factory reset initialized from the Settings menu usually takes between 5 to 15 minutes, depending on how much data is stored on your device. Ensure your iPhone 7 has at least 50% battery or is plugged into a charger before starting the wipe process.
  • 3. What should I do if my iPhone 7 Power button is broken and I need a restart?
    If your physical Sleep/Wake button is broken, you can perform a soft reset using AssistiveTouch. Go to Settings > Accessibility > Touch > AssistiveTouch and turn it on. Tap the virtual button, navigate to Device > More, and tap "Restart" to reboot without needing the physical keys.
  • 4. Does the iCloud remote erase feature work if the iPhone 7 is offline?
    If you trigger an "Erase This Device" command via iCloud Find My while the iPhone 7 is offline or turned off, the wipe will remain pending. The factory reset will automatically execute the exact moment the device connects to any Wi-Fi or cellular network.
OUR EXPERT
Selena Lee

Selena Lee

chief editor

Chief Editor of the Dr.Fone team since 2012, Selena is a veteran technology editor known for turning complex iOS and Android topics into clear, user-focused guidance.

Try It Free Try It Free