Effortlessly manage data through preview, delete, export, etc.

 100% Security Verified | No Subscription Required | No Malware

 :
: 
 ChatGPT
 Perplexity
 Gemini
 Claude
 Grok
Grok
The concept of 'rooting' refers to unlocking administrative or superuser access on an Android device. This advanced procedure grants users unrestricted control over the device's operating system, enabling them to tweak core system files, modify deeper device settings, and install specialized applications that require elevated privileges to function.
However, running a rooted Android phone introduces notable risks, including potentially voiding the manufacturer's hardware warranty, triggering software instability, and increasing your overall vulnerability to malware. Because of these critical factors, knowing exactly how to check if Android is rooted is absolutely essential, especially for individuals purchasing second-hand devices or setting up a corporate phone in 2026.
In this comprehensive guide, we will walk you through the most effective and straightforward methods to accurately verify if your Android phone is rooted. We will also explore the inherent benefits and major drawbacks of executing this process. Let's dive in and explore the best solutions to check your root status in minutes.

In this article
Part 1. Advantages and Disadvantages of Rooting Android
Before demonstrating how to check if an Android phone is rooted, it is highly recommended to understand exactly why power users root their devices and weigh that against the potential hazards associated with gaining unrestricted superuser access.
- Install Third-Party Apps: Rooting an Android smartphone empowers users to sideload and install specialized utility programs from external sources that are strictly restricted or otherwise unavailable on the official Google Play Store.
- Ultimate Customization Options: The procedure of obtaining core root access grants users profound customization capabilities, allowing them to dramatically alter the UI aesthetic, system fonts, startup boot animations, and overall device operation natively.
- Remove Unwanted System Apps: Often known as carrier bloatware, pre-installed apps ruthlessly consume space. Root privileges legally enable users to forcibly delete these stubborn system programs, freeing up storage and improving UI speed.
- Boost Device Performance: Advanced technical users can utilize their root access to overclock the phone's CPU for much better gaming performance, manually optimize RAM management, and utilize deep sleep tools to extend battery life.
- Vulnerability to Spyware: Bypassing Android's strict built-in sandbox protections significantly heightens your risk to malware, spyware injections, and other sophisticated cyberattacks.
- Possibility of Bricking Your Phone: The custom ROM and rooting process is notoriously delicate. A single misstep or flashing the wrong architectural file can render your smartphone completely unbootable and permanently inoperable, a scenario commonly referred to as 'bricking.'
- Warranty Voidance: Device manufacturers strictly prohibit tampering with the core OS. Rooting immediately voids the device's factory warranty, meaning physical hardware defects will no longer be covered for a free repair or replacement.
- Loss of Security Updates: Rooted devices systematically lose the ability to receive OTA (Over-The-Air) automated firmware updates and security patches, leaving your phone permanently exposed to unpatched software vulnerabilities and severe bugs.
Part 2. 5 Methods To Check If Your Android Phone Is Rooted
If you recently acquired a refurbished handset, attempted to modify your device, or simply want total peace of mind regarding your digital privacy, you undeniably need to check the Android phone's rooting status. Depending on your current operating system version, technical comfort level, and available desktop tools, there are several reliable, safe techniques to accomplish this task successfully.
Here are five proven methods for accurately determining if your Android phone currently has root access:
Method 1. Android Settings
The first and arguably most straightforward method for an average user is navigating directly through your device's built-in settings menu. This doesn't require any third-party app downloads or PC connections. Follow these simple visual steps:
-
Step 1 Access the About Phone Section
Unlock your Android device, tap the core Settings application icon on your home screen, scroll completely down to the bottom of the menu, and select the About Phone (or About Device) section.

-
Step 2 Verify Status Information
Within the detailed About Phone menu, locate and tap the Status Information option. Look closely at the specific Phone Status or Device Status data field. If it proudly displays an Official status, your phone is highly likely unrooted and secure. However, if it shows a Custom tag or a modified flag, there is a very high probability that the device's bootloader is unlocked and the system is rooted.

Method 2. Wondershare Dr.Fone (Free Android Root Checker)
Wondershare Dr.Fone is a comprehensive, all-in-one desktop toolkit engineered specifically for both iOS & Android users. It boasts a wide array of powerful features catering to secure data recovery, system repair, fast screen unlocking, phone transfer, and more. Notably, one of its highly convenient diagnostic utilities is the One Click Root Checker, which accurately scans your system architecture to evaluate if your Android phone is rooted with absolute precision.
Dr.Fone is widely celebrated for its clean, incredibly user-friendly interface and unyielding reliability, solidifying its position as a go-to solution for everyday Android users worldwide. Utilizing this software ensures you can seamlessly verify your phone's superuser status without facing complex technical hurdles or risking malware downloads.
Here are the detailed step-by-step instructions to effortlessly discover if your Android phone is rooted using Wondershare Dr.Fone:
-
Step 1 Install the Desktop Software
First, begin by downloading and successfully installing the official latest version of the Dr.Fone software onto your Windows PC or Mac computer.
-
Step 2 Connect Your Android Device
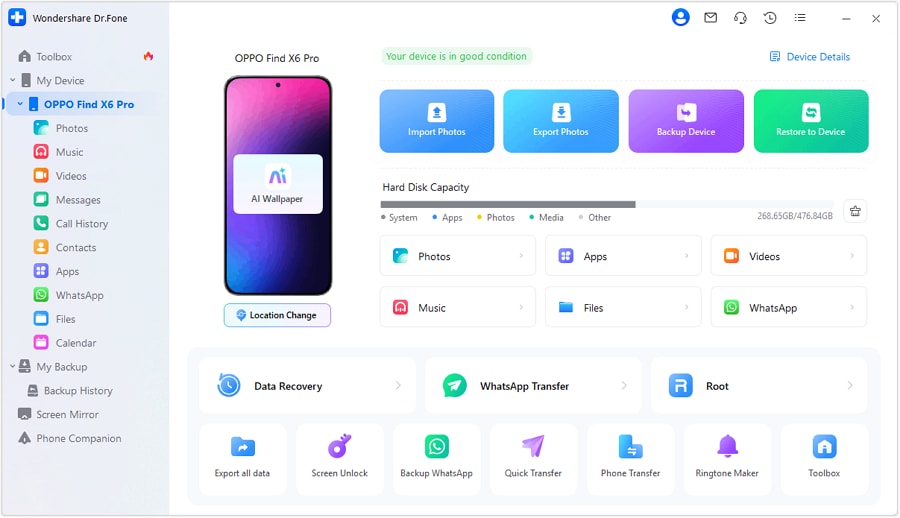
Launch the Dr.Fone desktop client interface. Ensure your Android phone is securely connected to your computer via a standard USB data cable. The software's intelligent engine will automatically recognize and detect your connected handset instantly.
-
Step 3 Access the Device Details Module
Upon a successful connection, the main dashboard will present multiple functional modules. Navigate your mouse and click on the "Device Details" button to trigger the One Click Root Checker capability.
-
Step 4 Review the Final Status
Dr.Fone will instantly commence a rapid analysis of your phone's underlying framework to detect superuser binaries. If your phone is indeed rooted, the data field will definitively show "Yes". If the system remains entirely secure and untouched by custom tools, it will simply display a "No".

 Effortlessly manage data through preview, delete, export, etc.
- Transfer all data between devices.
- Robust backup solutions for reliable data protection.
- Mirror screens to PC for meetings, teaching, and control.


If you generally prefer a seamless mobile management experience, you can also heavily consider utilizing the robust Dr.Fone App ecosystem directly on your mobile OS. By dramatically ditching the clutter of downloading multiple disconnected apps, this unified mobile solution thoroughly simplifies device upkeep, offering smart junk cleaning, lost file recovery, and incredibly efficient file sharing. Whether you want to manage internal storage limitations or just securely ensure everything runs optimally without system bottlenecks, obtaining the proper utilities makes a tremendous difference.
Method 3. Kinguser or SuperSU Icon
Historically, the two most universally utilized and recognized applications for granting, denying, and managing root permissions on Android environments are Kinguser and SuperSU. Consequently, a remarkably quick visual inspection of your phone's app drawer can reveal a significant amount of information. If you happen to locate one of these specific applications actively installed on your device, it acts as a massive indicator that your phone is fully rooted.
Furthermore, manually opening either of these apps provides direct feedback and logs regarding your Android phone's rooting status. If absolutely no such management applications exist, your phone is most likely running its original untouched firmware, or alternatively, it might be utilizing a more modern framework (like Magisk) to orchestrate root rights silently in the background.

Method 4. Use Terminal Emulator
If you distinctly prefer a more hands-on, developer-centric approach, utilizing a text-based terminal app is an excellent and highly educational option. While admittedly slightly more complicated than UI checks, a terminal emulator app fundamentally grants you direct access to your phone's background command line interface. Through this powerful environment, you can quickly execute specific text commands to definitively ping raw system information.
Follow these precise instructions to check if your Android phone is rooted utilizing a command line terminal emulator app:
-
Step 1 Install a Terminal Application
Navigate directly to the Google Play Store and download a highly reputable terminal emulator application, such as "Terminal Emulator for Android".
-
Step 2 Execute the Superuser Command
Launch the newly installed application. On the blinking prompt line, simply type the letters “su” (without quotes) and press enter on your digital keyboard. This highly specific command technically requests superuser or root access from the core Android system.
-
Step 3 Observe the Command Result
If your phone is successfully rooted, you will immediately witness a pop-up prompt appearing, asking you to manually grant root access to the terminal application. Subsequently, the command line symbol will visually transition from a standard "$" sign to a “#” symbol, confirming active root privileges are present.
-
Step 4 Recognize an Unrooted Status
Conversely, if the device severely lacks root, the console will quickly return an error output stating “su: not found” or “permission denied”. The input symbol will remain as a "$" without any modification.
Method 5. Check Through ADB Tools on the PC
For those deeply ingrained in the Android development ecosystem, utilizing desktop developer utilities is a highly sophisticated, precise, and universally accurate method. Android Debug Bridge (ADB) is a highly versatile command-line software that establishes a secure communication bridge between your desktop computer and your mobile device via a physical USB connection. It ultimately acts as a powerful gateway to perform deep system analyses and push commands.
Execute these somewhat technical steps to comprehensively determine your system's standing using official ADB tools from a computer:
-
Step 1 Setup Android Platform Tools
Initially, you need to Install ADB tools natively on your Windows, Mac, or Linux computer by downloading the official Android SDK platform tools zip file and extracting it.
-
Step 2 Enable USB Debugging Mode
On your mobile handset, actively enable developer access by navigating to About Phone and tapping your Build Number exactly seven times. Then, navigate back to Settings > Developer options > USB debugging and toggle the switch to the ON position.
-
Step 3 Connect and Open Terminal Window
Establish a stable connection between your phone and PC via a reliable USB cord. Proceed to open a Command Prompt (Windows) or Terminal window (Mac/Linux) and route the active directory to the exact local folder where your ADB platform tools currently reside.
-
Step 4 Verify the Hardware Device Connection
In the desktop terminal, type the exact command "adb devices" and strike Enter. This specific query lists all actively recognized connected hardware. Your phone's unique alphanumeric serial number should populate in the output instantly.
-
Step 5 Request the Superuser Shell
Next, type the phrase "adb shell" and press Enter to boldly initiate a remote shell session directly on your phone's inner architecture. Within this shell, type "su" and hit Enter again. This specifically prompts the Android system for core root clearance.

Part 3. Bonus Tip: Best Method To Check If Your iPhone is Jailbroken
While this entire guide focuses heavily on the complexities of Android ecosystems, those who also own an iPhone might be highly curious about the iOS equivalent procedure: jailbreaking. Functionally similar to rooting, jailbreaking permanently bypasses Apple's notoriously strict sandboxed restrictions, heavily enabling the user to install unauthorized applications and implement custom UI tweaks. Despite the immense freedom, a jailbroken iPhone suffers from severely compromised security protocols and massive potential firmware instability. As a result, before modifying an iPhone or finalizing a second-hand purchase, accurately validating its jailbroken status is highly encouraged for safety.
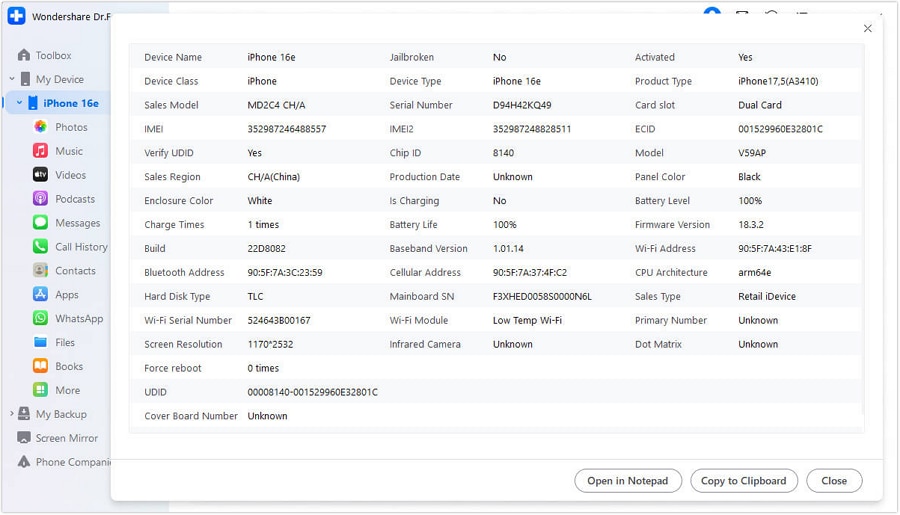
Utilizing the powerful Wondershare Dr.Fone stands as an incredibly proficient and trustworthy strategy to definitively check if your iPhone has undergone any jailbreaking. It features a dependable, straightforward diagnostic toolset capable of analyzing the device's internal flags efficiently. Users can actively rely on Dr.Fone's desktop software to get a device verification report that cleanly details the iPhone's current deep security state alongside other pivotal hardware specifications.
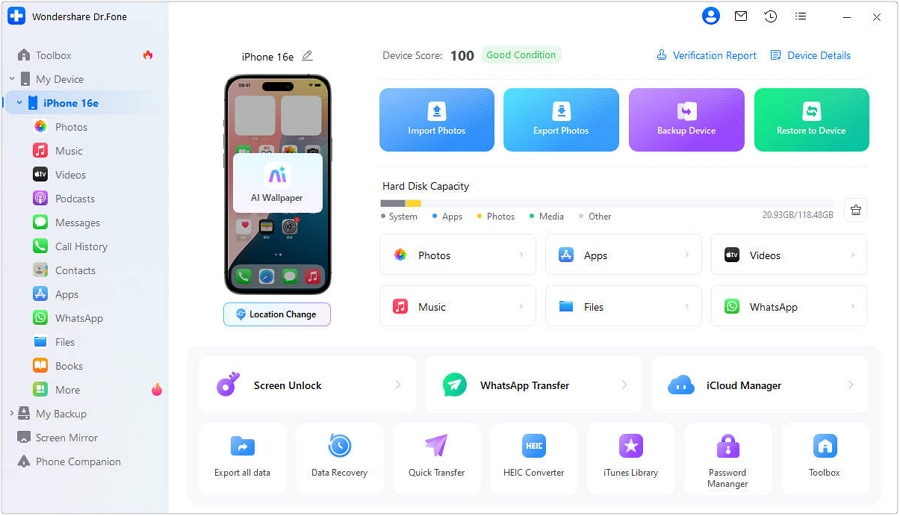
iDevice Verification Report
The highly specialized device verification function seamlessly integrated within Dr.Fone is tailored explicitly for complex iOS architecture. Once securely connected via USB, it automatically initiates a series of robust diagnostic tests across the filesystem to construct a detailed, multi-page verification report. This completely transparent document highlights altered system files and categorically states whether the iPhone is currently jailbroken or maintains Apple's original factory seal flawlessly.
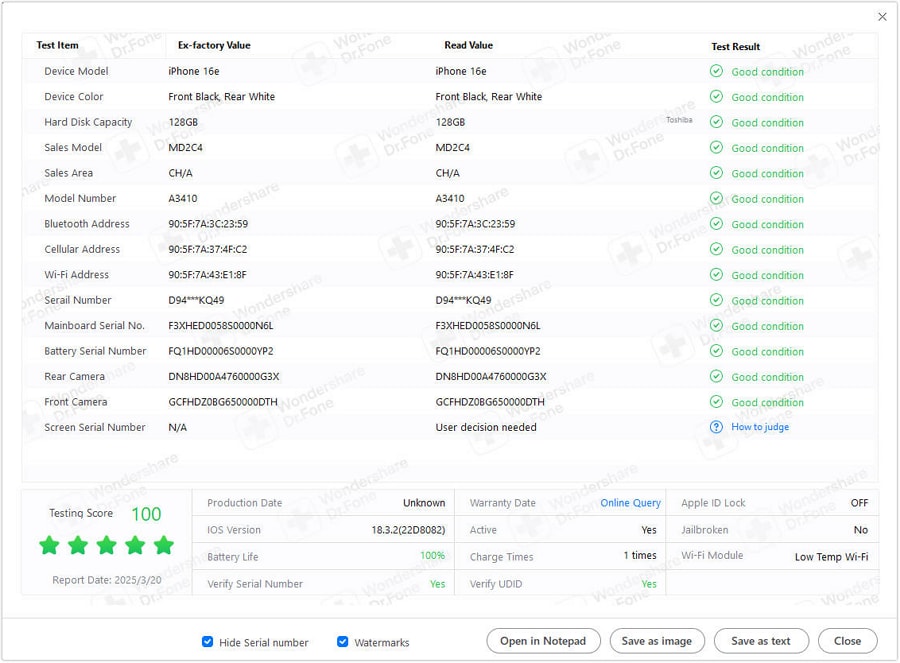
Accessing General Device Details
Beyond strict security evaluations, the interactive Device Details tab allows users to seamlessly retrieve general hardware metrics that are sometimes frustratingly hard to find natively in settings. This includes exact device models, factory manufacturing dates, deep battery health logs, IMEI numbers, and hidden Wi-Fi addresses.




Conclusion
Safeguarding your digital privacy inherently starts with intimately knowing the deep state of your mobile OS. Before attempting aggressive firmware modifications, installing highly sensitive corporate banking apps, or buying a heavily used handset in 2026, you absolutely must systematically verify whether your Android phone is rooted. As thoroughly outlined in this extensive guide, there are diverse and highly reliable pathways to actively validate this status, ranging from incredibly straightforward visual checks of your Settings app to much more involved, technical techniques leveraging ADB command lines or terminal emulators.
However, for a completely stress-free, deeply accurate, and highly user-friendly diagnostic experience, utilizing dedicated desktop software like Dr.Fone remains a premier choice. Beyond mere root checking, it actively helps you manage, repair, and transfer data securely across both rooted environments and completely official firmware states.
FAQ
-
1. Does Rooting Increases Battery Usage?
While the fundamental act of rooting itself does not directly drain your battery, the elevated privileges can unintentionally cause severe battery drain. Specific modules, custom unoptimized kernels, or rogue background apps requiring superuser access might forcefully compel the CPU to run continuously. Conversely, properly configured root tools (like battery savers or CPU underclocking governors) can actually maximize your battery life significantly better than stock settings. -
2. Is Rooting My Phone Safe?
Rooting inherently strips away the critical protective sandbox software architecture created by Google and smartphone manufacturers. This intrusive process immediately voids your official hardware warranty, permanently blocks critical Over-The-Air (OTA) security updates, and drastically increases the grave risk of malicious apps hijacking sensitive banking or personal data. Unless you have highly specific developer needs, running a rooted device requires diligent and continuous cybersecurity awareness. -
3. Can a Rooted Android Phone Be Unrooted?
Yes, virtually all rooted Android smartphones can be fully unrooted securely. The complex process involves systematically removing the superuser binaries and fundamentally revoking all granted software privileges. The most effective method to guarantee a perfectly clean unroot is by physically flashing the device's original stock firmware or factory boot image via PC tools, which totally overwrites any custom modifications and meticulously restores official system integrity. -
4. Will a factory reset remove root access from my Android device?
A standard factory reset performed manually through your device's basic settings menu will generally not remove root access. Rooting intrinsically alters foundational files deep within the `/system` partition, whereas a standard factory reset only superficially wipes the user-facing `/data` and `/cache` partitions. To completely eliminate root access and securely revert to a pristine stock status, you must absolutely re-flash the original firmware using a desktop PC or utilize highly dedicated unrooting applications.
 Add Wondershare Dr.Fone as a preferred source on Google