How to Bypass FRP on Samsung Phones and Tablets?
"I've just bought a second-hand phone, but I don't have the PIN code or the previous Google account. Is there a way to bypass Google FRP lock?"
Suppose you are struggling to get into the home screen of your Samsung tablets or mobile phones, like the Samsung Galaxy S26 & S25. It would be best if you learned the Samsung FRP unlock process. The problem is that the Factory Reset Protection (FRP) feature has been activated due to an unsafe factory reset; hence, you will have to bypass Google FRP before using your Samsung phone or tablet.
With the upgraded Dr.Fone – Screen Unlock (Android), bypassing Google FRP is now easier and smarter. The new Smart Recommendation (AI-Powered) feature can automatically analyze your connected Samsung device, detect key information such as device type and Android system version, and recommend the most suitable FRP unlock method for your case.
Whether you’re using a Galaxy S25, S24, S23, A Series, Tab Series, or even the newest Samsung Galaxy S26, you can choose a high-success-rate, device-specific FRP removal solution tailored for your model and Android version. That is Dr.Fone – Screen Unlock (Android). This guide will show you some of the trusted methods you can use to solve this issue.
Supported Devices:
- Samsung: All Samsung models (phones and tablets) and all system versions, including the latest Android 16, are supported.
- For Xiaomi/Redmi/OPPO/Realme/Vivo/Moto/Lenovo/Micromax/ZTE/HUAWEI/OnePlus users, we have a comprehensive guide available on how to unlock the FRP lock on your Android device. Please refer to our guide for detailed instructions tailored to other Android phone models.
Manage Your Phone Wherever You Go
🔔 Disclaimer:
Dr.Fone is purposefully designed to remove the lock, restoring your device to its full potential. This software is intended exclusively for personal use. Any form of misuse, including but not limited to using Dr.Fone for commercial or illegal purposes, is strictly prohibited.
Index

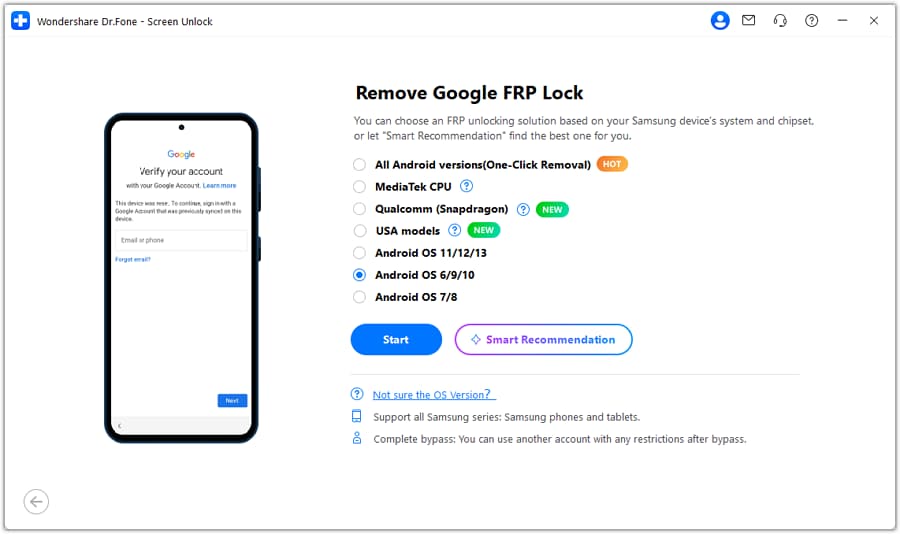
Part 1: Smart Recommendation (AI-Powered) — Find the Best FRP Unlock Method for You
Not sure which FRP bypass method you should choose for your Samsung phone or tablet? The upgraded Smart Recommendation (AI-Powered), a smarter way to start your Samsung FRP bypass process.
With built-in AI algorithms, Smart Recommendation analyzes your connected device type, model environment, and Android system version, then recommends the most suitable FRP unlock solution for you.
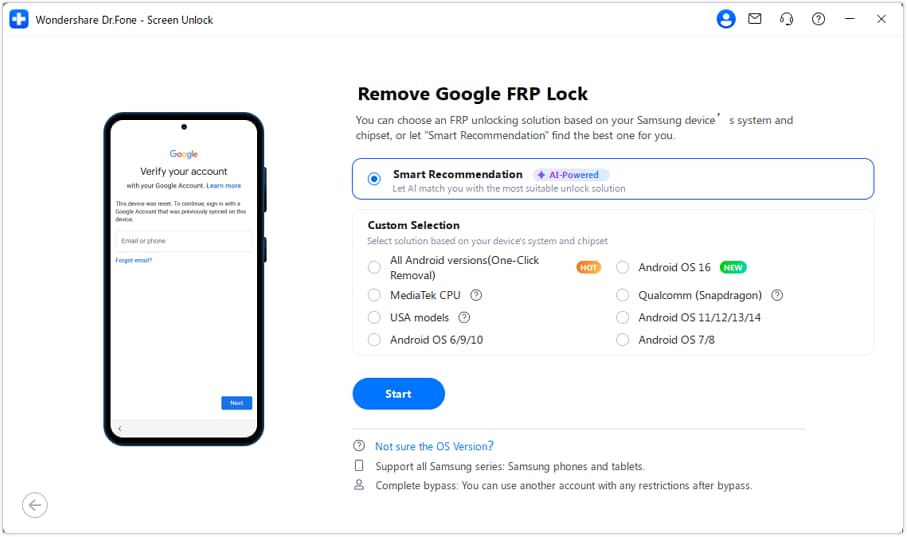
Start by launching Wondershare Dr.Fone on your computer and connect your Samsung phone or tablet. Then, progress through Toolbox > Screen Unlock to open the specific toolkit on a new window.

* The Dr.Fone Mac version still has the old interface, but it does not affect the use of the Dr.Fone function. We will update it as soon as possible.
Out of the options that appear on the next screen, select Android to continue.

You will then have to select Remove Google FRP Lock on the next screen to continue with the specific operation.

Then select Samsung and click the Start button to continue.

With Smart Recommendation (AI-Powered), Dr.Fone will match your device with the most suitable FRP unlock method. You can follow the recommended path directly instead of manually choosing from multiple Android versions or chipset options.
Then, continue with the guided instructions shown in Dr.Fone. The software will lead you through the correct FRP removal workflow based on the recommended solution.
Part 2: Bypass Google Account for All Samsung Phones & Tablets with Android 11/12/13/14/15/16
Removing the Google account from a device sounds no difficult and different for you. However, sometimes it is important to be aware of some details about the smartphone. What if you have bought a used Samsung device and want to remove its FRP lock? With no particular knowledge of its OS version or if you want to find the easiest Samsung FRP bypass way, you can have it unlocked with the solution for All Android Versions. Let's find out how you can cover this process with ease:
If you are not aware of the Android OS version of your Samsung phone or want to use the quickest way to remove Google Lock, select the option of All Android versions (One-Click Removal) and continue by clicking Start on the same screen.

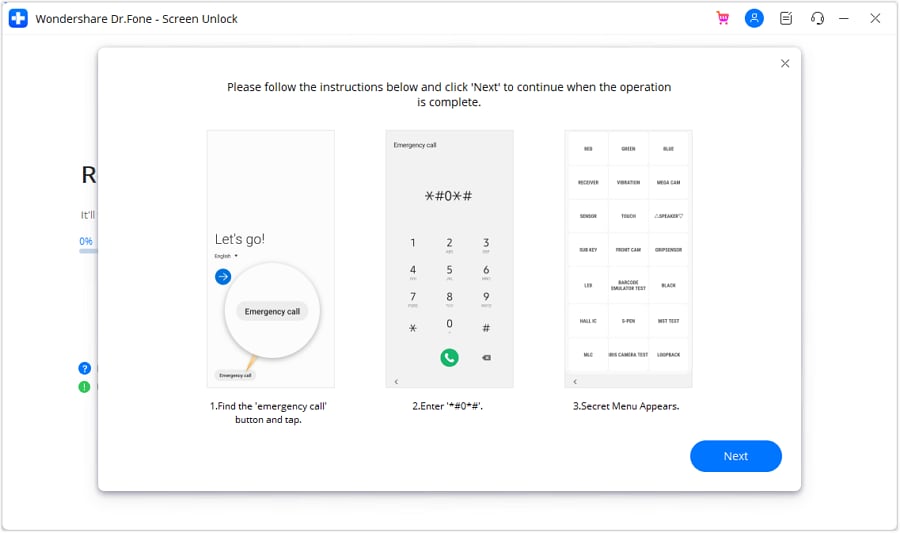
You will be prompted to a screen where you have to follow the on-screen instructions as guided. Look for the Emergency Call button on your Android and tap on it. Type *#0*# to open a secret menu. Once done, click Next on your computer screen.
Your Android screen will show a prompt to activate USB debugging. After allowing it on your Samsung device, click Authorized on your computer screen.

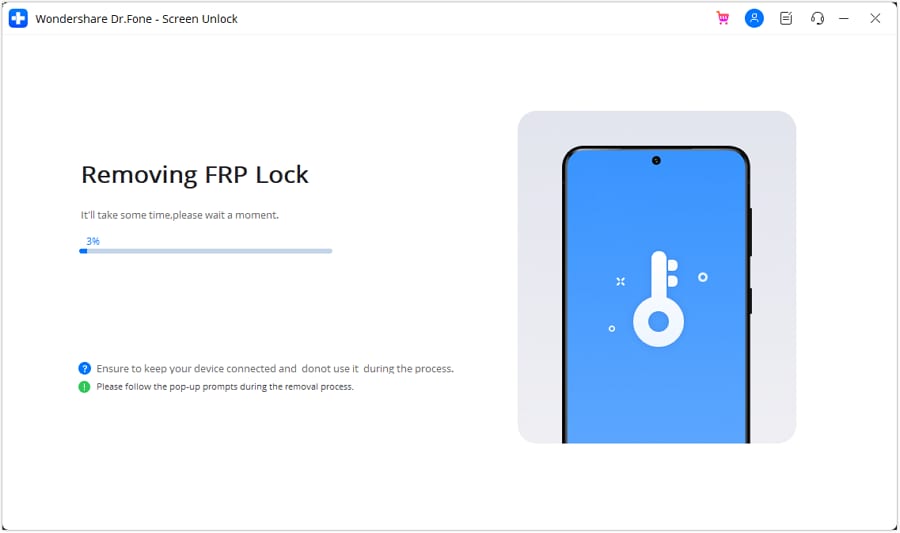
The next screen on your computer will display the removal of the FRP lock from your Samsung device.
Once the FRP lock is successfully removed, the prompt window will show its completion. Click Done if you have successfully executed the process. If the issue still prevails, go ahead with the process again with the Try Again option.


Part 3: Bypass Google Account for All Samsung Devices with Android 16 (including Galaxy S26 & S25)
If your Samsung device runs Android 16 and is locked by Google FRP, Dr.Fone - Screen Unlock provides a fast, guided bypass: select the OS, let the tool auto-download the correct USB driver, and run the Remove FRP Lock routine to restart and use your device without Google verification. Only use this tool on devices you own or have explicit permission to unlock.
💡 Tips: Dr.Fone offers prioritized support for Galaxy S26 & S25 models on Android 16 and delivers an industry‑leading success rate for S26 & S25 FRP bypasses—if you have an S26 & S25 on Android 16, this solution is the recommended first choice.
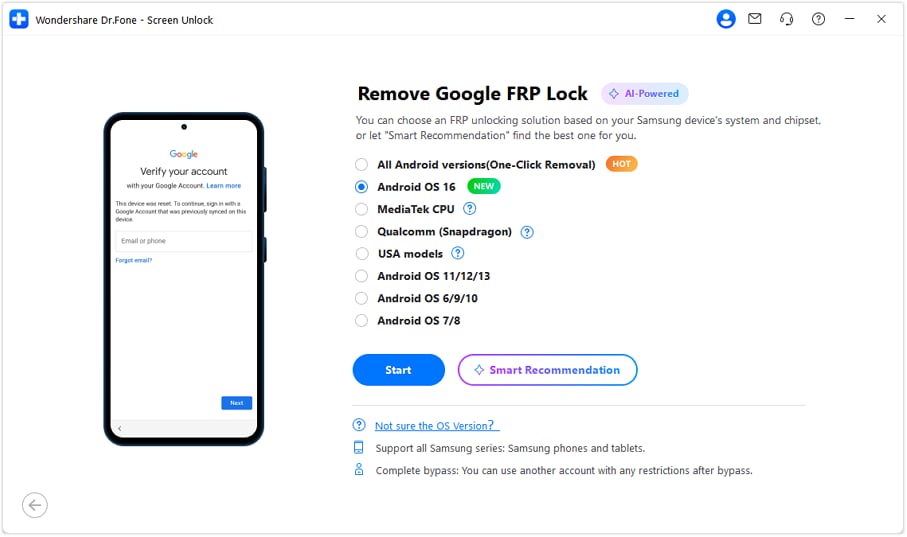
After launching Dr.Fone and opening the Screen Unlock module, choose the Remove Google FRP Lock function. You will reach a screen asking you to select the Android version. Select Android OS 16 from the options and click Start to proceed.
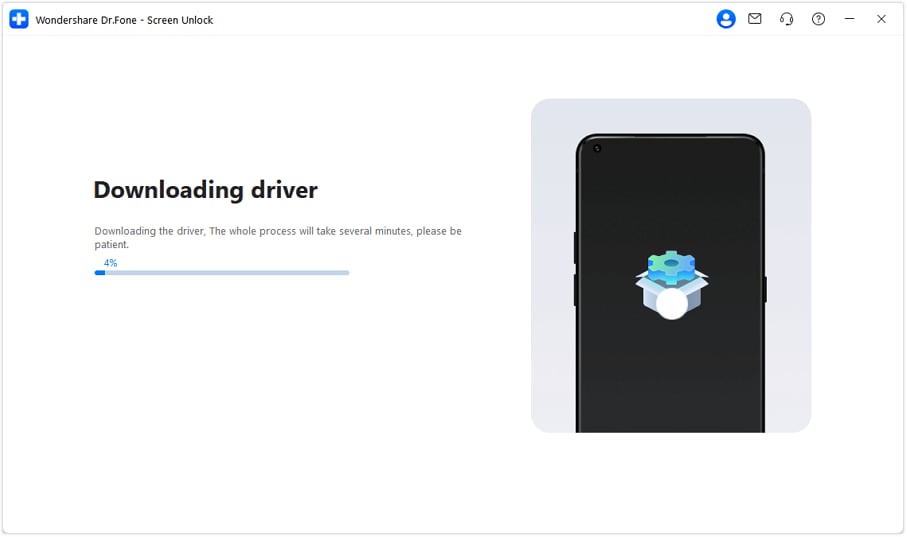
The tool will automatically detect your Samsung model and begin downloading the appropriate USB driver for your device. Please wait patiently until the driver download and installation complete.
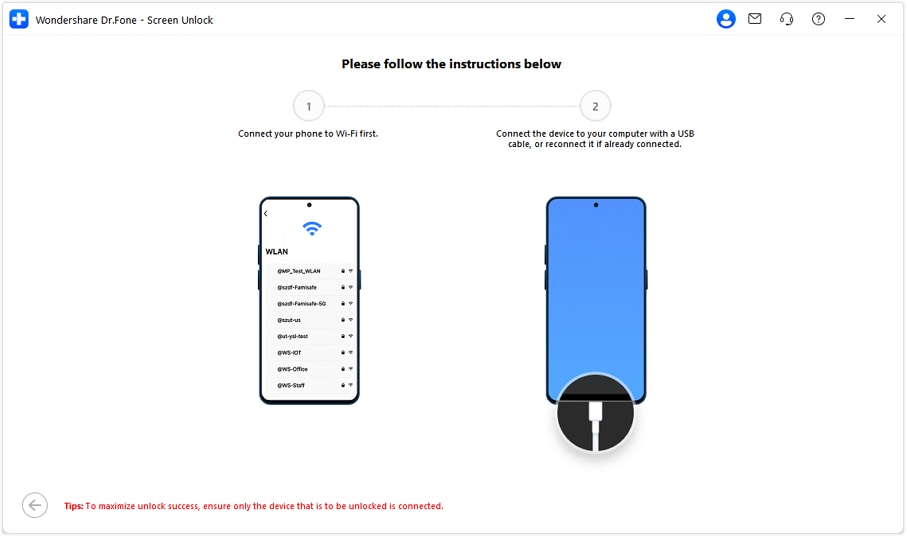
Follow the on-screen instructions to connect your device:
- Make sure the phone is connected to a stable Wi‑Fi network.
- Connect the phone to the computer with a USB cable. If the device was already connected, unplug and reconnect the cable to ensure a fresh connection.
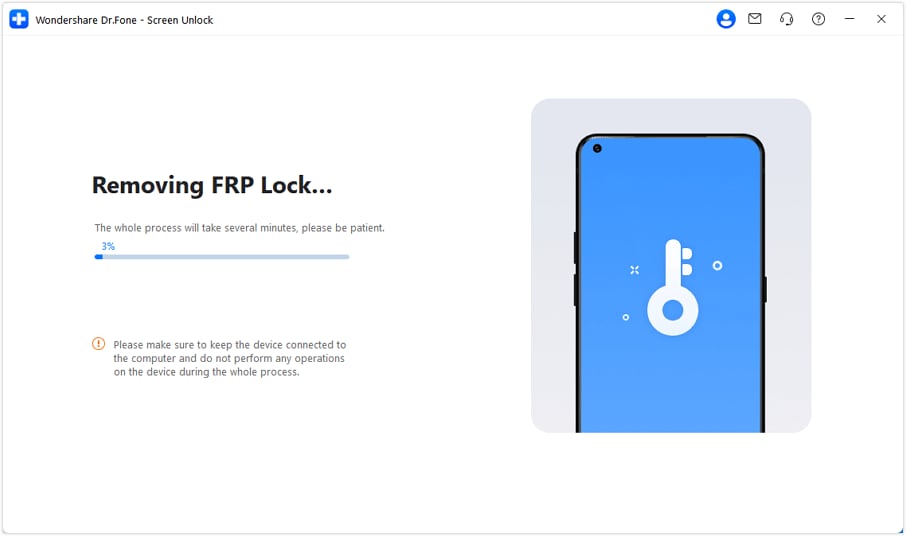
Once the device is detected and drivers are ready, Dr.Fone will automatically enter the FRP removal workflow. The software displays the real-time unlock progress and any prompts you may need to follow. Keep the device connected and do not interrupt the process.
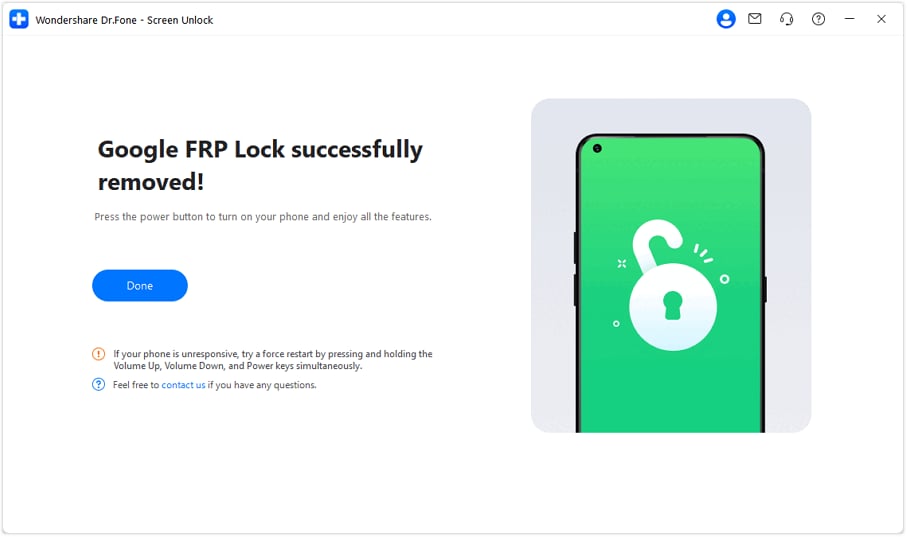
When the process finishes you’ll see a confirmation message on screen. Restart the device and complete the initial setup — no Google verification will be required. Your Samsung device running Android 16 should now be accessible.
Part 4: Bypass Google Account for All Samsung Snapdragon Phones (Android 11-15)
For users of Samsung Galaxy phones powered by Snapdragon processors, bypassing FRP (Factory Reset Protection) can sometimes be more challenging due to the specific software and hardware involved. However, it is possible to completely remove FRP on these devices with a 100% success rate.
The process to remove FRP on Samsung Galaxy phones with Qualcomm Snapdragon chips involves a series of steps to disable the Google Account verification and restore full access to the device. These phones, which run Android versions from 11 to 15, require a method tailored to their unique hardware.
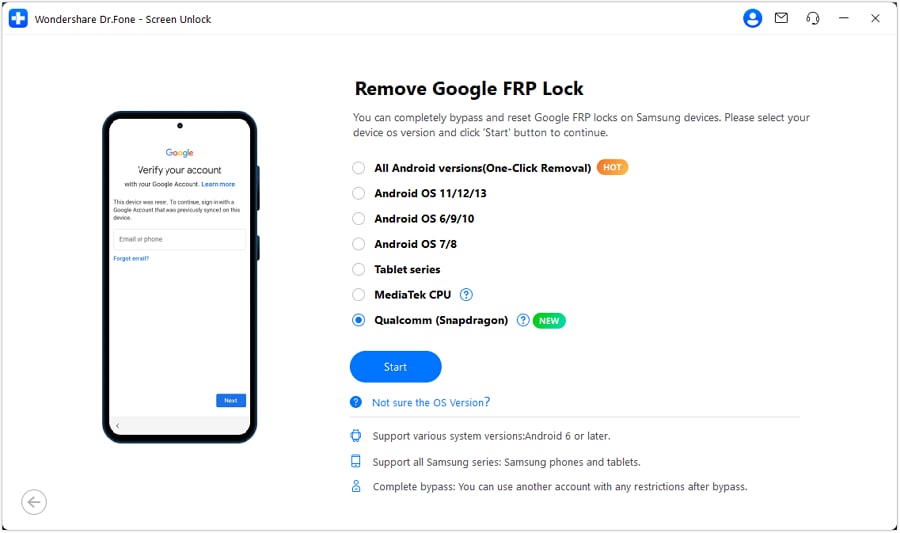
For a detailed step-by-step guide on bypassing FRP on Samsung Snapdragon devices, refer to the complete instructions for removing FRP from all Samsung Snapdragon phones.
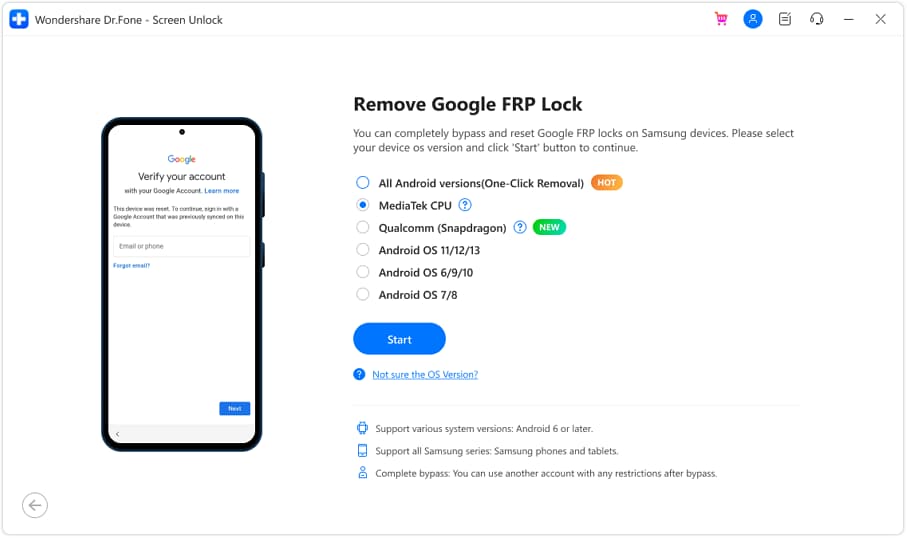
Part 5: Bypass Google Account for All Samsung MTK Phones (MediaTek CPU) (Android 11-16)
Bypass Google Account for all Samsung MTK (MediaTek) phones with a high success rate. This solution is tailored to the unique architecture of MTK chips, allowing users to efficiently remove FRP locks and regain full device access. This method ensures a smooth and secure bypass process across a wide range of Samsung models.
Supported Samsung MTK Chipset Models:
- Phone Models: A Series (A0X, A1X, A2X, A3X) / F Series / M Series
- Tablets & Others: A7 Lite (LTE/Wi-Fi) / Wide 5 / Wide 6 / Jump 5G
Tip: View full model list in-product via "?" icon.
On the main interface, choose "MediaTek CPU" to load the correct bypass method for MTK devices. Then click the "Start" button to begin.
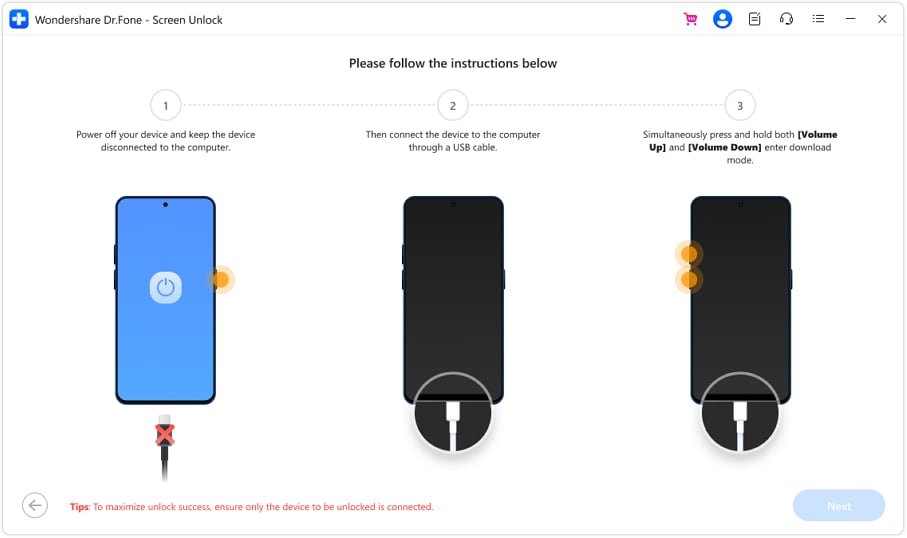
Follow the on-screen instructions. Power off your device completely, connect it to your PC via USB, and press and hold both Volume Up and Volume Down buttons at the same time to enter Download Mode. Once entered, click "Next" to proceed.
The tool will now remove the FRP lock automatically. Once done, a confirmation message will appear. Click "Done" to finish. If the process fails, click "Try Again" and repeat the steps.
Part 6: Bypass Google Account on Samsung Phones & Tablets with Android 6/9/10
If you are sure about your Samsung OS version, you can also follow the steps below to start the easy Samsung FRP bypass now. For Android 6/9/10, resetting the PIN code is a good way to deactivate Google FRP. Here are the steps for you to follow:
After accessing the Screen Unlock tool and opening the FRP lock function through it, lead to the screen where you have to select the Android version. Select Android OS 6/9/10 from the options and proceed by clicking Start.
Confirm the prompt that appears on the screen and make sure your Samsung device is connected to a proper Wi-Fi connection. Continue by clicking OK.

The next screen will display a notification sent to your Samsung device.

As it is sent successfully, the screen will prompt its execution. Click OK to continue to the next instructions and get hold of your Android device.

Click the View button to open the Samsung Internet Browser and type the required URL in the browser. Then, follow the instructions to select the PIN to protect your phone.
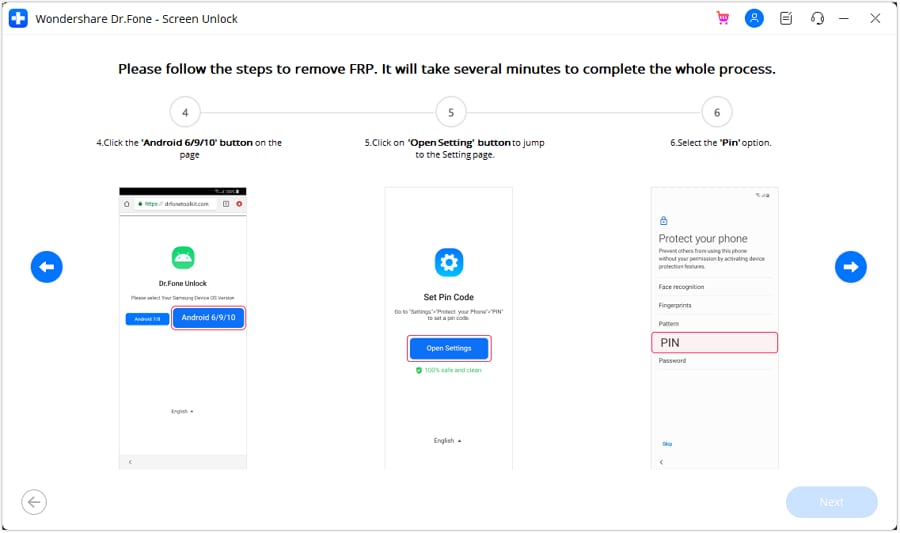
Select the Do not require option to set a PIN code, and then click the Skip button to continue.
After that, revert to the Wi-Fi connect page on your Samsung and enter the PIN code set. Progress with the on-screen instructions and discover the Skip button on the page when you are about to enter the Google account. Click Next on your computer screen once done.

The screen prompts the successful removal of the FRP lock from the Samsung device. Click Done to conclude the process.
Part 7: Bypass Google Account on Samsung Phones & Tablets with Android 7/8
The next steps are used to remove FRP on Samsung devices running Android 7/8. Let's get started now.
On reaching the Android version selection page, checkmark the Android OS 7/8 option and click Start.

When receiving a prompt on the screen, verify the information and click OK to continue.

You will be sent a notification on your Samsung device, and your progress will be displayed on the screen. Once it is sent successfully, the screen prompts its completion. Click OK to continue with the process.

To remove Samsung FRP, follow all on-screen instructions properly. On clicking View on the received notification on the Samsung device, continue to accept the terms of the Google Chrome browser that opens by clicking Accept & Continue. When choosing No Thanks, proceed to the next step.

Open the required URL and select Android 7/8. Continue to click the Download APK option to download an APK onto your Samsung device, which will serve as the key to bypassing the FRP lock.
As it downloads, open it and go to Settings. You will have to turn on the required permission settings to allow installation from this source and continue.

Successfully install the APK package on your Android device by following the on-screen instructions.
Then, lead back to the browser page and tap the Open Settings button. Access your Samsung device's security settings as instructed, and disable Android Device Manager and Find My Device to bypass FRP.
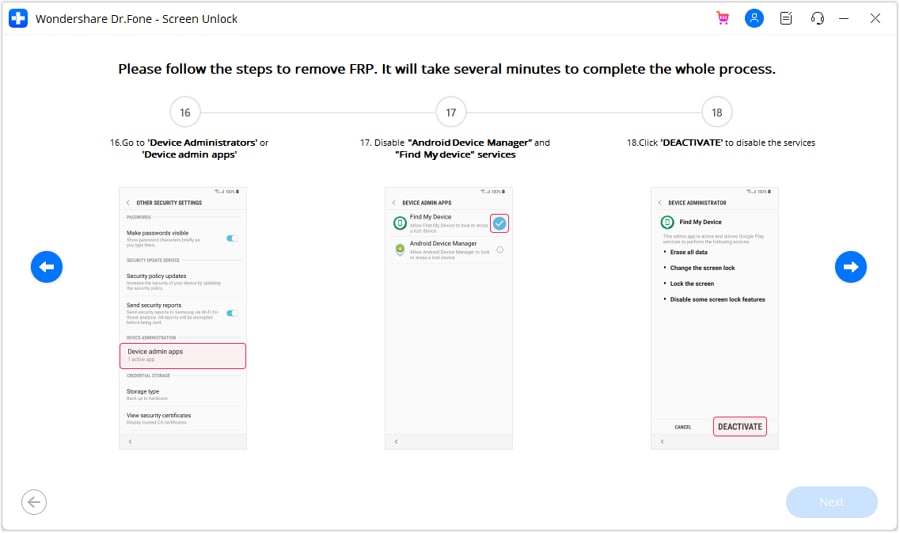
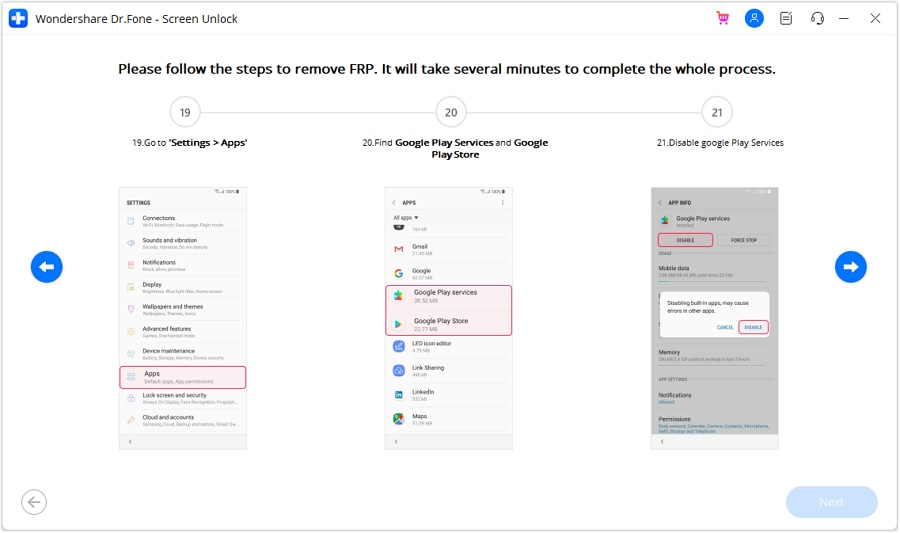
Go to your Samsung Settings and look for the Google Play Services and Play Store options to disable it.
After disabling these settings, proceed to set up an account on your Samsung device from Settings > Cloud and Accounts >Accounts. Then, follow the on-screen instructions to sign in to your Google Account or create a new one.

After you create/log in to the account and agree with the policy, head back into the similar navigation of security settings on the Samsung device to turn it back on.

Firstly, Android Device Manager and Find My Device services should be reactivated..
Conversely, turn on the Google Play Services and Play Store once again and restart your Samsung device.

As you open the device, you will find out that the FRP lock has been successfully removed from the Samsung device. The screen on the front of your computer also prompts the completion of the entire process.
WHAT YOU'LL NEED

Dr.Fone provides a complete set of tools for solving all iOS/Android phone problems.
Need help?
You might find the answer to your question in the FAQ or additional information below: