How to Backup iPhone in Recovery Mode
iPhone Backup
- iPhone Data Backup
- 1. Back up iPhone in Recovery Mode
- 2. Back Up iPhone With/Without iTunes
- 3. Back up iPhone to Mac
- 4. Back up iPhone/iPad to Computer
- 5. Back up iPhone to Mac Catalina
- 6. Back up Jailbreak Apps And Restore
- 7. iPhone Backup Software
- 8. Back up iPhone/iPad Easily
- 9. Back up iPhone/iPad in DFU Mode
- 10. Back up iPhone Apps and App Data
- 11. Back up Notes on iPhone and iPad
- 12. Back up iOS to External Hard Drive
- 13. Export Notes from iPhone to PC/Mac
- 14.Back up iPhone Photos to Google Photos
- 15. Back Up Your iPhone Voicemails
- 16. Back Up to External Drive
- 17.How to Back Up to NAS
- 18.Back Up iPhone With Broken Screen
- 19.Back Up iPhone to Google Drive
- 20.Buy Used iPhones
- 21.Sell Used Phone for Cash
- 22.Sell Used iPhone for Dollar
- 23.How Much is My iPhone Worth
- iPhone Data Recovery
- 1. Recover iPhone Data Without Backup
- 2. Restore Calendar on iPhone
- 3. Recover Call History on iPhone
- 4. Recover iPhone Lost Data
- 5. Restore iPhone in Recovery Mode
- 6. Undelete iPhone Backup Files
- 7. Recover Deleted iPhone Messages
- iPhone Data Restore
- 1. Restore iPhone from iTunes Backup
- 2. Restore iPhone after Downgrade
- 3. Restore iPhone from Backup
- 4. Restore iPhone from iPad Backup
- 5. Restore iPhone from DFU Mode
- 6. Restore iPhone Deleted Text Message
- iPhone Backup Problems
- 1. Find iPhone Backup Location on Mac
- 2. iPhone Backup Password Never Set
- 3. iPhone Backup Password Forget
- 4. iCloud Backup Taking Forever
- 5. iPhone Won't Backup to iCloud
- 6. iTunes Won't Backup iPhone
- iPhone Restore Problems
- 1. iTunes Stuck on Verifying iPhone
- 2. Not Space to Restore iPhone Backup
- 3. iTunes Backup Not Restoring
- 4. iPhone Won't Restore
- WhatsApp Backup & Restore
- 1. WhatsApp from Google Drive to iOS
- 2. Restore Old WhatsApp Backup
- 3. Restore WhatsApp Chat on iPhone
- 4. Retrieve WhatsApp Chat History
- 5. See Deleted Messages on WhatsApp
- 6. Restore WhatsApp Stuck on iPhone
- 7. iPhone WhatsApp to Google Drive
- 8. Back Up WhatsApp on iPhone
- 9. Backup WhatsApp Data before Changing Number
- iPhone Backup Tips
- 1. Extract Data From iPhone
- 2. Encrypt iPhone Backup
- 3. Reset iPhone Backup Password
- 4. Extract iPhone Backup in Win 10
- 5. How Long take iPhone to Backup
- 6. Find iPhone Backup Location
- 7. iPhone Backup Password
- 8. View iPhone Backup on Computer
- 9. iPhone Backup with iTunes/iCloud
- 10.Check Last Backup on iPhone
- 11.How To Encrypt iPhone Backup
- 12. Best Backup Chargers for iPhone
- 13. Speed Up Your iPhone Backups
- 14. Save Data When iPhone Disabled
- ● Manage/transfer/recover data
- ● Unlock screen/activate/FRP lock
- ● Fix most iOS and Android issues
- Back up Now Back up Now Back up Now
Oct 24, 2025 • Filed to: Backup & Restore Solutions • Proven solutions
Dr.Fone Basic:
Better Control for Your Phone
Manage, transfer, back up, restore, and mirror your device
When your iPhone XS (Max) / iPhone XR is in Recovery Mode, it allows you to do nothing but to come out of the mode so that you can use it normally. In other words, you cannot backup your iPhone when it is in Recovery Mode because all its functions that the iOS provides remain uninitialized, and the iPhone must be powered on normally before it can allow you to back up your data.
If your iPhone is in Recovery Mode, it means that either you are stuck in the Recovery Mode Loop, or the iOS that your iPhone has got corrupted. In order to resolve either of the problems, it is easy to rely on an efficient third-party tool that is not only cheap, it is also capable of making things easier for you.
- 1.Fixing the Corrupt iOS to Start Your iPhone XS (Max) / iPhone XR in Normal Mode
- 2.Using Dr.Fone - Phone Backup (iOS) to Backup iPhone XS (Max) / iPhone XR
1.Fixing the Corrupt iOS to Start Your iPhone XS (Max) / iPhone XR in Normal Mode
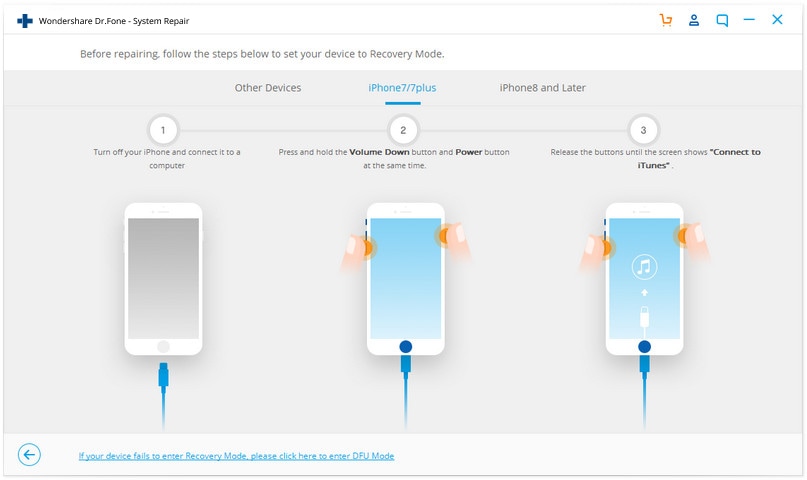
If you iPhone are stuck in the Recovery Mode, it is likely your iPhone has is corrupt and needs to be fixed. Dr.Fone - System Repair (iOS) simplifies this entire process, and you just need follow the step-by-step instructions given below to get the job done with ease.

Dr.Fone - System Repair (iOS)
- Fix with various iOS system issues like recovery mode, white Apple logo, black screen, looping on start, etc.
- Only fix your iOS to normal, no data loss at all.
- Supports iPhone XS (Max) /iPhone XR / iPhone X / 8 (Plus)/ iPhone 7(Plus)/ iPhone6s(Plus), iPhone SE and the latest iOS version fully!

- Work for all models of iPhone, iPad and iPod touch.
1.Run Dr.Fone,on the main window, then choose System Repair option.

2.Connect your iPhone XS (Max) / iPhone XR with USB on computer,then click the Start button to verify your iPhone's model number.

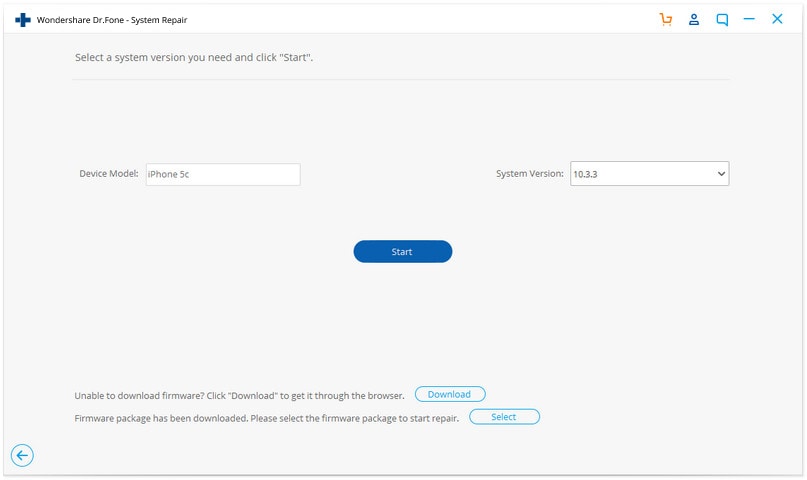
3.When the next window opens, verify your iPhone's model number.

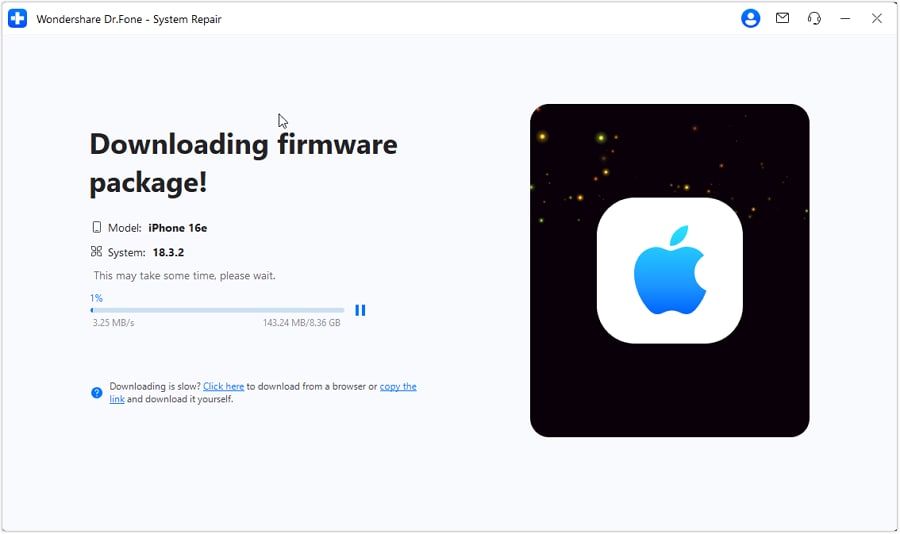
4.Click the Download button to download a compatible version for your iPhone to your computer's local hard drive.

Note: If the download fails, you can click the Copy button from below, open your favorite web browser, paste the copied URL in the web browser's address bar, and hit Enter to download an iOS image for your iPhone manually.

5.Once the downloaded is finished, Dr.Fone will continuously start repairing your iPhone to get your iPhone in normal mode. The whole process will take less than 10 minutes.


Once restarted, you can follow the procedure given below to backup your data to your computer.
Advantages of Using Dr.Fone
Although you can use any of the available programs to come out of the Recovery Mode whether or not the iOS on your device is corrupted, there are a few advantages that give Dr.Fone some additional scores:
- When you use Dr.Fone to download and restore a new iOS image to your iPhone, your data still remains intact and does not get deleted.
- Dr.Fone automatically detects your iPhone model and downloads the compatible iOS image for you.
- In case you cannot find your data in the Dr.Fone's scan results, you can recover it from the iTunes or iCloud backup files using the application.
- Unlike iTunes or iCloud, Dr.Fone allows you to pick individual objects from the backup files and restore them to your device or computer.
Conclusion
Having a corrupt iOS while continuously using your iPhone XS (Max) / iPhone XR is a normal thing. Thanks to Wondershare for developing an efficient tool like Dr.Fone that is capable of making your life easier when it comes to fixing your iPhone and getting your data back.
Video on Fixing the Corrupt iOS to Start Your iPhone in Normal Mode
2.Using Dr.Fone - Phone Backup (iOS) to Backup iPhone XS (Max) / iPhone XR
After your iPhone XS (Max) / iPhone XR has been fixed to the normal mode.In order to avoid data loss,we remind you backup your data at once. Dr.Fone - Phone Backup (iOS) is a very good tool which provides an effective way to backup your data in 3 steps.

Dr.Fone - Phone Backup (iOS)
Backup & Restore iOS Data Turns Flexible.
- One click to backup the whole iOS device to your computer.
- Allow to preview and restore any item from the backup to a device.
- Export what you want from the backup to your computer.
- No data loss on devices during the restore.
- Selectively backup and restore any data you want.
Here is the simple steps,just follow it:
Step 1.Launch Dr.Fone on your computer, select "Phone Backup" option.Then connect your normal iPhone to computer.

Step 2.When your iPhone XS (Max) / iPhone XR has connected,select the type of data you want to backup.Then click "Backup"to start.The whole process will take a few minutes,depends on the data storage on your iPhone.


Step 3.After backup has finished,you can check all contents of backup in categories.Choose the selected files to export to your computer,just click "Export to PC".

Video on Using Dr.Fone - Phone Backup (iOS) to Backup iPhone
You might also interest:
5 Reasons Why Your iPhone Backup Failed and How to Fix It
How to Save Your Data When Your iPhone Is Disabled
Easy Guide How To Check Last Backup on iPhone in Different Methods
A Comprehensive Guide on How To Back Up iPhone to Google Drive
Dr.Fone Basic:
Better Control for Your Phone
Manage, transfer, back up, restore, and mirror your device


Alice MJ
staff Editor