![]()
Record your iPhone screen and save it on your computer!
- Mirror iOS devices to a Large-Screen PC with Wi-Fi.New
- Control iPhone from Your Computer with Keyboard and Mouse.
- Record the Phone Screen and Save it on the PC.
- Take Screenshots on PC and Save to the Clipboard or PC.
How to Turn on Screen Record on iPhone/iPad Step by Step?

Jul 12, 2024 • Filed to: Mirror Phone Solutions • Proven solutions
When it comes to iOS, there is no match to features. It provides you with an all-new Control Center function that enables you to record the screen on both iPhone and iPad. But how to turn on screen recording on iPhone is a point of concern for many. If you fall in the same category and are looking for the right technique, you hit the right place. You might be wondering how? Well, continue reading further to get the answer.
Part 1. Does every iPhone have a Screen Record?
You might own an old model of the iPhone and are wondering about the availability of screen recording on your iPhone. Isn’t it? Well, you need to know that with iOS 11 or later and iPad, you can go for a screen recording. It comes with a built-in feature for the same. You can also capture sound on your iPhone, iPad, or iTouch. Then it doesn't matter whether you have an iPhone 7, 8, 9, X, XR, 11, 12, or 13. You can easily record the screen activity as well as video calls.
You might own an old model of the iPhone and are wondering about the availability of screen recording on your iPhone. Isn’t it? Well, you need to know that with iOS 11 or later and iPad, you can go for a screen recording. It comes with a built-in feature for the same. You can also capture sound on your iPhone, iPad, or iTouch. Then it doesn't matter whether you have an iPhone 7, 8, 9, X, XR, 11, 12, or 13. You can easily record the screen activity as well as video calls.
But on the other hand, if you are having an iPhone 6 or an earlier model or you are having iOS 10 and below, you can't record the screen directly. You have to rely on the third-party app for recording the screen. This is so because they don’t come with an inbuilt screen recording function. The inbuilt screen recording feature, along with the audio, came up with iOS 11.
Part 2. How to Enable Screen Recording on iPhone 13/12/11/XR/X/8/7 step by step?
It is easy to record the screen on your iPhone as it is an inbuilt function that lets you record the screen activity whenever you want. Then it doesn’t matter whether you are surfing the internet, you are on a video call, you are playing a game, or you are involved in some other screen activity.
But for using this feature, you are required to check whether the screen recording feature is already in the Control Center or not?
If it is there, it’s good to go. It will make it easy for you to go for a recording directly from the main screen. But if not, you are required to add it first. For adding this feature and enabling screen recording, you are required to follow some simple steps.
Step 1: Go to the “Settings” and scroll down to locate the Control Center. Now tap on the “Customize Controls.” Now find the “Screen Recording” from the customize interface and select the + icon. This will add the recording feature in the Control Center.

Step 2: Now, all you need to do is to raise the Control Center and start the process of recording whenever you want. For this, you can swipe up to pull the Control Center menu in case you are using iPhone 8 or earlier. On the other hand, if you are using iPhone X or later, you are required to pull down the menu from the top-right corner.
Step 3: For recording the screen, tap the “Screen Recording” and then select “Start Recording.” This will start recording the screen of your iPhone. If you want to capture your voice or the background sound, you can do so by turning on the Microphone. It is present below the screen recording.
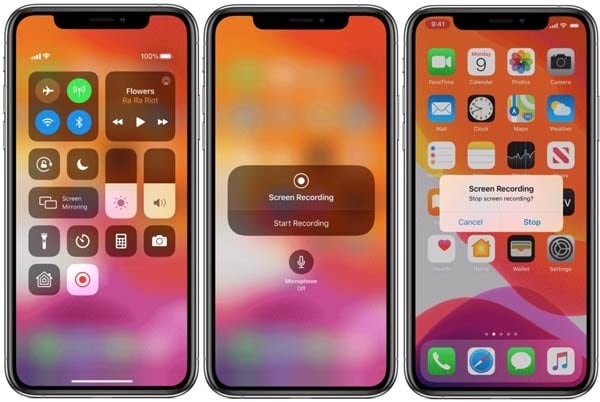
Step 4: When you are done with the recording, and you want to stop the recording, you can do so by tapping on the red status bar followed by “Stop.” It is present at the top of the iPhone’s screen. You can also stop the recording by going back to the Control Center and then tapping the screen recording icon.
On stopping the screen recording, the recorded file will be automatically saved to the “Photos” app. You can open, edit, share or perform other operations on the recorded file by going to the Photos.
MirrorGo - Wondershare Dr.Fone
Record your iPhone screen and save it on your computer!
- Mirror the iPhone screen onto the big screen of the PC.
- Record the phone screen and make a video.
- Take screenshots and save them on the computer.
- Reverse control your iPhone on your PC for a full-screen experience.

Part 3. How to Screen Record on an iPad?
iPad provides you the ability to record an on-screen video of almost any app. It also lets you record other screen activities without any hindrance. So you can record the video call, game, or any other screen activity using the in-built screen recording feature.
But before you go for a screen recording on the iPad, you are required to add a screen recording button to the Control Center. Once the button is added successfully in the Control Center, it will become easy for you to record the screen. For this, follow some simple steps.
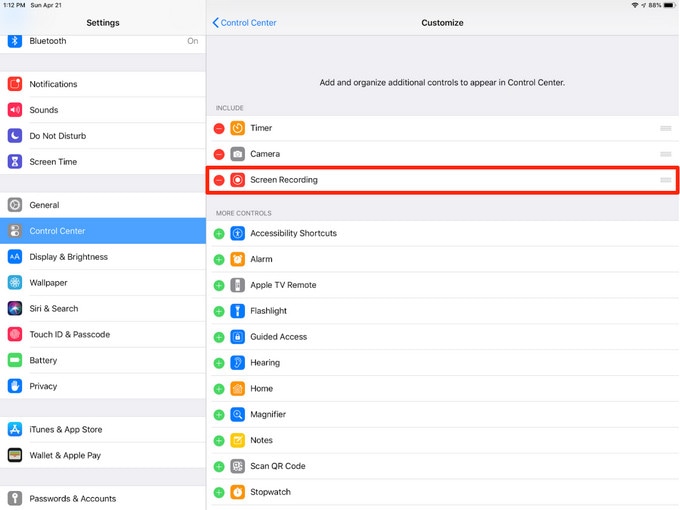
Step 1: Go to the “Settings” and scroll down until you find the “Control Center.” Once found, click on it. Now you have to tap on “Customize Controls.” You have to find the “Screen Recording” at the top in the section named “Include.” If it is not there, go for “More Controls” and select the plus sign in green color. If it is moved to the top of the screen, you are good to proceed ahead.
Step 2: When you want to record the screen, you are required to pull down the Control Center. You can do this by swiping down from the upper-right of the screen. Now you have to tap on the record button. It is a circle with a white dot inside.
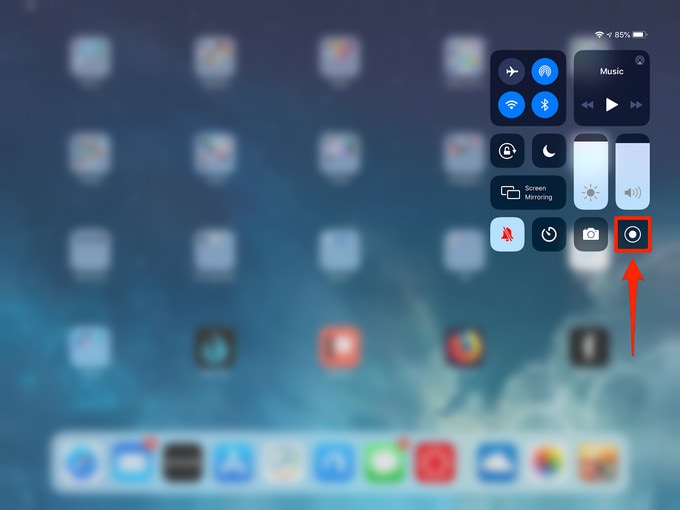
Step 3: The circle will change into a 3-second countdown. Then it will turn red. This is an indication that the recording is under process. You can take the help of the countdown timer to close the control center.
Once the recording begins, you will be able to see a small recording indication on the top of the screen as well as in the recording. Now when you are done with the recording, tap the recording indication. Then you have to tap on the “Stop” to confirm your action.
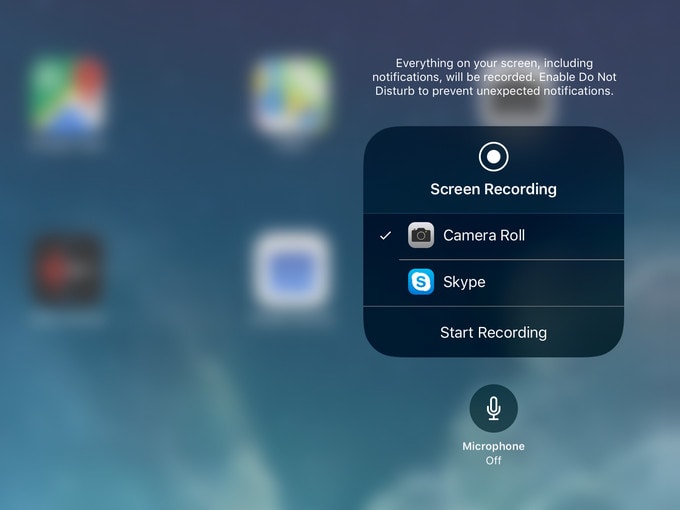
Note: You can long press the record button to use additional options. This includes where you want to send the recorded video. You want to turn on the microphone. By default, videos will be saved to the Photos app. You can also install a compatible app like Skype or Webex to send videos directly there.
Once the recorded video is stored on the selected path, you can visit there to watch, share or edit as per your choice. For editing, you can use an inbuilt tool or go with a third-party tool.
Conclusion:
How to turn on screen recording on iPhone is a matter of concern for many. The main reason behind this is a lack of knowledge regarding the right technique. This is the reason why even users with iOS 11 or above version are forced to use third-party apps for recording iPhone’s screen. If you were one of them, then you need to shrug it off because now you are introduced to the proper technique. So move ahead and enjoy the screen recording seamlessly on both your iPhone and iPad.


Other Popular Articles From Wondershare
iPhone Mirror
- Control iPhone from PC
- Control iPhone Tips
- Mirror iPhone to PC
- 1. Cast iPhone to Mac
- 2. Apps to Mirror iPhone to Mac
- 3. Cast iPhone to Windows PC
- 4. Mirror iPhone/iPad to Windows PC
- 5. Display iPhone Screen on PC
- 6. Screen Share on iPhone
- 7. Mirror iPhone to Laptop
- 8. Mirror iPhone to PC via USB
- 9. Mirror iPhone to Windows 10
- 10. Stream iPhone to Computer
- 11. Stream iPhone Video to Computer
- Mirror iPhone to Others
- 1. Screen Mirroring iPhone to iPad
- 2. Mirror iPhone to iPhone
- 3. Mirror iPhone/iPad to Fire TV Stick
- 4. Mirror iPhone to Roku
- 5. Cast iPhone to Chromecast
- Screen Record iPhone
- 1. iPhone Screen Recorders
- 2. Record Youtube Videos on iPhone
- 3. Capture iPhone Screen on PC/Mac
- 4. Screenshot Snapchat without Knowing
- 5. Turn on Screen Record on iPhone
- 6. Capture iPhone Screen Video
- 7. Record iPhone Screen without Jailbreak
- Screen Mirroring Tips
- ● Manage/transfer/recover data
- ● Unlock screen/activate/FRP lock
- ● Fix most iOS and Android issues
- Mirror Now Mirror Now Mirror Now
James Davis
staff Editor