4 Ways to Capter iPhone Screen on PC/Mac Like a Pro

Oct 24, 2025 • Filed to: Phone Mirroring Solutions • Proven solutions
Dr.Fone Basic:
Better Control for Your Phone
Manage, transfer, back up, restore, and mirror your device
iPhone has integrated within all major platforms and forums and has gathered millions of users worldwide to develop a fair market within the community. This smartphone device is considered among the top-notch models that present the best of smartphone technology through various features and characteristics. Apple created their own operating system to run the associated devices; however, this is not all that they strived for. The journey of coming up with state-of-the-art functioning smartphones and impressive features was followed by a series of different tools and platforms integrated within the devices. This included the renowned iCloud service and iTunes that had turned out to become the major tools within any iPhone. These smartphones offer extensive usability to the market and present them with an impressive and optimized solution for covering all basic problems while using a smartphone. This article features screen capturing and recording tools, which devices from the basic need of capturing the screen for various purposes, as found necessary. For this, several methods and mechanisms are to be discussed, explaining the process of capturing the iPhone's screen with ease.
Method 1. How to capture iPhone screen on PC
iPhone offers its own screen recording feature to users who have their iOS upgraded to 11 or above. The problem that lies in the consumption of this feature is its availability across multiple forums. Although the dedicated feature offers the versatility market without downloading any third-party platform, the use of the iPhone's screen recording or screen capturing feature is not available to be performed through a PC. For this, different third-party platforms offer adequate solutions that can cater to users' needs who are into capturing their iPhone's screen on PC.
Over observing the availability of third-party platforms in the market, selecting the most optimal software for iPhone's screen mirroring may get quite difficult in the process. Thus, this article introduces a trifling and proficient platform under the name of Wondershare Dr.Fonethat features a perfect environment for capturing the iPhone's screen over a PC. This platform is featured in offering the specific service and is focused on bringing various functions throughout its operation. You can process remote control of your device and even record all proceedings with appropriate tools available on the interface of MirrorGo.
MirrorGo - iOS Screen Capture
Take iPhone screenshots and save on your computer!
- Take screenshots and save on the computer.
- Mirror iPhone screen onto the big screen of the PC.
- Record phone screen and make a video.
- Reverse control your iPhone on your PC for a full-screen experience.

To successfully capture your iPhone's screen over a PC with MirrorGo, you need to follow the steps defined below.
Step 1: Download and Connect
You need to download Wondershare Dr.Fone on your desktop and connect your devices across a similar Wi-Fi connection to consume the platform effectively. The mirroring connection is established across the devices through a simple Wi-Fi connection.
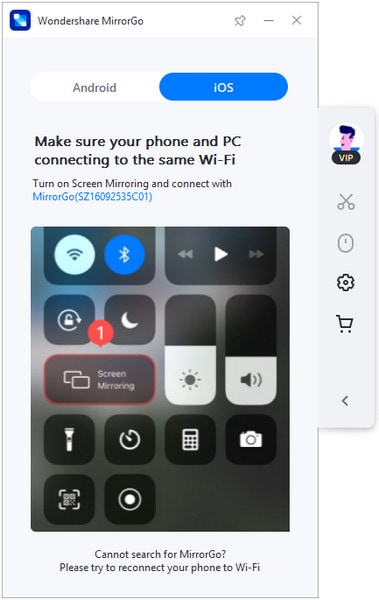
Step 2: Mirror iPhone
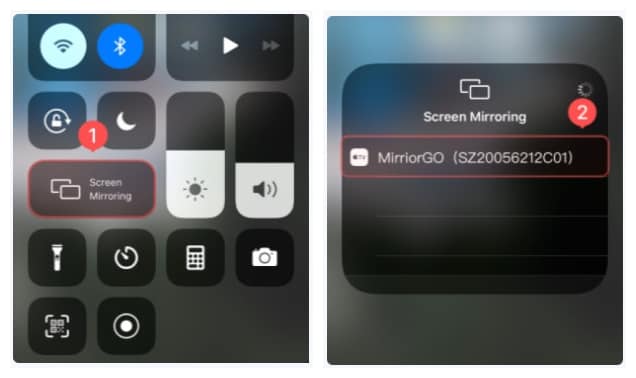
Proceed towards accessing the ‘Control Center’ within your iPhone. Select the option of ‘Screen Mirroring’ in the available list to lead to a new screen. This screen displays the various options that could potentially establish a mirroring connection. Tap on the option displaying ‘MirrorGo’ to proceed.
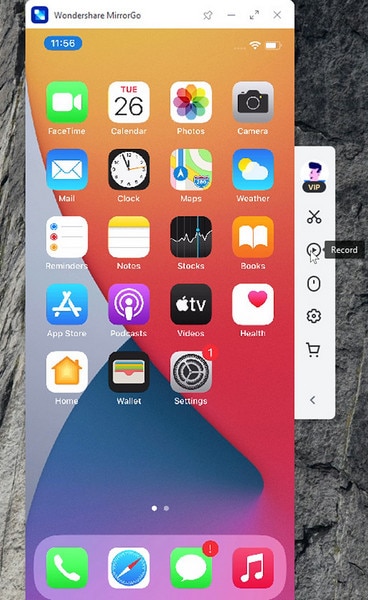
Step 3: Record your iPhone.
After you are done establishing a connection with your iPhone, you can initiate recording by accessing the control panel on the right side of your desktop screen. Tap on the button displaying 'Record' to start recording your iPhone. Tap on the same button once you are done recording.
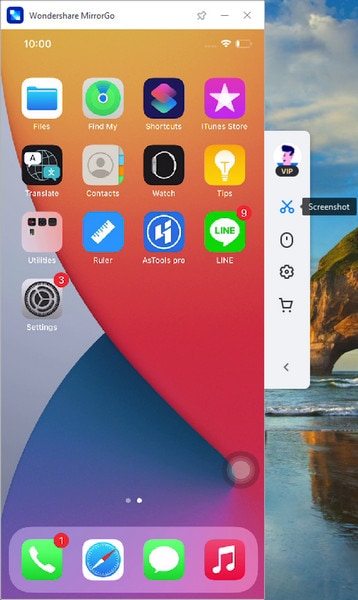
Step 4: Capture Screen
Before taking screenshots of your iPhone’s screen, you can set up the screenshots' location by accessing the ‘Settings’ on the left side of the panel. Access ‘Screenshots and recording settings’ and set up an appropriate path for saving all files. Proceed back to the screen and tap on the icon displaying ‘Screenshot’ on the right-panel of MirrorGo’s interface.
Method 2. Capture iPhone screen on Mac with QuickTime
If you are a Mac user and seek an appropriate method of capturing your iPhone’s screen, you can look across using QuickTime as a significant option compared to any other third-party platform existing in the market. QuickTime is not only a player that provides the user with a service of watching media files but allows you to feature several operations through its effective toolset. To easily capture your iPhone screen through a Mac using QuickTime, you need to follow the steps defined as shown below.
Step 1: You need to initially connect your iPhone with your Mac through a USB connection. Proceed to launch QuickTime Player on your Mac, located across the 'Applications' folder.
Step 2: Access the 'File' menu on the top of the toolbar and select 'New Movie Recording' to open a new recording screen. Before starting the process, you need to tap on the arrowhead on the right side, adjacent to the red 'Recording' button below the interface.

Step 3: Select your iPhone under the ‘Camera’ and ‘Microphone’ section and proceed towards tapping on the ‘Record’ button once the iPhone’s screen appears on the player’s interface. You can now easily capture the screen of your iPhone within your Mac.

Method 3. How to capture the screen on iPhone X or later?
iPhones are impressive smartphones that provide an excessive and adequate set of remedies to their users across all platforms. These smartphones integrate important third-party platforms that effectively guide in covering various aspects but offer their own dedicated system were found appropriate. You may find different platforms that are only dedicated to iPhone users. However, when it comes to capturing the screen within your iPhone, several procedures can be considered to cover this process. The major question that should be kept under consideration is the process that would allow the user to manage an adequate result for sharing it to the required forums. This article would provide the user market with two different tips that would allow them to capture the screen of their iPhone X or later successfully.
Tip 1: Screenshot through Buttons
Step 1: Open the screen that you wish to capture on your iPhone X.
Step 2: Proceed towards tapping on the side button on the iPhone. Simultaneously tap the 'Volume Up' button on your iPhone X to capture the screen's screenshot. The screenshot will appear as a thumbnail across the screen, which can be edited and shared as desired.

Tip 2: Screenshot through Assistive Touch
Step 1: Open the ‘Settings’ of your iPhone X and proceed into the ‘General’ settings. Tap on the ‘Accessibility’ settings on the provided list and scroll down on the next screen to tap on the option displaying ‘Assistive Touch’ for turning it on.
Step 2: Among the provided options, tap on the ‘Customized Top-Level Menu' and select '+' to initiate a new icon. Select the icon and proceed to add 'Screenshot' in the options. Tap "Done" once you are done.
Step 3: Open the screen that you wish to capture. Tap on the 'Assistive Touch’ button and select ‘Screenshot’ for successfully capturing the screen of your device.

Method 4. How to capture the screen on iPhone 8 or earlier?
The procedure of capturing the screen across your iPhone 8 or earlier models is slightly different from the models that followed this. To understand the process of taking a screenshot across your iPhone 8 or earlier models, you need to follow the process expressed as follows.
Step 1: Tap on the ‘Sleep/Wake’ button on your iPhone and simultaneously tap on the ‘Home’ button to successfully take a screenshot of your iPhone.
Step 2: With a screenshot taken successfully across your device, you can easily edit or share it across any album within your iPhone with ease.

Conversely, if you consider following another method of taking a screenshot on your iPhone 8, you need to consider following the tip of Assistive Touch as explained above. This would also help you in capturing the screen on your iPhone 8 or earlier. This saves you from all the formalities of going through a list of different methods for capturing a simple instant across your screen.
Conclusion
The article has taken up the issue of capturing the screen of your iPhones and defined several methods and mechanisms that can allow you to process it successfully. You can consider utilizing different methods if you are a PC user and feature different tools for executing the process if you consume Mac in your daily life. For this, you need to look across the guide to get a better understanding of different procedures that are involved in the complete process of capturing the iPhone screen.
Dr.Fone Basic:
Better Control for Your Phone
Manage, transfer, back up, restore, and mirror your device


iPhone Mirror
- Control iPhone from PC
- Control iPhone Tips
- Mirror iPhone to PC
- 1. Cast iPhone to Mac
- 2. Apps to Mirror iPhone to Mac
- 3. Cast iPhone to Windows PC
- 4. Mirror iPhone/iPad to Windows PC
- 5. Display iPhone Screen on PC
- 6. Screen Share on iPhone
- 7. Mirror iPhone to Laptop
- 8. Mirror iPhone to PC via USB
- 9. Mirror iPhone to Windows 10
- 10. Stream iPhone to Computer
- 11. Stream iPhone Video to Computer
- Mirror iPhone to Others
- 1. Screen Mirroring iPhone to iPad
- 2. Mirror iPhone to iPhone
- 3. Mirror iPhone/iPad to Fire TV Stick
- 4. Mirror iPhone to Roku
- 5. Cast iPhone to Chromecast
- Screen Record iPhone
- 1. iPhone Screen Recorders
- 2. Record Youtube Videos on iPhone
- 3. Capture iPhone Screen on PC/Mac
- 4. Screenshot Snapchat without Knowing
- 5. Turn on Screen Record on iPhone
- 6. Capture iPhone Screen Video
- 7. Record iPhone Screen without Jailbreak
- Screen Mirroring Tips
- ● Manage/transfer/recover data
- ● Unlock screen/activate/FRP lock
- ● Fix most iOS and Android issues
- Mirror Now Mirror Now Mirror Now


James Davis
staff Editor