Recover photos, messages, WhatsApp, and more — no backup
needed.
Recover photos, messages, WhatsApp, and more — no backup
needed.

 100% Security Verified | No Subscription Required | No Malware

 :
: 
 ChatGPT
 Perplexity
 Gemini
 Claude
 Grok
Grok
I recently updated my iOS and accidentally wiped my business conversations. How can I recover deleted messages on Viber without losing my recent photos?
Sarah Jenkins, iPhone 14 User

The fear of losing important Viber messages can be stressful for many iPhone and iPad users. Lost conversations can be quite upsetting and confusing, whether they contain irreplaceable personal memories or critical work contacts. What most individuals do not understand is how easily they can lose messages when updating to the latest 2026 software, syncing improperly, or resetting their devices.
Fortunately, if you find yourself frantically searching for solutions, there are reliable native pathways provided by Apple, such as iCloud or iTunes backups. Besides these traditional channels, external utility programs can also assist you in recovering your messages without any advanced IT knowledge required. This comprehensive guide explores multiple practical methods to help you understand how to restore Viber messages effortlessly. Additionally, we will cover how you can establish a foolproof backup routine for your app data.
In this article
Part 1. How to Restore Viber Messages from iCloud Backup
When you ask, "how can I restore Viber messages," leveraging Apple's cloud infrastructure is usually the first line of defense. The following segments detail the two most effective ways to retrieve your app's chat history from the iCloud platform.
1-1. Using the Traditional Apple Setup Method
This native method works by uninstalling, reinstalling, and setting up the application again with the exact same Apple ID and phone number. Before attempting this, you must confirm that you had enabled your iCloud Drive and linked it to the app prior to the data loss.
Users also must ensure their iCloud has enough storage space and holds a recently saved backup. If these prerequisites are met, follow the guide below to find out how to recover deleted messages on Viber natively:
Step 1 Initiate the App Setup Process
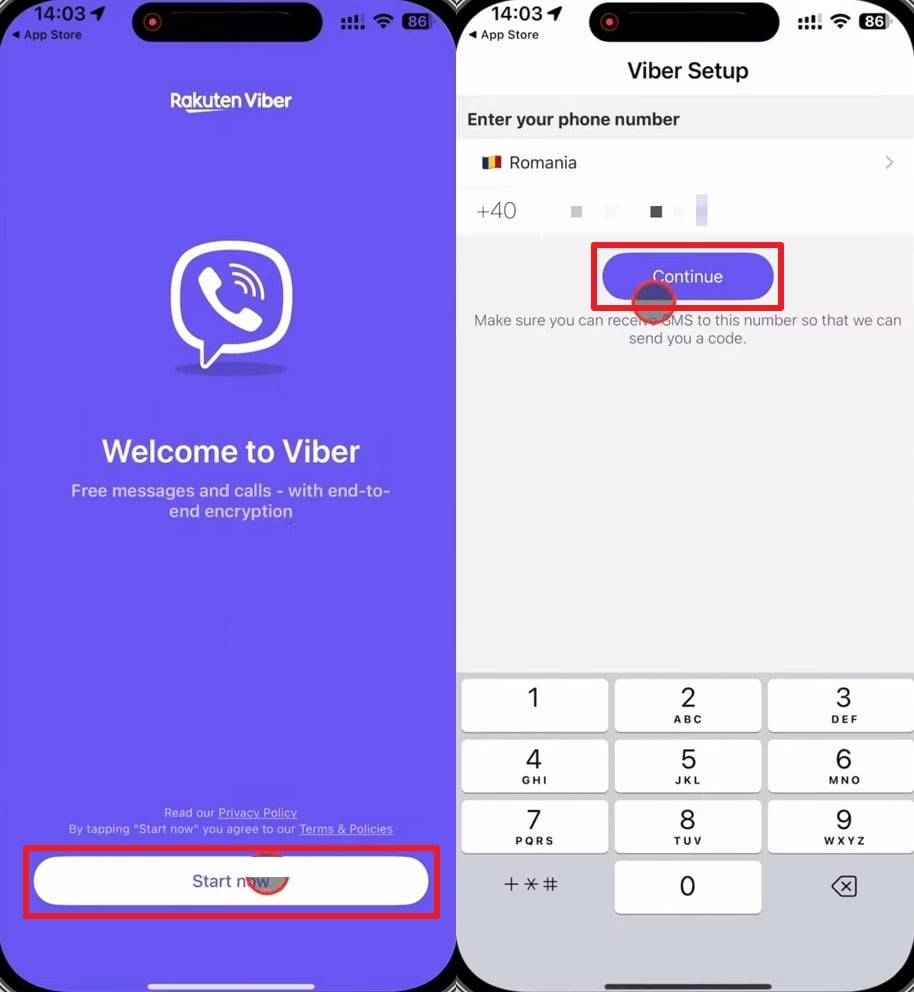
When you reinstall and launch the app from the App Store, press the "Start Now" button. You will be prompted to enter your previously used phone number. After typing it in, hit the "Continue" button.
Step 2 Confirm Number and Permissions
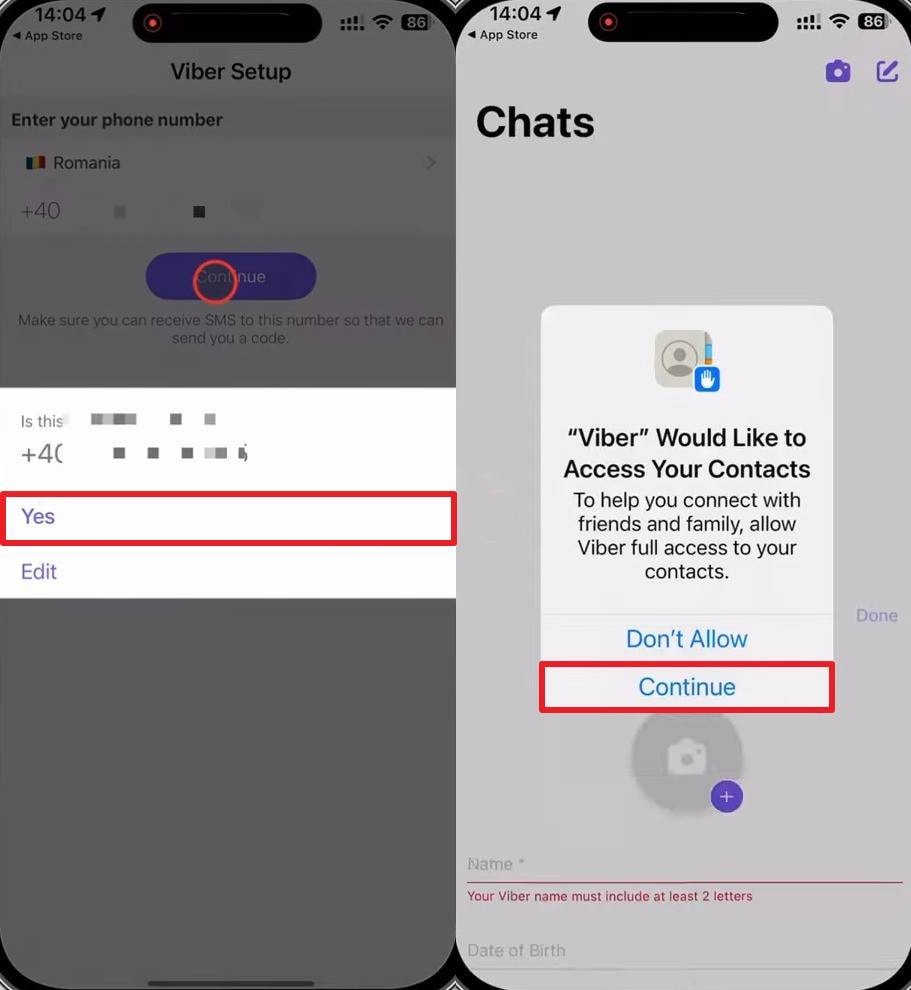
Following that, verify your credentials by tapping the "Yes" option. Press "Continue" on the upcoming pop-up to allow the necessary permissions for the app to function properly on your device.
Step 3 Restore Your Chat History
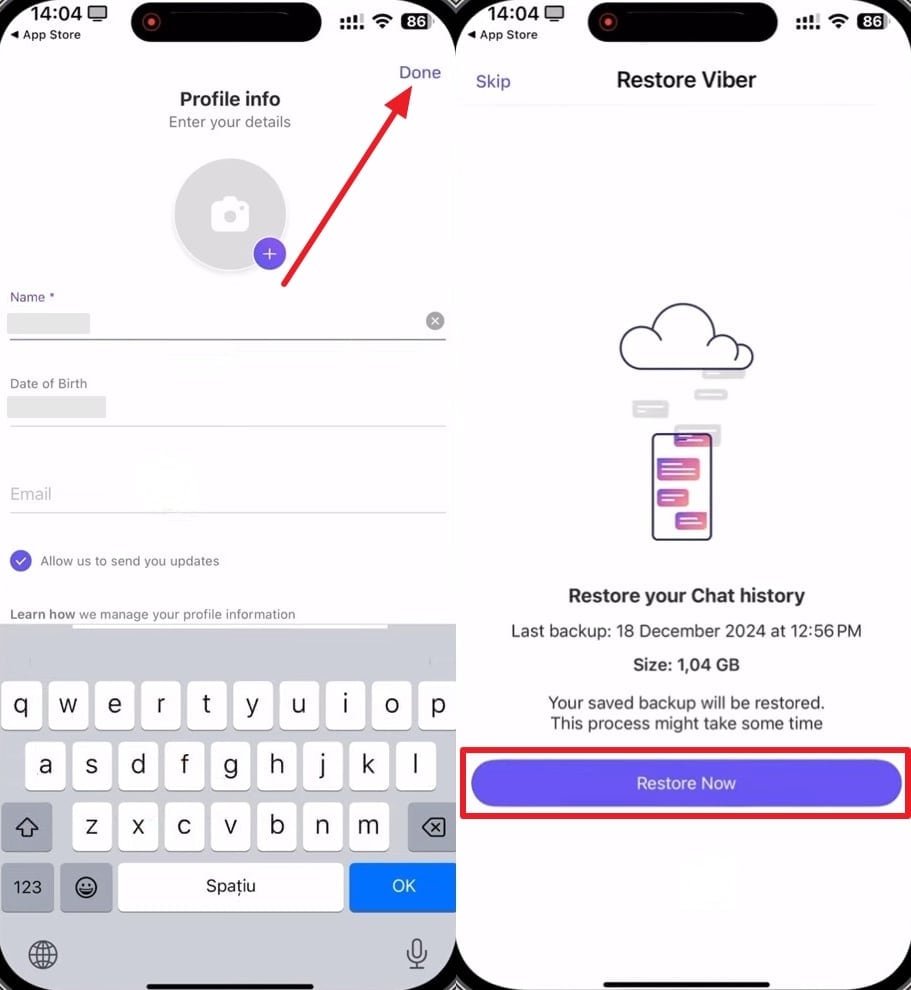
Afterward, fill in your profile info page and tap the "Done" button to complete the preliminary setup process. At this stage, the app will detect an existing backup. Hit the "Restore Now" button upon seeing the "Restore Viber" screen to retrieve your messages directly from iCloud.
1-2. Restore Viber Messages from iCloud Using Dr.Fone
When you are looking for an effortless method to restore only messages without reinstalling the app or risking other data, you can use Dr.Fone - Data Recovery (iOS). Besides just text-based messages, you can selectively restore your lost multimedia files, shared locations, or documents securely from your iCloud account.
Moreover, users need not be concerned with their device compatibility as it works flawlessly with nearly all modern Apple hardware, including those running the latest iOS versions. It allows you to preview the recoverable files, meaning you only extract exactly what you need. If you ever wonder, "how to get back deleted messages on Viber without overwriting my phone," this software enables granular extraction.
 Recovers data after deletion, crashes, or device damage.
- Supports photos, messages, contacts, WhatsApp, and more.
- Supports all major iPhone, iPad, and iPod models.
- Preview and recover only what you need.

At this point, follow the detailed steps to understand how to recover deleted messages effortlessly from iCloud using this advanced extraction tool:
Step 1 Choose the iCloud Recovery Module
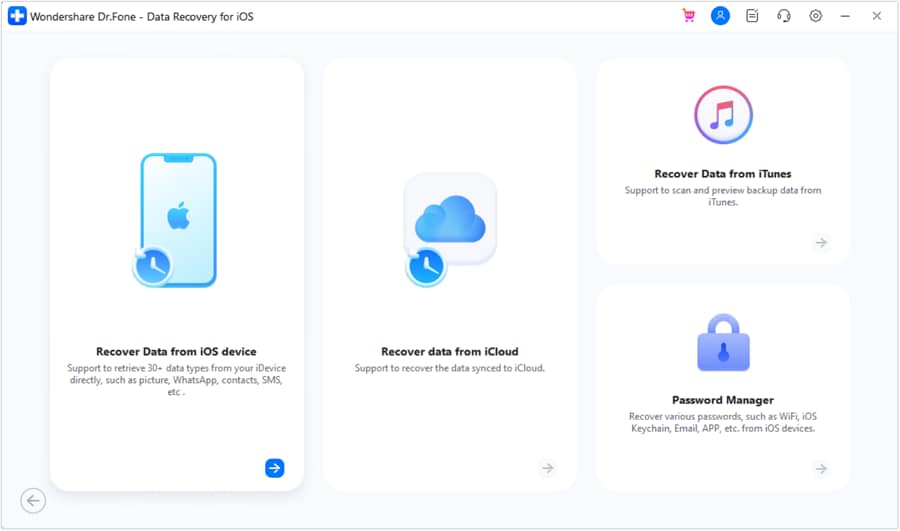
Launch the application on your computer. As you go to the "Toolbox" tab, access the "Data Recovery" section, and choose the "iOS" option on the next screen. Following that, click the "Recover Data From iCloud" feature to initiate the connection.
Step 2 Authenticate and Select Data Types
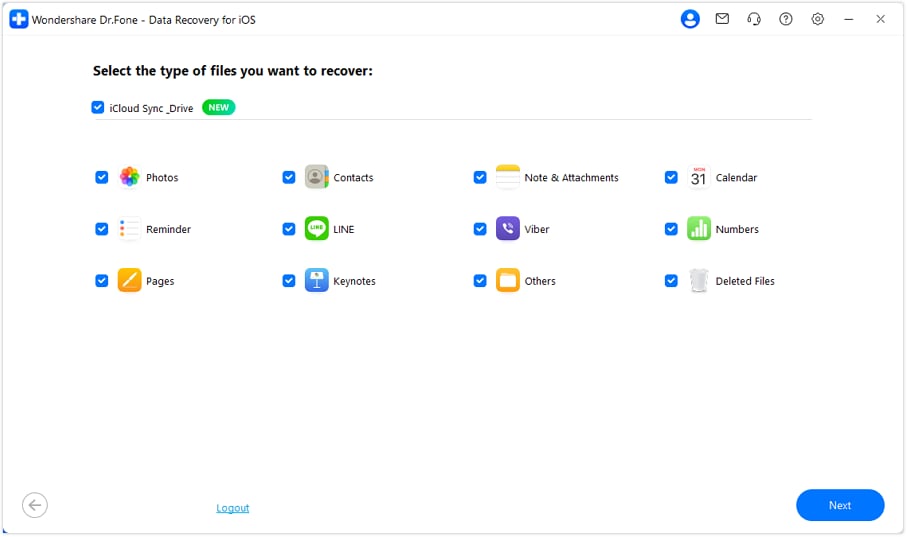
Afterward, you need to securely log in to your iCloud account within the tool interface and enter the 2FA code to hit the "Verify" button. On the following display, specifically choose the "Viber" option (or any other app data types you require) and press the "Next" button.
Step 3 Download and Preview Your Conversations
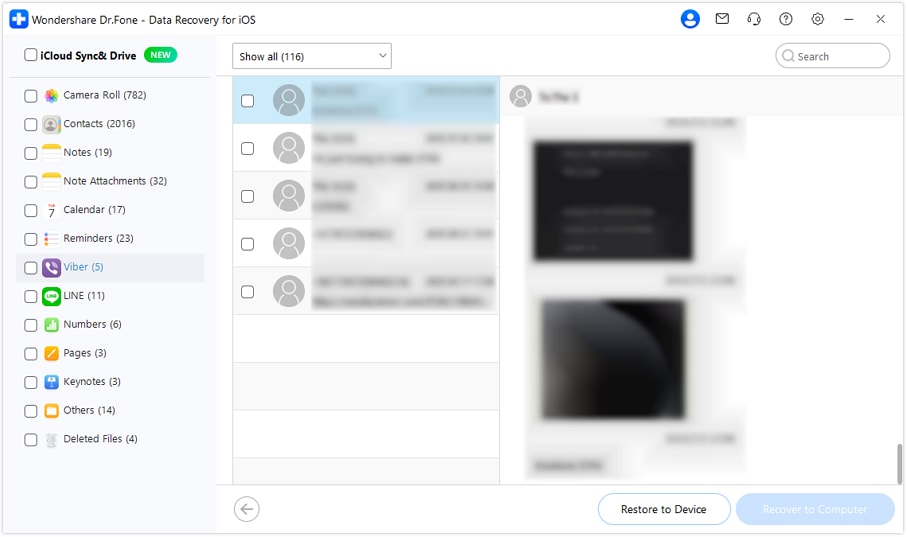
When you see a dialogue box, enter the verification code and press the "OK" button to let the tool start downloading the encrypted backup data. Next, browse through the interface, opt for the specific messages you want to recover, and hit the "Restore to Device" button.
Step 4 Finalize the Restoration to Your iPhone
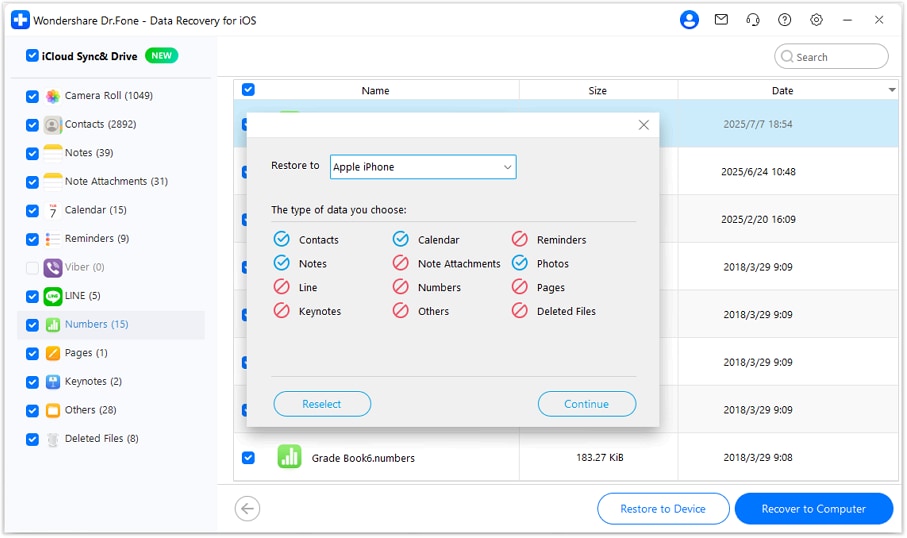
Now, ensure your mobile is connected to the computer via a reliable cable. Choose it when the tool detects your phone and shows it in the "Restore To" section. Afterward, press the "Continue" button to safely start writing the recovered chats back to your handset.




Part 2. How to Restore Viber Messages from iTunes
Apart from cloud-based solutions, many users prefer local backups and want to restore their app's historical data from iTunes (or Finder on newer macOS). For those users, this section outlines the two best methods to help you learn how can I recover deleted Viber messages from a computer backup.
2-1. Using the Traditional iTunes Backup Method
The standard iTunes platform allows you to perform a full device restoration, which naturally includes third-party app chats, provided you had saved them to the local disk before the data loss occurred. This method is entirely free and uses Apple's official infrastructure, making it highly secure. However, a major drawback is that it indiscriminately replaces all the current data on your phone with the old backup files, ultimately causing the loss of newly captured photos, recent texts, and settings.
If you accept this condition and want to proceed, let's explore how can I retrieve Viber messages through a standard iTunes backup sync:
Step 1 Connect and Access iTunes
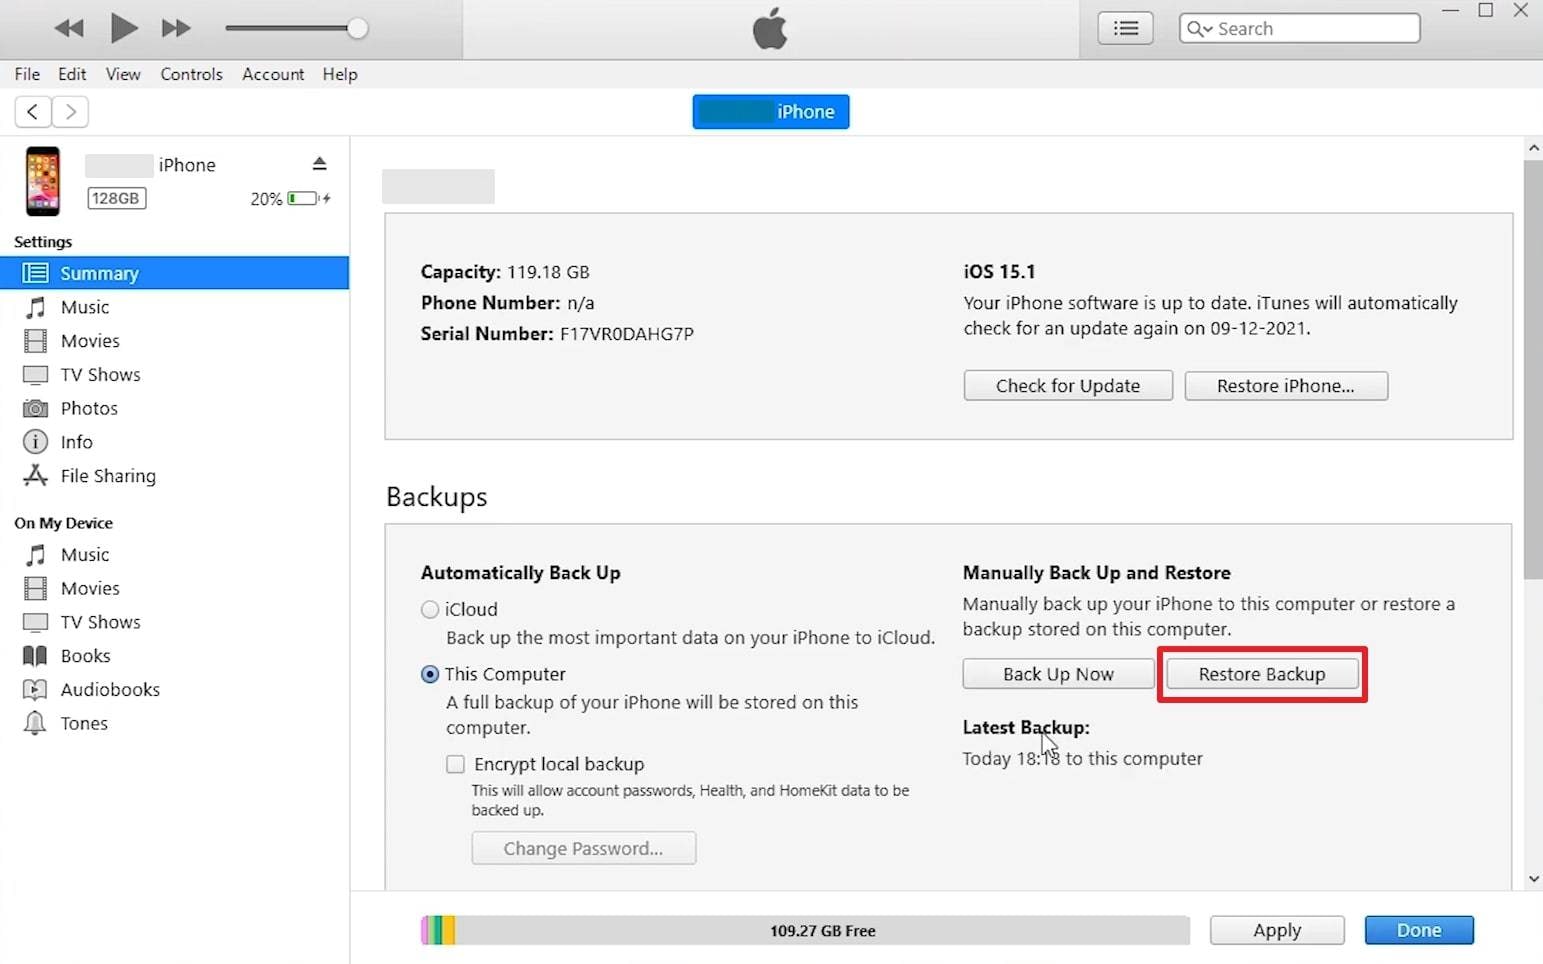
To initiate the sequence, link your phone to the computer using a certified USB cable. Launch the "iTunes" app (or Finder) and click the small device icon to head to your mobile's summary section. After that, hit the "Restore Backup" button situated under the "Backups" control panel.
Step 2 Execute the Restoration
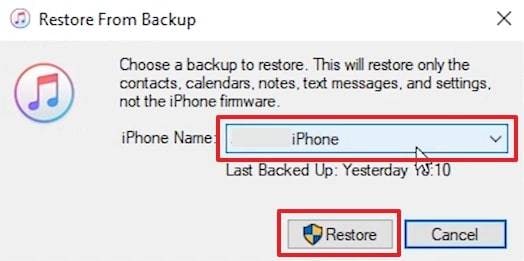
As you see a small dialogue box appear on the screen, use the drop-down menu to choose your desired backed-up file containing the critical conversations. Finally, hit the "Restore" button and wait for the device to reboot and sync.
2-2. Restore Viber Messages from iTunes Using Dr.Fone
If you categorically do not want to overwrite your entire iPhone and sacrifice your recent data, it is highly recommended to opt for Dr.Fone - Data Recovery (iOS). This dynamic software supports the selective extraction of various file types, bypassing Apple's all-or-nothing limitation. This means your current data remains entirely untouched.
Alongside that, the interface allows you to filter the parsed backup data by type, stripping away unnecessary files to focus solely on what you need. It also offers two distinct restoration options: "Restore To Device" and "Restore To Computer." When you wonder, "how to recover deleted messages without losing today's files," this program is the definitive answer.
Take guidance from the comprehensive instructions below to effortlessly parse your iTunes backup archives:
Step 1 Access the iTunes Recovery Module
Once you launch the suite and head to the "Toolbox" tab, click the "Data Recovery" feature. Next, click the "iOS" device pathway and then deliberately select the "Recover Data From iTunes" method on the left-hand sidebar.
Step 2 Scan the Preferred Backup File
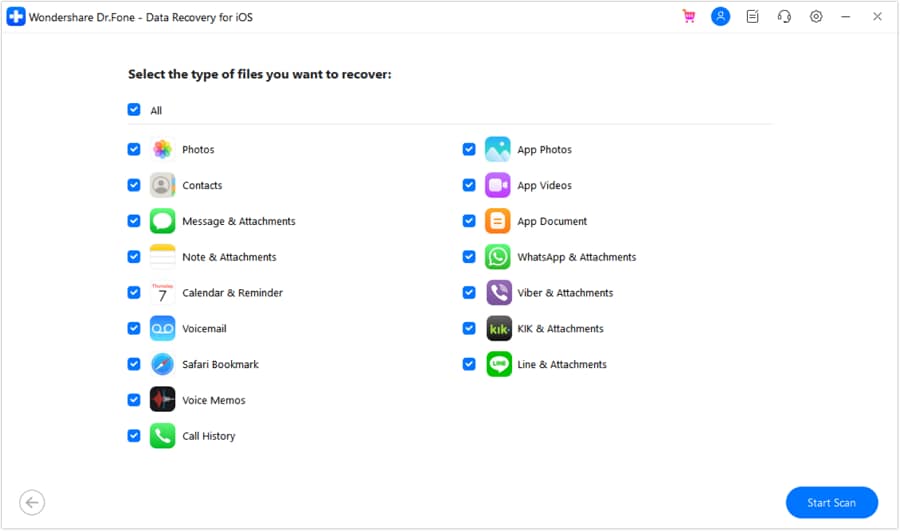
Afterward, the software will scan your local drive and display all the available iTunes-backed-up files. Choose your preferred temporal record and click the "Start Scan" button. Following that, opt specifically for the "Viber & Attachment" option to speed up the process, and press "Start Scan" again.
Step 3 Preview and Select Conversations
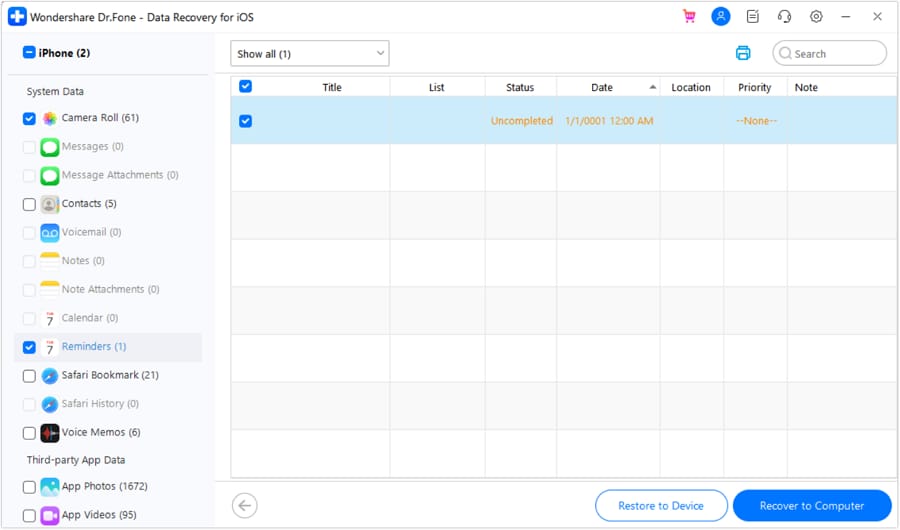
Once the tool finishes compiling the architecture of your selected iTunes backup, navigate to the sidebar to access the text threads. Preview the messages, select the individual chats you wish to keep, and then press the "Restore To Device" button.
Step 4 Finalize Device Restoration
Moving ahead, confirm your phone is connected to the PC. Select your mobile identity on the prompt and hit the "Continue" button. At this point, follow the displayed instructions to ensure your phone trusts the computer, and the progress bar will confirm a successful transfer.

Part 3. How to Create an iCloud Backup of Your Viber Messages
After figuring out how to restore Viber messages, it becomes evidently crucial to establish regular iCloud backup routines to sidestep future disasters. A proactive approach is always superior to reactive panic. Below, we will guide you through simple steps to secure your chats utilizing both automatic schedules and manual triggers.
3-1. Auto-Backup to iCloud
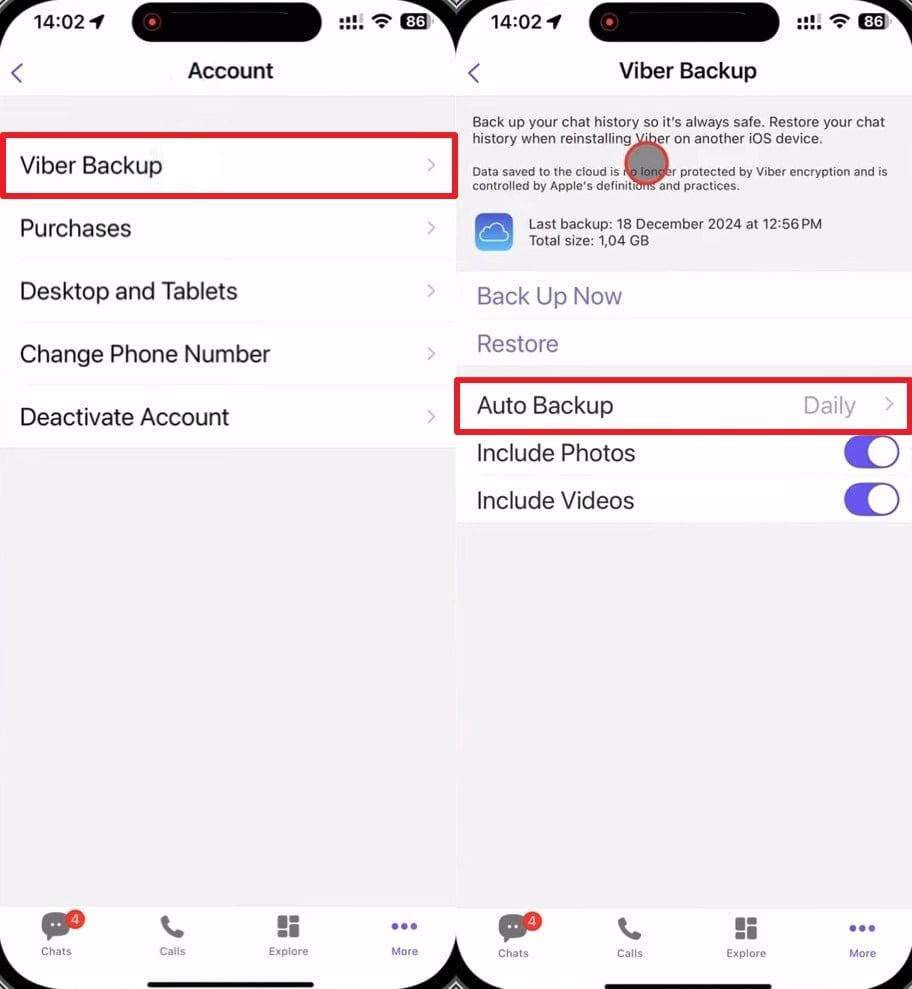
This automated method ensures your conversations continuously sync quietly in the background without needing manual intervention every time. First, you must enable iCloud drive permissions within your iPhone's core settings. The platform provides three flexible frequencies: Daily, Weekly, or Monthly. So, before you ever need to search for "how can I restore Viber messages" again, establish this safety net.
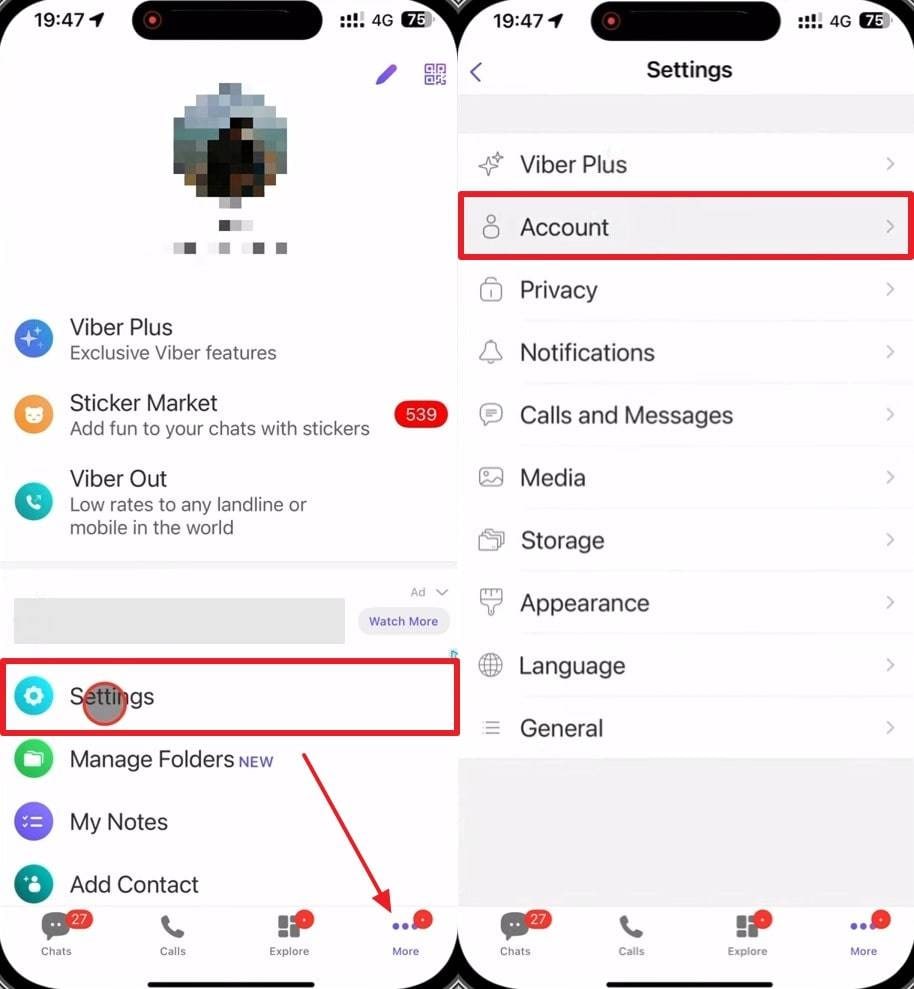
- Step 1: As you run the communication app on your device, tap the "More" tab situated at the bottom right. Choose the "Settings" menu gear and then navigate straight into the "Account" section.
- Step 2: Moving forward, select the "Viber Backup" directory to uncover the "Auto Backup" option. Tap it and configure your preferred synchronization cadence depending on how frequently you text (Daily is highly recommended for business users).
3-2. Manual Backup
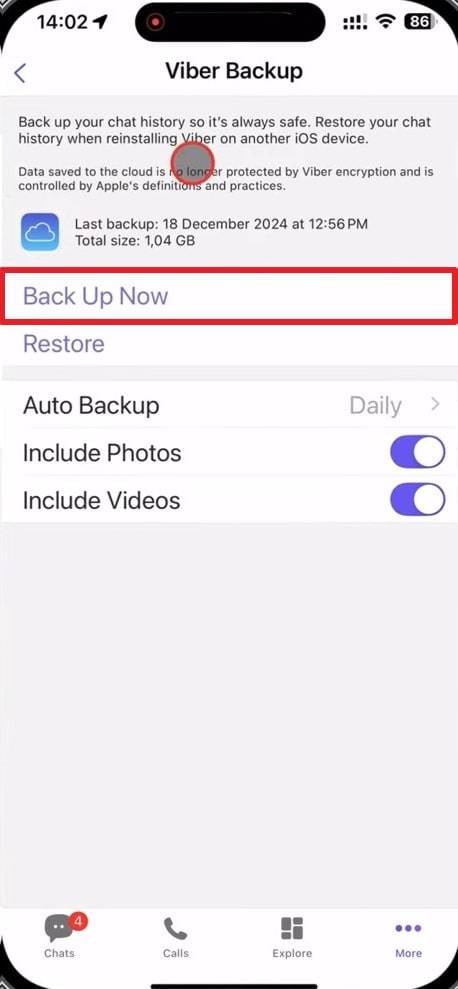
Executing a manual archive grants you absolute control to upload your data precisely when you finish an important conversation or right before performing a major iOS software update. It also provides granular toggles allowing you to include or exclude heavy multimedia files, ensuring you don't exhaust your cloud storage quotas unnecessarily.

Conclusion
In conclusion, while discovering you have lost critical communication threads can be deeply frustrating, there are several highly effective and effortless avenues to recover the data safely. Whether you opt for Apple's standard iCloud sync or leverage older local iTunes records, this article has laid out actionable, step-by-step methodologies to rectify the situation.
Furthermore, maintaining updated archival habits prevents recurring heartache. However, in scenarios where you demand pinpoint precision to avoid overwriting your current digital life, utilizing Dr.Fone - Data Recovery (iOS) stands out as the ultimate solution for mastering how to restore Viber messages gracefully.
FAQ
1. Does uninstalling Viber delete my chat history permanently?
Your chats will most likely be wiped from the local device if you uninstall the application without generating an external backup first. This happens because the system relies heavily on localized storage. Unless you have explicitly linked the architecture to an Apple ID for cloud syncing, deleting the app clears the cache. Always verify that automatic synchronization is active before removing the software.2. Can I restore my previous chats onto a brand-new iPhone?
Absolutely. You can seamlessly migrate your historical texts and multimedia attachments to a freshly purchased handset provided your cloud archival features were active beforehand. During the initial setup phase on the new hardware, log in utilizing the exact same Apple ID and phone number. The interface will automatically prompt a "Restore" screen once it detects the saved payload.3. How can I recover deleted messages on Viber without iCloud or iTunes?
Bypassing official Apple ecosystem backups requires utilizing specialized third-party extraction software. A highly reliable countermeasure is the Dr.Fone - Data Recovery (iOS) suite, which possesses the capability to scan the physical device's internal memory or parse fragmentary data files directly. This approach bypasses standard limitations and permits the selective extraction of specific threads.4. Why is my cloud backup failing to restore properly?
Restoration failures typically stem from three primary culprits: insufficient local storage space on the receiving device, unstable network connections during the download phase, or mismatched Apple ID credentials. Ensure your Wi-Fi is robust, double-check that you are utilizing the original phone number associated with the archive, and verify you have enough gigabytes free to accommodate the incoming data.
 Add Wondershare Dr.Fone as a preferred source on Google