
Comprehensive Solutions for Viber Image Issues

Jun 11, 2026 • Filed to: Social App Management • Proven solutions
 TL;DR:
Resolving common Viber photo issues requires specific third-party tools, including Dr.Fone for iOS data recovery, Stellar Phoenix for repairing corrupted JPEGs, and iPhoto Library Manager to fix unopenable images.
● To successfully recover lost images using Dr.Fone - Data Recovery (iOS), your device must be running the latest iOS version with automatic sync turned off before initiating the scan.
● If pictures are missing or generate a file not found error due to corruption, use Stellar Phoenix Repair for JPEG, or resolve unopenable files by selecting the Rebuild Library option inside iPhoto Library Manager.
● Transferring internal Viber images to an external SD card using a File Explorer app requires iOS 8 and above, while changing the default desktop download path requires updating the PayloadPath in the viber.db file via SQLite Manager.
Ask AI for a summary
 ChatGPT
 Perplexity
 Gemini
 Claude
 Grok
Grok
Dr.Fone Basic:
Better Control for Your Phone
Manage, transfer, back up, restore, and mirror your device
A good number of people who use the Viber messaging app have experienced a number of Viber photo problems in one way or another. These problems, which may range from missing pictures to accidentally deleting them, can affect your day to day life when using Viber. When it comes to using Viber or any other messaging app, you have to be extra careful when you save, send, or download Viber pictures.
There's no bad thing like losing your most precious memories due to something that you could have rectified a long time ago. In this article, we are going to take a look at some of the most common Viber image problems, how to solve them, how to back up Viber pictures as well as how to transfer these photos from the phone's internal storage to an external SD Card.
- Part 1: How to Change Viber Storage Location?
- Part 2: Why My Viber Images File not Found?
- Part 3: How to Recover Lost Viber Photos on iPhone?
- Part 4: How to Backup and Restore Viber Images?
- Part 5: Why are my Viber Photos No Longer Available?
- Part 6: How to Transfer Viber Photos to SD?
- Part 7: Viber Photos Won't Open? How to fix it?
Part 1: How to Change Viber Storage Location?
By default, Viber files are usually stored in the Documents/ViberDownloads folder. You can, however, change this location storage by clearly following the steps listed below:

- Step 1. Backup all your Viber files present on your phone. If you don't know how to backup your Viber data, take a look at section 3 of this article.
- Step 2. With your files securely backed-up, download the SQLite Manager database on your laptop. You need this manager to open up your
.ViberPCfolder using your computer. - Step 3. Connect your phone to your computer, launch the SQLite Manager, and open the
~/.ViberPC/{your-phone-number}/viber.dbwith sqliteman. - Step 4. Once the file listed above has been opened, and you will be prompted to enter a query in the query box. Enter the following details and press enter.
Update messages set PayloadPath = replace(PayloadPath, "Documents/ViberDownloads", ".viberdownloads") where PayloadPath is not null and PayloadPath <> '';- What this does is; replaces text
Documents/ViberDownloadswith.viberdownloadsinPayloadPathfield of messages table. In the request listed in step 4, I typed the words ".viberdownloads" because I wanted my Viber downloads to appear in the /home/user/.viberdownloads folder. You can, however, change it depending on your own preferences.
- Step 5. Press F9 on your computer to run the application. Just like that, you have yourself a brand new storage place for all your Viber documents.
Part 2: Why My Viber Images File not Found?
Are you having trouble locating your Viber images on your phone? There could be several reasons why your Viber images file is not found. In this part, we will discuss the top reasons behind this issue and provide you with solutions to fix it.
1. Recent Photo App Upgrade
A recent photo app upgrade could have changed the default storage location for your Viber images. To resolve this issue, check the settings of your photo app and reset the default storage location to the correct folder.
2. Accidental Deletion
You may have accidentally deleted your Viber images. In this case, check your trash or recycle bin folder to see if you can recover the deleted images.
3. Insufficient Internal Storage
Your phone's internal storage might be full, causing new Viber images to be saved in a different location, such as an SD card. To fix this, try clearing some space on your internal storage by deleting unwanted files and apps.
4. SD Card Storage
If your phone is storing images on an SD card, make sure the card is properly inserted and functioning. You may also need to change your photo app's default storage location to the SD card.
5. Changed Default Photo Gallery Path
You may have unknowingly changed the default photo gallery path, causing your Viber images to be stored in a different location. To fix this, go to your photo app settings and reset the default storage location.
There are several reasons why your Viber images file may not be found. By identifying the root cause and following the above solutions, you can easily locate and retrieve your missing Viber images. Always remember to back up your important Viber files and images to prevent any future data loss.
Part 3: How to Recover Lost Viber Photos on iPhone?
Losing pictures, whether by accidentally deleting them or accidentally formatting your iPhone, is a common thing that a lot of people have experienced. It even becomes more problematic and mid wracking, especially if the lost photos meant a lot to you. If you ever find yourself in such a situation, worry no more as I have with me a program that can sort you out. This state of the art program from Wondershare is known as Dr.Fone. Dr.Fone - Data Recovery (iOS) retrieves and recovers all your deleted photos from your iPhone device.
Dr.Fone - Data Recovery (iOS)
Retrieve Lost Viber Photos in 5 Minutes!
- Provide three ways to recover iPhone data.
- Scan iOS devices to recover photos, videos, contacts, messages, notes, etc.
- Extract and preview all content in iCloud/iTunes backup files.
- Selectively restore what you want from iCloud/iTunes backup to your device or computer.
- Compatible with the latest iPhone models.
Steps to Recover Lost Viber Photos on iPhone by Dr.Fone
Step 1. Download, install, and launch the Dr.Fone program (Try It Free/Try It Free). Once launched, connect your iOS device to your computer. Continue to "Toolbox" > "Data Recovery" > "iOS" to start the tool.

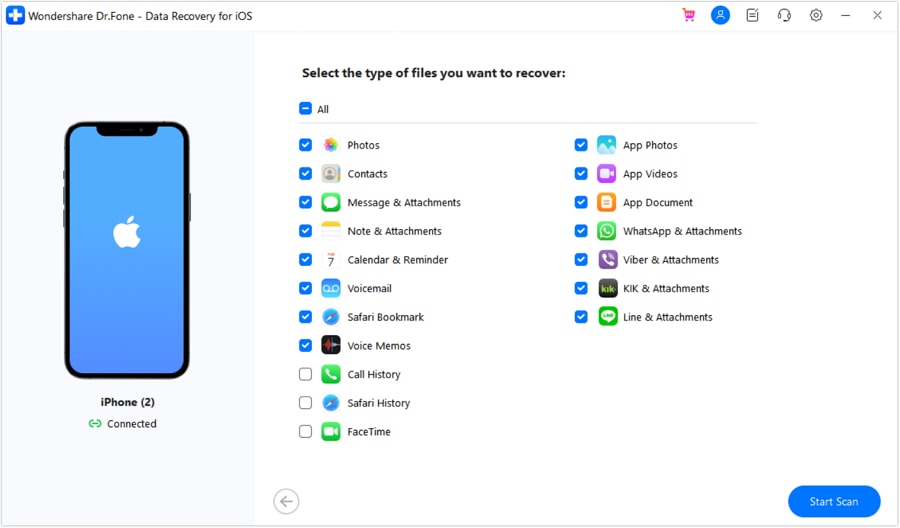
Step 2. On the "Recover Data from iOS Device" tab, select the "Photos" icon and click on the "Start Scan" button. The scan process takes a few minutes, depending on the amount of data present on your iPhone. The larger the data, the more the time required to scan it. The moment scanning starts, you'll be in a position to see the scanning progress, time remaining as well as the covered percentage.
Tips: Dr.Fone has been set by default to detect any iOS device automatically. Also, make sure that you are running on the latest iOS version and that automatic sync is turned off.
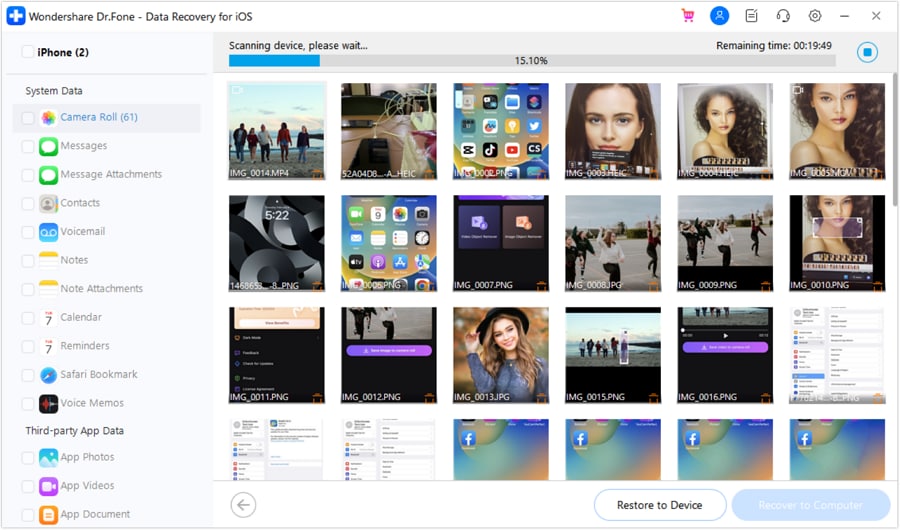
Step 3. Once the scan process is complete, check the box next to the recovered file for each and every file that you want to restore. Once you are done, click on the "Recover to Computer" icon, which is located on the lower side of your interface on the right-hand side. The time required to restore the recovered photos will depend on the general size of the pictures. All the photos will be saved to your device.
Part 4: How to Backup and Restore Viber Images?
In a Smartphone world where valuable data can get lost within a blink of an eye, creating a backup plan should be a priority, not a request. A backup plan is of great importance since it gives you the peace of mind that you deserve. Though many different back-ups and restore programs are available, Dr.Fone - WhatsApp Transfer stands out among the rest. The following is a process on how to backup Viber images as well as how to restore Viber photos using Dr.Fone.
Dr.Fone - WhatsApp Transfer
Back up & Restore iPhone Viber Photos in 5 Munites.
- One click to backup the whole iOS device to your computer.
- Support to back up Social apps on iOS devices, such as WhatsApp, LINE, Kik, Viber.
- Allow to preview and restore any item from the backup to a device.
- Export what you want from the backup to your computer.
- No data loss on devices during the restoration.
Steps on How to Backup Viber Photos
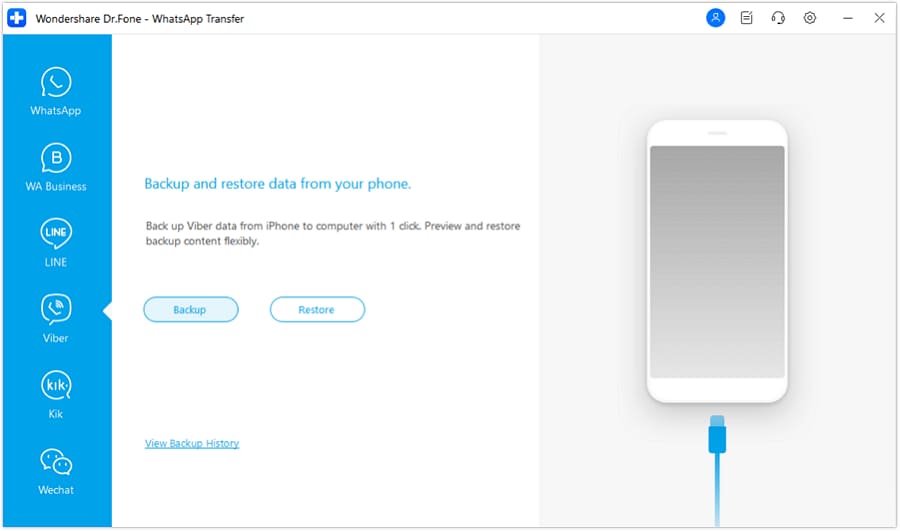
Step 1. The first and foremost thing to do is to launch Dr.Fone(Try It Free/Try It Free) on your computer. Among all the features, select "WhatsApp Transfer".

Step 2. Connect your iPhone to your computer, go to "Viver" tab. Then Viber Backup & Restore option will be presented as below. Click on Backup to initiate the backup process.
Step 3. The backup process usually takes a few minutes depending on the amount of data present in your phone. You'll be in a position to see the backup process on your interface as Dr.Fone scans and backs-up your Viber images. Once the backup process is over, and a confirmation message will be displayed. If you want to view your images, just click on the "View it" option.
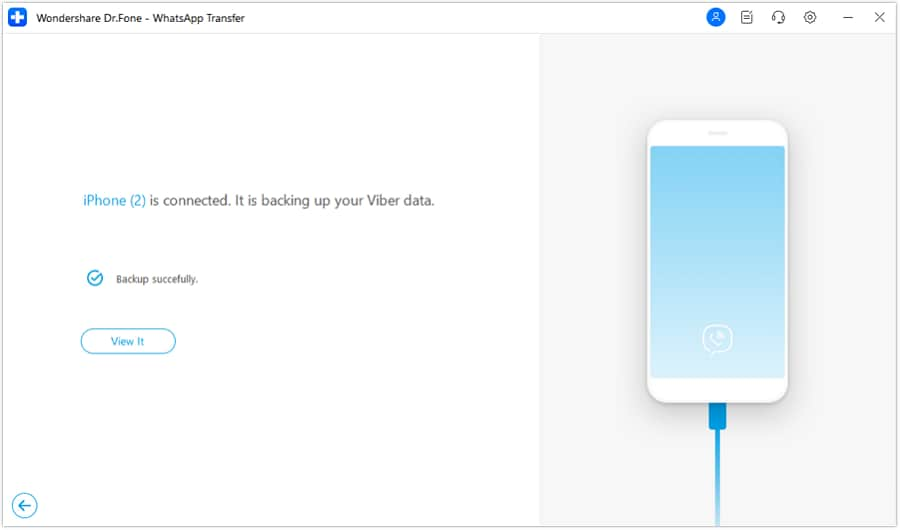
Once you have confirmed that the pictures are properly backed-up, proceed to the next step, which is restoring Viber images.
How to Restore Viber Images?
Step 1. With your phone still connected to your desktop using its USB cable, click on the "View it" option located below the "Backup" option. Then you will see all Viber chats backup history.
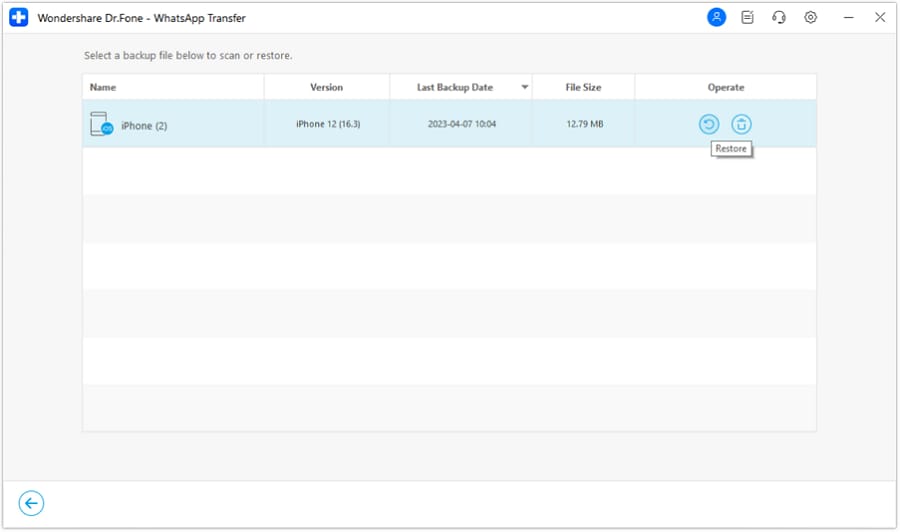
Step 2. A new interface will open up. It's from this interface that you'll be in a position to restore your images. You can either choose the "Restore to Device" option or the "Export to PC" option. Just click on your preferred option and wait for the restoring process to end.

Step 3. Once the process is over, unplug your iPhone from your computer.
Part 5: Why are my Viber Photos No Longer Available?
Are you having trouble finding your Viber photos? In some cases, you may realize that your Viber photos are no longer available in your gallery, or when you try to open them, you get a “file not found” message. There are several reasons why this can happen:
1. A bug infected your picture gallery
Sometimes, a software glitch or a bug can cause your Viber photos to go missing from your gallery.
2. Presence of a single corrupted file
Just one corrupted file can lead to the destruction of the other files in your gallery, making your Viber photos unavailable.
3. Accidental deletion
It is possible that you or someone else using your device might have accidentally deleted the photos.
4. Storage issues
In some cases, Viber photos may not be available due to insufficient storage space or issues with your device's memory card.
If you can no longer find your Viber photos, the only way to recover them or repair them is by using image fixing software. In this case, we recommend using Stellar Phoenix Repair for the JPEG program. This software is specifically designed to repair corrupted or damaged JPEG files, making it the perfect solution for recovering your missing Viber photos.
How to Fix Broken Viber Images?
To use Stellar Phoenix Repair for JPEG, follow these steps:
Step 1. Download and install the software on your computer. Launch the program and click on 'Add File' to add the corrupted JPEG files. The add file icon allows you to choose and add a broken Viber image.

Step 2. A list of all your broken files will be listed in the next interface, as illustrated below. Choose the Viber photo file that you want to repair by checking the box next to it. Once you are done, click on the "Repair" tab located below your interface on your right-hand side.

Step 3. Once you have added the files, click on 'Repair' to initiate the repairing process. The process usually takes a few minutes to complete, so be patient.

Step 4. After the repair process is completed, you can preview the repaired files and save them to your desired location.

Step 5. Once you are satisfied, click on the "Save" icon to complete the process. A "save success" message will be displayed. Just like that, your corrupted and broken Viber photos are back to normal.

By using Stellar Phoenix Repair for JPEG, you can effectively recover your lost Viber photos and ensure that they are no longer missing from your gallery. Always remember to back up your important files and photos to prevent any future loss or corruption.
Program Link: http://www.stellarinfo.com/jpeg-repair.php
Part 6: How to Transfer Viber Photos to SD?
Keeping your Viber photos or any other photos under one roof can be a risky venture. Getting yourself an external SD Card can come in very handy, especially if you happen to lose your photos. In this section, we're going to take a look at how we can transfer Viber photos to an external SD card using a file explorer.
N.B.: Keep in mind that the File Explorer version app used in this method may differ from one device to another. Also, make sure that you're operating on iOS 8 and above.
Step 1. For you to move any files from your internal storage to your SD card, you must have the file explorer app. Launch this app on your phone to open its interface, as illustrated below. Click on the "File Storage Services" icon.

Step 2. Once you have opened the "File Storage" or "Internal Memory" option, a list of all your files and folders from different apps will be displayed. It's from this point that you'll search and select the folder containing the Viber pictures. From the below screenshot, we can try to look at our Viber pictures by selecting the "Pictures" folder.
N.B:. Folder appearance depends on your phone version, the app in use as well as the file explorer version.

Step 3. Once you've selected the "Pictures" folder, a list of all your pictures will be displayed. Check the "box" icon next to each and every photo, as shown below. Once you have checked your preferred photos, click on the third icon from the left located below the interface. This request will open up a new drop-down list. From the list, select the "Move" option.

Step 4. You'll be in a position to see the "Device Storage" and "SD Card" option. Since we want to move the photos to "SD Card" our selection will be the SD Card option. Just check the box next to the pictures option and click on the "Move" icon located below the interface and wait. The time required to complete the moving process usually depends on the size of the images selected. Just like that, your Viber photos are safely moved to your SD Card. You can later check them by going through the SD Card.

App Link: https://itunes.apple.com/us/app/fileexplorer/id499470113?mt=8
Part 7: Viber Photos Won't Open? How to Fix It?
Are you experiencing issues with opening your Viber photos on your iPhone? You're not alone. This common issue often results in error messages and can be quite frustrating. The problem typically lies within the pictures app of your phone and may be caused by various factors, including recent upgrades or bugs that corrupted your files. In this part, we will discuss a standard method to fix this issue and ensure your Viber photos open without any errors.
1. Restart your iPhone
Sometimes, a simple restart can fix minor glitches and refresh your phone's system.
2. Update Viber App
Ensure your Viber app is up-to-date by checking the App Store for any available updates.
3. Clear Viber Cache
Go to Viber's settings and clear the cache to remove any corrupted files that might be causing the issue.
4. Check Photo Permissions
Make sure Viber has the necessary permissions to access your iPhone's photo library. Go to Settings > Privacy > Photos and toggle on the permissions for Viber.
5. Reinstall Viber
If the issue persists, try uninstalling and reinstalling the Viber app to ensure any corrupted files are removed and replaced.
6. Check Storage Space
Insufficient storage space on your iPhone could be causing the issue. Go to Settings > General > iPhone Storage to check available space and clear any unnecessary data.
7. Using iPhoto Library Manager
Below is a standard method that is commonly employed when images or Viber photos can't open up on an iPhone.
Step 1. Download the iPhoto Library Manager from the iOS store and launch it. Its interface looks like the screenshot below. On top of your interface, you'll be in a position to see the "Add Library" icon located on your left-hand side. Click on it.

Step 2. With the "Add Library" icon open, navigate through it, and find your Pictures folder or the "iPhoto Library Folder". A drop-down list of your pictures will be displayed. Go through the list to find your Viber photos.

Step 3. Once you have located your files, go to the "File" option, and select the "Rebuild Library" option.

Step 4. A new window with rebuild options will open up. Choose and check the box next to the last option. Click the "Rebuild" button. Switch off your phone and back on.

Step 5. Open your new library and check for your pictures.
iPhoto Library Manager Program Link: https://www.fatcatsoftware.com/iplm/
8. Contact Viber Support
If all else fails, reach out to Viber support team for further assistance and troubleshooting.
Yes, Viber photos not opening on your iPhone can be quite annoying. However, by following the standard method outlined above and trying out different solutions, you can quickly fix the issue and get back to enjoying your Viber experience.
Conclusion
From what we've covered in this article, it's my hope that you have learned a thing or two on how to solve Viber image and photo-related problems. Next time you encounter such a problem, I hope you'll be in a position to sort it out in a span of minutes, if not seconds. As a parting shot, always remember to chat safely and always ensure that your precious Viber images are well secured and safeguarded.
Dr.Fone Basic:
Better Control for Your Phone
Manage, transfer, back up, restore, and mirror your device


Viber Manage
- Viber Messages
- 2. Backup Viber Messages from Mobile
- 3. Delete Viber Account/Group/Messages
- 4. Recover iOS Deleted Viber Messages
- 5. Restore Viber Messages from iOS
- Viber Tricks
- 1. Use Viber on A PC
- 2. Fake Your Location on Viber
- 3. Change Viber Number on PC/Mobile
- 4. Fix Common Viber Photos Problems
- 5. Top 8 Viber Problems and Solutions
- 6. Free Calls from iPhone on Viber
- 7. Record Viber Calls on PC/Mobile
- Other Social Apps Tips
- 1. Find Facebook Password
- 2. Facebook Dating Is Not Working
- 3. Top 5 Instagram Password Crackers
- 4. Download KIK for PC Windows
- 5. Fix Common LINE App Problems
- 6. Save Snapchats Secretively
- 7. Recover WeChat Account / History
- 8. Backup WhatsApp to PC
- 9. Whatsapp from Android to iPhone
- 10. Retrieve Deleted WhatsApp Message
- ● Manage/transfer/recover data
- ● Unlock screen/activate/FRP lock
- ● Fix most iOS and Android issues
- Free Download Free Download Free Download


James Davis
staff Editor