How to Sync Outlook Calendar With iPhone [2026]
Dec 31, 2025 • Filed to: Device Data Management • Proven solutions
Dr.Fone Basic:
Better Control for Your Phone
Manage, transfer, back up, restore, and mirror your device
Are you tired of switching devices to keep track of your meetings and appointments? Do you want to know how to sync Outlook calendar with iPhone? If yes, you are in the right place!
Many people use Outlook to schedule their meetings, classes, and appointments, and many of these people also use iPhones. This can make it hard to keep one calendar updated on both devices. They end up juggling between devices.
Thankfully, there is a solution! You can connect your Outlook and iPhone calendars so you won’t miss important events, calls, or meetings.
This article will show you how to link Outlook calendar to iPhone calendar. We will explore different methods with step-by-step guides.
Let’s get started!
- Methods to Sync Outlook Calendar to iPhone Calendar
- Method 1. How to Link Outlook Calendar With iPhone Via Settings?
- Method 2. How to Sync Outlook Calendar With iPhone Using iCloud?
- Method 3. How to Sync Outlook Calendar With iPhone Via iTunes (Windows Only)?

- Bonus Tip: How to Manage iPhone Data Between Phones and PC?
Methods to Sync Outlook Calendar to iPhone Calendar
There are various methods that can help you sync Outlook calendar with iPhone. In this section, we are going to explore the three most common ones. You can go through their step-by-step guide and get it done. Let's dive in!
Method 1. How to Link Outlook Calendar With iPhone Via Settings?
The first method you can try to sync the PC Outlook calendar with iPhone is via Settings. It is a simple and quick method to do so. You can follow the instructions given below:
Step 1: Open Settings on your iPhone.

Step 2: In Settings, find and click the Calendar option.

Step 3: Once you open the Calendar, click Accounts > Add Account.

Step 4: You will see various options; select Outook.com. If you already have logged in once before, you can simply enable the toggle. Otherwise, you have to log in using your Outlook credentials.

Step 5: After you logged in, you will see the permission option for various apps. Enable the toggle next to Calendar and click Save.

Did you see how easily you can add Outlook Calendar on iPhone? However, if you cannot follow these steps, don’t worry! You can try the next method.
Method 2. How to Sync Outlook Calendar With iPhone Using iCloud?
We have good news for you! There is another method that can help sync the PC Outlook Calendar with iPhone. It is by using iCloud. This method can be used for both Windows or Mac OS.
However, there is one condition. You must have logged in with the same iCloud accounts on your OS and iPhone. You can follow the instructions given below:
(Note: Before trying this method, ensure you have added an Outlook account to Mail. If not, you can follow the steps given in the first method.)
Step 1: If you are using Windows, you must download and install the iCloud app on your PC. However, if you are using a Mac, you already have it.

Step 2: Once the iCloud is successfully installed, launch the app and log in with your Apple ID and password. However, if you are a Mac user, simply click the Apple icon and then go to System Preferences > iCloud.

Step 3: Next, you will see the apps using iCloud. All you have to do is click on the arrow of Calendar and Contacts.

Step 4: Now, enable the toggle and click Done. That's it! You have successfully synced iCloud calendar with Outlook calendar.

Your iPhone will start syncing to your Outlook Calendar. But even after following this method, if your Outlook calendar does not sync with iPhone, try the next method.
Method 3. How to Sync Outlook Calendar With iPhone Via iTunes (Windows Only)?
If you use a Windows PC, you can use iTunes to sync Outlook calendar with iPhone. It is one of the reliable options, and you don't need to rely on cloud services.
However, you need a USB cable to follow this method. Plus, make sure you have the iTunes app installed on your PC. Otherwise, you can install it by clicking here.
Then, follow the instructions below to sync your Outlook calendar with your iPhone.
Step 1: You must connect your iPhone to your PC via a USB cable. Then, open the iTunes app on your PC.
Step 2: Click on the Phone icon on the top menu, and it will open a new window.

Step 3: Here, in the Settings menu on the left side, click the Info button.

Step 4: Click and tick the box next to Sync calendars with, then select Outlook. You will see all your different Outlook calendars here. You can either select All Calendars or Selected Calendars.

Step 5: Once done, click the Sync button, and iTunes will start syncing your Outlook calendar.

That's it! This is how you can use iTunes to add Outlook Calendar to iPhone. Sometimes, we find it difficult to manage data between phone and PC. But luckily, there are different solutions and tools available that can help you do the job with just a few clicks.
Don’t believe me? Let me introduce you to a complete solution for your iOS devices.
Bonus Tip: How to Manage iPhone Data Between Phones and PC?
Managing data between your iPhone and your PC can be a hassle, especially if you have a lot of files. But don't worry! We have a solution for you - Wondershare Dr.Fone. This tool can transfer your photos, videos, music, contacts, and even calendars between your iPhone and PC. It works on both Windows and Mac, making it useful for everyone.
The best part is that Dr.Fone is user-friendly. You don't need to be a tech expert to use this tool. Also, you can preview files before you transfer them, so you only move what you need. Dr.Fone also supports direct phone-to-phone transfer, which is a great feature. With Dr.Fone, you can keep your iPhone data organized and secure, making life easier.
Now that we have explored Dr.Fone's features, you must be wondering how you can use this tool to manage data. Well, why don't you see it yourself?

Dr.Fone - Phone Manager (iOS)
Manage iPhone Data Between Phones and PC
- Transfer, manage, export/import your music, photos, videos, contacts, SMS, Apps, etc.
- Back up your music, photos, videos, contacts, SMS, Apps, etc., to the computer and restore them easily.
- Transfer music, photos, videos, contacts, messages, etc., from one smartphone to another.
- Transfer media files between iOS devices and iTunes.
- Fully compatible with the newest iOS system.
Steps to Use Dr.Fone to Manage Data
First, download and install the Dr.Fone app on your PC or laptop. Then, follow the instructions given below:
Step 1: Connect your iOS device to the computer through a wireless or wired connection. Then, launch the Dr.Fone app.
Step 2: Locate calendars by navigating through the More section from the left menu. Walk through the details of your calendar.

Step 3: Click the Export button to transfer your calendar's data in ICAL, Excel, or CSV formats. Moreover, you can also print, refresh, and select whether to repeat a specific event on data for every year from the available options.
This is how you can export your calendar from your iPhone to your PC. If you want to transfer all your iPhone’s data to a PC, you can walk through the next section.
Steps to Use Dr.Fone to Transfer Data
Here is how you can transfer data from iPhone to PC using Dr.Fone. Before jumping to the steps, make sure you have downloaded Dr.Fone’s app.
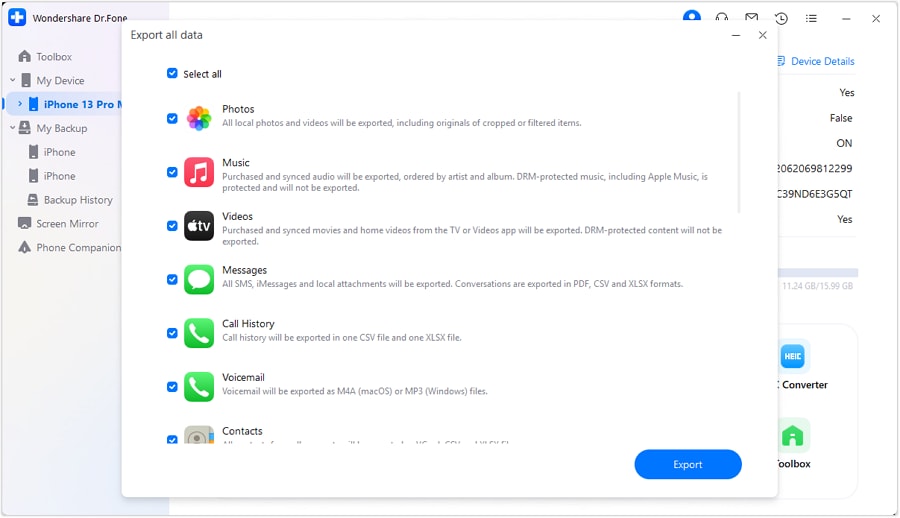
Step 1: Connect your iOS device to the computer via a USB cable. Once the device is detected successfully, You will see its details on the home screen. Select the Export all data button in the Quick Start section.

Step 2: Next, select the file types you want to export. Checkmark all the data types, including Calendars, and click Export to start the process. Then, select the location where you want to save your exported data.

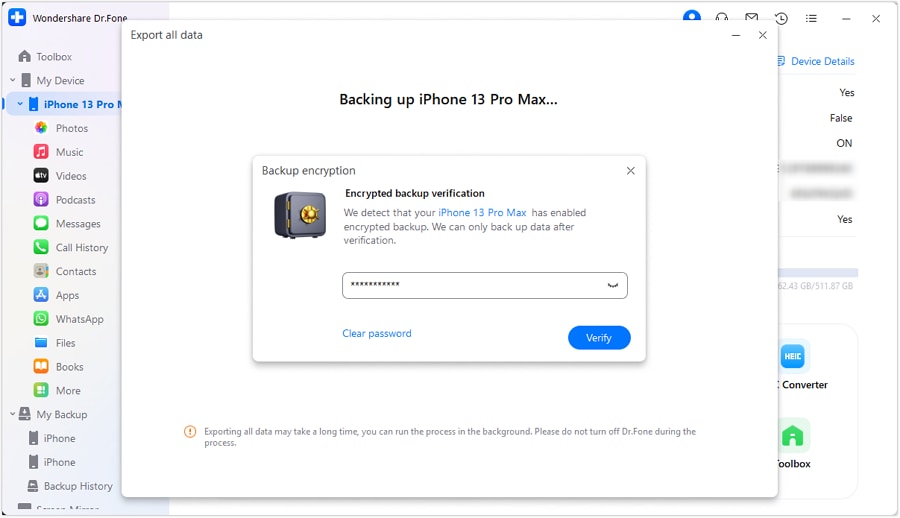
Step 3: Now, you will be asked to set up an encrypted password for the backup saved on the computer. Set a password, confirm it, and click the Done button to proceed.

Step 4: The iOS device will start exporting data to the computer through Dr.Fone. You can see the progress on the Dr.Fone screen.

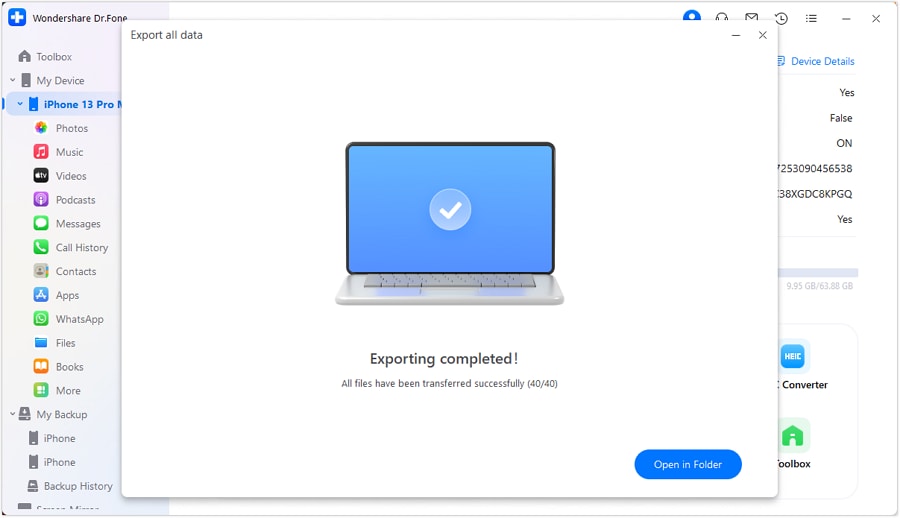
Step 5: Once the exporting process is completed, you will see the below interface on your screen. Click the Open button to view the exported data.

That's it! Did you see how easy it is to manage data between iPhone and PC? It is one of the most reliable and hassle-free ways to do the job.
Now, let’s move forward and answer some of the frequently asked questions.
Conclusion
Let's wrap it up! So, in this article, we have explored easy and effective ways to sync Outlook calendar with iPhone. You can do it through your iPhone settings, iCloud, or iTunes on a Windows PC. Each method is simple and keeps your events up-to-date.
With your Outlook calendar on your iPhone, you’ll never miss an important event. Just follow the steps, and you’ll stay organized and on schedule.
However, If you need more options, Wondershare Dr.Fone can help manage your data between devices. It is a complete solution for all your data managing concerns.
FAQs
Dr.Fone Basic:
Better Control for Your Phone
Manage, transfer, back up, restore, and mirror your device
iPhone Data & Files
- iPhone File Managers
- 1. iPhone File Browsers
- 2. iPhone File Explorers
- 3. iPhone File Managers
- 4. Apps to Transfer File Wirelessly
- Transfer iPhone Files
- 1. Send Large Files For Free
- 2. Transfer File from iPhone to Laptop
- 3. Transfer Files from iPhone to Mac
- 4. Transfer Files from iPhone to PC
- 5. Transfer Files from Mac to iPhone
- 6. Transfer Files from PC to iPhone
- 7. Print Text Messages from iPhone
- 8. Transfer Files Over WiFi
- 9. iPhone File Transfer Without iTunes
- 10. Access iPhone Files Using a PC
- 11. Export Notes from iPhone to PC/Mac
- 12. Save iPhone Text Messages to Computer
- iPhone Manage Tools
- 1. iPhone Transfer Tools
- 2. Manage Apps On iPhone
- 3. Security Apps for iPhone
- 4. Call Forwarding Apps
- 5. iPhone Tracking Apps
- Manage iPhone Apps
- 1. Change Viber Number
- 2. iPhone Calls Apps
- 3. Block People in Facebook
- 4. Monitor Snapchat on iPhone
- 5. Snapchat Saver Apps
- Sync iPhone Data
- 1. Sync Notes from iPhone to Mac
- 2. Ford Sync iPhone
- 3. Sync iCal with iPhone
- 4. iPhone Calendar Not Syncing
- 5. Sync iTunes Library to iPhone
- 6. Unsync iPhone from Computer
- 7. Sync iPhone with Multiple Computers
- More iPhone File Tips
- ● Manage/transfer/recover data
- ● Unlock screen/activate/FRP lock
- ● Fix most iOS and Android issues
- Manage Now Manage Now Manage Now


Daisy Raines
staff Editor