The Future of Collaboration: Moving from Skype to Teams

Jun 30, 2026 • Filed to: Device Data Management • Proven solutions
 TL;DR:
Microsoft will officially retire Skype on May 5, 2025, requiring all users to migrate to Microsoft Teams by logging in with their existing Skype credentials to automatically transfer contacts and chat history.
● Temporary cross-platform interoperability exists until the retirement date but strictly excludes screen sharing and group chat functionalities between Skype and Teams users.
● Microsoft Teams is designed for enterprise environments by supporting up to 10,000 meeting participants and real-time document editing, whereas Skype restricts meetings to 100 participants for casual or small business use.
● Users needing to preserve data for alternative platforms can manually export existing conversations and files by submitting a data request through the Skype Account & Profile settings before the transition deadline.
Ask AI for a summary
 ChatGPT
 Perplexity
 Gemini
 Claude
 Grok
Grok
Dr.Fone Basic:
Better Control for Your Phone
Manage, transfer, back up, restore, and mirror your device
Many individuals and businesses have used Skype for years to connect and collaborate. Nevertheless, with the development of workplace needs, Microsoft has shifted its focus to Teams. This transition aims to offer a more integrated and secure experience. Skype Teams migration has sparked curiosity among users who wonder why Microsoft made this change.
Basically, Teams integrates video conferencing and external application functionalities, thereby enhancing collaborative capabilities for contemporary work environments. Despite this transition, many users still rely on Skype for personal or business communication. This creates common questions such as, “Can Skype connect to Teams?” and “How do their features compare.” So, this guide addresses these questions and provides solutions for syncing both platforms.
- Part 1. Why Did Microsoft Switch From Skype to Teams?
- Part 2. Can Skype Connect to Teams?
- Part 3. What Is the Difference Between Skype and Teams?
- Part 4. How To Sync Skype and Microsoft Teams
- Part 5. How To Export Your Skype Data

- Pro Tip. How To Transfer Your Important Data From PC to Mobile or Vice Versa in a Single Click
Part 1. Why Did Microsoft Switch From Skype to Teams?
The transition from older communication tools to a more advanced platform was not just a rebranding. Microsoft Skype Teams integration reflects a strategic shift to meet modern workplace demands. As we all know, businesses require effortless collaboration or file sharing as well as app integration. The shift started in 2017 when the company announced that its new solution would replace Skype for Business.
In addition, Skype for Business Online was officially retired by July 31, 2021, marking the completion of this transition. The main reason behind this change was Microsoft’s struggle to integrate Skype into its suite of tools fully. Despite efforts, the platform could not keep up with the competition from Apple’s FaceTime and Google’s developing communication apps.
Jeff Teper, Microsoft's Corporate VP, explained, "In order to streamline our free consumer communications offerings so we can more easily adapt to customer needs, we will be retiring Skype in May 2025 to focus on Microsoft Teams (free), our modern communications and collaboration hub." Thus, this shift aimed to provide businesses with a unified workspace for communication and file sharing.
Part 2. Can Skype Connect to Teams?
Basic interoperability between the two platforms is supported, allowing for user connection across services. Along with that, this interoperability is limited to certain capabilities. Specific features, such as screen sharing and group chat functionality, are not available between Skype and Teams transitions. Plus, Microsoft has announced that Skype will be retired in May 2025.
Following this date, interoperability between these two platforms will no longer be supported. During the transition period, users can integrate their Skype accounts with Teams to maintain their contacts and conversation history. After May 2025, to continue effortless communication, it is advisable for all users to adopt Teams fully.
Part 3. What Is the Difference Between Skype and Teams?
Both platforms offer messaging and calling and serve different purposes. Understanding their key differences helps users decide which platform suits their needs best. Thus, below is a detailed comparison between Skype and Microsoft Teams:
|
Feature |
Skype |
Microsoft Teams |
| Primary Use | Personal and small business communication | Business collaboration and enterprise use |
| Supports Large Group Meetings | No (Up to 100 participants) | Yes (Up to 10,000 participants) |
| Real-Time Document Collaboration | No | Yes (Edit files directly in chats) |
| Video Quality | Standard video calling | HD video conferencing with AI enhancements |
| Screen Sharing | Yes (Limited features) | Yes (Advanced options with annotation) |
| Integration with Microsoft 365 Apps | No | Yes |
| Security Features | Basic | Advanced |
| Customizable Workspaces | No | Yes |
| Persistent Chat Threads | No | Yes |
| File Sharing | Can share files, but limited | Integrated file sharing with cloud storage |
Although Skype is still a good option for casual conversations and small business use, Teams is the best choice for companies and remote teams. With its powerful collaboration features and security, it provides a future-ready solution for modern workplaces.
Part 4. How To Sync Skype and Microsoft Teams
For those who are in the process of making the change, syncing both services can be helpful. Although Skype to Teams migration is encouraged, Microsoft provides options to utilize basic communication on both platforms till May 2025. So, the following section will provide you with complete steps to sync Skype and Teams:
For Mobile
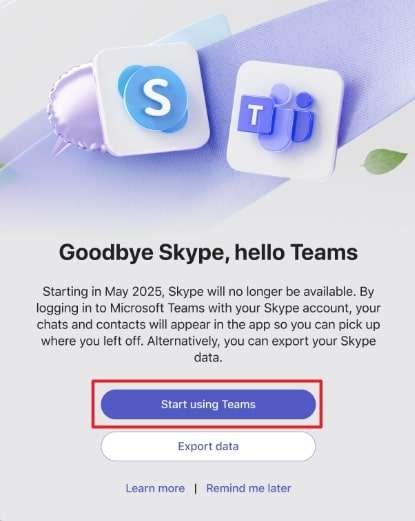
Step 1. To inaugurate, you will get a notification on your Skype, prompting you to sign in to Teams. Tap "Start using Teams" to either download the app or open it if it's already installed.

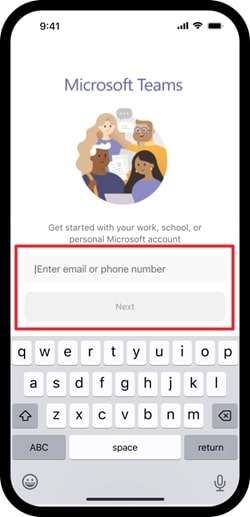
Step 2. Once you access the Team application, you need to sign in with your Skype account and press the “Next” button. Afterward, hit the “Get Started” button on the next screen that appears.
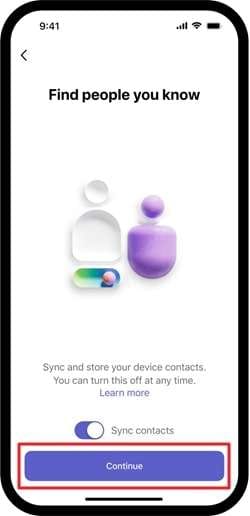
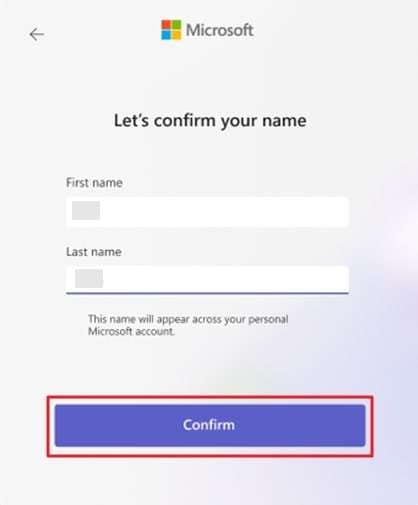
Step 3. Following that, select "Accept" or "Decline" to share optional diagnostic data with Microsoft to enhance Teams. Then, hit the “Continue” button after verifying your name and profile to sync Skype with Team successfully.
For Desktop
Step 1. When you receive an alert on Skype to log in to Teams, press “Start Using Teams” to open it if it’s already installed or download it.
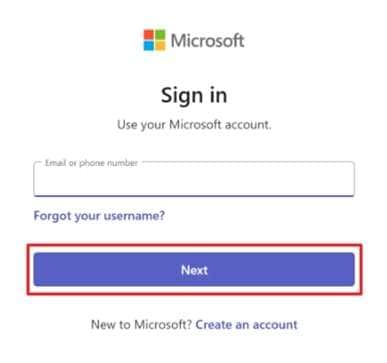
Step 2. Upon opening, enter your Skype account username and hit the “Next” button. After entering the credentials, click the “Get Started” button and select your profile from the “Choose a Profile to Use Everywhere” box.
Step 3. When you select your profile, verify your first and last name and hit the “Confirm” button to finish the syncing task.
Part 5. How To Export Your Skype Data
As businesses transition to modern tools, some users may still need to access old conversations. When moving to Teams or exploring other platforms, exporting your chat history is important. So, if you want to use another messaging app like Discord, Skype allows you to save your data for future reference.
Follow the guidelines below to learn how you can export your chat history before the skype to Teams transition:
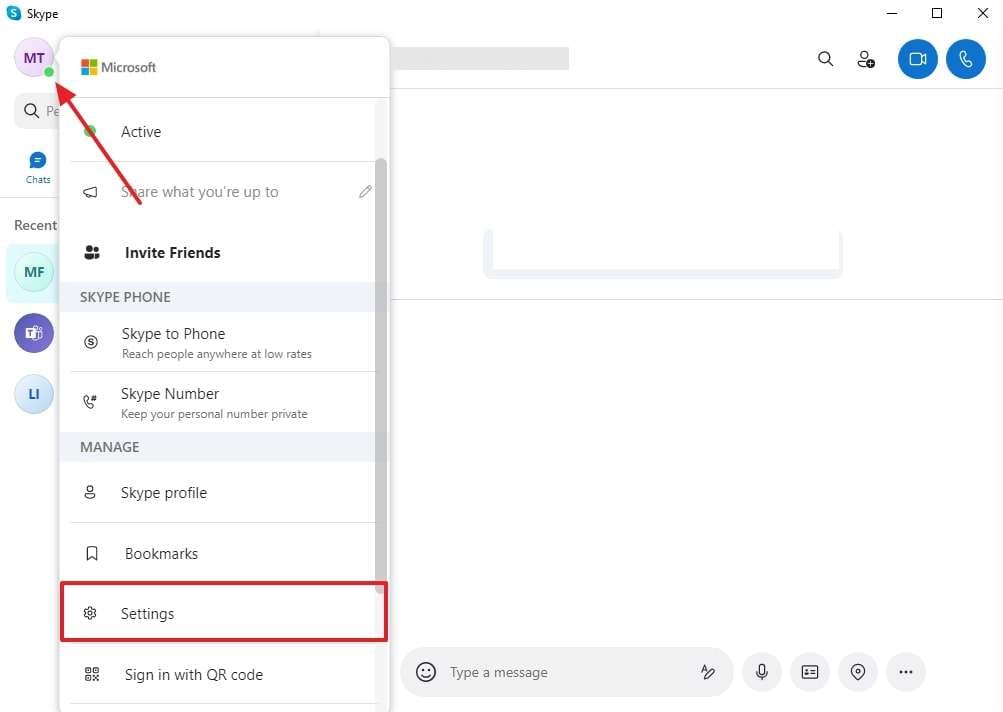
Step 1. Launch the “Skype” application on your desktop and click on your “Profile” icon. Next, select the “Settings” option from the newly appeared dropdown menu.
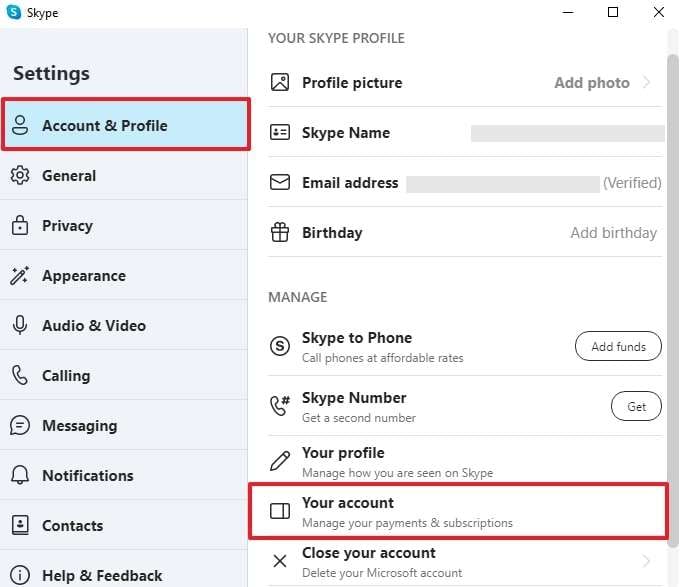
Step 2. Upon seeing the new interface, go to the “Account & Profile” section and select the “Your Account” option.
Step 3. Afterward, you will navigate to the “Skype Export Chat” interface on your browser. Next, scroll down and select the “Export Files and Chat History” option.
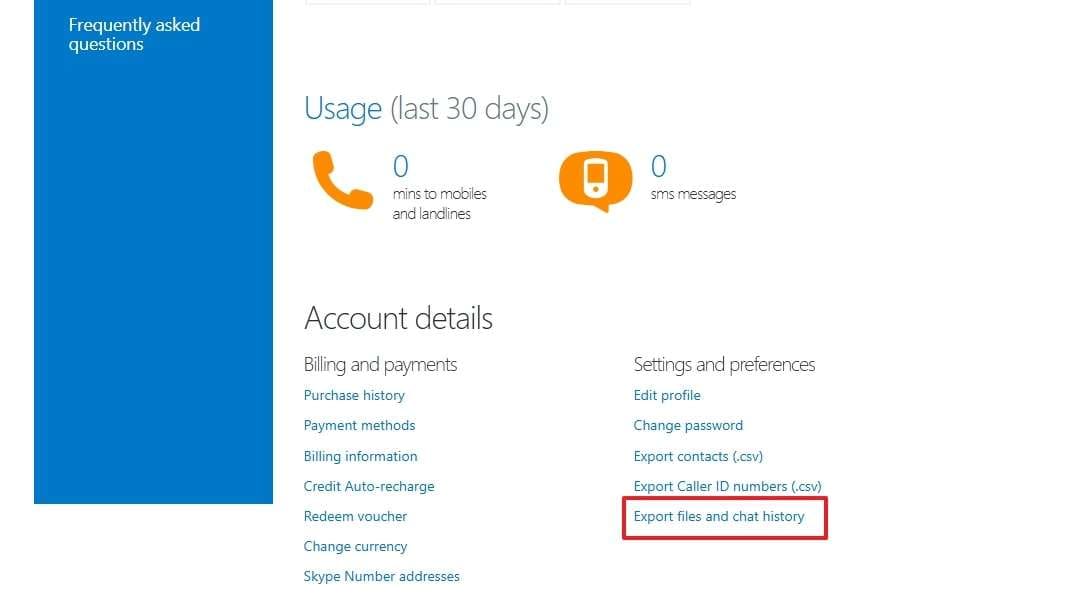
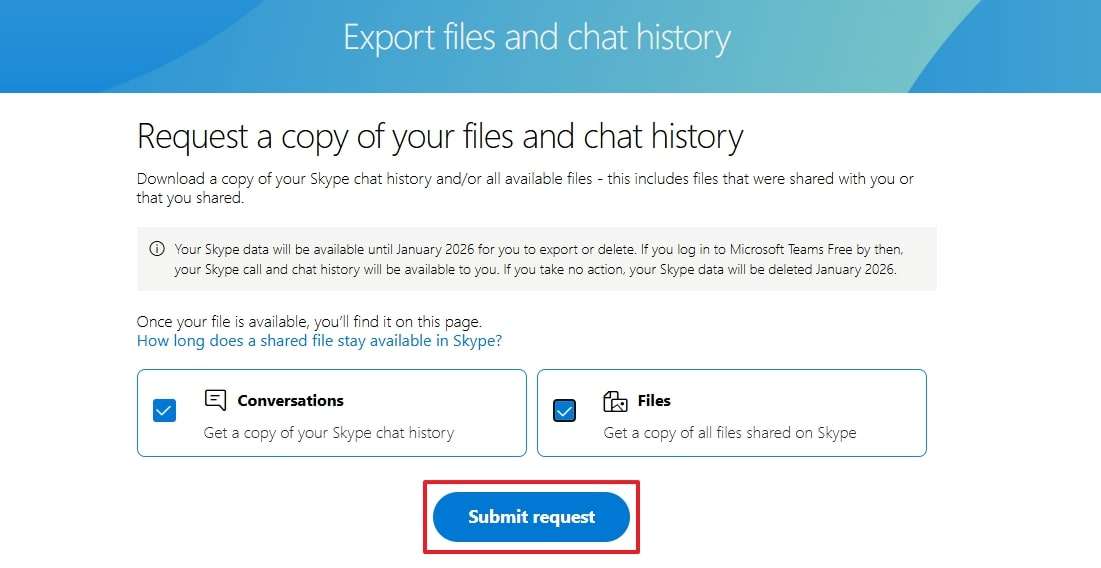
Step 4. Following that, select the data you want to export, like “Conversation” or “Files,” and hit the “Submit Request” button.
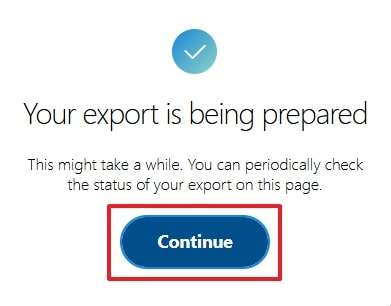
Step 5. Upon seeing a pop-up, press the “Continue” button and download the file when notified via email.
Pro Tip. How To Transfer Your Important Data From PC to Mobile or Vice Versa in a Single Click
Apart from the Skype and Teams transition, many users also want to migrate their data files from one device to another, whether it's a phone or a desktop. That’s why we recommend you use Wondershare Dr.Fone to move your precious data. With this dedicated tool, you can transfer files effortlessly between Windows, Mac, iPhone, and Android. It organizes your media into folders and makes retrieval much easier.
Moreover, you can even break iTunes restrictions by transferring ringtones, playlists, and files between iTunes and your device. Plus, this software offers wireless backup options to ensure your data is safe without manual effort. It supports incremental backups, which store only new or modified files to save time and space. Dr.Fone even offers the capability to restore iCloud and iTunes backups while preserving existing data on the target device.
Beyond transferring and backing up your data, its screen mirroring feature allows you to project your phone’s display onto a computer. You can also control your phone from your computer, reply to messages, and access apps without switching devices.
Wondershare Dr.Fone
Transfer Your Important Data from PC to Mobile or Vice Versa
- Transfer, manage, export/import your music, photos, videos, contacts, SMS, Apps, etc.
- Back up your music, photos, videos, contacts, SMS, Apps, etc., to the computer and restore them easily.
- Transfer music, photos, videos, contacts, messages, etc., from one smartphone to another.
- Transfer media files between iOS devices and iTunes.
- Fully compatible with the newest iOS system.


Simple Guide To Transfer Your Important Data From PC to Mobile
Step 1. Access Dr.Fone Basic to Start Transferring Your Data
To inaugurate, launch this dedicated tool and connect your preferred phone to your computer. Once the device is detected, click on the “Quick Transfer” button at the bottom of the home screen.

Step 2. Select the Data You Want to Migrate to Your Phone
Afterward, click the “Select Files” button to import the files you want to transfer. Otherwise, you can simply drag and drop the files for a quicker operation.

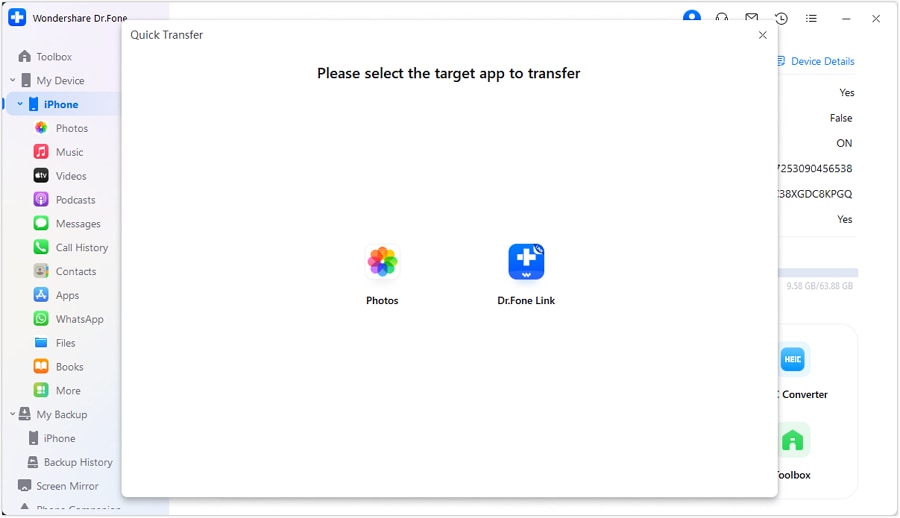
Step 3. Choose the Target App to Transfer Your Data
When prompted, Dr.Fone Basic will ask you to choose a target application to store specific data types. Next, choose “Dr.Fone Link” if you use Android or select the desired option for iPhone, and proceed with the transfer.
Step 4. Successfully Migrate Your Data from PC to Mobile
Upon finishing the task, click the "i" icon to check where the data is stored, along with the file location details.

Ultimate Guide Transfer Your Important Data From Mobile to PC
Step 1. Open Dr.Fone Basic to Export Your Data to the Computer
After launching this tool and connecting your mobile to the computer, click the “Export All Data” option from the main interface.
Step 2. Choose the Data to Export to Your PC
Select the desired file types for export and then initiate the process by clicking the “Export” button. Subsequently, specify the device destination for storing the exported data.

Step 3. Add a Password to Enable Backup on Your Phone
In case you are doing this task on an iPhone, you have to create and confirm an encrypted password for the backup. After that, just hit the “Verify” button in order to continue.

Step 4. Successfully Export Your Data from Mobile to PC
The software will now start transferring data from your phone to the computer. Once the export is complete, click the “Open in Folder” button to view the saved files in the selected location.

Conclusion
To conclude, the Skype Teams transition marks a significant shift in business communication by offering advanced collaboration tools. We have explored several aspects of this transition and noticed that Teams provides better integration and efficiency. Users can sync both platforms temporarily, but migration is inevitable. Plus, if you want to move your important data from any device, we have discovered Dr.Fone Basic to do this task efficiently.
FAQs
Dr.Fone Basic:
Better Control for Your Phone
Manage, transfer, back up, restore, and mirror your device


Xiaomi Topics Series
- Xiaomi Screen & FRP Unlock
- 1. Unlock Xiaomi Bootloader
- 2. Mi Account Unlock Tools
- 3. Redmi Note 8 FRP Unlock Tool
- 4. Redmi Note 9 FRP Bypass Tool
- 5. Redmi 9A FRP Bypass
- 6. Remove FRP on Xiaomi/Redmi
- Xiaomi Repair
- Xiaomi Recover
- Xiaomi Reset
- Xiaomi Tips & News
- 1. Xiaomi HyperOS 3.0
- 2. Screen Mirror Xiaomi to PC
- 3. Run Hardware Tests on Xiaomi
- 4. Conduct battery test on Xiaomi
- 5. How Do I Obtain the Security Code Xiaomi
- 6. DND Mode Xiaomi
- Xiaomi Transfer & Backup
- ● Manage/transfer/recover data
- ● Unlock screen/activate/FRP lock
- ● Fix most iOS and Android issues
- Free Download Free Download Free Download


Daisy Raines
staff Editor