 Effortlessly manage data through preview, delete, export, etc.

 100% Security Verified | No Subscription Required | No Malware

 :
: 
 ChatGPT
 Perplexity
 Gemini
 Claude
 Grok
Grok
Moving videos from a PC to an iPhone can often feel cumbersome, especially when dealing with iTunes. Many users find iTunes to be slow, overly complex, and restrictive. It can consume significant system resources, struggles with certain video formats, and sometimes fails to support the newest iPhone models. These limitations are why so many people are searching for simpler, more direct ways to send videos from a PC to an iPhone without iTunes.
This guide details seven reliable methods that explain how to send videos from PC to iPhone without launching iTunes. These solutions are designed to work across all major operating systems, including Windows and macOS. Whether you have the latest iPhone 15 or an older model, you'll discover a method that suits your needs, such as the powerful Dr.Fone – Phone Manager. By following our instructions, you'll be able to transfer and watch your favorite videos on your iPhone seamlessly.
In this article
- Part 1. Key Reasons to Avoid iTunes for Video Transfers
- Part 2. Pre-Transfer Checklist for Your Devices
- Part 3. 7 Proven Methods to Send Videos from PC to iPhone Without iTunes
- Method 1: Using Dr.Fone - Phone Manager
- Method 2: Using iCloud Drive
- Method 3: Using Cloud Storage Apps (Google Drive, Dropbox)
- Method 4: Using Email or Messaging Apps
- Method 5: Using an SMB Shared Folder with the Files App
- Method 6: Transferring from Mac to iPhone via USB with Finder
- Method 7: Using AirDrop for Wireless Mac Transfers
- Part 4. Troubleshooting Common Transfer Issues
- Part 5. Conclusion
Part 1. Key Reasons to Avoid iTunes for Video Transfers
Many iPhone users actively seek alternatives to iTunes for transferring videos from their PCs due to its reputation for being slow and unnecessarily complicated. The process often involves multiple confusing steps, leading to a frustrating user experience. Thankfully, modern solutions offer far greater flexibility, superior speed, and enhanced ease of use.
A primary complaint is that iTunes consumes a large amount of system resources, which can slow down both your PC and iPhone during transfers. Furthermore, it has strict limitations on video format compatibility, often requiring you to convert files before you can even begin the transfer. This extra step makes it impractical for anyone needing to move videos from a computer to an iPhone quickly.
Another significant drawback is that iTunes doesn't always integrate smoothly with the latest hardware and software. If you're using an iPhone 15 with iOS 17, you might encounter unexpected synchronization errors. Similarly, users on Windows 11 can face installation problems or connectivity issues that prevent their devices from being recognized.
Part 2. Pre-Transfer Checklist for Your Devices
Before you can send videos from your PC to your iPhone without iTunes, it's crucial to prepare both devices. Ensuring compatibility and installing the right tools will help make the transfer process smooth and trouble-free. Here's what you need to check.
PC System Requirements
Your computer must meet a few basic requirements for a successful video transfer. For Windows users, it is recommended to have Windows 10 or Windows 11 fully updated. Mac users should be running a recent version of macOS to ensure maximum compatibility with their iPhone. Depending on the method you choose, you may need software like Dr. Fone – Phone Manager or a modern web browser for cloud-based services. If using a USB cable, ensure your computer's drivers are up to date so it can properly recognize your iPhone.
iPhone Preparation Steps
For optimal performance, your iPhone should be updated to at least iOS 15, although the latest version is always recommended. This is particularly important for newer models like the iPhone 15 running iOS 17. You'll also need to install any necessary apps for your chosen transfer method. Apps like Dr.Fone, Google Drive, or Dropbox are excellent iTunes alternatives and should be downloaded from the App Store before you begin.
Important Video File Considerations
iPhones are selective about the video formats they can play natively. The most compatible formats are MP4, MOV, and M4V. If your videos are in a different format, such as AVI or MKV, you may need to convert them first using a tool like VLC Media Player. Additionally, be mindful of file size. Transferring large, uncompressed videos over Wi-Fi can be slow. If you're using a USB transfer, check that you have enough free storage on your iPhone to accommodate the files.
Part 3. 7 Proven Methods to Send Videos from PC to iPhone Without iTunes
Several effective and user-friendly methods make it easy to transfer videos from your PC to your iPhone without iTunes. These alternatives offer more convenience and flexibility. Let's explore the best ways to get your videos onto your device.
Method 1: Using Dr.Fone - Phone Manager
A. Overview of Dr.Fone – Phone Manager
The Dr.Fone – Phone Manager is a comprehensive tool designed to transfer videos and other files from your PC to your iPhone effortlessly. It offers a clean, intuitive interface and powerful features that streamline media management, breaking free from the limitations imposed by iTunes. It ensures fast, secure, and reliable file exchanges.
- Simplifies data import, export, and management.
- Allows drag-and-drop functionality for transferring files to iOS apps.
- Facilitates the transfer of iCloud data to your iOS device or computer.
- Syncs iOS media like music and videos with your PC seamlessly.
- Operates independently, requiring no iTunes or iCloud installation.
B. Using the Desktop Version
For a stable and fast transfer, the desktop version of Dr.Fone – Phone Manager is the ideal choice. It guides you through a simple process to move videos between your PC and iPhone.
-
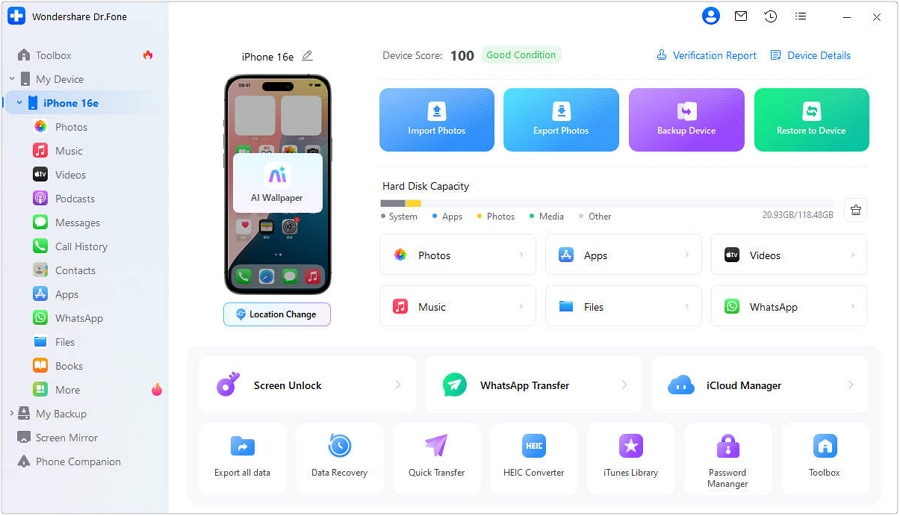
Step 1 Launch Dr.Fone and Connect Your iPhone
Open Dr.Fone - Phone Manager on your computer and connect your iPhone using a USB cable. Once the software recognizes your device, select the "Quick Transfer" option.
-
Step 2 Select Videos for Transfer
Click the "Select Files" button to browse for the videos you want to transfer. You can also drag and drop the files directly into the application's interface for convenience.

-
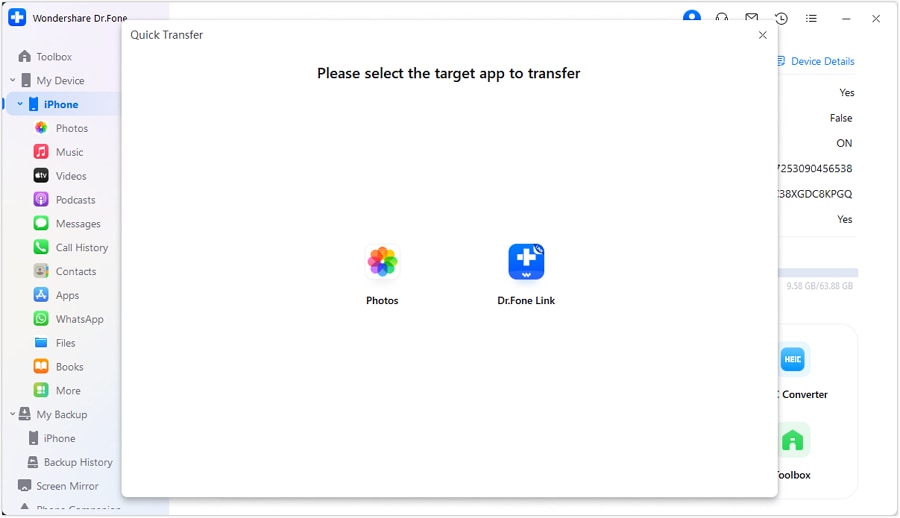
Step 3 Choose the Target App on Your iPhone
After selecting your files, Dr.Fone will prompt you to choose a destination app on your iPhone to store the videos. Options may include Photos, VLC, iVideo, or other compatible applications. The transfer will begin once you make your selection.
-
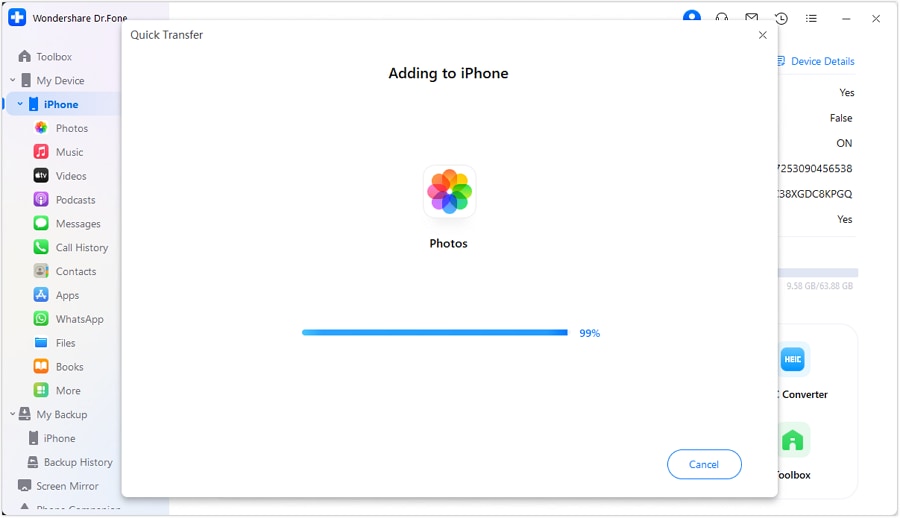
Step 4 Monitor and Complete the Transfer
A progress bar will appear, showing the status of the transfer. You can click "Cancel" at any time to stop it. Once finished, you can click the "i" icon to see the exact location of the transferred videos on your iPhone.




C. Using the Dr.Fone App for Wireless Transfer
The Dr.Fone App provides a convenient, wireless method for transferring videos between your PC and iPhone. This approach eliminates the need for USB cables, making file sharing incredibly simple. Whether you're moving videos for editing, backup, or sharing, the Dr.Fone app ensures a smooth transfer without compromising quality.
- Wireless Freedom: No cables or hardware needed for a simple setup.
- Broad Compatibility: Works with a wide range of iOS devices, including the newest iPhone models.
- User-Friendly: The intuitive interface makes navigation and transfers straightforward for everyone.
- Secure and Lossless: Transfers are secure, ensuring no compression or data loss occurs.
Method 2: Using iCloud Drive
For users in the Apple ecosystem, iCloud Drive is a natural choice. This built-in cloud storage service allows for effortless file synchronization across your devices. Follow these steps to send videos from your PC to your iPhone:
-
Step 1 Install iCloud for Windows
Download and install the iCloud for Windows application from the Microsoft Store on your PC.
-
Step 2 Sign In with Your Apple ID
Launch the application and sign in using the same Apple ID that you use on your iPhone.
-
Step 3 Upload Your Videos
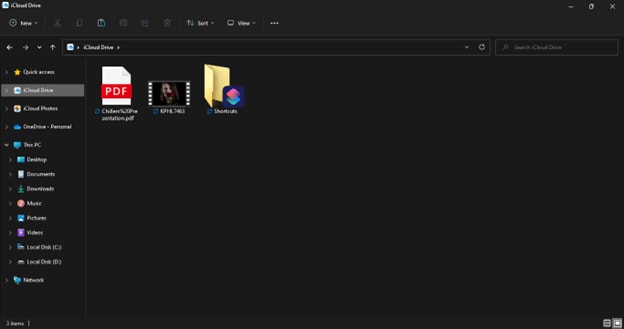
On your PC, open the iCloud Drive folder. Drag and drop the videos you want to transfer into this folder.
-
Step 4 Access on Your iPhone
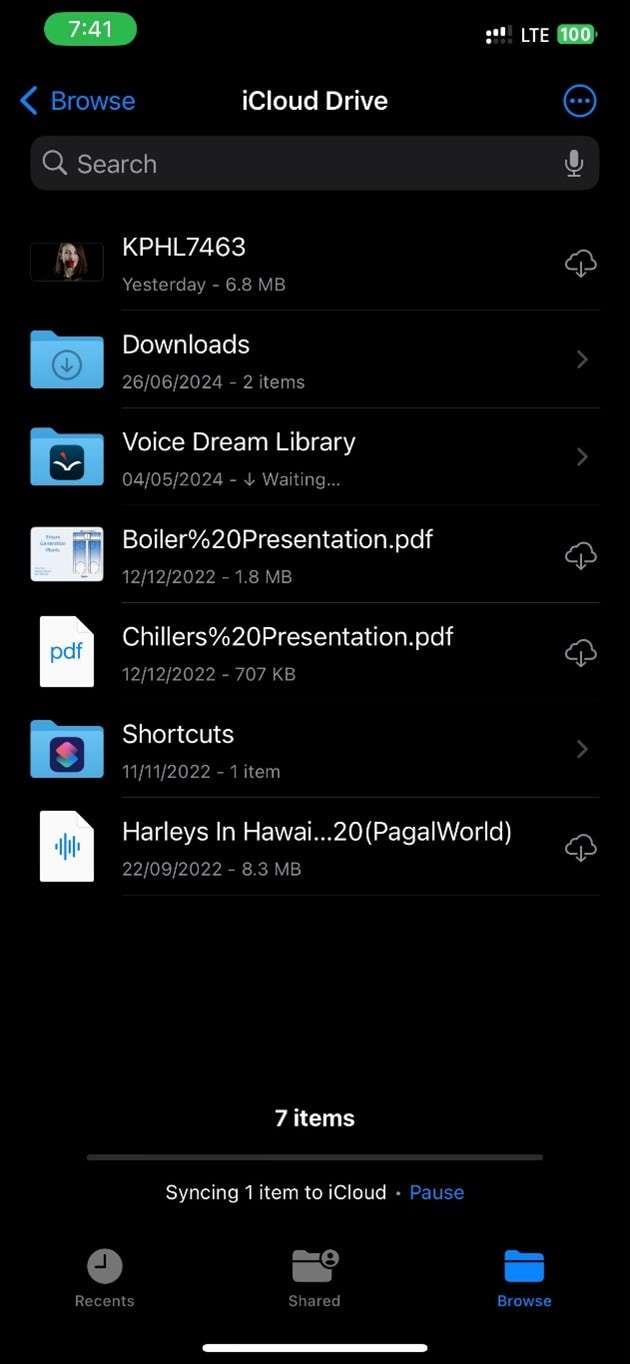
The files will automatically sync to iCloud. Open the Files app on your iPhone, navigate to iCloud Drive, and you will find your videos ready to be downloaded and viewed.
This method is entirely wireless and automatic, but keep in mind that you need sufficient iCloud storage space, as large video files can quickly fill up the free 5GB allowance.
Method 3: Using Cloud Storage Apps (Google Drive, Dropbox)
Third-party cloud storage services like Google Drive and Dropbox are excellent alternatives for transferring videos from a PC to an iPhone without iTunes. They allow you to upload files from one device and access them on another seamlessly.
Using Google Drive
Google Drive offers a simple, wireless way to share videos. Here’s how:
-
Step 1 Open Google Drive on PC
On your PC's web browser, navigate to the Google Drive website and sign in to your Google account.
-
Step 2 Upload the Video
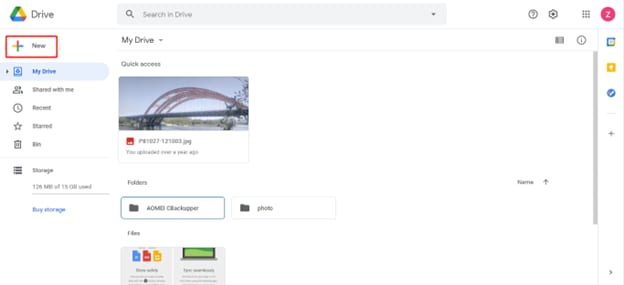
Click on "New" and then select "File upload" to choose the videos you want to transfer from your computer.
-
Step 3 Access on iPhone
Once the upload is complete, open the Google Drive app on your iPhone. Your uploaded videos will be visible and available for download.
Using Dropbox
Dropbox functions similarly to Google Drive and is another popular choice for file transfers.
-
Step 1 Log in to Dropbox
On your PC, go to the Dropbox website and log in. Install the Dropbox app on your iPhone from the App Store.
-
Step 2 Upload Files
Click the "Upload" button on the Dropbox website and select the video files from your PC.

-
Step 3 View on iPhone
After the upload finishes, open the Dropbox app on your iPhone to access and save the videos.
Method 4: Using Email or Messaging Apps
For small video files, email is one of the simplest ways to send them from your PC to your iPhone. This method requires no extra app installations but is limited by attachment size restrictions (usually around 25MB).
-
Step 1 Compose a New Email
Open your preferred email client on your PC and start a new message addressed to yourself.
-
Step 2 Attach and Send the Video
Attach the video file to the email. Ensure it does not exceed your email provider's size limit, then send the email.

-
Step 3 Download on Your iPhone
Open the Mail app on your iPhone, find the email you just sent, and download the video attachment directly to your device.
Method 5: Using an SMB Shared Folder with the Files App
Server Message Block (SMB) is a network protocol that allows you to share files wirelessly between a PC and an iPhone. This method involves creating a shared folder on your PC that you can access from your iPhone's Files app. It requires iOS 13 or later.
-
Step 1 Find Your PC's IP Address
On your PC, open the Command Prompt (type 'cmd' in the Start menu). Type ipconfig and press Enter. Note down the IPv4 Address.
-
Step 2 Create and Share a Folder
Create a new folder on your PC desktop. Right-click it, go to "Properties" > "Sharing" > "Advanced Sharing." Check "Share this folder," then click "Permissions." Grant "Full Control" to Everyone, then click "Apply" and "OK."

-
Step 3 Connect from Your iPhone
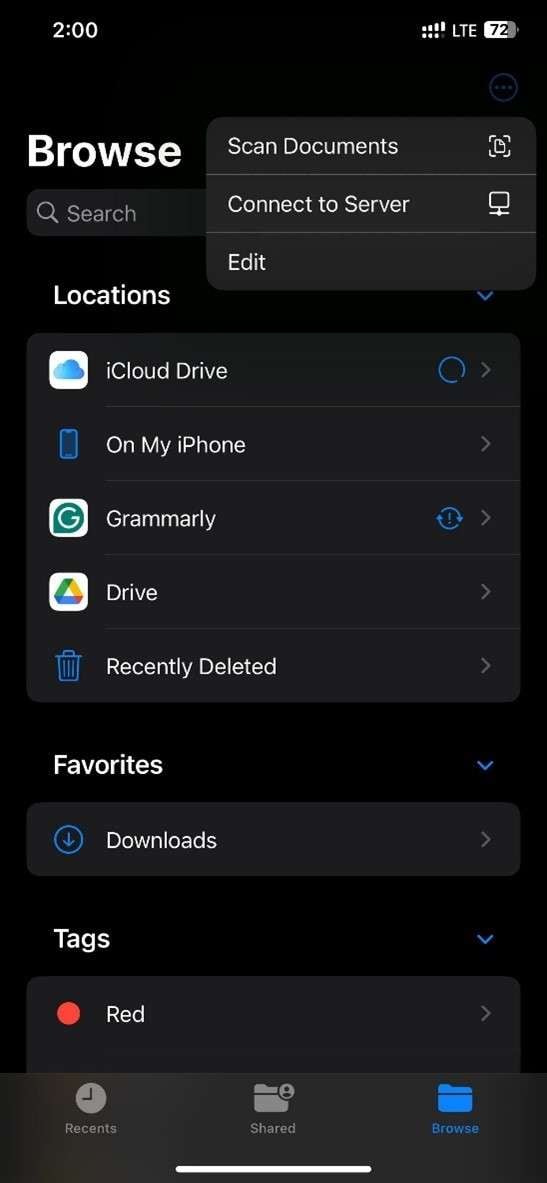
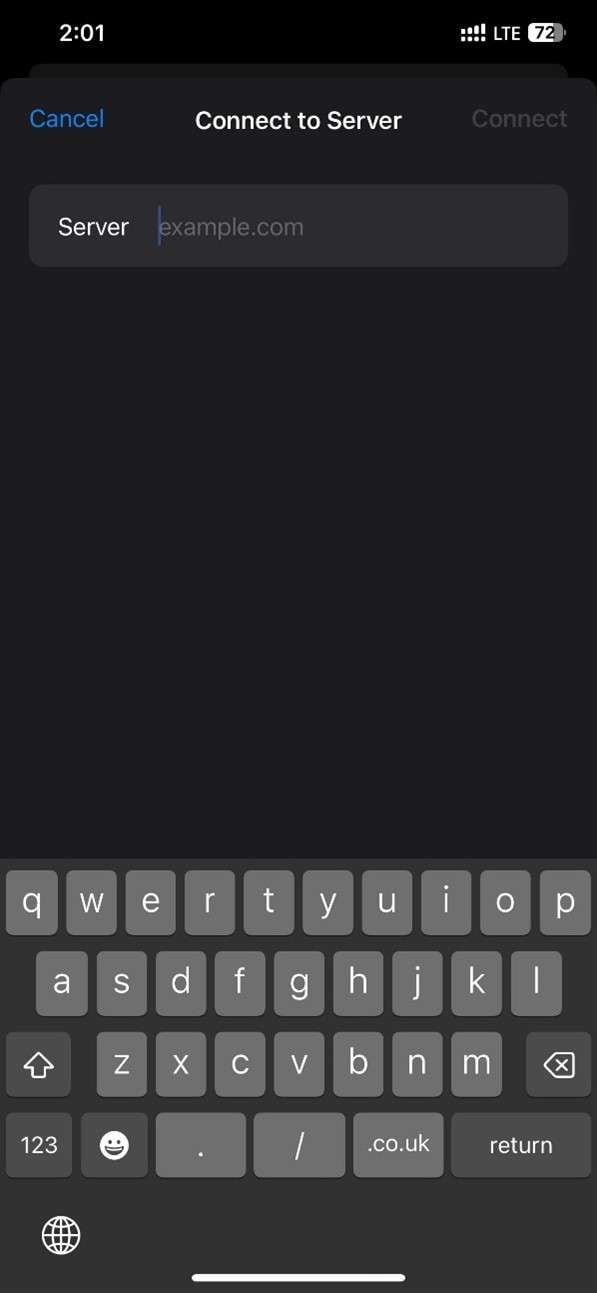
Open the Files app on your iPhone. Tap the three-dots icon at the top, and select "Connect to Server."
-
Step 4 Enter Server Details
In the server address field, type smb://YourIPAddress (using the IP from Step 1). Select "Registered User," enter your PC's username and password, and tap "Next" to connect. You can now access the shared folder.
Method 6: Transferring from Mac to iPhone via USB with Finder
For Mac users with macOS Mojave or a later version, Finder has replaced iTunes for device syncing. This allows for a direct and seamless way to transfer videos to your iPhone with a USB cable.
-
Step 1 Connect iPhone to Mac
Connect your iPhone to your Mac using a USB cable. If prompted on your iPhone, tap "Trust" and enter your passcode.
-
Step 2 Open Finder
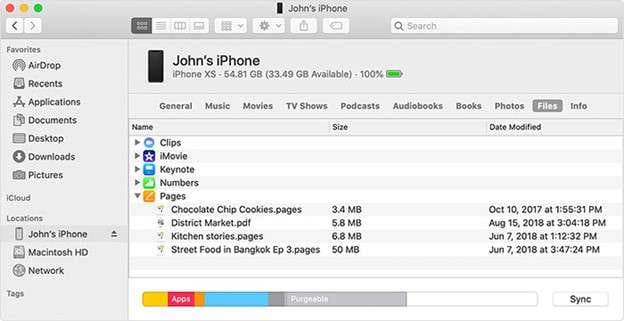
Launch Finder and select your iPhone from the locations sidebar.
-
Step 3 Transfer Videos
Navigate to the "Files" tab. You will see a list of apps that support file sharing. Simply drag and drop your video files from your Mac directly into the desired app's folder.
-
Step 4 Access Files on iPhone
Once the transfer is complete, open the corresponding app on your iPhone to access your videos.
This method provides a quick, wired transfer without needing iTunes. For a wireless solution on a Mac, consider using AirDrop.
Method 7: Using AirDrop for Wireless Mac Transfers
AirDrop is Apple's proprietary wireless transfer technology, making it an excellent choice for moving files between a Mac and an iPhone. It's fast, secure, and incredibly convenient, but it only works between Apple devices.
To use AirDrop, make sure both your Mac and iPhone have Wi-Fi and Bluetooth turned on and are on the same network.
-
Step 1 Select the File on Your Mac
Locate the video file you wish to transfer on your Mac.
-
Step 2 Share via AirDrop
Right-click the file, select "Share" > "AirDrop," and choose your iPhone from the list of available devices.
-
Step 3 Accept on Your iPhone
A notification will appear on your iPhone. Tap "Accept" to begin the transfer.
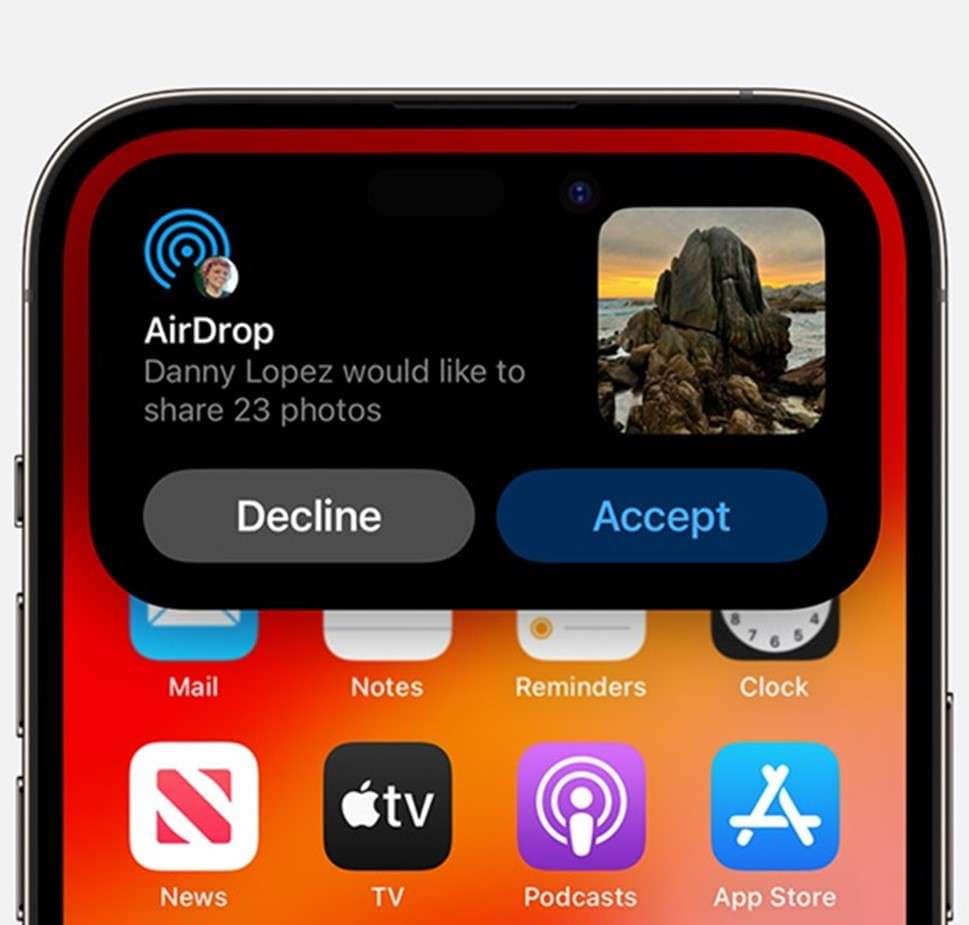
The video will be sent instantly and saved to your Photos app. If you don't have a Mac, you'll need to use one of the other methods like cloud storage or third-party transfer apps.
Part 4. Troubleshooting Common Transfer Issues
Even with simple methods, you might encounter issues when transferring videos from a PC to an iPhone. Here are solutions to some common problems.
A. iPhone Not Detected by Computer
If your computer doesn't recognize your iPhone, try these steps:
- Check Your Cable and Ports: Use an official Apple or MFi-certified USB cable. Try a different USB port on your computer, as the current one may be faulty.
- Trust the Computer: When you connect your iPhone, it should display a prompt asking if you trust the computer. Make sure to tap "Trust."
- Restart Both Devices: A simple restart of both your iPhone and PC can often resolve connectivity issues.
- Update Drivers: Ensure your computer's operating system and any relevant device drivers are fully updated.
B. Transferred Videos Are Not Playing
If a video you transferred won't play on your iPhone, consider the following:
- Check File Format: iPhones natively support MP4, MOV, and M4V formats. If your video is in a format like MKV or AVI, it won't play in the default Photos app.
- Use a Different Video Player: Install a versatile media player app like VLC from the App Store, which can handle a much wider range of video formats.
C. iCloud Syncing Is Slow or Stuck
If your videos aren't appearing in iCloud Drive, try these fixes:
- Verify Internet Connection: Ensure both your PC and iPhone are connected to a stable, high-speed Wi-Fi network.
- Force a Refresh: On your iPhone, open the Files app, navigate to iCloud Drive, and pull down from the top of the screen to manually refresh and trigger a sync.
D. Security and Privacy Considerations
Keeping your data safe during transfers is vital:
- Use Secure Networks: When transferring files wirelessly, especially with methods like SMB or AirDrop, make sure you are on a trusted and secure Wi-Fi network to prevent unauthorized access.
- Avoid Public Computers: Refrain from transferring personal videos using public or shared computers, as your data could be compromised.
Conclusion
Transferring videos from your PC to your iPhone no longer requires you to use the often-frustrating iTunes. With a variety of methods available, including wireless transfers, USB connections, and cloud storage, you can choose the option that offers the best flexibility, speed, and convenience for your needs. By moving beyond iTunes, you eliminate its limitations and enjoy a much smoother experience. Among the available tools, Dr.Fone – Phone Manager stands out as a highly reliable and efficient solution, offering seamless transfers, broad device compatibility, and a user-friendly interface. Select the right method, and you'll be able to move and enjoy your videos on your iPhone without any hassle.
FAQ
-
1. What is the fastest way to transfer a large video from a PC to an iPhone?
For large video files (over 1GB), the fastest and most reliable method is typically a direct USB connection using a tool like Dr.Fone - Phone Manager or Finder on a Mac. This avoids potential slowdowns and interruptions that can occur with wireless or cloud-based transfers. -
2. Can I transfer videos from a Windows PC to an iPhone without any software?
Yes. You can use cloud-based services like iCloud Drive, Google Drive, or Dropbox. You simply upload the video to the service via a web browser on your PC and then download it to your iPhone using the respective app. For smaller files, email is also a software-free option. -
3. Do these transfer methods reduce video quality?
Most of the methods discussed, including Dr.Fone, USB transfers via Finder, and cloud storage services, do not compress or reduce the quality of your video file. They transfer the original file as-is. The only exception might be some messaging apps that automatically compress videos to save data. -
4. Why can't I play the video I transferred to my iPhone?
This is almost always due to an unsupported video format. iPhones natively support MP4, MOV, and M4V files. If your video is in a format like AVI, MKV, or WMV, you will need to either convert it to a compatible format on your PC before transferring or use a third-party media player app on your iPhone, such as VLC, which can play almost any video file.
 Add Wondershare Dr.Fone as a preferred source on Google



