4 Best Ways to Transfer Files from iPhone to PC

May 18, 2026 • Filed to: Device Data Management • Proven solutions
 TL;DR:
Transferring files from an iPhone to a PC relies on iTunes for iOS 4 or higher devices, Windows AutoPlay for direct USB media imports, the iCloud Control Panel for wireless access, or third-party alternatives like Dr.Fone - Phone Manager (iOS) for selective data management.
● The iCloud Control Panel method requires enabling "Download and Keep Originals" in your iPhone settings to successfully route media into the Windows iCloud Photos directory.
● Windows AutoPlay exclusively imports pictures and videos via a USB connection, which requires manual cable or port troubleshooting if the import prompt fails to trigger automatically.
● Dr.Fone - Phone Manager (iOS) bypasses iTunes to export broader data types like SMS, contacts, music, and apps to custom save paths, supporting devices running iOS 7 through iOS 13 on both Windows and Mac.
Ask AI for a summary
 ChatGPT
 Perplexity
 Gemini
 Claude
 Grok
Grok
Dr.Fone Basic:
Better Control for Your Phone
Manage, transfer, back up, restore, and mirror your device
If you are using an iPhone, you get a host of beautiful functions and features. However, it is always suggested to keep a backup of all the data of your iPhone into your PC, just in case of some emergencies. In this article, we are going to show you the various ways of transferring the files from the iPhone to the PC with and without using iTunes, from music to photos, and other documents, to your PC.
Part 1: How to transfer files from iPhone to PC using iTunes?
If you own an iPod touch, iPad, or an iPhone with iOS 4 or above, the best method by which you would be able to transfer files, such as photos from iPhone to PC is by using iTunes which involves some of the steps which aid in sharing of the files.
You will be needed to do this in case you wish to save the files that you have created on your iOS devices on your PC, or extract the files from the device. You can access them on the PC without any restriction, even if the devices are not with you.
Step 1: You should have the updated version of iTunes. Just click and open iTunes on your computer.
Step 2: Now, you should connect the iPhone to the PC by using the USB cable.
Step 3: On the left side of the window, you can see the icon in the mobile picture. Click the Device icon.

Step 4: Once If you click it, you will be directed to the next window, which displays many options on the left side. Choose the option “Photo” from that.

Step 5: If you didn’t synchronize the photos, then click the button “sync”. If the photos are already in your iCloud library, then you have already synchronized it. So no need of synchronization needed.
Step 6: If you are going to synchronize the photos, then you need to select the folder to save all your photos. If you have folders & subfolders to synchronize, then subfolders will appear first as the album on your device.

Step 7: If you wish to add video, then you can add by clicking include videos. Or else leave it. Tap apply at last – once if you have finished the work.
With the above-mentioned steps, then you can easily transfer files from iPhone to pc. Wasn’t it very simple?
Part 2: How to transfer files from iPhone to PC without iTunes using Dr.Fone?
This is an easier way to transfer data from iPhone to pc. This tool for transferring files from an iPhone can help you to copy files from iPhone to pc, and much more such as transferring pictures between PC and iPhone, transferring or sharing contacts between PC and iPhone is very simple now. Using this one software, you can transfer photos, videos, music, and other different kinds of files to PC.
Dr.Fone - Phone Manager (iOS)
Transfer Files from iPhone to PC without iTunes
- Transfer, manage, export/import your music, photos, videos, contacts, SMS, Apps, etc.
- Backup your music, photos, videos, contacts, SMS, Apps, etc. to computer and restore them easily.
- Transfer music, photos, videos, contacts, messages, etc. from one smartphone to another.
- Transfer media files between iOS devices and iTunes.
- Fully compatible with iOS 7, iOS 8, iOS 9, iOS 10, iOS 11, iOS 12, iOS 13and iPod.


Now let us move to the step by step process of the transfer procedure. Here we go:
Step 1: First of all, download then install Dr.Fone on your system. Run the program normally, and choose the option called "Phone Manager" from the main page.

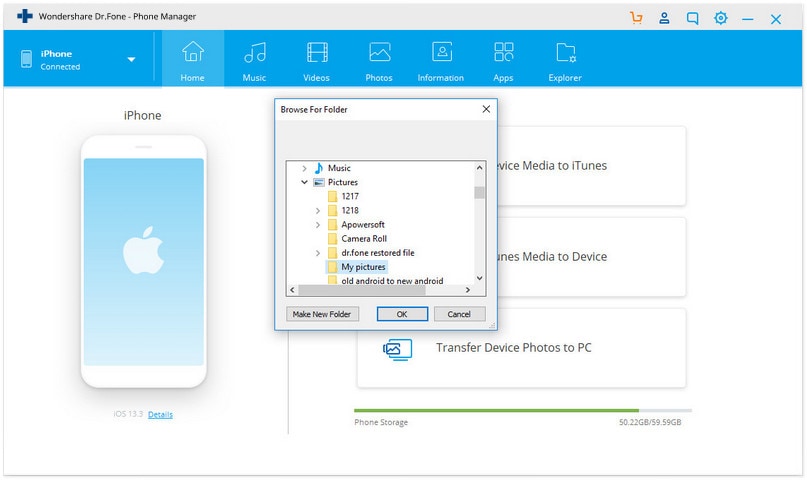
Step 2: Using a USB cable, connect the iPhone to your PC. Now, you will be displayed with the three options. Choose “Transfer device photos to PC.

In this way, you can transfer all photos on iPhone to PC directly. Browse the folder on your computer to save your iPhone photos.
Step 3: You can also transfer photos, videos, music, and other files to your PC using other tabs besides the Home tab, such as Music, Videos, Photos, information, Apps, etc..
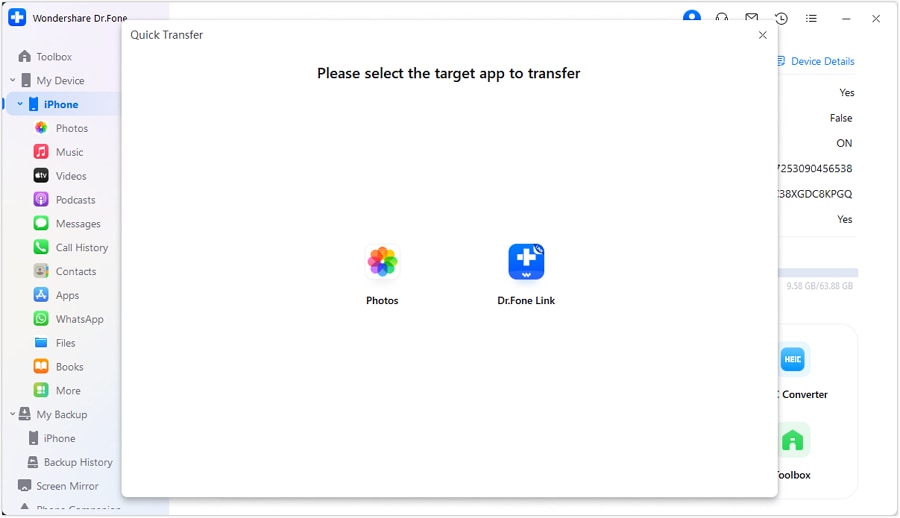
Step 4. Then choose the music, photos, or videos you need and click the Export button to transfer them from iPhone to PC.
![]()
Click Export to PC and customize the save path for the iPhone files and save them on your computer.
![]()
Part 3: How to transfer files from iPhone to PC via iCloud?
Except for the two methods above, we can also use the iCloud control panel to access and download iPhone files to PC.
Step 1. Download the iCloud control panel from Apple official website to your PC. Launch the iCloud control panel and log in to your iCloud account.
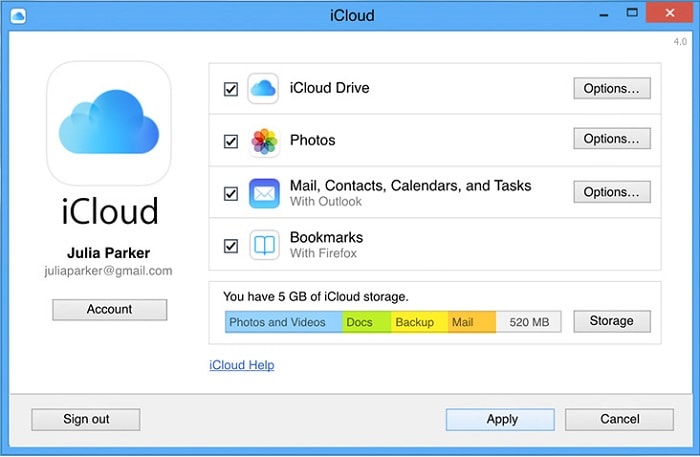
Step 2. To be able to access photos, videos using the iCloud control panel, tap Settings > iCloud > Photos on your iPhone, then choose Download and Keep Originals and import the photos to your computer.
Step 3: The uploaded photos will be saved in This PC > iCloud Photos folder on your Windows computer. Click the download icon or choose Download Document from the Action drop-down. The document will get downloaded to the default download location on your device.

Part 4: How to transfer files from iPhone to PC using Windows AutoPlay?
Following is the process to transfer data from iPhone to pc with the help of Windows AutoPlay.
Step 1. Connect your device with the USB cable to your PC.
Step 2. The autoplay PC will appear immediately and select “Import pictures and videos” option. This process will be very easier to transfer files from iPhone to PC.

Step 3. Click on "More Option" to select the folders where you wish to import the pictures and videos on your iPhone. You can create a folder for Pictures. Now Click on “OK” and then on “Next”.
After setting up the functions, you can import the video or music by clicking the import button. You can select the set of photos or videos that you wish to import and press the Import button.

While connecting your iPhone to the PC, if the AutoPlay doesn’t appear, or your iPhone photos do not appear on your system, you can attempt to fix it with some basic methods, like disconnecting and reconnecting the iPhone, change the USB cable or port, restart the computer, etc.
In the above article, we have told you about the various methods of transfer files from iPhone to pc. We assure you the process to learn how to transfer files from iPhone to pc is very easy to simplify.
Dr.Fone Basic:
Better Control for Your Phone
Manage, transfer, back up, restore, and mirror your device


iPhone Data & Files
- iPhone File Managers
- 1. iPhone File Browsers
- 2. iPhone File Explorers
- 3. iPhone File Managers
- 4. Apps to Transfer File Wirelessly
- Transfer iPhone Files
- 1. Send Large Files For Free
- 2. Transfer File from iPhone to Laptop
- 3. Transfer Files from iPhone to Mac
- 4. Transfer Files from iPhone to PC
- 5. Transfer Files from Mac to iPhone
- 6. Transfer Files from PC to iPhone
- 7. Print Text Messages from iPhone
- 8. Transfer Files Over WiFi
- 9. iPhone File Transfer Without iTunes
- 10. Access iPhone Files Using a PC
- 11. Export Notes from iPhone to PC/Mac
- 12. Save iPhone Text Messages to Computer
- iPhone Manage Tools
- 1. iPhone Transfer Tools
- 2. Manage Apps On iPhone
- 3. Security Apps for iPhone
- 4. Call Forwarding Apps
- 5. iPhone Tracking Apps
- Manage iPhone Apps
- 1. Change Viber Number
- 2. iPhone Calls Apps
- 3. Block People in Facebook
- 4. Monitor Snapchat on iPhone
- 5. Snapchat Saver Apps
- Sync iPhone Data
- 1. Sync Notes from iPhone to Mac
- 2. Ford Sync iPhone
- 3. Sync iCal with iPhone
- 4. iPhone Calendar Not Syncing
- 5. Sync iTunes Library to iPhone
- 6. Unsync iPhone from Computer
- 7. Sync iPhone with Multiple Computers
- More iPhone File Tips
- ● Manage/transfer/recover data
- ● Unlock screen/activate/FRP lock
- ● Fix most iOS and Android issues
- Free Download Free Download Free Download


Daisy Raines
staff Editor